Armos: Difference between revisions
mNo edit summary |
|||
| (112 intermediate revisions by 18 users not shown) | |||
| Line 1: | Line 1: | ||
{{ | {{Infobox|enemy | ||
| | | image = [[File:Armos-Medium.png|200px]] | ||
|image = [[File:Armos- | | caption = Artwork from ''[[The Legend of Zelda: Skyward Sword|Skyward Sword]]'' | ||
|game = | | attack = | ||
''[[ | '''''Link's Awakening'''''<br/>{{H|2}} Contact | ||
| | '''''Ocarina of Time'''''<br/>{{H|.5}} Contact<br/>{{H|.5}} Explosion | ||
'''''Oracle of Seasons'''''<br/>{{H|1}} Contact | |||
'''''Oracle of Ages'''''<br/>{{H|1}} Contact | |||
'''''The Wind Waker'''''<br/>{{H|.25}} Contact | |||
'''''Skyward Sword'''''<br/>{{H|1}} Contact | |||
| weapon = | |||
'''''Link's Awakening'''''<br/>[[Boomerang]] - 2 hits<br/>[[Bomb]]s - 1 hit<br/>[[Bow]] - 1 hit<br/>[[Hookshot]] - Freezes | |||
'''''Oracle of Seasons'''''<br/><small>'''Blue Armos'''</small><br/>[[Sword]] - 3 hits<br/>[[Bomb]]s - 2 hits<br/><small>'''Red Armos'''</small><br/>[[Bomb]]s - 1 hit<br/>[[Magical Boomerang]] - 2 hits | |||
'''''Oracle of Ages'''''<br/>[[Bomb]]s - 1 hit | |||
'''''The Wind Waker'''''<br/>[[Hero's Sword]] - 2 hits<br/>[[Master Sword]] - 1 hit<br/>[[Skull Hammer]] - 1 hit<br/>[[Bomb]]s - 1 hit<br/>[[Hookshot]] - 2 hits<br/>[[Arrow]] - 1 hit<br/>[[Fire Arrow]] - 1 hit<br/>[[Ice Arrow]] - 1 hit<br/>[[Light Arrow]] - 1 hit | |||
'''''Skyward Sword'''''<br/>[[Bomb]]s - 1 hit<br/>[[Sword]] - 1 hit | |||
'''In General'''<br/>[[Sword]]<br/>[[Gust Bellows]]<br/>[[Bomb]] | |||
| game = | |||
''[[The Legend of Zelda]]'' | |||
''[[The Legend of Zelda: A Link to the Past|A Link to the Past]]'' | |||
''[[The Legend of Zelda: Link's Awakening|Link's Awakening]]'' | |||
''[[The Legend of Zelda: Ocarina of Time|Ocarina of Time]]'' | |||
''[[The Legend of Zelda: Majora's Mask|Majora's Mask]]'' | |||
''[[The Legend of Zelda: Oracle of Seasons|Oracle of Seasons]]'' | |||
''[[The Legend of Zelda: Oracle of Ages|Oracle of Ages]]'' | |||
''[[The Legend of Zelda: The Wind Waker|The Wind Waker]]'' | |||
''[[The Legend of Zelda: Four Swords Adventures|Four Swords Adventures]]'' | |||
''[[The Legend of Zelda: The Minish Cap|The Minish Cap]]'' | |||
''[[The Legend of Zelda: Twilight Princess|Twiight Princess]]'' | |||
''[[The Legend of Zelda: Phantom Hourglass|Phantom Hourglass]]'' | |||
''[[The Legend of Zelda: Spirit Tracks|Spirit Tracks]]'' | |||
''[[The Legend of Zelda: Skyward Sword|Skyward Sword]]'' | |||
''[[The Legend of Zelda: A Link Between Worlds|A Link Between Worlds]]'' | |||
''[[Link: The Faces of Evil|The Faces of Evil]]'' | |||
''[[Zelda: The Wand of Gamelon|The Wand of Gamelon]]'' | |||
| location = | |||
'''''The Legend of Zelda'''''<br/>[[Hyrule]] | |||
'''''A Link to the Past'''''<br/>[[Eastern Palace Compound]] | |||
'''''Link's Awakening'''''<br/>[[Face Shrine]] | |||
'''''Ocarina of Time'''''<br/>[[Dodongo's Cavern]]<br/>[[Spirit Temple (Ocarina of Time)|Spirit Temple]] | |||
'''''Majora's Mask'''''<br/>[[Stone Tower Temple]] | |||
'''''The Wind Waker'''''<br/>[[Tower of the Gods]]<br/>[[Wind Temple (The Wind Waker)|Wind Temple]]<br/>[[Savage Labyrinth]] | |||
'''''Four Swords Adventures''''' | |||
'''''The Minish Cap'''''<br/>[[Wind Ruins]]<br/>[[Fortress of Winds]] | |||
'''''Twilight Princess'''''<br/>[[Temple of Time (Dungeon)|Temple of Time]]<br/>[[Cave of Ordeals]] | |||
'''''Phantom Hourglass'''''<br/>[[Goron Temple]] | |||
'''''Spirit Tracks'''''<br/>[[Tower of Spirits]] | |||
'''''Skyward Sword'''''<br/>[[Lanayru Mining Facility]]<br/>[[Pirate Stronghold]]<br/>[[Sandship]] | |||
'''''A Link Between Worlds'''''<br/>[[Eastern Palace (A Link Between Worlds)|Eastern Palace]]<br/>[[House of Gales]] | |||
'''''The Wand of Gamelon'''''<br/>[[Tykogi Tower]]<br/>[[Dodomai Palace]] | |||
| threat = 7 | |||
}} | }} | ||
Armos are | '''Armos''', or '''Armos Statues''', are recurring enemies in [[The Legend of Zelda (Series)|''The Legend of Zelda'' series]].{{Ref|''[[The Legend of Zelda: Encyclopedia]]'', pg. 163}} They are living statues that come to life upon contact and appear in every game in the series except ''[[Zelda II: The Adventure of Link|The Adventure of Link]]'' and ''[[The Legend of Zelda: Four Swords|Four Swords]]''. | ||
== | ==''The Legend of Zelda''== | ||
Armos are found throughout [[Hyrule]]. They are immobile and harmless at first, but when [[Link (The Legend of Zelda)|Link]] makes contact with them, they come to life and start moving around at one of two speeds. If Link touches one from the front, he will immediately take half a heart of damage. They take three hits from the [[Sword (The Legend of Zelda)|original Sword]], two hits from the [[White Sword]] or one hit from the [[Magical Sword]] to be defeated. One bomb will also destroy them, and they are also vulnerable to arrows, the [[Candle]] and the [[Magical Rod]]. | |||
Link can often find secrets such as stairs and items beneath these statues. These can only be accessed by touching the Armos so it moves away from the spot it is guarding. Some Armos guard [[Item Shop]]s, while one guards the [[Power Bracelet]]. | |||
== | ==''A Link to the Past''== | ||
[[File:Armos-Sprite-1.png|left]] | |||
Armos are statue enemies that reside in the ruins outside the [[Eastern Palace (A Link to the Past)|Eastern Palace]]. They look like normal statues until [[Link (A Link to the Past)|Link]] makes contact with them, after which they will hop after Link. A good few hits from the sword should take care of them, but it is still preferred to remain cautious with them. These enemies are similar to the six [[Armos Knight (A Link to the Past)|Armos Knights]] that Link will fight in the Eastern Palace. | |||
{{clear|left}} | |||
==''Link's Awakening''== | |||
If [[Link (A Link to the Past)#Link's Awakening|Link]] touches an Armos, they will randomly move around the room. If they touch Link, he will lose two hearts. They can be found in the overworld. Two ways to defeat them (because the sword does no damage) is to attack them with a bomb or shoot them with the [[Hookshot]] and place a bomb nearby. | |||
==''Ocarina of Time''== | |||
{{Float|left|{{Navi}}}} | |||
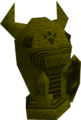
Armos appear as brown, rounded monstrous statues with a pair of orange curved horns and a smaller pair of short black horns on their head, a pair of red eyes, a wide nose and a patch of grey stone with a zigzag-esque pattern running through on its face, a grey, segmented column-like body and a pair of hands wielding a sword and an orange shield. Found within [[Dodongo's Cavern]] and the [[Spirit Temple (Ocarina of Time)|Spirit Temple]], they sit completely still until [[Link (Ocarina of Time)|Link]] touches them, at which point they come to life and start chasing Link. If not defeated fast enough, they will return to their original position and revert into a statue. Upon defeat, they will flash red and jump around before exploding. Making contact with them or being caught in their explosion will deal a half heart of damage. To defeat them, Link must use bombs, [[Deku Nut]]s or, as an Adult, the [[Megaton Hammer]]. | |||
There are statues that resemble an inactive Armos that don't come alive upon contact and are often used for puzzles where they are to be pushed or pulled onto a floor switch. In the Spirit Temple, there is a particular puzzle where Link will need to trigger a live Armos to step over a floor switch to open a doorway. | |||
{{clear|left}} | |||
== | ==''Majora's Mask''== | ||
{{Float|left|{{Tatl}}}} | |||
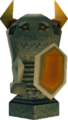
Armos are only found in the [[Stone Tower Temple]] and appear and behave identically to their ''Ocarina of Time'' counterparts. The strategy to defeating them is additionally identical save for an additional weakness to [[Goron Link]]'s punches. | |||
{{clear|left}} | |||
== | ==''Oracle of Seasons'' & ''Oracle of Ages''== | ||
Like other games, | Like other games, Armos come to life by touch, but one difference is that there are two types of them: red and blue. The red ones only come to life when [[Link (Oracle Series)|Link]] activates a switch. They then move around the room. The three ways to defeat them are to place a bomb next to them (which can be difficult), hit them with the Magic Boomerang twice, or simply hit them with [[Biggoron's Sword]], which can only be found with a secret. The blue ones can be harder to defeat because they move really fast and also because they activate whenever Link walks past them. To defeat them, Link must either slash them with the sword three times or by blowing up bombs nearby twice. Both of them can take a single heart away if they touch Link. | ||
== | ==''The Wind Waker''== | ||
In | In ''[[The Legend of Zelda: The Wind Waker|The Wind Waker]]'', Armos work mostly the same way as usual. Instead of bombs, its weakness is a crystal on its back. It can be easier for [[Link (The Wind Waker)|Link]] to attack this weak point once it is stunned in the eye by an arrow. When they are defeated, they jump around like crazy with no direction as a last resort before exploding. | ||
=== | ==''Four Swords Adventures''== | ||
== | ==''The Minish Cap''== | ||
In ''[[The Legend of Zelda: The Minish Cap|The Minish Cap]]'', Armos were built by the [[Minish]] for the [[Wind Tribe]] a long ago, and they can be found in the [[Wind Ruins]]. Like other games, they remain completely still until [[Link (The Minish Cap)|Link]] touches them. Link can either de-activate or activate them while he is in Minish form. This is done by climbing up the steps on the front of the Armos, where there will be a special switch. When de-activated, they will not move at all. To defeat them, Link must activate them and then slash at them with the sword while he is in Human form. | |||
According to [[Swordsman Newsletter]] issue 8, the Armos were the creation of the Minish.{{Unsourced}} | |||
{{Figurine|Armos|Armos_Figurine.gif|Appears in the Wind Ruins. Built by the Minish for the Wind Tribe long ago. They look like stone statues, but if you get too close, they move!}} | |||
Armos | |||
== | ==''Twilight Princess''== | ||
Armos | Found in the [[Temple of Time (Dungeon)|Temple of Time]] and the [[Cave of Ordeals]], Armos will sit completely still until [[Link (Twilight Princess)|Link]] approaches them, at which point they come to life and jump around while swinging their hammers. The crystal on their back is their only weak point. Link can use the [[Hidden Skills#Back Slice|Back Slice]] or smash them with the [[Ancient Statue]]'s hammer while one is controlled with the [[Dominion Rod]]. Three shots to the back from a [[Clawshot]] will also take one down. Upon defeat, they will jump around swinging their hammer wildly before exploding.Being hit by their hammer takes away half a heart. | ||
==See | ==''Phantom Hourglass''== | ||
[[Armos Knight]] | Armos will slowly hop toward [[Link (The Wind Waker)#Phantom Hourglass|Link]]. All Link has to do is toss a bomb at it and it will simply de-activate, allowing Link to push the body on to a switch. Their only attack is contact, which takes away half a heart. | ||
==''Spirit Tracks''== | |||
In ''[[The Legend of Zelda: Spirit Tracks|Spirit Tracks]]'', Armos only appear as a mount for [[Miniblin]]s in the [[Tower of Spirits]]. The actual Armos is invincible, but it disappears once the Miniblin riding it is defeated, which is only possible when [[Link (Spirit Tracks)|Link]] is being carried by [[Zelda (Spirit Tracks)|Zelda]] while she is possessing a Phantom. | |||
==''Skyward Sword''== | |||
{{Fi}} | |||
[[File:Armos-Screen-Large.jpg|right|thumb|[[Link (Skyward Sword)|Link]] fighting an Armos]] Armos are statues found in various areas throughout the [[Lanayru Province]]. To defeat them, [[Link (Skyward Sword)|Link]] must use the Gust Bellows to spin the colored screw on top of their head, opening their mouth. From here, Link can slash the crystal inside their mouth, or place a bomb inside to kill them. | |||
{{clear}} | |||
==Non-Canon Appearances== | |||
{{Non-Canon|section}} | |||
===''The Faces of Evil''=== | |||
Armos appear in the same fashion as they do in ''[[Zelda: The Wand of Gamelon|The Wand of Gamelon]]''. | |||
===''The Wand of Gamelon''=== | |||
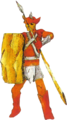
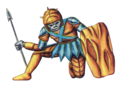
These iron-clad enemies carry large spears and will try to hit [[Zelda]] with them. Their only attack is to slowly walk up to Zelda and strike her with their spear. Some Armos have large amounts of health as it will take three sword attacks to defeat one. Alternatively, a single bomb will also defeat an Armos. These enemies will leave behind a green ruby as a spoil once they have been defeated. | |||
==See also== | |||
* [[Armos Knight]] | |||
* [[Death Armos]] | |||
==Gallery== | ==Gallery== | ||
{{main|Gallery:Armos}} | |||
<gallery> | <gallery> | ||
File:Armos-LoZ-Art | File:Armos-LoZ-Sprite.png|Sprite from ''[[The Legend of Zelda]]'' | ||
File:Armos-LoZ- | File:Armos-LoZ-Art.png|Artwork from [[The Legend of Zelda Instruction Manual|''The Legend of Zelda Instruction Booklet'']] | ||
File:Armos.png| | File:Armos-LoZ-Art-2.png|Artwork from ''[[Million Publications The Legend of Zelda Strategy Guide]]'' | ||
File:Armos-LA-Sprite.png| | File:Armos-Artwork-LoZ-Kodokawa-Shoten-Guide.png|Artwork from ''[[Kadokawa Shoten The Legend of Zelda Strategy Guide]]'' | ||
File:Armos- | File:Armos-Sprite-2.png|Sprite from ''[[The Legend of Zelda: A Link to the Past|A Link to the Past]]'' | ||
File:Armos- | File:Armos-LA-Sprite.png|Sprite from ''[[The Legend of Zelda: Link's Awakening|Link's Awakening]]'' | ||
File:Armos- | File:Armos OoT In Game.png|Model from ''[[The Legend of Zelda: Ocarina of Time|Ocarina of Time]]'' | ||
File:OoT-Armos-Artwork.png|Artwork from ''Ocarina of Time'' | |||
File:Armos.png|Model from ''[[The Legend of Zelda: Majora's Mask|Majora's Mask]]'' | |||
File:Armos-Blue-Oracle-Sprite.png|Sprite from ''[[The Legend of Zelda: Oracle of Seasons|Oracle of Seasons]]'' | |||
File:Armos-Red-Oracle-Sprite.png|Sprite from ''[[The Legend of Zelda: Oracle of Ages|Oracle of Ages]]'' | |||
File:Armos-Sprite-MC.gif|Sprite from ''[[The Legend of Zelda: The Minish Cap|The Minish Cap]]'' | |||
File:Armos_Figurine.gif|Figurine from ''The Minish Cap'' | |||
File:PH-Armos.png|Model from ''[[The Legend of Zelda: Phantom Hourglass|Phantom Hourglass]]'' | |||
File:ST-Armos.png|Model from ''[[The Legend of Zelda: Spirit Tracks|Spirit Tracks]]'' | |||
File:Armos-CDI.png|Armos in ''[[Link: The Faces of Evil|The Faces of Evil]]'' and ''[[Zelda: The Wand of Gamelon|The Wand of Gamelon]]'' | |||
</gallery> | </gallery> | ||
{{references}} | |||
{{Iconic Enemies}} | |||
{{Listbox|The Legend of Zelda Enemies}} | |||
{{Listbox|A Link to the Past Enemies}} | |||
{{Listbox|Link's Awakening Enemies}} | |||
{{Listbox|Ocarina of Time Enemies}} | |||
{{Listbox|Majora's Mask Enemies}} | |||
{{Listbox|Twilight Princess Enemies}} | |||
{{Spirit Tracks Enemies}} | |||
{{Listbox|A Link Between Worlds Enemies}} | |||
{{Cat|Iconic Enemies}} | |||
{{Cat|The Legend of Zelda Enemies}} | {{Cat|The Legend of Zelda Enemies}} | ||
{{Cat|A Link to the Past Enemies}} | {{Cat|A Link to the Past Enemies}} | ||
| Line 71: | Line 161: | ||
{{Cat|Ocarina of Time Enemies}} | {{Cat|Ocarina of Time Enemies}} | ||
{{Cat|Majora's Mask Enemies}} | {{Cat|Majora's Mask Enemies}} | ||
{{Cat|Oracle of Seasons Enemies}} | |||
{{Cat|Oracle of Ages Enemies}} | {{Cat|Oracle of Ages Enemies}} | ||
{{Cat|The Wind Waker Enemies}} | {{Cat|The Wind Waker Enemies}} | ||
{{Cat|Four Swords Adventures Enemies}} | {{Cat|Four Swords Adventures Enemies}} | ||
| Line 80: | Line 170: | ||
{{Cat|Spirit Tracks Enemies}} | {{Cat|Spirit Tracks Enemies}} | ||
{{Cat|Skyward Sword Enemies}} | {{Cat|Skyward Sword Enemies}} | ||
{{Cat|A Link Between Worlds Enemies}} | |||
{{Cat|BS The Legend of Zelda Enemies}} | |||
{{Cat|The Faces of Evil Enemies}} | |||
{{Cat|The Wand of Gamelon Enemies}} | |||
Latest revision as of 19:19, March 1, 2024

Games | ||
Location | The Legend of Zelda | |
Threat | ||
Attacks | Link's Awakening | |
Effective | Link's Awakening | |
Armos, or Armos Statues, are recurring enemies in The Legend of Zelda series.[1] They are living statues that come to life upon contact and appear in every game in the series except The Adventure of Link and Four Swords.
The Legend of Zelda
Armos are found throughout Hyrule. They are immobile and harmless at first, but when Link makes contact with them, they come to life and start moving around at one of two speeds. If Link touches one from the front, he will immediately take half a heart of damage. They take three hits from the original Sword, two hits from the White Sword or one hit from the Magical Sword to be defeated. One bomb will also destroy them, and they are also vulnerable to arrows, the Candle and the Magical Rod.
Link can often find secrets such as stairs and items beneath these statues. These can only be accessed by touching the Armos so it moves away from the spot it is guarding. Some Armos guard Item Shops, while one guards the Power Bracelet.
A Link to the Past
Armos are statue enemies that reside in the ruins outside the Eastern Palace. They look like normal statues until Link makes contact with them, after which they will hop after Link. A good few hits from the sword should take care of them, but it is still preferred to remain cautious with them. These enemies are similar to the six Armos Knights that Link will fight in the Eastern Palace.
Link's Awakening
If Link touches an Armos, they will randomly move around the room. If they touch Link, he will lose two hearts. They can be found in the overworld. Two ways to defeat them (because the sword does no damage) is to attack them with a bomb or shoot them with the Hookshot and place a bomb nearby.
Ocarina of Time

|
Armos |
|---|
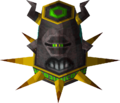
Armos appear as brown, rounded monstrous statues with a pair of orange curved horns and a smaller pair of short black horns on their head, a pair of red eyes, a wide nose and a patch of grey stone with a zigzag-esque pattern running through on its face, a grey, segmented column-like body and a pair of hands wielding a sword and an orange shield. Found within Dodongo's Cavern and the Spirit Temple, they sit completely still until Link touches them, at which point they come to life and start chasing Link. If not defeated fast enough, they will return to their original position and revert into a statue. Upon defeat, they will flash red and jump around before exploding. Making contact with them or being caught in their explosion will deal a half heart of damage. To defeat them, Link must use bombs, Deku Nuts or, as an Adult, the Megaton Hammer.
There are statues that resemble an inactive Armos that don't come alive upon contact and are often used for puzzles where they are to be pushed or pulled onto a floor switch. In the Spirit Temple, there is a particular puzzle where Link will need to trigger a live Armos to step over a floor switch to open a doorway.
Majora's Mask
You know about the Armos, right? |
Armos are only found in the Stone Tower Temple and appear and behave identically to their Ocarina of Time counterparts. The strategy to defeating them is additionally identical save for an additional weakness to Goron Link's punches.
Oracle of Seasons & Oracle of Ages
Like other games, Armos come to life by touch, but one difference is that there are two types of them: red and blue. The red ones only come to life when Link activates a switch. They then move around the room. The three ways to defeat them are to place a bomb next to them (which can be difficult), hit them with the Magic Boomerang twice, or simply hit them with Biggoron's Sword, which can only be found with a secret. The blue ones can be harder to defeat because they move really fast and also because they activate whenever Link walks past them. To defeat them, Link must either slash them with the sword three times or by blowing up bombs nearby twice. Both of them can take a single heart away if they touch Link.
The Wind Waker
In The Wind Waker, Armos work mostly the same way as usual. Instead of bombs, its weakness is a crystal on its back. It can be easier for Link to attack this weak point once it is stunned in the eye by an arrow. When they are defeated, they jump around like crazy with no direction as a last resort before exploding.
Four Swords Adventures
The Minish Cap
In The Minish Cap, Armos were built by the Minish for the Wind Tribe a long ago, and they can be found in the Wind Ruins. Like other games, they remain completely still until Link touches them. Link can either de-activate or activate them while he is in Minish form. This is done by climbing up the steps on the front of the Armos, where there will be a special switch. When de-activated, they will not move at all. To defeat them, Link must activate them and then slash at them with the sword while he is in Human form.
According to Swordsman Newsletter issue 8, the Armos were the creation of the Minish.[citation needed]
| Armos | |

|
Appears in the Wind Ruins. Built by the Minish for the Wind Tribe long ago. They look like stone statues, but if you get too close, they move! |
Twilight Princess
Found in the Temple of Time and the Cave of Ordeals, Armos will sit completely still until Link approaches them, at which point they come to life and jump around while swinging their hammers. The crystal on their back is their only weak point. Link can use the Back Slice or smash them with the Ancient Statue's hammer while one is controlled with the Dominion Rod. Three shots to the back from a Clawshot will also take one down. Upon defeat, they will jump around swinging their hammer wildly before exploding.Being hit by their hammer takes away half a heart.
Phantom Hourglass
Armos will slowly hop toward Link. All Link has to do is toss a bomb at it and it will simply de-activate, allowing Link to push the body on to a switch. Their only attack is contact, which takes away half a heart.
Spirit Tracks
In Spirit Tracks, Armos only appear as a mount for Miniblins in the Tower of Spirits. The actual Armos is invincible, but it disappears once the Miniblin riding it is defeated, which is only possible when Link is being carried by Zelda while she is possessing a Phantom.
Skyward Sword

Armos are statues found in various areas throughout the Lanayru Province. To defeat them, Link must use the Gust Bellows to spin the colored screw on top of their head, opening their mouth. From here, Link can slash the crystal inside their mouth, or place a bomb inside to kill them.
Non-Canon Appearances
| This section describes a subject that is or may be outside the core Zelda canon. |
The Faces of Evil
Armos appear in the same fashion as they do in The Wand of Gamelon.
The Wand of Gamelon
These iron-clad enemies carry large spears and will try to hit Zelda with them. Their only attack is to slowly walk up to Zelda and strike her with their spear. Some Armos have large amounts of health as it will take three sword attacks to defeat one. Alternatively, a single bomb will also defeat an Armos. These enemies will leave behind a green ruby as a spoil once they have been defeated.
See also
Gallery
- Main article: Gallery:Armos

Sprite from The Legend of Zelda
Artwork from The Legend of Zelda Instruction Booklet
Artwork from Kadokawa Shoten The Legend of Zelda Strategy Guide

Sprite from A Link to the Past

Sprite from Link's Awakening
Model from Ocarina of Time

Artwork from Ocarina of Time
Model from Majora's Mask

Sprite from Oracle of Seasons

Sprite from Oracle of Ages

Sprite from The Minish Cap

Figurine from The Minish Cap

Model from Phantom Hourglass
Model from Spirit Tracks

Armos in The Faces of Evil and The Wand of Gamelon


References
- ↑ The Legend of Zelda: Encyclopedia, pg. 163
- Iconic Enemies
- The Legend of Zelda Enemies
- A Link to the Past Enemies
- Link's Awakening Enemies
- Ocarina of Time Enemies
- Majora's Mask Enemies
- Oracle of Seasons Enemies
- Oracle of Ages Enemies
- The Wind Waker Enemies
- Four Swords Adventures Enemies
- The Minish Cap Enemies
- Twilight Princess Enemies
- Phantom Hourglass Enemies
- Spirit Tracks Enemies
- Skyward Sword Enemies
- A Link Between Worlds Enemies
- BS The Legend of Zelda Enemies
- The Faces of Evil Enemies
- The Wand of Gamelon Enemies