- Chapter 1 – Gnarled Root Dungeon
- Chapter 2 – Snake’s Remains
- Chapter 3 – Poison Moth’s Lair
- Chapter 4 – Dancing Dragon Dungeon
- Chapter 5 – Unicorn’s Cave
- Chapter 6 – Ancient Ruins
- Chapter 7 – Explorer’s Crypt
- Chapter 8 – Sword & Shield Maze
- Chapter 9 – Onox’s Castle
- Chapter 10 – Room of Rites
8.1 Exploring the Temple Remains
Equip to Roc’s Cape and soar across the gap, landing below the block on the right ahead. Push this block “up” and push the middle one “left” to clear a path towards the staircase. Take the staircase up and out of the cave and Link will emerge back in the Graveyard. Head up one and left one screen, then use the Power Bracelet to toss the mushrooms growing here aside and clear a path. Follow the path back right one screen to grab Piece of Heart #9!Optional: Piece of Heart #9


Optional: Gasha Seed on top of the Maku Tree


Use a Gale Seed to warp to North Horon. From the Scent Tree, head down one, left one, and up one screen. Continue left one more screen and up two screens from there, then head through the hollowed log on the left to enter the Temple Remains region. Head up one screen and use the Roc’s Cape to soar over the pits on the right, then continue right one screen. Link will reach what was once the entrance to the Temple of Seasons before it was submerged into the underworld of Subrosia.


Cross the water and head up the staircase on the other side. Walk over to the left side of this room and head up the steps, then head back towards the right along this upper ledge until you reach another staircase. Take the staircase up to the next level and use the Roc’s Cape to soar to the piece of land surrounded by lava at the upper-right corner of this room. Bomb the cracked blocks to access the chest and open it to obtain a Magical Ring! This ring will appraise as the L-2 Armor Ring, which reduces the damage Link takes from enemies by 2, but also reduces his sword power by the same amount. Exit the Goron Mountains the same way you came in, back to the entrance, then head back left three screens to reach the Temple Remains entrance again.Optional: Armor Ring L-2


Enter the Temple Remains by heading up one screen from the entrance. Continue right one screen and change the season to Autumn, then head left two screens from here. Follow the path, taking Link up two screens. Climb the steps and continue around the path on the right down two screens to reach another stump. Use it to change the season to Winter, then head up one screen and walk up the steps. Head right one screen this time, then jump over the pits and follow the prints in the pile of snow down one screen. Enter the portal here which takes Link to the Subrosian Volcanoes.


8.2 Fireworks from Subrosia
Walk up the stairs ahead of Link and enter the cave. Here, Link finds a Subrosian throwing all kinds of random items into a spot of lava, apparently trying to cause “fireworks” to shoot up. Help him out by tossing in a bomb which will cause the volcanoes to erupt all the way to Holodrum. A cutscene will play showing the Temple Remains being peppered by the eruption, consequently becoming covered in streams of lava. Exit this cave and head down one screen, then use the portal here to return to the Temple Remains.


Optional: Piece of Heart #10


From the warp portal where you returned from Subrosia, head up and right one screen. Defeat the Darknuts and Crows, then continue down the steps and down one screen. Head down the next steps to reach a stump and use it to change the season to Summer. Continue right one screen and soar over the lava streams to reach the vines growing along the wall on the right. Climb them up one screen, then soar across the lava to each piece of land counter-clockwise and head left one screen. Soar up to the opening in the Temple Remains and enter it to reach a cave area.


Stand at the center of the gap in this room and use the Magnetic Gloves to pull Link to the other across the gap to the other side. Head right as far as you can, then face “down” and use the gloves again to pull Link towards the bottom of the room here. Continue along the path and head up the staircase Link comes to at the end.


Push the far right boulder here “down”, the upper of the left two boulders to the “left”, then the lower of these two boulders “down”. Follow the path to the left side of the room to find more green boulders blocking another staircase. Start by pushing the bottom boulder “up” to gain access to the path, then follow it to the topmost boulder and push it “right”. Head up the staircase now to emerge at the very top of the Temple Remains.


Walk left one screen, then head up the steps and descend the stairwell to another cave area within the Temple. Make your way clockwise through this area, defeating the enemies that get in your way as you go, and head left one screen along the upper-most path. Continue walking left until Link reaches a staircase and head up it, this time emerging on the opposite side of the stairwell Link descended a minute ago. Walk down the steps and head left two screens. Enter the opening in the temple here to discover a cross between a Fairy Fountain and a hidden portal to Subrosia. Grab the Fairies if needed, then enter the portal.


Once in Subrosia, head up two screens along the steps until Link reaches a peculiar-looking volcano, which has eyes and a mouth-like structure. This volcano is actually the location of the final big dungeon of Link’s quest, and also where the last Essence of Nature lay hidden. When ready, enter Level 8.


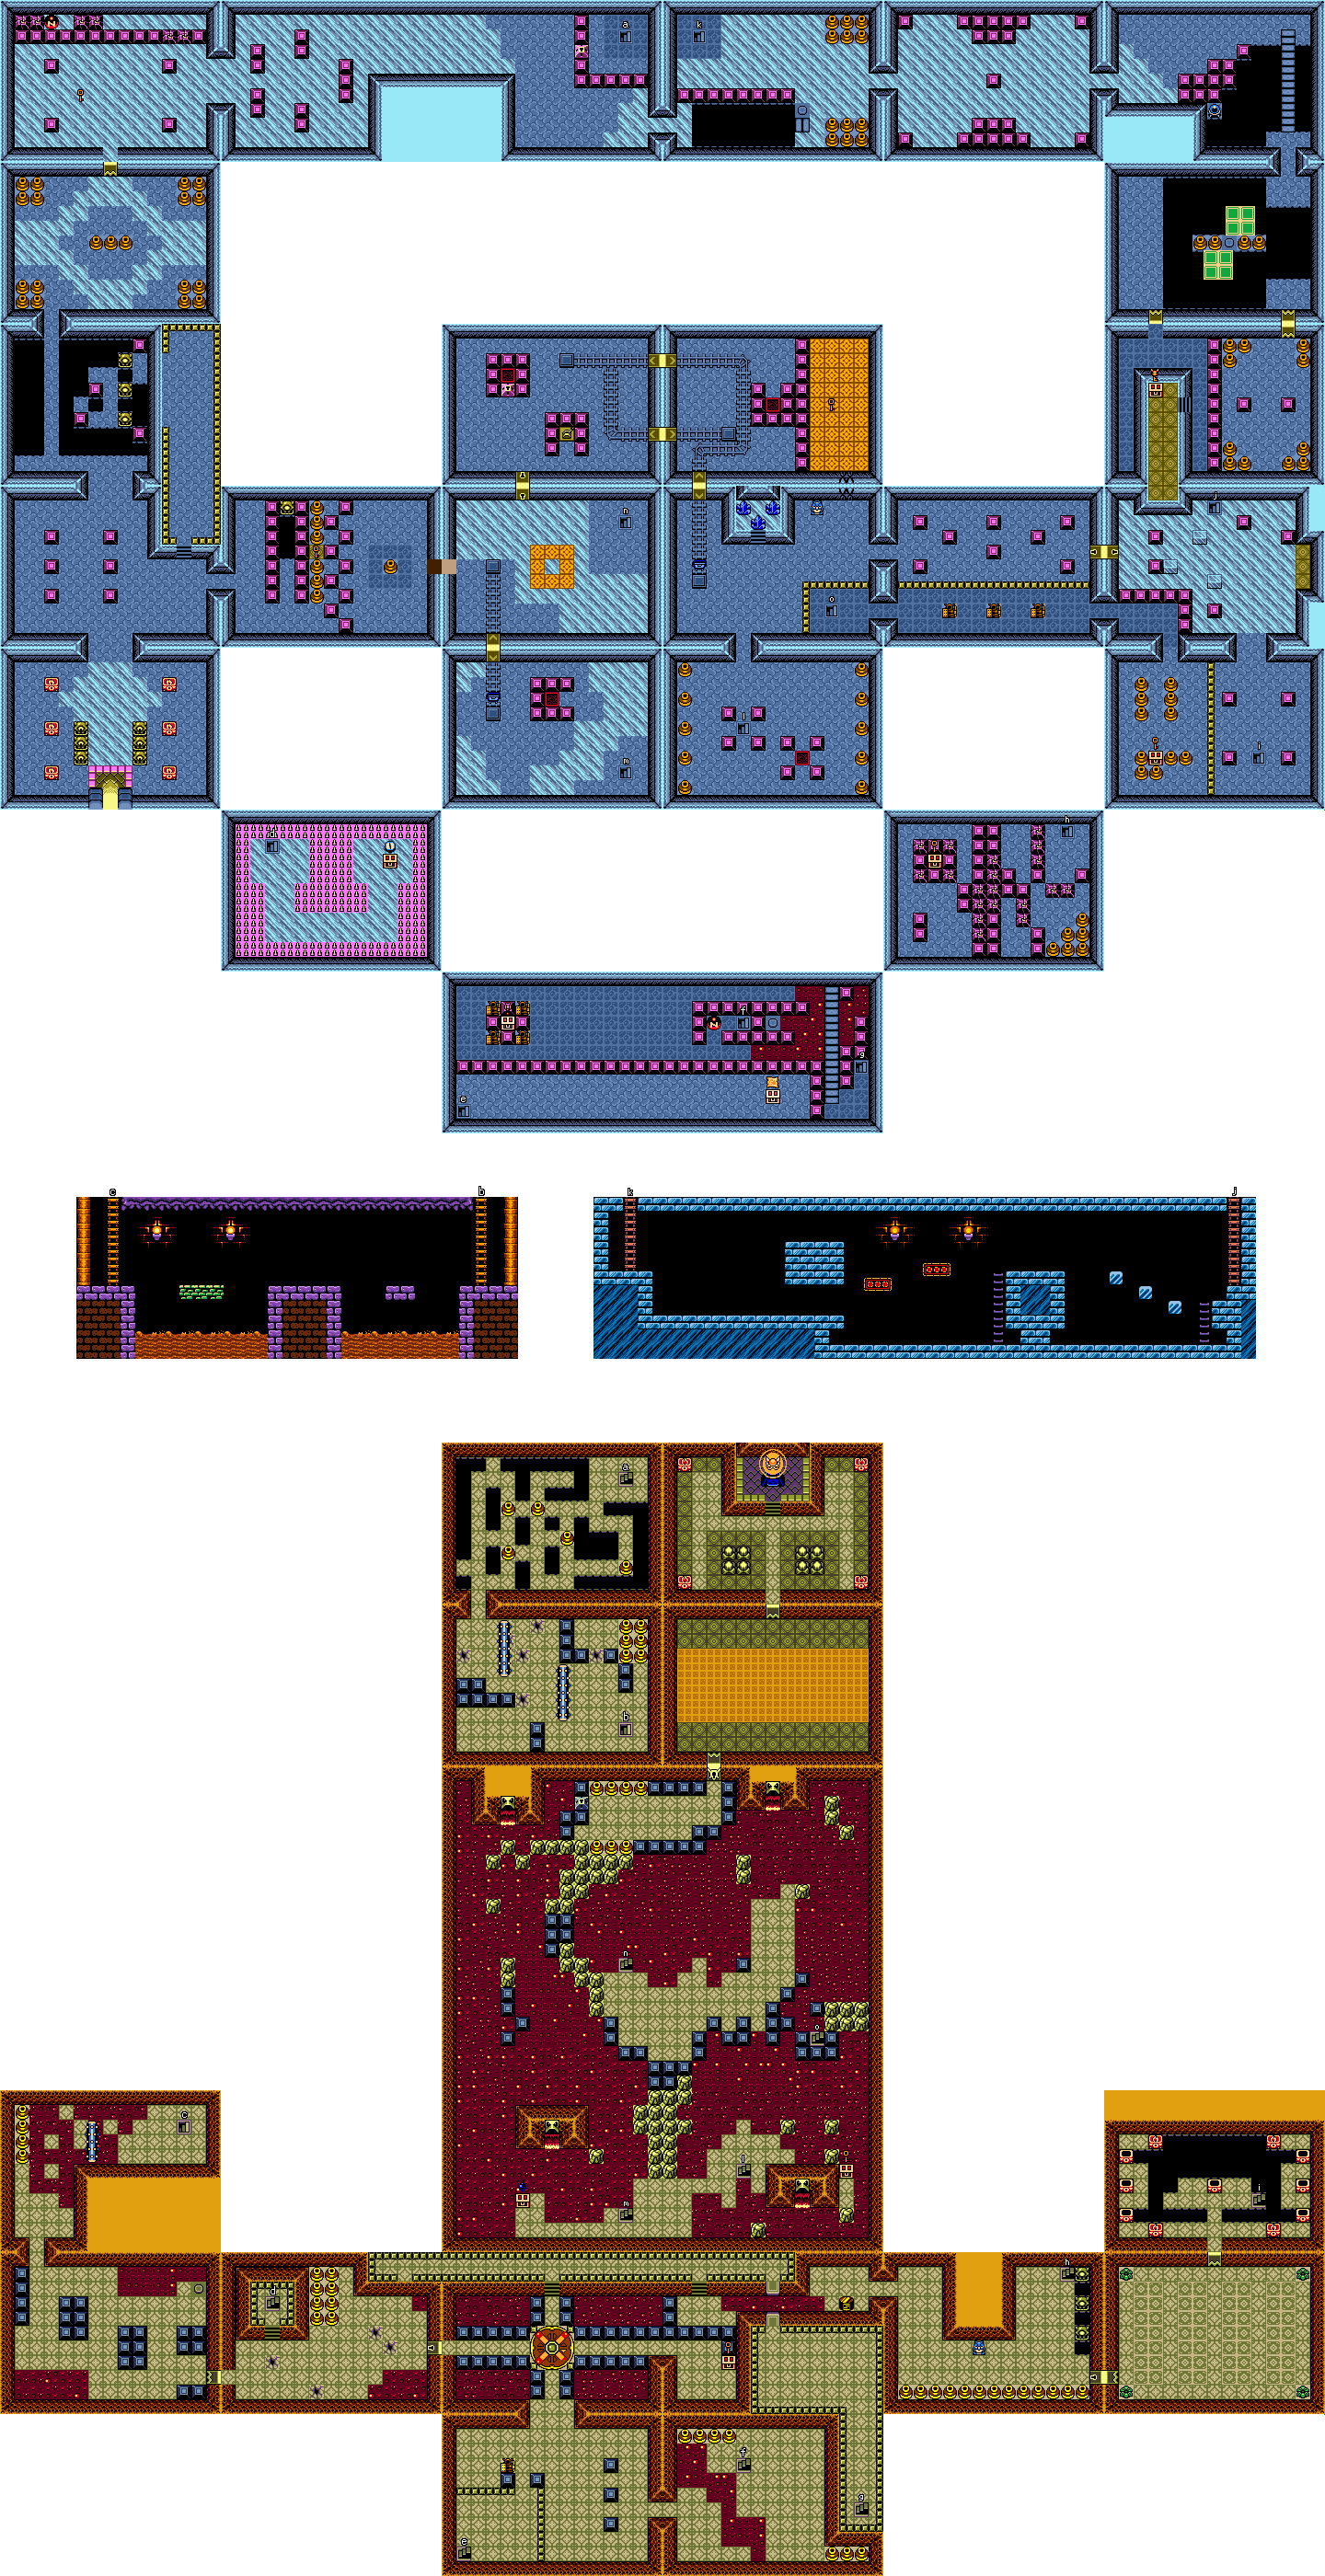
8.3 Sword and Shield Maze
From the dungeon entrance, head up one and right one screen. There are two vertical rows of purple blocks in this room with a statue on the far end. Use the Slingshot to shoot the statue and a Small Key will fall onto the golden tile between the vases on the right. Grab the key and head back left one screen, then continue up one screen from the upper-middle of this room.


Follow the path on the left up another screen. Defeat the three Magnites in this room, unlocking the doorway at the top, then head up one screen. The entire floor in this room is covered in ice, along with a few Zols and a Hardhat Beetle wandering about. Defeat the Zols, then bomb the cracked blocks at the top of the room to gain access to the magnetic ball. Use the Magnetic Gloves to pull the ball towards Link, then make contact with it against the Hardhat Beetle to defeat him. Alternatively, you can shoot the hardhat beetles with gale seeds to get rid of them. Once all the enemies are defeated, a Small Key will fall from the ceiling onto the center of the floor. Grab it and head right one screen.


Equip the Magical Boomerang to dispose of the many Sparks throughout this and the next room and continue right another screen. Use a Small Key on the purple locked block in this room and head down the staircase to the basement level.


Navigate this room towards the lower-left corner, defeating the enemies and slashing away the vases that get in Link’s way, and head down one screen. Link needs to keep moving in this room to avoid the Wallmasters that will fall from the ceiling and attempt to take him back to the start of the dungeon. These enemies will also continue to spawn no matter how many are defeated, so make your way to the lower-right section of the room and head down the staircase to a dungeon area.


Link must soar onto the platform on the left while avoiding contact from the spiraling fireballs as well as Keese. From that platform, soar onto the ledge on the left and head left one screen. Continue heading left, avoiding the fire that will shoot up from the lava here, until you reach a ladder going up. Head up the ladder.


Make your way over the lava and spiked roller while heading left, then head down one screen. Link can use the Roc’s Cape to easily soar over the Giant Orange Blade Traps in this room, but must also be wary of the Fire Keese that attempt to make contact with him as well. Head to the right side of the room to discover a switch and step on it, unlocking a doorway in the lower-right corner. Head right one screen through the doorway.


Walk up the steps onto the raised section of floor and enter the staircase leading to the first floor.


Have Link’s shield equipped to avoid contact from the Spiked Beetles in this room. The iced floors will cause Link to slide and can easily result in running into the spiked floors throughout. On the right side of this room, open the chest to obtain the Compass, then head back down the staircase you came through to the basement level again.


Unlock the door on the right side of this room and head through. Step onto the rotating platform to have it turn clockwise, facing Link towards the north. Head up the steps above and walk back left one screen. Hop off the ledge and walk right one screen and step on the rotating platform, this time having it turn Link towards the south. Head down one screen.


Do NOT defeat any enemies in this room until the Armos Statue awakens, then pass through the area it was blocking and head up the staircase.


Head right one screen and open the chest here to obtain the Dungeon Map!


Equip the Magnetic Gloves and pull that ball above towards Link, then walk to the left to pull it closer to the long horizontal row of purple blocks. Walk to the right while still pulling the ball until it is on the under-side of the block below the staircase leading down, then repel it away and continue walking right. Once the ball clears the purple blocks and begins to travel north across the lava, walk back left and have the ball land on the switch. A bridge on the far right side of the room will connect vertically across the lava. Head back left one screen and descend the staircase to the basement first floor again.


Head right one screen and then use the Roc’s Cape to soar over the lava stream while avoiding the Ball and Chain Trooper on the other side. Head up the staircase above back to the first floor, now on the northern side of the long horizontal row of purple blocks.


Head left one screen. Awaken and defeat all of the Armos Statues surrounding the chest, then push the bottom purple block “right” or “left”. Open the chest to obtain the Hyper Slingshot! This upgraded Slingshot will spray three seeds in one shot, also at the cost of only one seed from Link’s inventory. Head back right one screen and follow the upper-most path to the right. If you pressed that switch earlier, you can now use the Roc’s Cape to soar over the lava and safely onto the newly connected bridge. Follow it south and head down the staircase.


Head up one screen and then continue walking towards the upper-left of this room and cross the gap using the jump-platform. Along this upper ledge, head left one screen and then head down into the rotating platform to have Link face towards the east. Head right one screen and open the chest to obtain a Small Key.


Now, backtrack left one screen, through the rotating platform and back up the steps onto the upper ledge. Continue right one screen and head down the steps. Face the lava to the right, then equip the Magnetic Gloves and pull Link over the lava and against the pole. Continue right one screen.


The vases at the bottom of this room will contain a variety of Seeds, as well as a Fairy in one of them. Walk to the upper-right side of the room where three statues can be found. Stand as far back as possible from the middle statue and shoot the Hyper Slingshot to strike each statue simultaneously, causing a staircase to appear to the upper-level beside the top statue. Head up the staircase to the first floor.


Head towards the left side of this room, bombing the cracked blocks along the way. Vases in the lower-right section of the room will contain additional Bombs if needed, but at least one needs to be used to access them. Once you make it to the chest on the left, open it to obtain a Small Key, then head back down the staircase to the basement level again.


Walk down and head through the locked door on the right to make it to the dungeon’s Mini-Boss.
Frypolar will alternate between Fire and Ice forms. While in his Ice Form, Link can shoot Frypolar with Ember Seeds for minimal damage, though this will revert him back to his Fire form for about four attacks. For maximum damage, shoot the icicle spikes Frypolar creates with a Mystery Seed to make them smaller and lift one with the Power Bracelet. Carry the block of ice while keeping a safe distance from Frypolar, then throw it at him when he changes to his Fire form and comes close. This latter method is a bit risky as Link must get get close to Frypolar to hit him with the ice block, thus taking the chance of the boss running into Link, causing him to drop and lose the ice block. Keep the Roc’s Cape equipped to soar away from Frypolar and his attacks while dealing constant damage to the boss until he is defeated.


Grab the Fairy released by Frypolar and at this point, there is an optional Magical Ring we can get. You can head through the warp portal to get back to the entrance of the dungeon. Walk up a screen and then climb the steps on the right side, heading up another screen. There are three states on the left that Link must hit at the same time, using his Slingshot. Doing so will cause a treasure chest to appear containing a Magic Ring. When appraised, this becomes the Steadfast Ring. Walk back to the dungeon entrance and head through the warp portal to return to the mini-boss lair.


From the mini-boss room, walk up one screen.
All torches must be lit simultaneously to solve the puzzle, though they will not stay lit for long so it must be done quickly. Stand on the left side of the torch straight ahead and use the Hyper Slingshot, equipped with Ember Seeds, to shoot the three torches on the left side of the room. Do the same for the torches on the right side, then light the center torch last. If done quick enough, a staircase will appear on the right. Head up the staircase to the first floor.


Head up one screen where a rather challenging puzzle awaits Link. Three blocks of ice in this room must be pushed certain directions to get them all onto the three golden tiles on the right. To do this, start by pushing the rightmost block to the “right” and onto the first tile. The block in on the left must be pushed “down”, “right”, then “up”. Now push the topmost block “left”, “down”, “right”, then “up”. Two of the blocks should now be setting just to the left of the remaining golden tiles, so push them both “right” onto the tiles and a staircase leading to the basement level will appear at the top of the room. Head down to a dungeon area below.


Be careful not to fall in this iced-covered dungeon area as the first two screens contain Orange Blade Traps that will quickly send themselves towards Link from both sides. Using the Roc’s Cape, jump onto each block of ice heading “left”. Soar from the last one onto the far-left ledge and continue left one screen. Again, use the Roc’s Cape to make your way across the conveyor platforms and continue left one screen along the topmost ledge on the left. In this last screen, simply fly onto each of the Thwomps’ heads until Link can soar onto the leftmost ledge, then head up the ladder.


Step on the switch in the lower-right section of this room to connect a bridge below, then continue right one screen. Simply soar over the Wizzrobes and Blade Traps in this room, avoiding contact with both, and keep heading right another screen. After defeating the enemies in this room, stand in the upper-right corner and use the Magical Boomerang to strike the blue switch below, turning it “red” and connecting the bridge to the south. Head across the bridge and down one screen.


Ride along the green platforms and destroy the outside vases, leaving at least one in the middle, then push it onto the switch. Head through the newly opened doorway at the bottom-right side of this room. Defeat the Ball and Chain Trooper in this room, then head back up. Defeat all the Keese, as well as the Pols Voice on the left side of the room, to unlock the doorway at the bottom-left, then head through.


Walk onto the ledge where the chest is and open it to obtain the Boss Key! While still on this ledge, head down one screen. Hop off the ledge and use a Small Key to unlock the door on the left, then head left two screens. Bomb the cracked portion of wall just above where Link enters this room to reveal a passage and head through up one screen.


Pay close attention to the path of the Armos Statue in this room as Link will have to follow this exact path to solve the puzzle. Once completed, grab the Small Key that falls and head back down one screen. Use the Power Bracelet to grab one of the ice crystals from the altar and carry it down one screen. Toss the crystal into the red pit in the lower-right of the room and it will drop to the level below, solidifying some of the lava in that room.


Head back up one screen and grab another ice crystal from the altar. This time, hop into the mine cart on the left which takes Link up one and left one screen to room. Drop the crystal for a moment and defeat the Wizzrobes to get them out of the way, then unlock the purple block on the left side of the room, giving access to the red pit. Pick the ice crystal back up and toss it into this red pit, freezing another section of lava in the room below, then ride the minecart back.


Pick up another ice crystal and ride the mine cart back up and left. Drop the block and strike the switch in the lower-right side of the room to alter the mine track above, then carry the crystal again and hop back into the mine cart. This time, the cart will take Link right one screen, where he must again toss the crystal into the red pit and solidify the lava below. Once done, ride the mine cart back left, then strike the switch again and ride the cart back right and down.


Head down one screen and walk down the staircase to the basement level below.


Open the chest on the right side of this room to obtain a Small Key, then head up one screen. Head around the blue blocks to the staircase on the right and ascend them to the first floor.


Head right two screens and down one. Trash the vases at the bottom to access a chest, then open it to receive a Small Key. Backtrack up one and left two screens, then head back down the staircase.


Head down and left a screen and walk along the path to a chest. Open it to obtain 10 Bombs, then head up the staircase in this room.


Ride the minecart on the left side of this room up one screen, then take the staircase in the upper-right side to the room below. Head right one and down one screen from here, then head up the staircase to the first floor again. Walk up one screen and grab an ice crystal from the altar, then ride the mine cart in this room back up and left. Drop the crystal and unlock the door at the bottom of this room, then carry the crystal down one screen. Ride the mine cart in this room on down another screen, then toss the crystal into the red pit on the right to solidify the remaining lava in the room below. Head down the staircase.


Head up two screens and use a Small Key to unlock the blue block at the top-right of the room. Follow this path right one screen, where the door to the boss’ lair is located. When ready, head up one screen and face the final dungeon boss, Medelock.


Medelock will move about the room, often stopping to hit Link with one of three attacks. Medelock will often shoot red fireballs in Link’s direction, disappear and reappear at one of the top corners of the room to shoot lasers from her eyes while moving to the other side, or shoot a circular array of blue orbs across the room. The first two attacks will merely damage Link, whereas if he is hit by one of the blue orbs, he will become frozen in stone and vulnerable to another of Medelock’s attacks. By using the Roc’s Cape to soar over her attacks, Link can avoid most everything that Medelock throws at him. Link shoot out Pegasus Seeds at Medelock, causing him to freeze momentarily. Link can then simply slash the boss with his sword until she is defeated.


Grab the Heart Container that appears after defeating Medelock and head up one screen to the altar room. Walk up the steps and claim the final Essence of Nature, the Changing Seasons.


