Breath of the Wild features three different dragons you may have seen on your travels: Farosh, the yellow spirit, Dinraal the red spirit, and Naydra the blue spirit. If you land an arrow on a dragon, it will drop a rare material, which can only be found in select chests otherwise. Each dragon can drop one of four parts, a scale, claw, fang or horn. This guide will teach you the most effective way of farming these materials, and what you can do with them.
Preparation:
In order for you to effectively farm goodies from the three dragons, you’ll need to prepare yourself with some helpful gear.
First, make sure you have lots of wood. This can be obtained by felling trees of all types, or by finding some bundles at the various stables. We recommend heading to the Rito Stable, as there are many logs stored here ready for chopping. You can use an axe to cut them up, but any two-handed weapon should work. If you don’t want to waste your precious durability, bombs work great too.
In order to use this wood to start campfires, it is recommended you get your hands on a flame-producing weapon. Good candidates include:
- Flameblade
- Great Flameblade
- Flamespear
- Fire Rod
These elemental weapons can be found in a bounty at the Coliseum Ruins, just north of the Great Plateau, though be warned; a tough Lynel roams the wreckage, so take care. Alternatively, head to the Ancient Tree Stump, also in the Central region, where a Great Flameblade can be found guarded by a couple of enemies.
If you can’t find any flame weapons, you can always use some Flint in conjunction with a metal weapon to start a fire.
Some other items we recommend having include the Zora Armor, Thunder Helm, and a straight-firing bow, such as the Falcon Bow or the Ancient Bow. We’ll explain why later.
Obtainable Materials:
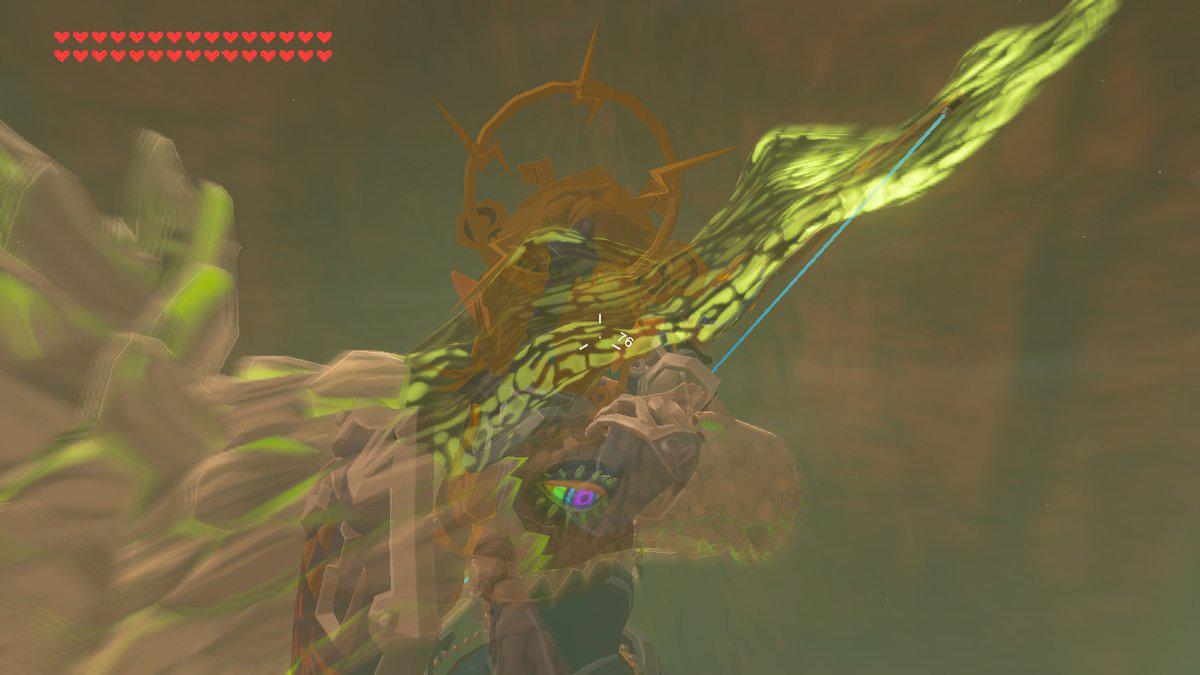
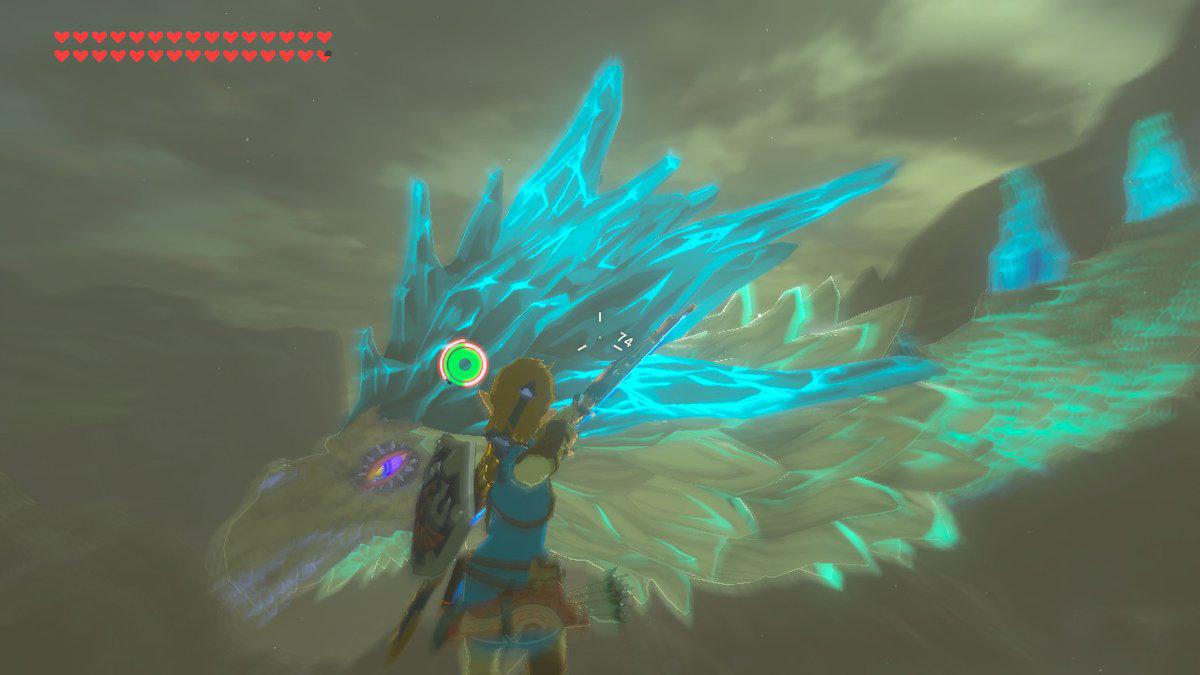
As mentioned before, you can obtain a scale, claw, fang or horn from shooting the dragon in different locations. Refer to the image for information on where to fire your arrow. Here’s a list of all the individual materials you can snag:
- Farosh’s Scale
- Dinraal’s Scale
- Naydra’s Scale
- Farosh’s Claw
- Dinraal’s Claw
- Naydra’s Claw
- Shard of Farosh’s Fang
- Shard of Dinraal’s Fang
- Shard of Naydra’s Fang
- Shard of Farosh’s Horn
- Shard of Dinraal’s Horn
- Shard of Naydra’s Horn
Farosh:
Now you have everything ready, go ahead and warp to the Shoda Sah Shrine in the Faron region. It can be found hidden behind the waterfall flowing from the Riola Spring. Now’s the time to equip your Zora Armor and Thunder Helm, if you have it. Start a fire using one of the previously mentioned methods, and sit until morning. Jump straight into the water below, and swim up the waterfall. You should see Farosh fly over the waterfall, and as you jump from the top of the waterfall you can get a close-up shot on the dragon. The material the beast drops should land on a stretch of land, so paraglide on down and pick up your reward. If you need more materials, head back to the Shrine and sit until morning once more. Keep on repeating this process until you’re satisfied.


Farosh can also be found around the Bridge of Hylia during the nighttime, as well as in the Gerudo Highlands.
Dinraal:
Dinraal likes to parade down the Tanagar Canyon which splits most of western Hyrule in two. Warp to the Shae Loya Shrine, which is right by the Tabantha Bridge Stable. This time you shouldn’t need to use any wood, as you can sit by the stable’s cooking pot, or, if it is raining, you can rest up in a bed for a price of 20 rupees. Either way, wake up at morning, and head straight to the center of the Tabantha Great Bridge. Look north, and you should see Dinraal heading towards you at around 6:00AM. Once it has come close enough, jump off the bridge and pull out your paraglider. Again, fire an arrow in the desired location, and pick up the material. If you’re in need of more pieces, warp back to the Shrine, and repeat the process.


If you are having trouble finding Dinraal here, try setting up camp atop of the Eldin Great Skeleton. If you sit until morning then look to the northeast the dragon can be found heading west.
Naydra:
This blue beast is a little different to the other two. It can initially be found at the peak of Mount Lanayru, covered in Ganon’s Malice. Upon interaction, shoot one of the eyes and it will begin to fly around the mountain, and a mini-boss battle will initiate. Float around using your paraglider, then use the updrafts to get close and take out the eyes as you go. Once freed, Naydra will be roaming around like the other dragons.
The easiest way to find the blue spirit is to head to the east gate of the Lanayru Promenade, by the archway. Here you can set up a campfire, and if it begins to rain, the small overhang will miraculously act as cover for you to relight it. Again, sit until morning then climb up to the small peak shown in the image. You should see Naydra circling the peak of Mount Lanayru, and after a short while it will head towards the Lanayru Promenade. Float towards it as it nears, and take aim at the desired location. Make sure to snag your loot before heading back to the campfire to relight it, if you are planning on obtaining more materials.


Naydra can be inconsistent in showing up at times, but here we have a couple of other locations it tends to head towards.
Uses of the Dragon Parts:
Each dragon part has its use, whether it be to upgrade pieces of armor or just for some rupees, we have listed below all the different ways to utilize these rare materials.
Springs of Courage, Power and Wisdom:
There are three springs located around Hyrule, and each requires an offering to be placed by the Goddess Statue in order to access the hidden shrine. This offering is a scale of each dragon: Farosh’s for Courage, Dinraal’s for Power, and Naydra’s for Wisdom.
Enhancing Armor Pieces:
Select pieces of armor require these elusive materials to enhance them all the way. These include the Champion’s Tunic, the Barbarian set, and the Wild set. You’ll need to collect quite a few materials to upgrade the armor completely, so this is only recommended if you are a true completionist.
Selling for Rupees / Mon:
The parts tend to sell for decent prices, and can also be traded with Kilton for copious amounts of Mon. Below is a table displaying the values of each dragon part.
- Scale: 150 Rupees, 60 Mon
- Claw: 180 Rupees, 80 Mon
- Fang: 250 Rupees, 110 Mon
- Horn: 300 Rupees, 150 Mon
