- Chapter 1 – Skyloft
- Chapter 2 – Faron Woods
- Chapter 3 – Skyview Temple
- Chapter 4 – Eldin Volcano
- Chapter 5 – Earth Temple
- Chapter 6 – Lanayru Desert
- Chapter 7 – Lanayru Mining Facility
- Chapter 8 – Isle of Songs
- Chapter 9 – Lake Floria
- Chapter 10 – Ancient Cistern
- Chapter 11 – Lanayru Sand Sea
- Chapter 12 – Sandship
- Chapter 13 – Volcano Summit
- Chapter 14 – Fire Sanctuary
- Chapter 15 – Thunderhead
- Chapter 16 – Song of the Hero
- Chapter 17 – Sky Keep
- Chapter 18 – Final Showdown
2.1 Sealed Grounds
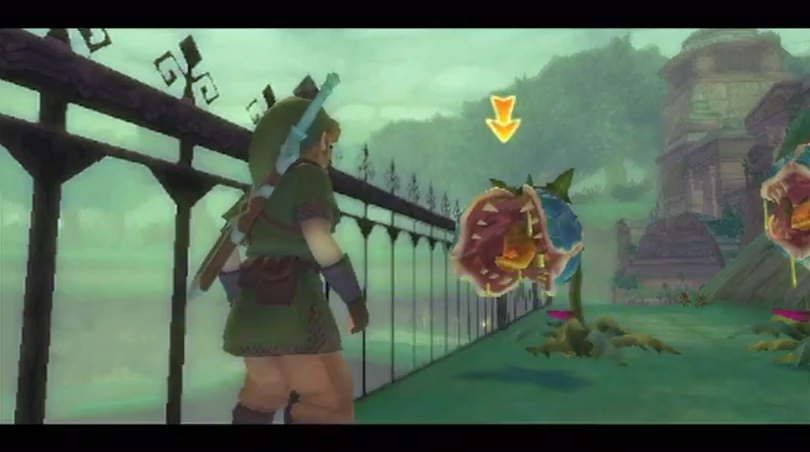

Once you arrive, you’ll find yourself within the Sealed Grounds. After some discussion with Fi, you’ll regain control of Link. Walk down the pathway and you’ll encounter a new enemy known as a Deku Baba. Some Deku Babas will open up their mouths horizontally, while others open them vertically. The key to defeating these creatures is to slash your sword in the direction so that it splits the Deku Baba by the mouth. Alternatively, you can deliver a shield bash just when the Deku Baba lunges towards you and this will stun the enemy temporarily, allowing you to deliver a free sword slash.


Follow the pathway and jump down to trigger a cut-scene. Afterwards, jump down to the center of this area. Be careful as you descend and use the sailcloth to avoid taking damage. Walk over to the strange object in the center and deliver a Skyward Strike. This will change the area a bit, unlocking the massive door at the top of the Sealed Grounds. Fi will also teach you about the Dowsing ability and registers Zelda as a dowsing figure. Using the dowsing feature of the Goddess Sword, Link can detect in which direction Zelda is located.


There are now these air geysers blowing wind from the ground. If you walk over them, Link will pull out his sailcloth and the gust will send him up to the higher ledge. Use these air geysers to reach the top of the Sealed Grounds and head over to the massive door. As you draw near, the door will unlock, so head on over and enter the Temple.


Run forward and speak with the old woman found here. After quite a bit of dialogue, she will unlock the adjacent door and tells you to open the nearby treasure chest. Run on over and open the chest to pick up some Revitalizing Potion. More importantly than the potion, this serves as the second bottle in your quest! With bottle in hand, head through the unlocked door.


Back outside, run forward and you’ll find a bunch of enemy Bokoblins surrounding a friendly Goron. These Red Bokoblins will come charging at you once they spot you. They will hold their small swords in defense, forcing Link to attack with another method. The best way to defeat them is to attack from the right and then immediately attack from the left. They might block the first attack, but they will be unable to block the second attack. Once you land the first hit, quickly slash your sword to get consecutive hits in. Alternatively you can wait for the Bokoblin to attack you and then quickly deliver a shield bash, stunning the enemy in the process. Work your way through the pack of Bokoblins until they have all been defeated.


Afterwards, Gorko the Goron will talk to you about the Bird Statues. The Goddess Sword will activate this bird statue and Gorko mentions that it will also activate all the other statues in the land. All of these statues can be used as save points, but many of them can be used in order to return to the sky above. It’s a good idea to save at each of these bird statues as soon as you come across them, as this will activate them as entry points when you return to the area at a later time.
Just to the right of the bird statue, you will find a bug or two crawling along the wall. Roll into the wall to knock them down to the ground and run over them to collect a Woodland Rhino Beetle or two. These bugs can be traded in at a later point in time to upgrade your potions.
Continue down the pathway to get to the X that is on the map. You’ll reach a higher ledge that you cannot quite jump up to. Instead, push the nearby log against the wall and use that to climb up to the higher ledge. Continue down this path to enter the Faron Woods.
2.2 Faron Woods


After speaking with Fi and getting an introduction of the area, run right ahead (past a bird statue that you should interact with to add to your map) and you’ll see a rope hanging down. Jump over and grab it and then use the Wiimote to swing yourself back and forth. Press the ‘A’ button to jump off when it is close to the other side.
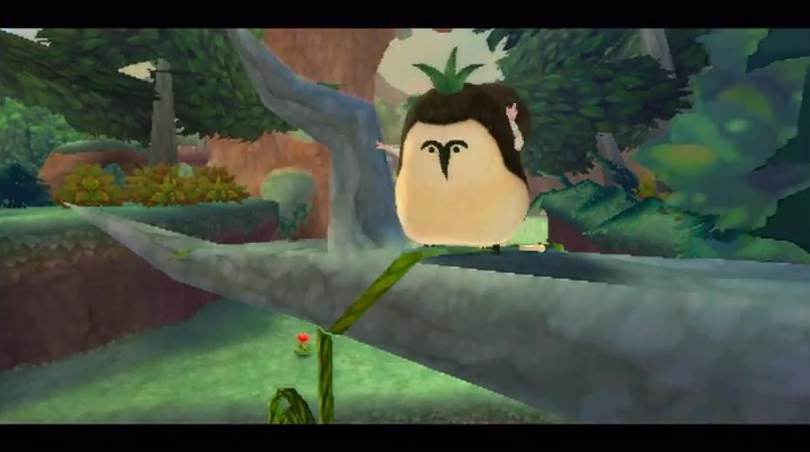
Continue forward and there are a few small trees that are blocking your pathway. Use your sword to cut these down. Continue forward and you’ll find a couple of red bokoblins tormenting something beneath the grass. Defeat the two red bokoblins and then speak with the plant to find a strange looking creature underneath. The creature will get up and run off to the area ahead. Fi jumps in and explains that he is a member of the Kikwi tribe that resides here in the forest. Strangely, the Kikwi are being detected as Zelda by your swords dowsing capabilities.


Run ahead and you’ll find a steep incline, so dash ahead to get to the top. Continue ahead and you’ll find that same Kikwi once again. Before you get a chance to chat with him, he will run off and hide. The Kikwi will hide behind a nearby Mushroom and if you use your dowsing ability, you can easily sense where it has gone. Slash at the mushroom and he will run off elsewhere.
Once you slash at the mushroom, it will unleash some spores into the air. If you pull out an empty bottle you will be able to swipe some Mushroom Spores. Some of the Mushrooms within the Faron Woods will be glittering before you slash at them. Once you slash at them, they too will release spores, but these are the special Glittering Spores. With these you can sprinkle them on recovery hearts to turn them into fairies. Additionally, you can sprinkle them onto rupees and you might get lucky and have the rupees turn into more valuables rupees, or even the negative valued rupoor. Glittering Spores can be used five times before the bottle becomes empty once again.


Continue using your dowsing ability to chase after the Kikwi. He will hide behind another mushroom and then behind a tree in the distance. After uncovering him the third time, he’ll finally stop and chat to realize you are no harm to him. He introduces himself as Machi and mentions that he previously ran into Zelda. This explains the strangeness in the dowsing that was confusing Machi with Zelda.


Our next job is to find the Kikwi Elder. Use the dowsing mechanism and you’ll get pointed in the right direction. Head back in the direction you came, and if you look off to the left, there is another sandy incline. This time there is a deku baba located right in the middle of it. Dash up along one of the sides, avoiding the enemy in the process. If you’d like, you can pick up the large rock and toss it at the deku baba to defeat it.


Pass through this area and you’ll find more red bokoblins as well as a new enemy Octorok. These grass varieties of octoroks will shoot rocks out towards you. Link can use his shield attack by pushing the nunchuck forward and deflecting the rocks back towards the octorok. Alternatively, a well timed sword slash will do the same thing.
There is a small pond and waterfall just to the left here. Climb up using the log and you may find an Amber Relic in the water. This is another type of treasure that Link can collect and it can be used to upgrade items. This is the most common treasure that you will find throughout your quest. Be sure to pick up any of these you see, we will need at least two of them shortly.
Continue along the path and you’ll see a large log on the right. You can push it down, revealing another Amber Relic and making navigation of this area a bit easier. Just below is a bird statue called In the Woods, which you should activate as we’ll use it in the future to return to this area. Climb back up the log and follow this pathway upwards and to the left, cutting down some trees in the process. There is a strange looking door to the right, but we cannot do anything about it for now. Instead, continue along the pathway, defeating some octoroks and a deku baba in the process.


You’ll see a rope that is attached to the ground here. Slash at it to detach it from the ledge. Jump on over and grab the rope, using it to swing over to the other side. It is here that you will find the giant Kikwi Elder known as Bucha. Bucha asks you to look for the three Kikwi that are still missing. Fi will create the Kikwi as a dowsing option, making it easier for you to find them.
Just near Bucha, you’ll find a small cave that you can crawl through, so do just that. Climb up the vines on the other side and you’ll find a tightrope. Use the Wiimote to carefully cross the tightrope. Be extra careful as there are some spiky creatures known as Myu hanging from the rope. As you draw closer you can shake the Wiimote forward to jostle and they will fall off. If you lose balance, Link will fall to the side, but will still hang onto the rope. Swing the Wiimote to shake the myu off and then climb back up. Keep going at it until you reach the other side.


Jump down and you’ll find a bokoblin, but this one is a tad bit different. This is a Red Bokoblin Leader who wears a cloth on his head. Furthermore, it uses its horn to call over other bokoblins to join in on the attack. You must defeat the leader otherwise he will continuously summon an endless number of regular bokoblins. Defeat the leader and then finish off all the individual bokoblins.
A Kikwi can be found in the tree here, but he seems to be stuck. In order to free him, dash and shake the nunchuk to roll into the tree, causing the Kikwi to come crashing to the ground. This Kikwi’s name is Lopsa and is the first of the three lost Kikwi. Two more to go!

Grab the rope that was hanging from the tree where Lopsa was and then use the Wiimote to start swinging yourself. Land onto the higher platform and from there push the nearby log. Jump off the ledge and you’ll find a ruin like structure to the right. Don’t mind it for now and instead just run straight ahead. You’ll encounter some new bird enemies that are flying around this area known as Guay. They are fairly harmless and their only attack is pooping on you! If they do so, use a spin attack to get rid of the smell.


Using the Faron Woods map, you want to head to the northern wall and you’ll find some vines hanging from the wall. Climb up the root below them and jump over to the vines. Leap across to the other vines and then land on the higher platform. Slash at the bushes found here and you’ll see a Kikwi crawling around. It will continuously try to crawl under other bushes, so slash them all to cause the Kikwi to stop moving. Finally talk to Erla, the second of the lost Kikwi. One more to go!


Jump off the ledge and run to the right. You’ll find a small hole that Link can crawl through. Do just that and defeat the nearby octoroks. Straight ahead you’ll find a ramp that leads to a higher ledge. Climb up the ramp and defeat the nearby Deku Baba to the right. Afterwards turn around and look to the northeast, and you’ll see a piece of heart waiting for you there. Run on over, cross the tightrope, and grab the Piece of Heart!
Walk back across the tight rope and follow this higher ledge all the way to the other end. If you use your dowsing ability, you’ll find the meter is going crazy, but there isn’t a Kikwi nearby. There is a small hole in the ground around the large tree, so drop down it. Walk around this area and you’ll find the Kikwi hiding underneath a bush. This is the final of the three Kikwi and he goes by the name Oolo.


It’s now time to return to the Kikwi Elder. Dash and jump over the nearby ledge and then begin making your way back to the Kikwi Elder. His location has been jotted down on your map, so use that to track him down. You’ll have to use the same process of using the rope to swing over to reach him.


As a reward for finding all of the missing Kikwi, Bucha will reward you with the Slingshot. Sweet! Bucha also tells you that Zelda ran off to the Deep Woods in the direction of the temple. Shoot the nearby rope to cause it to lower, allowing you to use it to swing across the gap. Do just that and then head straight ahead along the path. You’ll see some water on the right. Just to the right of the water, there is a narrow passage that you can squeak right by.


You’ll now be back near the ruin of that strange structure. Head to the top of it to get another bird statue added to your map, the Viewing Platform. Then head behind the structure to find another one of those curled up green ropes. Shoot it with the slingshot and then climb up. Swing yourself to the higher ledge and then progress towards the Deep Woods.
2.3 Deep Woods
Once you enter, you’ll immediately encounter a number of red bokoblins, including a red bokoblin leader who will summon his friends to fight. Defeat all of these enemies and then progress along the pathway to the right. You’ll come across a tight rope with a hornets’ nest. Use the slingshot to shoot down the nest from a distance, causing it to fall into the abyss.

Walk across the tightrope and defeat the bokoblin that is in this area. Continue along the linear path and fight the octorok that can be found here. The bridge to the temple has been broken, so we’ll have to find another way around. Turn to the right and you’ll find a ledge that Link can grab on. Do just that and then make your way to the left.
There is a tightrope here and a bokoblin that is waiting for you on the other side. There are also some myu on the rope so be careful. Once you start walking across the tightrope, so will the bokoblin on the other side. Jostle so that the myu and bokoblin are knocked to the ground.


There is a tree right in this area and right behind it there is a small tree stump. If you’d like you can sit down on thus stump and Link will restore his health! Be sure to interact with the Bird Statue as well to add it to your map.
There is a rope hanging from the tree in the next area, but this gap is quite the distance. You’ll have to have a running start and then leap in order to reach the rope. Do so and then swing across to the other side. Run along the path and you’ll meet a new variety of deku baba known as the Quadro Baba. As its name suggests, this enemy has four parts of its head instead of two, allowing it to open vertically or horizontally. It will constantly change, so make sure your sword slashes are precise, based on the direction its head opens. Alternatively, you can deliver a shield bash to stun the quadro baba. Turn to the left and walk up the higher platform to find a treasure chest containing a red rupee.
Continue along the pathway and you’ll find your Goron friend waiting around. Talk to him and he will tell you about Goddess Cubes (If you refuse to talk to him twice, he will give you a Hornet Larvae and you will be forced to help him). After chatting with Gorko, perform a Skyward Strike on the Goddess Cube. This will create a treasure chest on one of the floating islands somewhere in Skyloft. These Goddess Cubes are found all through the land and you can check out our Skyward Sword Goddess Cubes Guide for a full listing.
Make your way towards the entrance of the Temple. Once you are nearby, look at the missing bridge once again and you’ll spy a second Goddess Cube. Be sure to perform a Skyward Strike as it will make another treasure chest appear.
Walk on over to the Temple and you’ll hear some talk about Fi about how dangerous it is within the Temple and she suggests returning to the Sky to further prepare. This is in fact not a bad idea at all. Now that we have the Slingshot, there are a number of things for us to do in the Sky. In particular, we can acquire the Bug Catching Net, which can be used within the Skyview Temple. Additionally, we can find the two corresponding treasure chests of the Goddess Cubes that we just unlocked. There is plenty to do in the Sky, so you can return there, or dive right into the Skyview Temple. Jump on ahead to section 2.5 to find the entrance of the Skyview Temple.
2.4 Extras in the Sky
Immediately when you return to the Sky, Fi will tell you that the Goddess Cubes that were hit with a Skyward Strike have activated Goddess Chests above the clouds. In particular, the first Goddess Chest was activated over at the Pumpkin Landing and the second one activated a chest on a small island just south of the entrance to the Faron region. Our first stop is over at the Pumpkin Landing, located at the southeast part of the Sky.
Once you arrive at the Pumpkin Landing, run to the side of the entrance and you’ll find the Goddess Chest. Open it up to get an additional Adventure Pouch Slot! This will allow you to hold up to 5 items in your Adventure Pouch. While this is not that useful immediately, this could come in handy as you progress in the game. Afterwards enter the large building here to find yourself in the Lumpy Pumpkin.


Once you arrive you’ll see some rupees and a piece of heart sitting atop the chandelier in the center of the bar. You can speak to the folks here at the tavern and in particular if you speak to the Owner, he’ll tell you not to mess around. In particular he mentions for you not to mess around with his chandelier.
Run to the second floor and then roll into the balcony railings twice, causing the massive chandelier to fall to the floor. Run downstairs and collect the second piece of heart that has fallen to the ground! Also collect the rupees here and then speak with the tavern owner.


The owner is frustrated at you for breaking the chandelier and says that you must work for free to pay off every single rupee that the chandelier cost. This triggers the beginning of one of the sidequests in Skyward Sword, but there are multiple steps to this sidequest and we can only complete the first one as of now. If you have an empty bottle, the store owner will fill it up with Hot Pumpkin Soup and asks you to deliver this to Eagus, the knight commander at the Sparring Hall. There is a time-limit of 5-minutes before this soup will go cold.
While you can do this first step now, there is no reward to doing so. Thus, we’ll completely skip this quest for now and return to it once we can complete it in its entirety. You can drink the soup at any point to free up your bottle. For now, exit the Lumpy Pumpkin and jump back onto your Loftwing.


Our next destination is to fly over to the second Goddess Chest, just south of Skyloft. Once you arrive you’ll see that this small island is completely empty, other than the chest. Open it up to get the third piece of heart! Afterwards, jump off the island and get back on your Loftwing.
One of the islands in the sky that you can fly on over to is Bamboo Island. It is located directly north of Skyloft and it’s one of the few islands in the sky that has an inhabitant. Peater can be found here during the day and he runs the the Clean-Cut Challenge minigame. It costs 10 rupees to play and it involves cutting down a bamboo tree.
The key is to try to swipe as fast as you can left and right, while trying to keep the Wiimote from tilting. If you tilt it just a bit, the bamboo tree will cut diagonally and it might fall further away from your sword, lowering your chance to get a higher score. It might take some practice, but you should be able to score somewhere in the mid-20’s after a few tries. Listed below are the rewards that you will get for scoring in certain point ranges.


0-15 – Nothing
15-19 – 30 Rupees
20-27 – Treasure (Monster Horn, Evil Crystal)
28+ – Rare Treasure (Blue Bird Feather, Goddess Plume, Golden Skull)
You will be able to find these treasures elsewhere, but this is a good location if you’d like to stock up on them now for upgrades. Furthermore, since it is relatively easy to score in the 15-19 range, you can play this game repeatedly, and each time you’ll get a net gain of 20 rupees.
Now that we have the Slingshot, we are able to access Beedle’s Air Shop, which circulates its way around Skyloft. Fly on over to Skyloft and then look in the air to find Beedle’s Air Shop. If you are having trouble doing so, you can glance at your map to see where it is at the moment. Use your slingshot to hit the bell on the Air Shop, causing a rope to be lowered. Run on over and climb the rope to enter the shop.
Beedle will have four items for sale at a time and in this first visit he has the following:
Bug Net – 50 Rupees
Extra Wallet – 100 Rupees
Life Medal – 800 Rupees
Adventure Pouch Slot – 300 Rupees
You should have close to 150 rupees by now if you’ve been following along. You certainly want to purchase the Bug Net right now and if you have enough rupees, purchase the Extra Wallet. The Bug Net will allow you to catch small birds, bugs, and other goodies, which can be used to store in bottles or to upgrade your potions. The Extra Wallet will allow Link to hold an additional 300 Rupees, raising the total number of rupees he can hold to 600. This will come in handy early on as you’ll easily pass the 300 mark soon.


Run on over to the Bazaar and make your way to Gondo’s Scrap Shop. You are able to upgrade your items using the Treasures that you find throughout your quest. Right now there are several items that upgrades are available for, but we don’t have the treasure for most of them. The one that you should have enough treasure for is the Banded Shield. This item takes 2 Amber Relics, 1 Monster Claw, and 1 Jelly Blob. If you need a Monster Claw or Jelly Blob, you can defeat the Keese and Chuchu in the Waterfall Cave. For the Amber Relics, hopefully you picked up two in Faron Woods.
The Banded Shield allows for more resistance against enemy attack than that of the Wooden Shield. This upgraded shield could be of great use during the Skyview Temple. If you don’t have the materials to upgrade now, though, you can do it later. The materials will be more plentiful as the game continues.
With all those goodies out of the way, jump off one of the nearby docks, land on your Loftwing, and fly back over to the Faron region. Once you arrive you will have option to land at any of the Bird Statues that you’ve activated. Since we are ready to travel to the first dungeon, lets land at the landing that is titled Forest Temple.
2.5 Entering the Skyview Temple
Once you are ready to tackle the Skyview Temple, you’ll immediately be confronted with a puzzle. How the heck do I enter this dungeon? There is a clue from a stone tablet behind a tree just to the right of the dungeon, but the trick is to look up!


There is a pink diamond-like shape located just above the entrance to the Temple. Use the Slingshot to hit the crystal switch and this will open the door to the Temple.
- Chapter 1 – Skyloft
- Chapter 2 – Faron Woods
- Chapter 3 – Skyview Temple
- Chapter 4 – Eldin Volcano
- Chapter 5 – Earth Temple
- Chapter 6 – Lanayru Desert
- Chapter 7 – Lanayru Mining Facility
- Chapter 8 – Isle of Songs
- Chapter 9 – Lake Floria
- Chapter 10 – Ancient Cistern
- Chapter 11 – Lanayru Sand Sea
- Chapter 12 – Sandship
- Chapter 13 – Volcano Summit
- Chapter 14 – Fire Sanctuary
- Chapter 15 – Thunderhead
- Chapter 16 – Song of the Hero
- Chapter 17 – Sky Keep
- Chapter 18 – Final Showdown
