- Chapter 1 – Mercay Island
- Chapter 2 – Temple of Fire
- Chapter 3 – Ocean King Part II
- Chapter 4 – Temple of Wind
- Chapter 5 – Ocean King Part III
- Chapter 6 – Temple of Courage
- Chapter 7 – Ghost Ship
- Chapter 8 – Ocean King Part IV
- Chapter 9 – Goron Temple
- Chapter 10 – Temple of Ice
- Chapter 11 – Ocean King Part V
- Chapter 12 – Mutoh’s Temple
- Chapter 13 – Ocean King Part VI
5.1 Optional Goodies
OPTIONAL: This entire section of this chapter is optional and it involves goodies that we can now collect with the bombs. Skip ahead to section 5.2 to continue onward with the main quest.
Return to Linebeck and set sail for Bannan Island at the northeast corner of the quadrant. Enter the cave on this island and use bombs to blow up the cracked wall. Make your way through the cave and exit on the other end. Speak with Salvatore, the man sitting at the table in the middle of this area. He runs a cannon mini-game and charges 20 rupees to play. Salvatore explains how to play the game. Hit blue targets to get 100 points, and hit red targets repeatedly to earn 20 points per shot. There are a number of prizes you can earn depending on the scores you reach. Additionally, if you beat your record, you will earn another prize. This location is a good place to earn some extra free rupees, but at the very least, keep playing until you have won the Bomb Bag upgrade. Afterward, return through the cave and head back to the boat.Optional: Bannan Island - Bomb Bag Upgrade


Use the Cyclone Slate, or just set sail back to the southwest quadrant and head over to the Isle of Ember once again. Once you arrive, return to Astrid’s Hut and speak with her. After finding out that you have rescued another spirit, she will reward you with a 5th Wisdom Gem.Optional: Wisdom Gem #4


Return to Linebeck and set sail for Mercay Island. Once you arrive you can run over to the Mercay Island Shop where you’ll find that bombs are now for sale. If you haven’t already, you should go ahead and purchase the Power Gem from the store, as by now you should have enough rupees to acquire it.Optional: Power Gem #5


Make your way back to the west side of Mercay Island and speak with Oshus. Much like Astrid, he will congratulate you for getting as far as you have, rewarding you with a Power Gem. NOTE: If you don’t talk to Oshus at this point, he will eventually just mail the Power Gem to you in a letter.Optional: Power Gem #6


Make your way to the north end of the island and you’ll finally be able to blow up those cracked blocks that have been blocking your way.

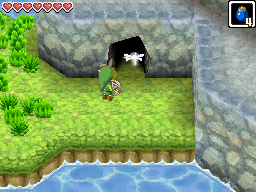
In the area just near the entrance to the Temple of the Ocean King, there is a cracked wall that can be blown up using the bombs, so do so and then enter the cave. There isn’t too much to do inside this cave at this point in time. You can leap across the ledges and find a treasure chest that contains another Power Gem. We will return here at a later point once we get a new item. At this point you can exit the cave and make your way back to the Temple of the Ocean King.Optional: Power Gem #7


5.2 Temple of the Ocean King III
Your third journey through the Temple of the Ocean King will have you retrace your steps through several familiar floors. Now that you have the bombs, there are a few shortcuts to make the route a bit faster. The Temple guide below will still cover all the floors, but we’ll quickly run through some of the familiar areas, mainly pointing out the new features.
There is nothing new on floor 1F, so run over to the staircase and head down to floor B1.
Run over to the northeast corner of the room. Now that you have bombs you can blow up the cracked blocks to the left, allowing for quick access to much of the room. Step on the floor switch to open the door and then run over and grab the small key. Return to the locked door at the northeast corner of the room and head down the stairs.


Wait until the Phantom is looking to the west and dash southward. There is a cracked wall to the south that you can blow up, revealing a shortcut. Do just that and the Phantoms will likely be alerted. You can run to safety at the northeast safe zone and wait for the Phantoms to retreat.


You will still need to hit the two crystal switches near the northeast part of the room. Do so and the small key will once again drop. Run over to the safe zone at the east part of the room. When the coast is clear, step on the floor switch and use the Boomerang to snag the small key.


Wait until the Phantom is heading toward the southwest corner of the room, then quickly run southward across the lowered blocks. Hit the switch to change which blocks are lowered, and then run to the locked door to the west. Use the small key and head down to the floor below.
Unfortunately, this floor does not have any large shortcuts, but there are a few notable changes. You will still need to collect the three Force Gems and place them in their proper slots at the top-right portion of the room. The first Force Gem can be snagged from the treasure chest at the northwest area of the room. Once you place it in its slot, run over to the northeast corner of the room. You can use bombs to blast away the blocks and break the yellow jar for some extra time.


The second Force Gem is at the southeast corner of the room within the treasure chest. After snagging the second Force Gem, return to the southeast corner. Just to the right of the flames, there is a soft soil spot where you can dig up a geyser with your Shovel. This offers a small shortcut. Step on one of the two floor switches, causing the Phantom to fall into the abyss.


Grab the small key that is left behind and use it to unlock the door at the southwest portion of the room. Take the third Force Gem to its proper slot and then head up through the door. In the next room you can now tap on the door and Neri, the Spirit of Wisdom will open it up. Before heading down the steps, be sure to break the yellow pot on the left side of the room for some extra time. Continue down the steps to the next floor.
On this floor you will be introduced to Phantom Eyes. If they spot you, they will slow down your movement and cause Phantoms to quickly appear. Walk down on the right side of the screen until you reach a gust jar that is blocking your way. Trace a path with your Boomerang to hit the crystal switch, causing the wind to subside. Before heading down, trace a second path with the Boomerang and hit the Phantom Eye. While it is stunned, run over and slash at it with your sword to defeat it. Be sure to also use your Boomerang to break the yellow jar at the corner of the room to acquire some extra time.


Run over to the safe zone if needed and wait for the Phantom to begin walking upwards. Follow the Phantom up and to the left, being sure not to get spotted. Once you are in the center of the room, don’t peek your head too far north, as the Phantom Eye will spot you. Instead, wait just around the corridor and toss the Boomerang at the enemy to stun it. Defeat the Phantom Eye and then run over to the northwest corner of the room. You can break the jar to create a safe zone.
As you traverse across this room, carefully defeat all of the Phantom Eyes that are around the various corridors. Once you defeat all of them, a large treasure chest will appear at the east end of the room that contains the Power Gem.Optional: Power Gem #8


Wait until the third and final Phantom Eye is moving southward and then quickly run over to the safe zone at the west end of the room. From here you can wait until the Phantom Eye comes nearby and then stun it with your Boomerang. Near the southwest corner of the map, use the Shovel to dig up the soft soil spot. Ride the geyser to the higher platform and strike the crystal switch. This will cause all of the gust jars in the room to go out, making for quick navigation throughout the room. Additionally, while standing next to the crystal switch, if you trace a pathway northward with your Boomerang, you can hit a yellow pot for an extra 30 seconds.


Run over to the western safe zone and wait until the Phantom starts walking southward. Run to the east a bit and you’ll notice a crack in the nearby wall. Toss a bomb to blow open a hole. Be careful as the Phantom may draw near due to the noise. Run inside and strike the switch, causing the spikes on the east side of the room to drop.


Maneuver around the Phantom and run over to collect the small key. With the key in hand, make your way to the locked door at the south end of the room while avoiding the Phantom. Open the door and head down to the next floor.
Wait for the spikes to lower on the left and then run past them. There is a crystal switch at the far southwest corner of the room. Wait until the spikes lower and then smack it with your Boomerang. This will cause the spikes on the right side of the room to lower. You can run over to get 30 seconds of time, as well as replenish your health. Run back to the left and then head up, where the door will shut behind you.


Four Yellow ChuChu will appear. Hit them with the Boomerang to stun them and then finish them off with some sword slashes. When all four are defeated, be sure to grab the 15 seconds of time at the west end of the room and then travel eastward.


Once again the door will shut behind you and this time you’ll be greeted by some Miniblins. Make quick due of these enemies and then collect 15 more seconds of time from the right side of the room. Run northward and use the Boomerang to hit the crystal switch to the right, causing a treasure chest to appear that contains a Red Potion. Note, if you already have two potions, this chest will contain some rupees instead. Run over to the door and head down to the next floor.
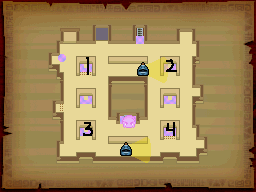
Once you arrive at this floor, wait until the Phantom Eye at the northeast corner comes near and smack it with the Boomerang. When the coast is clear, run over to the safe zone at the northeast corner of the room. Here you will find a massive tablet that states that it is the second tablet in the governing crest. You can make a note on your map with the number 2. NOTE: There are four tablets in this room and while you can look at all four of the tablets to figure out the puzzle, you can also just skip down in the guide to find the immediate solution, as reading the tablets is not required.


Next, if you run to the southeast corner of the room you can hit the crystal switch, lowering the nearby spikes. Read the tablet here and then mark it with a number 4 on your map. Just to the left of the statue there is a floor switch that will cause the nearby gust jar to wind down.


Just to the left of this gust jar there is a second one, but the floor switch to deactivate this gust jar is on the left. Be careful to avoid both of the Phantoms and the Phantom Eye and run along the southern end of room before then stepping on the floor switch. With the gust jar now deactivated, run to the safe zone near the large red door. From here you can target the Phantom Eye on the left with your Boomerang and then defeat it with your sword. Doing so will cause the spikes at the west end of the room to lower.
Run over to the west part of the room and break the pot to get some extra time. Step on the nearby floor switch to deactivate the gust jar found here as well, giving you quick access to the safe zone. Don’t read this tablet as it will cause two Phantom Eyes to appear in the room.


Run over to the northwest part of the room and break the red pot to create a small safe zone. Pull out your Shovel and dig up the nearby soft soil, then toss a bomb onto the newly revealed wind geyser. This will blow up the cracked blocks. Ride the geyser up and hit the crystal switch, causing the nearby spikes to lower. Read the tablet that is now accessible to find that it is both the first and last point in the sacred crest, so mark it with a 1 on your map.


The final tablet is at the southwest corner of the room and can be accessed after bombing the cracked blocks. Be careful as the bomb will alert any nearby Phantoms. This tablet is the 3rd for the crest, so be sure to mark it on your map.


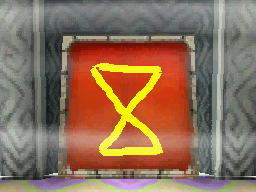
Run over to the large red door in the center of the room where you will need to draw the crest. The pattern matches the order that the tablets in the room gave. In one stroke, place your stylus at the top-left, move it to the top-right, then to the bottom-left, then to the bottom-right, and finish off back at the starting point at the top left. The shape is that of an hourglass and correctly drawing it will cause the door to open, so head on through.
Climb the steps and walk up to the sun symbol. You have to press the crest up to your map. If you look closely, the image is actually an upside image of the southwestern quadrant. Pull up your Sea Chart and select the southwestern quadrant. At this point you need to close your Nintendo DS/3DS. Yes, actually close the clam-shell. Note: If you are on the Nintendo 2DS you will need to just put your system into sleep mode. Doing so will cause the symbol to appear on your map in the middle of the sea. Step into the blue warp portal to return to the temple entrance.

Back outside, run on over to Linebeck and along the way, you’ll notice the Mailbox is shaking. There is a letter from Eddo at Cannon Island. He mentions that he has been working on a Salvage Arm and it is now ready. Once you are ready, head to Linebeck and set sail.
After completing the Temple of the Ocean King Part III, the Treasure Teller on Mercay Island is now open for business. Here you can sell some of your treasure, as well as any Ship Parts. The price of each Ship Part and Treasure piece is variable from game to game. He may pay 0, 50, 150, 800, or 1500 rupees for any particular treasure or ship part. Whatever he offers to pay for a particular item, it will remain that price for the duration of the game. However, if you start a new game, treasures might be assigned different values. At this point you should trade in as many of your treasures and any duplicate ship parts to get some rupees.Optional: Treasure Teller


Speak to the man by the dock who is standing next to Linebeck. He’ll talk about the Salvage Arm that is now available over at Cannon Island. If you tell him you already have the Salvage Arm, he will sell you a Treasure Map for just 50 rupees.Optional: Treasure Map #9


5.3 Salvage Arm
Set sail for Cannon Island and then enter the building to speak with Eddo. He wants you to shout about how much you want the Salvage Arm. This involves you yelling or just blowing into the Nintendo DS microphone. Depending on how loud you yell, Eddo will sell you the Salvage Arm for a cheaper price. The cheapest you can get the item for is 200 rupees, but you could pay up to 1,000 rupees if you don’t yell loud enough at all. After acquiring the Salvage Arm, return to the ship and set sail.


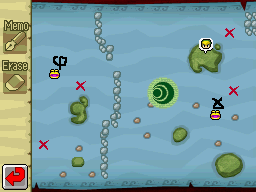
Now that you have the Salvage Arm, set sail for the green crest that is in the middle of the quadrant. Once you arrive, tap the Menu button and select the Salvage icon. This will release the Salvage Arm down to the depths of the sea. Unlike in The Wind Waker where Link would just pull up the treasure automatically, this time you’ll have to do some work.


Drag the bar to the left or right to move the arm side to side. Tap the red scroll upward to slow down the rate at which the arm is dropping or tap the red scroll downward to speed things up. Your Salvage Arm has its own health bar, indicated by the yellow diamonds at the top-left of the screen.
As you lower the Salvage Arm, you’ll run into a number of obstacles. Underwater you will find stationary Octomines that will explode if you hit them with your Salvage Arm. Additionally, you’ll find some Octomines that move left and right, sending a gust of water towards your arm, which will cause it to sway, potentially hitting another mine or wall.


While salvaging for treasure, there are a number of rupees that can be collected, however, they are often found in dangerous areas between Octomines. Once you reach the bottom of the sea floor, position your salvage arm above the treasure chest to grab it. Now carefully pull it back up, avoiding the Octomines. Successfully doing so will earn you the Sun Key!


Up until this point, we have collected nine Treasure Maps, but only eight of them are accessible at the moment. The 4th Treasure Map is marked by an X that is southeast of Bannan Island. You won’t be able to access this treasure until you can first reach the Northeast Quadrant. The locations and goodies of the 8 Sunken Treasures are listed below. NOTE: If you bang up your Salvage Arm, you can get it repaired at the Shipyard on Mercay Island. Your rewards include 5 ship parts, a treasure, and 2 additional minutes of sand for your hourglass. There are a ton of rupees to collect as well. For the most part, you should avoid any hard-to-reach rupees, with the exception of the big green rupees, as those are worth getting.Optional: Sunken Treasure
Chest
Location
Southwest of Molida Island
Northeast of Mercay Island
(1 minute)
Southwest of Isle of Gust
North of Molida Island
West of Bannan Island
East of Isle of Gust
Southeast of Mercay Island
West of Cannon Island
(1 minute)
- Chapter 1 – Mercay Island
- Chapter 2 – Temple of Fire
- Chapter 3 – Ocean King Part II
- Chapter 4 – Temple of Wind
- Chapter 5 – Ocean King Part III
- Chapter 6 – Temple of Courage
- Chapter 7 – Ghost Ship
- Chapter 8 – Ocean King Part IV
- Chapter 9 – Goron Temple
- Chapter 10 – Temple of Ice
- Chapter 11 – Ocean King Part V
- Chapter 12 – Mutoh’s Temple
- Chapter 13 – Ocean King Part VI
