- Chapter 1 – Skyloft
- Chapter 2 – Faron Woods
- Chapter 3 – Skyview Temple
- Chapter 4 – Eldin Volcano
- Chapter 5 – Earth Temple
- Chapter 6 – Lanayru Desert
- Chapter 7 – Lanayru Mining Facility
- Chapter 8 – Isle of Songs
- Chapter 9 – Lake Floria
- Chapter 10 – Ancient Cistern
- Chapter 11 – Lanayru Sand Sea
- Chapter 12 – Sandship
- Chapter 13 – Volcano Summit
- Chapter 14 – Fire Sanctuary
- Chapter 15 – Thunderhead
- Chapter 16 – Song of the Hero
- Chapter 17 – Sky Keep
- Chapter 18 – Final Showdown
13.1 More Fun in the Sky
After a short chat with the Ancient Robot, run over to the nearby bird statue to return to the sky. Our next destination is the Isle of Songs over in Thunderhead. Set the course and fly straight into the massive cloud.

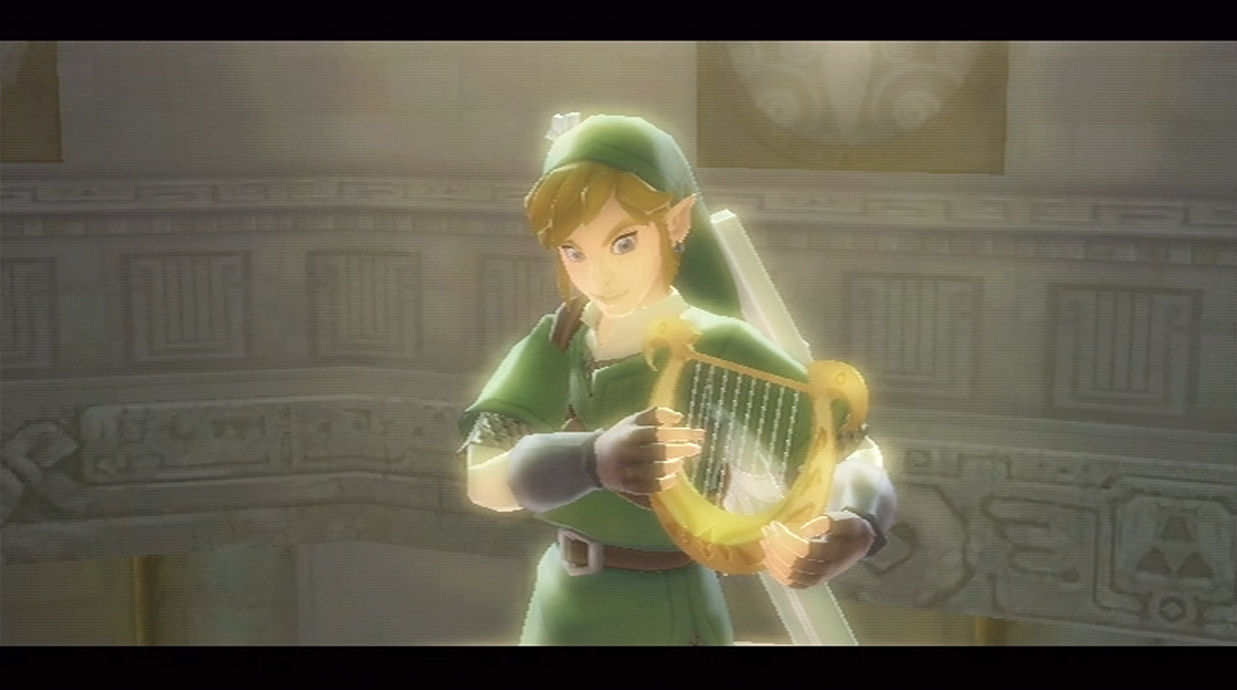
Land on the Isle of Songs and crawl in through the small hole. Run on over and deliver a Skyward Strike to the emblem. After a cutscene with Fi, Link will learn the next song on the Harp, which is called Din’s Power.
Now that we have the Double Clawshots and the Bow and Arrow, there are a few new things we can do in Skyloft. These are all optional, so if you want to progress in the main quest, jump over to section 13.2.
- Goddess Chest #19 is found within the storage area of Gondo’s Scrap Shop and it contains a Gold Rupee.
- Goddess Chest #20 is found on the island just northwest of Fun Fun Island and it contains the Potion Medal. Land on the smaller platform and you’ll see a gate on the other side. Just above it you will see some vines that you can grapple over to. Do so and then drop down to reach the Goddess Chest.
- Goddess Chest #21 is found on top of the Waterfall within Skyloft and it contains Piece of Heart #17. Use your clawshots to grapple onto the vines and reach the top.
If you haven’t completely upgraded your Beetle or any of your Shields, now is a good time to do so if you’d like. However, what is most intriguing now are the upgrades to the bow and arrow. You can upgrade your Bow to the Iron Bow and then again to the Sacred Bow. The treasures that you will need are listed below. The Iron Bow is stronger and can also launch arrows further. The Sacred Bow is even stronger, using a sacred power of the goddess.
- 3 Tumbleweeds
- 1 Evil Crystal
- 3 Monster Claws
- 2 Eldin Ores
- 50 Rupees
- 5 Tumbleweeds
- 2 Evil Crystals
- 3 Lizard Tails
- 1 Goddess Plume
- 100 Rupees
If you’d like to stop at Rupin’s Item Shop, he is now selling the Small Quiver, which will allow you to store an extra five arrows.
After completing the Sandship it’s now time to check on how our pal Fledge has been doing. Enter Fledge’s room at nighttime and you’ll see that he is now more aggressively doing push-ups. Speak to him and you’ll see that he is close to 4,000 push-ups!
You’ll find that the near 4,000 push-ups is just Fledge’s warmup. He’s grown to be quite strong and he thanks Link for all his help. Link will get 5 Gratitude Crystals for his work.
After completing Fledge’s Strength Quest, he can be found near the Sparring Hall during the day. Speak with him and he’ll comment on your sweet bow and arrow. This will trigger a mini-game where Fledge tosses pumpkins into the air and Link must hit them with his Bow.
You will get 10 points for every Pumpkin that you hit, but if you can hit multiple pumpkins in a row, you can get 10 additional points for each additional pumpkin you hit. The maximum you can get for a single pumpkin is 50 points. There are some prizes for good scores, but the top prize is a Piece of Heart and you can get it by scoring above 600 points. It isn’t too difficult and you’ll get the hang of it quite quickly.
If you have gathered at least 1200 rupees, you can afford to pick up another one of the items within Beedle’s Air Shop. If you’ve been following along, Beedle will only have two items for sale. The final Adventure Pouch Slot, as well as a Piece of Heart. The final adventure pouch slot can be useful if you feel the need to have that extra slot. It’s great as it will allow you to hold an extra bottle or medal with you at all times. Shell out the 1200 rupees if you’d like.
When we continue the main quest, we will need one empty bottle, although it’s faster to bring two. Keep that in mind when swapping out at the Item Check before moving on.
13.2 Eldin Volcano: Silent Realm
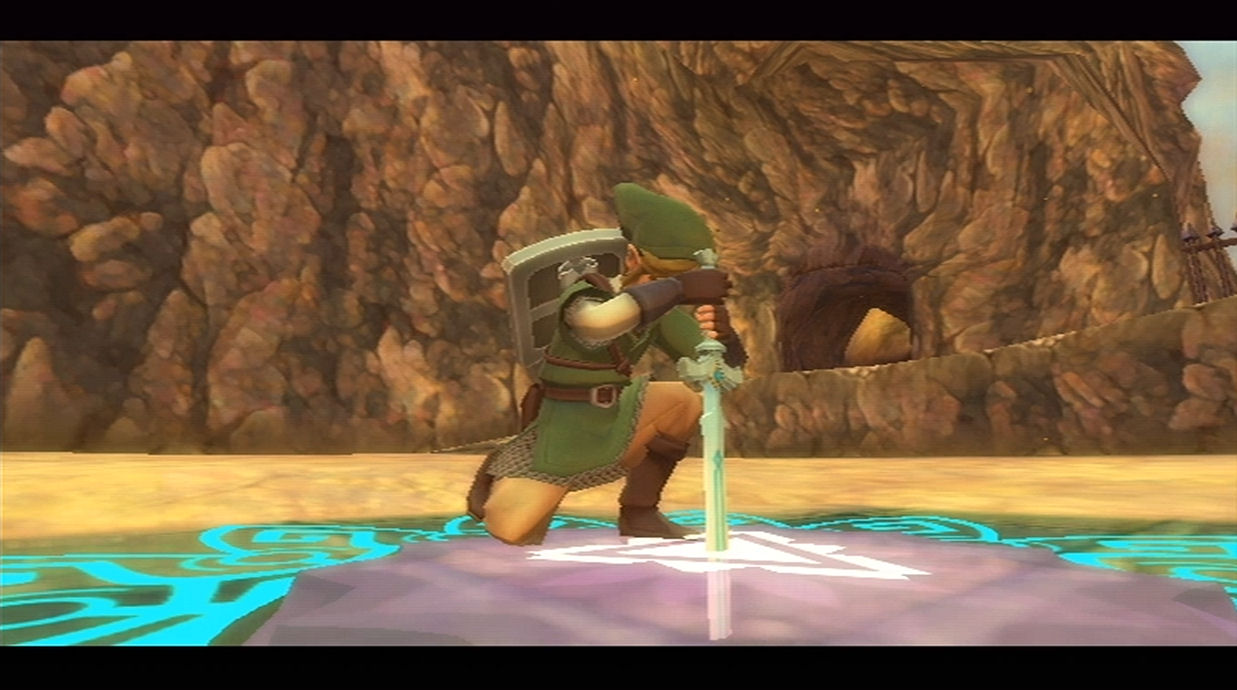
Once you are ready to go, fly on over to the Eldin region and land at the Volcano Ascent, just near where the bridge is. Use the dowsing mechanic to find the entrance to the Silent Realm. Play the newly learned Din’s Power with the harp to open the entrance. Stab your sword into the ground to enter the Silent Realm.

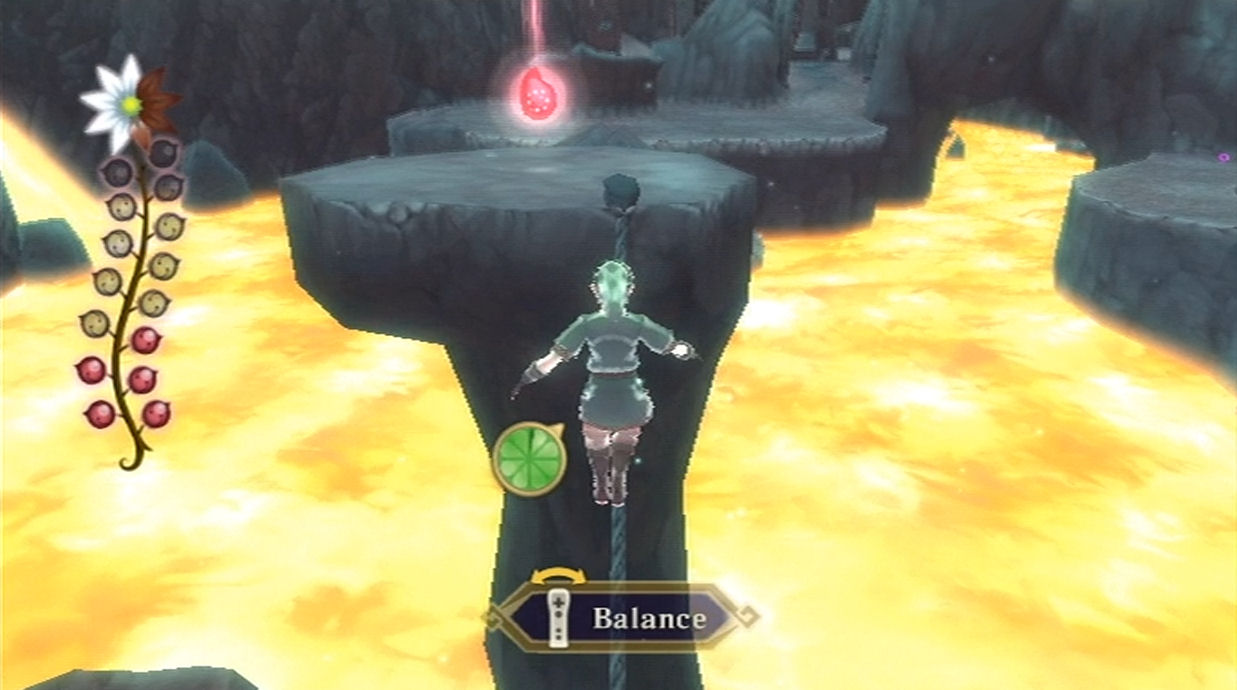
This time the Silent Realm is significantly more difficult and you’ll find yourself having to avoid guardians quite often. There are several waking waters that will automatically summon Guardians, as well as difficult to reach tears that are in the slide area of the region.
The Volcano region is open, but it’s vaster than the other regions. Even when you get a Light Fruit to illuminate the rest of the tears, you might not be able to see all of them right away.

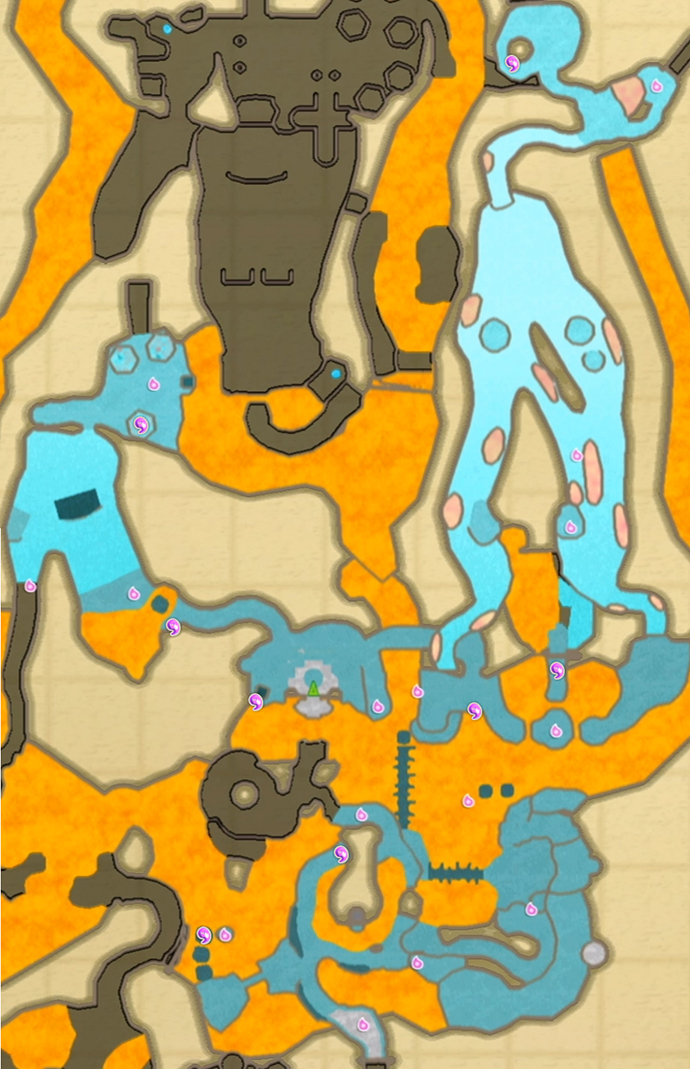
As a quick rundown, three tears are to the west of the starting point. One is at the bottom of the slope near the starting point, one is at the bottom of the same slope, but around the corner. The third is at the top near the Earth Temple.
After you grab those three, backtrack past the starting point and head east, and ride up the wind geyser (even though you don’t have a Sailcloth in the Silent Realm). One tear is in the room at the top of the slide, up the ramp. The next two are down the slide. Head to the right side first, and jump across two wind spouts for a tear (the same spouts we jumped across for a piece of the key to the earth temple, long ago). Once you grab that tear, look to your left, up the slope. If you run and jump from here, you should be able to get the tear more easily than trying to slide into it. If you do slide past it, you can intentionally hit the waking water to come to a stop and then try to run up the slope to grab it before you start sliding again.
The rest of the tears should be relatively easy to find using the Light Fruit and your in-game map, as they are all in the region south of the starting point. You can also refer to the map below. This is also the last chance for a while to easily get Dusk Relics so if you have been short on them for any of your upgrades, now is a good time to get some.
After collecting all 15 of these Tears of Din, you will be rewarded with the Fireshield Earrings. These can withstand heat, allowing Link to travel deeper into the Volcano Summit.
13.3 Volcano Summit
Once you return from the Silent Realm, head eastward to the giant wind geyser. If you never blew up the boulder here, do so using a bomb. Ride the large wind geyser up the mountain.
Walk southward from here and you’ll hear the cling of the Fireshield Earrings once you reach the hot area. Now that you are able to navigate this area for a lengthy period of time, run on up along the left side and enter the Volcano Summit.
Run straight ahead and defeat all the fire keese and red chuchu that occupy this area. You can use the nearby bird statue to save your progress. Turn to the right you’ll find a new variation of an enemy known as a Cursed Spume. They act much like their Fire Spume counterparts, except they spit out an evil curse in your direction and if it hits you, you will not be able to use your sword for a period of time. Use your Bow to defeat these spume and you’ll notice a Goddess Cube on the right. This Cube can be hit with a Skyward Strike, if angled appropriately. If this proves too difficult, it can be hit upfront at a later time.
Go back to the bird statue and then jump down to the area below. Defeat the keese and then run past the cursed spume that are in the lava. Run straight ahead and exit the cave.


Once you are outside, you’ll see a small waterfall just to the left. Fill up as many bottles of water as you can. Technically you only need one empty bottle and you can just keep running back here each time, but it makes things easier if you can fill up two of them.
If you look out in front of the waterfall there is an opening that you can leap off of. Just ahead there is a large pillar and while we cannot see it, there is a Goddess Cube behind this pillar. Jump off the ledge and glide on over, landing on the platform behind the pillar. Perform a Skyward Strike to activate Goddess Cube #22. Afterwards, use your clawshot on the nearby vines and continue along a series of vines until you get back to the waterfall.
Go back into the Volcano Summit and take a left. Defeat the massive red chuchu found here and keep progressing up this ramp. You’ll find Gorko the Goron here and he is blocked from progressing because of this wall of fire. Fi will now grant you the ability to use dowsing to find Goddess Cubes.
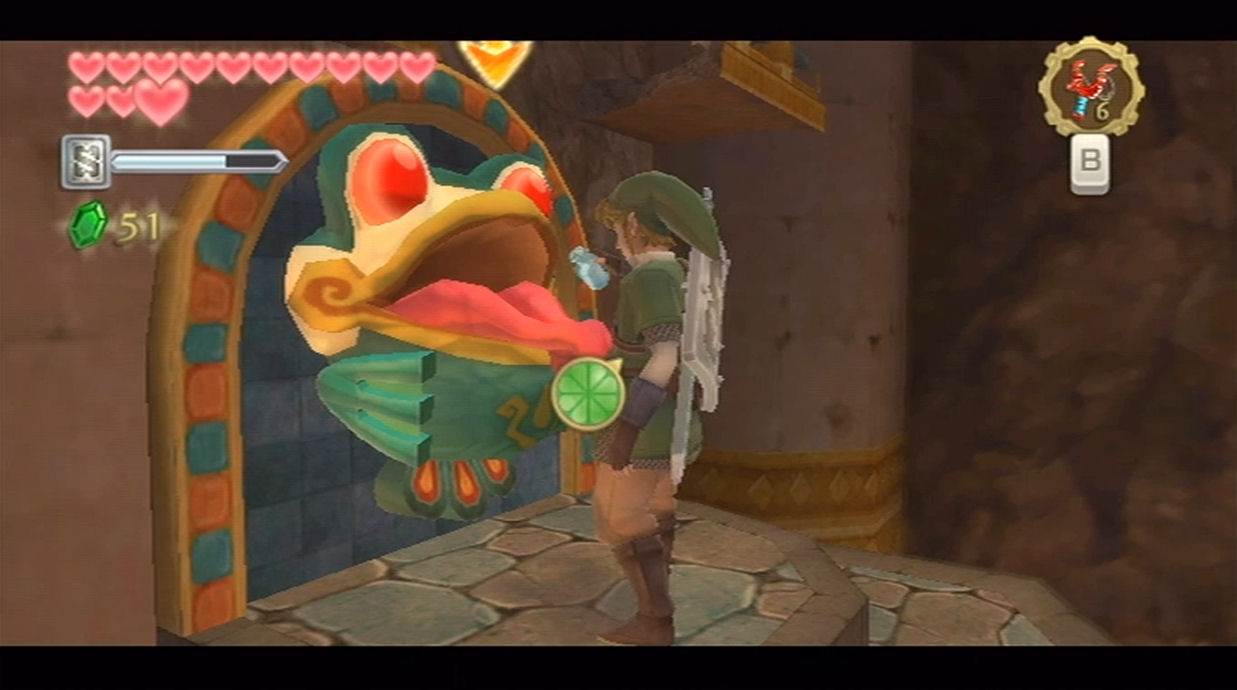

Just to the right of the wall of fire, you’ll find what looks like a frog head of sorts and its tongue is sticking out. Pull out a bottle of water and pour it on its tongue. This will cause the wall of fire to go out! Go to the next room and you’ll find another frog mouth and another wall of flames. This time the ground in front of the frog is broken so you’ll have to find another way. Look against the wall on the left and you’ll see some vines. Claw on over and then jump to the platform so you are standing directly above the frog mouth. Pour some water onto the frog and another wall of fire will disappear.
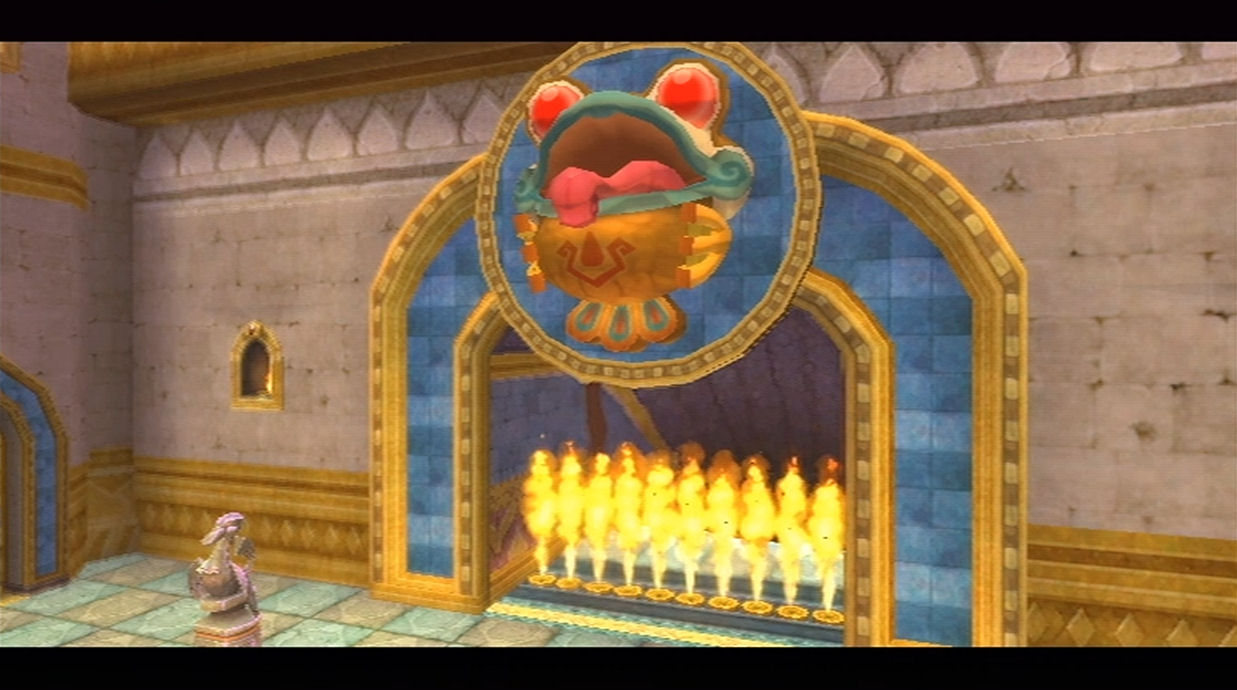
Jump down and run ahead to find the entrance to the Fire Sanctuary. Unfortunately there is another wall of fire that is blocking your pathway, but this time it is a much larger frog statue. An ordinary bottle of water is not going to work, so we’ll need something much bigger.

Turn to the left and jump up the window here. Use the clawshots on the vines and then climb up the pillar. Use the clawshots on another set of vines and you’ll encounter a lizalfos. Continue using the clawshots once more and you’ll find Goddess Cube #23. Perform a Skyward Strike to activate a treasure chest somewhere in the sky.
So back to that water dilemma we just ran into. Where are we going to find such a large bowl of water? Hmm, what immediately came to mind for me was that giant bowl where Faron was sitting in. Run to the bird statue and return to the sky.
13.4 Pour Water on the Fire
Our next destination is back at the Faron Woods region and while we are there, there are two additional Goddess Cubes that we can now pick up. They are on opposite sides of the region though, so it’s up to you if you’d like to grab them. The first one is found within the Deep Woods, so fly on over and land at the Forest Temple bird statue.
Run to the right side of the entrance of the Skyview Temple and you’ll see some vines on the wall, just above the entrance of the Temple. Use your clawshots to get on top of this structure and then use it again by the nearby vines. Deliver a Skyward Strike to activate Goddess Cube #24.
Our next destination is at the Floria Waterfall and the quickest route is to use the bird statue to return to the sky and then land at the Floria Waterfall. Once you arrive face the direction that leads to where the Water Dragon Faron is located. Turn to the left and look up to spot some vines. Use the Clawshots to claw on over and climb up to find Goddess Cube #25. Also, if you look at one of the higher platforms nearby you will see a Gold Rupee just sitting there so use your beetle to grab it.
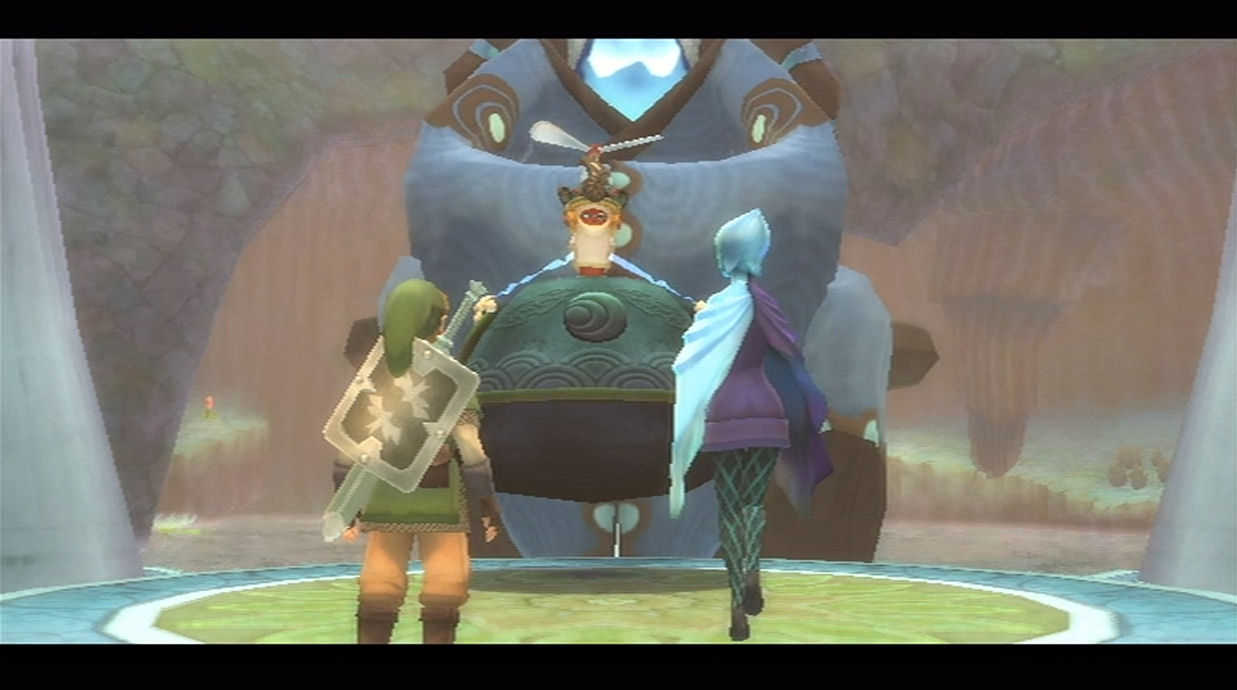
With these cubes out of the way, enter the area where the Water Dragon Faron resides. Swim on over and chat with her and she’ll allow you to take her water basin. Fi will call over Scrapper and he will pick up the water basin. Swim back to the Floria Waterfall and return to the sky.

Fly on back to the Eldin Volcano, but unfortunately you aren’t given a choice of where to land. The robot automatically just takes you to the Volcano entry. You’ll have to scale the mountain once again, this time protecting Scrapper and the Water Basin in the process.
This area is now flooded with bokoblin archers and moblins, so the pathway will be a bit more difficult. To begin, take the left passageway as it’s a huge shortcut up the volcano. You might want to use your bow and arrow to defeat the bokoblin before hand. Follow this pathway and if you haven’t already, blow up the boulder that blocks your path with a bomb.
You’ll reach the first of those large inclines of sand. Use the bow and arrow to knock off the three bokoblin archers that are in your sight. Run on up to the first level platform and wait for Scrapper to carry up the Water Basin. Continue up the incline to reach the top.

Turn to the right and you’ll see a moblin in the distance. You are going to have to get rid of him, but this moblin could give Scrapper some trouble. There are some nearby bomb flowers so I’d suggest just tossing bombs at the moblin without battling it head on. Four bombs will defeat the moblin. Alternatively, if you’ve fully upgraded your bow, the arrows are so powerful that they can defeat this moblin in three hits.
Continue along and climb the vines at the end of the pathway. Follow the pathway, defeating a chuchu in the progress. You’ll have another set of bokoblins to defeat here in this incline area. There are actually five bokoblin archers all the way at the top of this incline and if you aim precisely you can hit them, even from this distance. Run up the incline to the level platforms and you’ll find two more bokoblin here. Defeat them and then run on up to the top of this area.
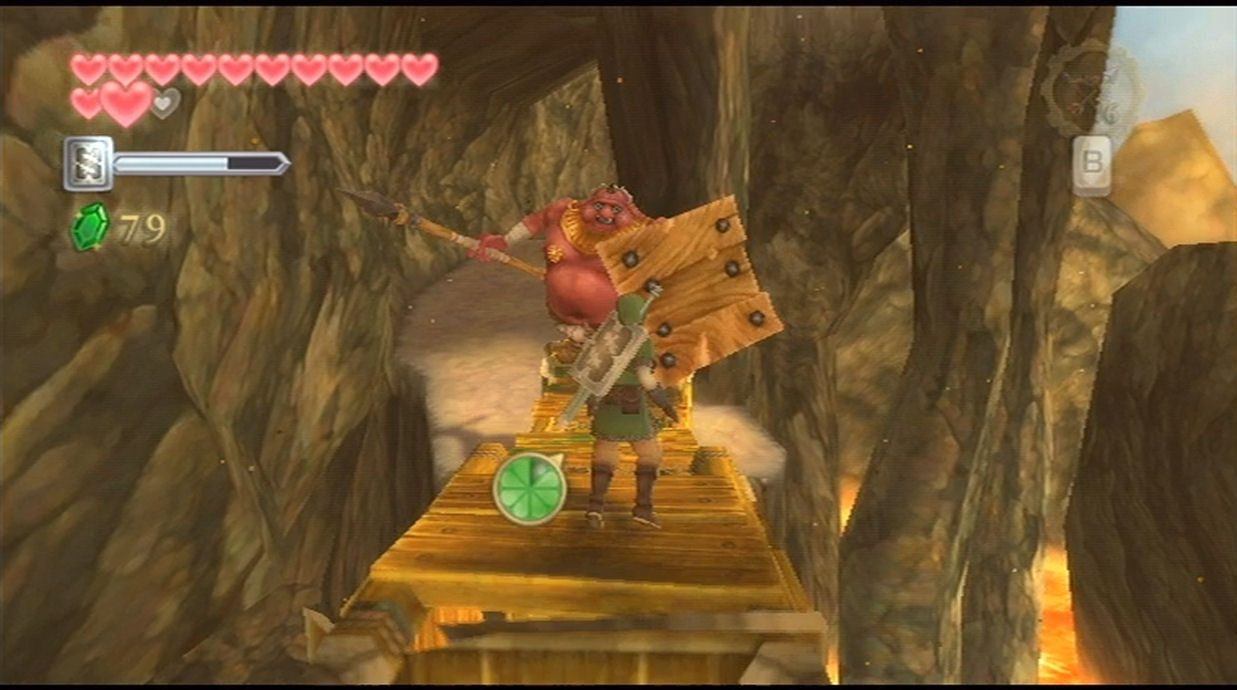
Turn to the right and defeat the three blue bokoblin that are in this area. There is another moblin here, but this is one of the metal shield varieties. The bomb trick won’t work this time around. Your best bet is to run and jump over him and deliver as many sword slashes as you can. Be sure to be aggressive as you want him to keep his focus on you, as opposed to attacking Scrapper and the Water Basin. Again, if you’ve upgraded your bow, you can hit this moblin with five arrows to defeat him.

Continue up the ramp and you’ll encounter three more bokoblin archers as well as another metal shield moblin. Get rid of the bokoblin archers first if you have any arrows. Here’s a trick. If you don’t have any arrows, allow the bokoblin to shoot towards you, but move out of the way. You can pickup their used arrows and shoot them back at them. The moblin is a bit easier to defeat since you don’t have to climb up anymore. Just jump over him and slash away. When he turns around, just jump over once again and defeat him with your sword.
Cross the bridge and follow the path to enter the Volcano Summit. Defeat the fire keese and run up the sand on the left. Drop down and you’ll face off with two Lizalfos. Defeat them and then turn your attention to the cursed spume. You’ll have to get rid of these guys, so use your arrows or a bomb to defeat them. Jump across the gap and head to the next area.


There are no enemies here so run straight ahead to the entrance of the Fire Sanctuary. Once you arrive, Scrapper will pour the water on the large frog, revealing the entrance. You can save at the bird statue just to the left. Once you are ready to go, head inside and enter the 6th dungeon, the Fire Sanctuary.
- Chapter 1 – Skyloft
- Chapter 2 – Faron Woods
- Chapter 3 – Skyview Temple
- Chapter 4 – Eldin Volcano
- Chapter 5 – Earth Temple
- Chapter 6 – Lanayru Desert
- Chapter 7 – Lanayru Mining Facility
- Chapter 8 – Isle of Songs
- Chapter 9 – Lake Floria
- Chapter 10 – Ancient Cistern
- Chapter 11 – Lanayru Sand Sea
- Chapter 12 – Sandship
- Chapter 13 – Volcano Summit
- Chapter 14 – Fire Sanctuary
- Chapter 15 – Thunderhead
- Chapter 16 – Song of the Hero
- Chapter 17 – Sky Keep
- Chapter 18 – Final Showdown
