- Chapter 1 – Gnarled Root Dungeon
- Chapter 2 – Snake’s Remains
- Chapter 3 – Poison Moth’s Lair
- Chapter 4 – Dancing Dragon Dungeon
- Chapter 5 – Unicorn’s Cave
- Chapter 6 – Ancient Ruins
- Chapter 7 – Explorer’s Crypt
- Chapter 8 – Sword & Shield Maze
- Chapter 9 – Onox’s Castle
- Chapter 10 – Room of Rites
3.1 North Horon


From the entrance to Level 2, toss the stone blocking the path to the left aside and head left one screen, where the season will automatically change to Autumn.
In this screen, Maple will likely appear as Link has surely defeated 30 enemies since just leaving the second dungeon. Bumping into her will cause only Link to drop the Lon Lon Egg. Maple will grab it and give Link the Ghastly Doll in return.
Optional: Trading Sequence Item #3 - Ghastly Doll


Head up one screen and use the tree stump to change the season to Winter. There are a couple of optional Pieces of Heart that can be obtained in the woods which are shown below. After choosing whether or not to obtain those, head back to Horon Village via the exit in the far southwestern corner of the woods.
The next Piece of Heart is found within a cave near the entrance to the Woods of Winter. Go to the southwest corner of the woods where Link enters from Horon Village, then head right one screen, where a Red and Blue Pig Moblin roam around another season-changing tree stump, then continue up one screen and climb the stairs. Cross the pile of snow leading to the area where the Windmill is located and enter the cave to find the second Piece of Heart!
Optional: Piece of Heart #2


From the tree stump used to change the season to winter at the north portion of the Woods, head down two screens and continue right one screen. Follow the path east along the lower section of the forest, past another tree stump, to the partially frozen lake. With the power bracelet, Link can now toss aside the boulder blocking the path to the third Piece of Heart!
Optional: Piece of Heart #3


Back in Horon Village, there are a few optional tasks that can be completed at this point, one of which requires the season to be winter. To locate the tree stump in the village, head left two screens and down one from the entrance to the Woods of Winter.
If the season is not winter in the village, head to the tree stump and change it, then go east to Dr. Left’s house. Inside, bomb the cracked wall on the right and exit the back door. Cross the now-frozen pond and open the chest to obtain 20 rupees!
Optional: 20 Rupees at Dr. Left's House


Back at Bipin and Blossom’s House, Blossom will inform Link of her baby’s sickness and request rupees to fund a doctor visit. This is the first time where Link will be asked to assist in helping Blossom with her baby, each decision being crucial to determining the child’s personality much later on.
Optional: Bipin and Blossom's Sick Baby


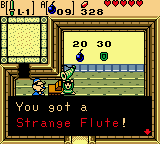
If you chose not to obtain the strange flute from the Subrosian Dance Hall in Chapter 2, Link can purchase an alternate Strange Flute from the Horon Village Shop for 150 rupees. This item will later become Moosh’s Flute, making him Link’s permanent animal companion.
Optional: Purchase the Strange Flute


After finishing up in the village, leave via the northern path to North Horon. Head up to the area just right of the Gnarled Root Dungeon, where a stone blocks a path continuing north. Before continuing further, going on into the northern region of North Horon will set-in-stone whatever animal companion Link will obtain. Refer to the “Optional” bubble below for a recap on getting either Moosh or Dimitri’s Strange Flutes. When ready, throw aside the stone and head through the path further into North Horon.
Do not go past the stone into the northern region of North Horon if you would rather have Moosh or Dimitri as Link’s permanent animal companion. To get Moosh, simply head back south to Horon Village and buy the Strange Flute from the Shop for 150 Rupees. As for Dimitri, Link will have to backtrack pretty far to the Woods of Winter, east of Horon Village, and go back to Subrosia via the portal there. The Strange Flute that becomes Dimitri’s can be won by successfully completing the Subrosian Dance Hall’s dance routine. It may take a few times, but eventually Link will be rewarded with the Strange Flute.
Optional: Last Chance to Get the Strange Flutes


Heading north through the North Horon region, Link will encounter a unique new enemy: The Buzz Blob. It is often best to avoid this enemy, though Link can drop a Mystery Seed on one, transforming it into a “Cukeman” for some interesting effects. Continue north until reaching a tree growing Scent Seeds and swipe them down. Stay on the path, heading right one screen and watch out for the Spiny Beetle hidden among the bushes on the right, then head down one final screen to reach Blaino’s Gym.


Enter the gym and talk with Blaino, who will challenge Link to a boxing match for the price of 10 rupees. Link will be relieved of all his weapons and be left only with his fists to face Blaino, with the goal of knocking one’s opponent outside of the “ring” (the square, blue area in the center of the room) to win. Often times, Blaino will raise his hands in the air preparing for a strong hit, giving Link a prime opportunity to get in a few punches of his own. Carefully avoid Blaino’s punches while using the B and A buttons to attack until you successfully knock him outside of the ring. If Link fails to defeat Blaino, he may challenge again at the cost of 20 rupees, although if Link walks out of the gym and comes back in, Blaino will only charge 10 rupees as if the first bout was never lost. Once defeated, Blaino will surrender Ricky's Gloves to Link.
After defeating Blaino the first time, Link can challenge him over and over with each win earning him 20 Rupees. Blaino will now recognize Link as the “champ” and inform him that the fight costs 10 Rupees with the purse totaling 30 Rupees. As before, Link will have to pay 20 rupees if he loses to Blaino and immediately challenges him again, though he can simply exit the gym and re-enter to only pay 10 rupees for the rematch.
Optional: The New Champ Challenges Again


Exit the gym and backtrack along the path past the Scent Tree, then continue west. Link will eventually cross a bridge into the Holodrum Plain region. Continue west into the wooded area, then walk up one screen to find Ricky, a boxing kangaroo who will allow Link to ride in his pouch after returning his gloves. If Link has not obtained either of the other two strange flutes at this point, Ricky will give Link Ricky's Flute. Ricky can cross single holes blocking the path ahead. He can also punch using the B button, as well as fire off a whirlwind attack by holding the B button for a moment and releasing it when charged.
From where Ricky is located, Link can head down a screen, right a screen, and up two screens. Walking through the wood log on the left brings Link to the Temple Remains. This area is not required until super late in the game and has some dangerous enemies. However, there is a soft soil location here that Link can dig up using the shovel. There are two Armos statues on the left side. From the upper of the two Armos statues, if Link digs two sqaures to the right, he’ll find the soft soil spot.
Optional: Soft Soil Location #4 - Temple Remains (Tier 1-3)


3.2 Releasing the Floodgates


After taking control of Ricky, head down two screens and jump across the pits by walking into them. Continue south past the second set of pits (right one screen from here contains a lone, flowerless bush hiding a stray fairy if needed), then continue south.
After crossing the second set of pits and heading down one screen into a clearing, head one screen right of the area above to a ledge. Use the shovel to dig the bare spot of earth surrounded by bushes to reveal a hidden soil patch.
Optional: Soft Soil Location #5 - Holodrum Plain (Tier 1-3)


Link will reach an area with a suspicious vertical row of trees on the right. Burning the bottom tree will reveal a staircase leading to an Old Man’s hideout, who will take 100 rupees from Link if spoken to.
Optional: Avoid the Angry Old Man


Upon reaching the screen with the vertical row of three trees, head left one screen to reach Mrs. Ruul’s Villa.
Optional: Trading Sequence Item #4 - Iron Pot


Head up one screen to find a large cliff blocking the path forward. Using Ricky, hop against the wall and he will leap onto the ledge above, then continue up one screen. If Link obtained either of the two Strange Flutes from earlier, Ricky will drop Link off and head back home. Otherwise, Ricky can still be left behind at this point as we will not need him for the next section. Continue up another screen and avoid the two Takkuri while heading west into the woods.
Once Ricky leaves after helping Link reach the path to Spool Swamp, he will return to the spot in which he was originally found. At this point, it would seem that getting back across those pits he helped Link clear a moment ago would be impossible. However, if you use the tree stump at the base of the ridge Ricky was able to jump onto, changing the season to Winter, the path to the Holodrum Plain will now be covered with snowy paths and withered trees that are easily bypassed. When coming back to Spool Swamp, simply request the help of Ricky again to cross the pits if the season is no longer Winter.
Optional: Getting Back to Holodrum Plain Without Ricky


Head up and left one screen each into the Spool Swamp region, where Link will come upon a Pegasus Tree. Swipe the Pegasus Seeds down from the tree here and head south. Be careful navigating the path as Link will encounter Orange Tektite and a Spiny Beetle hiding beneath a stone along the way. Continue along the path left one screen, then head up two and right one screen to the Floodgate Keeper’s House.


Inside, Link can speak with the Floodgate Keeper to learn that he has lost his key, an essential tool needed to progress into Spool Swamp. Swipe the lever on the right to drain the pool and discover the Floodgate Key hiding beneath. Grab the key and head back outside, where the small pond beside the house has also now drained. Head down the staircase that was submerged beneath the pond into an underground cave passage.


Use a Pegasus Seed and step on the switch below, then quickly cross the bridge to the other side before it disappears. Continue left one screen, where Link will need to push the larger boulders in a certain pattern to reach the stairwell on the left.


Traverse the cave area by heading left and counter-clockwise around the path. Be wary of the Green Zols that will emerge from the ground in this area and proceed along the path, tossing aside the stones along the way. Eventually, Link will come to a staircase leading to smaller cave area above. Cross this room to the staircase in the upper-left corner, where Link will emerge from the underground on the other side of the large body of water from the Floodgate Keeper’s house.


Head down two screens along the path. The bush to the right in this area is actually a disguised Business Scrub who will offer some information about the swamp before attempting to sell Link a shield for 50 rupees.
In the lower-left corner of this area, lift the stone amongst the bushes to uncover a hidden patch of Soft Soil.
Optional: Soft Soil Location #6 - Spool Swamp (Tier 1-2)


Continue right one screen and walk into the rock with the keyhole to use the Floodgate Key, lowering the gate and allowing the water from the large pool to drain into Spool Swamp. Link will now be able to walk along the shallow waters and explore more of the swamp to the south. Head back left, up, and right one screen each where Link will find Sokra sleeping out by the ledge.


Jump off the ledge and walk around the upper-side of it left one screen, then use the tree stump to change the season to Winter. Now, head right one and down three screens along the frozen path. The next section will differ slightly depending on which Strange Flute, if either, Link obtained previously.
3.3 Navigating Spool Swamp
Continue down, right, and up one screen each across the frozen lake each to find Dimitri the Dodongo surrounded by Moblins. Walk up and speak with the Green Moblin who will offer to sell Dimitri to Link for 50 rupees. Unfortunately, there is no bargaining here and Link must pay up. After giving the moblins 50 rupees, they will ask for 30 more which, also, must be paid to advance. After paying 80 rupees, the moblins will leave. Talk to Dimitri, who will introduce himself and turn the Strange Flute Link is holding into Dimitri's Flute. Hop on Dimitri and head south for two screens through the water. There will be a cave on the right with a path to it blocked by snow piles. Use the shovel to clear the snow or use Dimitri to gobble through them, then bomb the entrance and enter the cave. Inside, grab the Square Jewel from the box, then leave the cave.
Optional: Subrosian Strange Flute Becomes Dimitri's


Head down and left one screen each, then take the path above up one screen. Here, Moosh the flying bear is being ambushed by Moblins trying to steal his Spring Bananas. After Moosh knocks them away with his ground pound, walk up and speak with him, at which point the Moblins will return and attempt to attack. Defeat the Moblins and Moosh will thank Link by turning the Strange Flute into Moosh's Flute, offering his assistance going forward. Ride Moosh down and right one screen each, then fly over the pits below by rapidly pressing the A button and continue down one screen through the path. Continue past the second set of pits and head down one and right one screen each, reaching a cave on the right side of the screen. Link can bypass the snow piles by using Moosh’s ground pound (press and hold A, then release after charged), or by simply using the shovel to clear a path. Enter the cave and claim the Square Jewel from the chest, then exit.
Optional: Horon Village Shop Strange Flute Becomes Moosh's


Choosing to not obtain either of the Strange Flutes, Link will already be in possession of Ricky’s Flute at this point, so go ahead and use it to call Ricky. Hop into his pouch and jump onto the ledge on the left. Continue on around the path to the left, heading down one screen and using the tornado punch to clear the bushes. Go down another screen and be wary of the Pincers that appear from the pits through this area. Continue along the lower path right two screens, trying to avoid or defeat the Pincers along the way, until reaching a cave blocked by snow piles on the right. Use the shovel to dig a path to the entrance, then blow it open with a bomb. Grab the Square Jewel from inside and exit the cave.
Optional: Already Have Ricky's Flute


After obtaining the Square Jewel, head left two screens along the lower path. As before, be mindful of the Pincers through this area while clearing the snow piles.
Lift the stone in the lower-left corner of this screen to uncover a soil patch underneath. We will come back to this area later after the third dungeon, so you may want to plant a Gasha Seed here if you have one.
Optional: Soft Soil Location #7 - Spool Swamp (Tier 1-3)


Head up one screen via the path on the right. Toss aside the stone, then walk into the portal to Subrosia.
3.4 A Date with Rosa


The portal will take Link to the Subrosian Village area, just north of his next destination. Head left one and down two screens to the Subrosian Seaside.

Link must find the Star-Shaped Ore buried somewhere on the four screens in this area. Each time Link enters the seaside, the location of the ore will change. However, it will be in one specific spot in either of the four screens. Refer to the image above to locate and dig up the Star-Shaped Ore.


Now, leave the beach by heading up the staircase and up one screen. Continue up and left one screen each to reach the Subrosian Market. Inside, trade the Star-Shaped Ore for the Ribbon.
Link can purchase the fourth Piece of Heart, named a “Rare Peach Stone” here, for 20 Ore Chunks and 10 Ember Seeds. The clearing just right of the market outside provides a great spot for digging Ore Chunks if needed. By obtaining the fourth Piece of Heart, Link will have completed and gained a new full Heart Container!
Optional: Piece of Heart #4


The market contains several other nice items for sale, including:Optional: More Goods at Subrosian Market


– Gasha Seed(replaces Ribbon): 1st(40 Ore Chunks+20 Scent Seeds) Additional(100 Ore Chunks + 20 Scent Seeds)
– Big Bomb Bag: (10 Bombs + 50 Ore Chunks) *Upgrades bomb capacity to 30 and fills bag*
– Magic Ring(x4)(replaces Bomb Bag): 1st(30 Ore Chunks) 2nd(40 Ore Chunks) 3rd(50 Ore Chunks) 4th(70 Ore Chunks) *All appraise randomly*
– 4 Ember Seeds(replaces Magic Rings): (5 Ore Chunks)
– 10 Pegasus Seeds: (25 Ore Chunks)
– 3 Recovery Hearts: (10 Ore Chunks)
– 10 Ore Chunks: (20 Gale Seeds)


Head back to the seaside, but this time take the path on the right one screen over and down. Speak with Rosa, who will ask Link if the Ribbon is for her. After giving Rosa the Ribbon, she will accompany Link on a “date” and suggest they go and check out the temple.


Leave the seaside area and go back to the screen where the market is located. Now, head up one screen and, making use of the key that Rosa carries, head through the locked door and cross to the other side. Continue right for four screens, reaching the entrance to the Temple of Seasons.


At the temple, head up two, left one, and up one screen to reach the Tower of Summer. Again, Rosa’s key can unlock the door here, so head on through. Toss aside the stone inside the tower to reach the staircase at the top of the room. Continue up the tower to reach the Spirit of Summer who will grant Link the Power of Summer!


With the Power of Summer, Link can finally reach the Poison Moth’s Lair, so head back all the way to the portal by the volcano and return to Spool Swamp. Note that the season will automatically change to Autumn here, resulting in new enemies, Goponga Flowers and Water Tektites, appearing throughout the swamp. As before, traversing the swamp will differ depending on the animal companion Link has chosen.
First, head down one screen, then continue along the lower path right two screens again trying to avoid the Pincers. Once reaching the cave where the Square Jewel was obtained, take out Dimitri’s Flute and call him. Hop on Dimitri and head up two screens into the deep waters. Continue up and left one screen each, then up one more. Hop off Dimitri as the water forward is shallow enough for Link to walk in.
Optional: Crossing the Swamp with Dimitri


From the portal, toss aside the stone and head down one screen. Use Moosh’s Flute to call him, then continue along the lower path right two screens, using Moosh’s flying ability to easily avoid the covered pits and Pincers. Now, head left one screen along the upper side of the trees and up one screen across the path. Fly over the pits and go up one screen, then fly over the next set of pits and up another screen, where Link can leave Moosh and continue alone.
Optional: Crossing the Swamp with Moosh


Toss aside the boulder and head down one screen. Use Ricky’s Flute to call him if necessary, then head up one screen via the path on the left. As before, use Ricky’s tornado punch to clear the bushes and continue on up another screen. Jump down from the ledge to the right and hop right one screen. Here, Link may leave Ricky behind as he heads toward the third dungeon.
Optional: Crossing the Swamp with Ricky


Head through the shallow water up two screens and left one back to the tree stump. Take out the Rod of Seasons and change the season to Summer, then head up one screen, where vines will now be growing up the wall to the entrance of the third dungeon. Climb the vines and enter the Poison Moth’s Lair.
3.5 Poison Moth's Lair
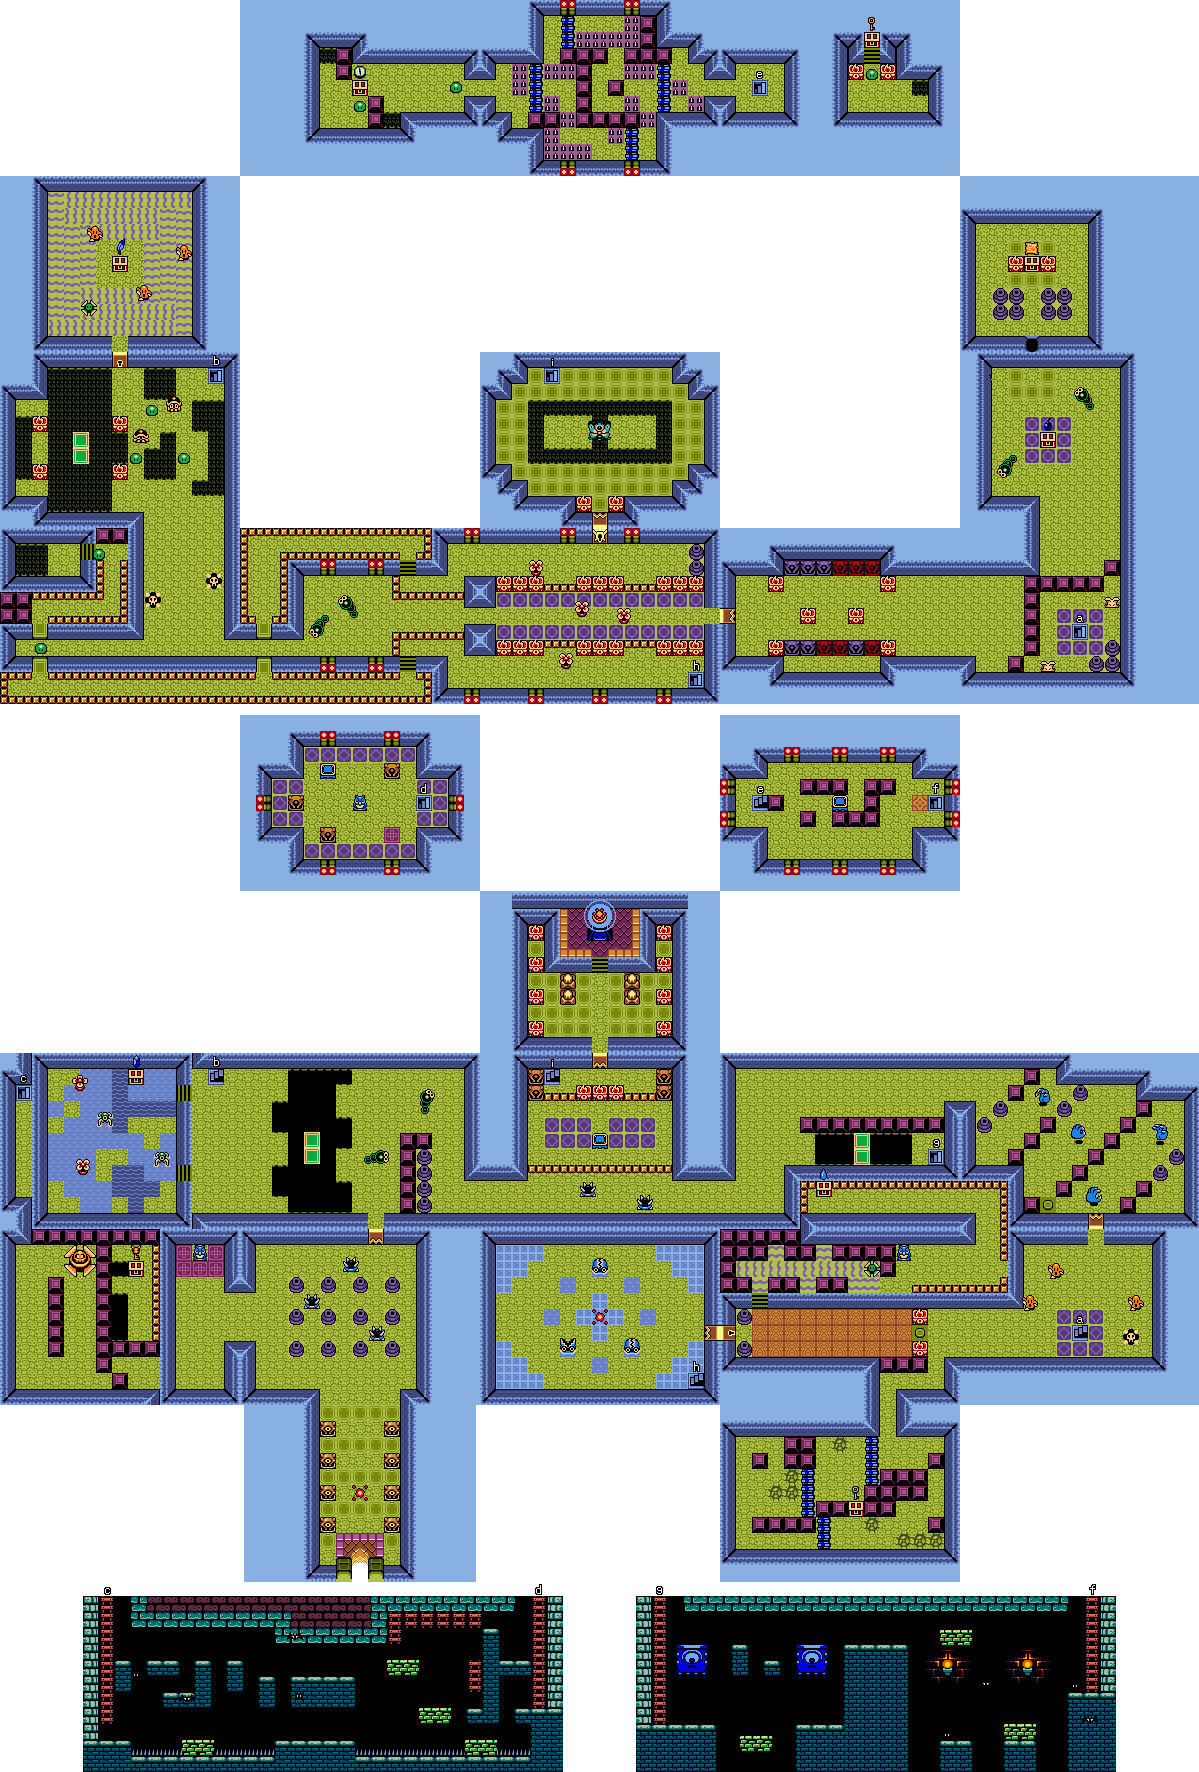


From the entrance, head through the hall up and left one screen each. The Owl Stone here reveals that “Good defense is the best offense”. Back right one room, we find that the hint refers to the way to defeat the three Spiked Beetles roaming about. Use the Shovel to flip them, or the Shield to bump them which also flips them on their backs, then follow up with a sword strike to dispatch of each Spiked Beetle. After defeating all three, the doorway above will open. Note that some of the vases here contain items shown above that will respawn each time Link re-enters the room, so grab some recovery hearts if needed and continue on up one screen.


Defeat the two Mini-Moldorm swarming this passage and continue right one screen. Watch out for the two Spiked Beetles that will charge at Link through the passage and continue right another screen, then head along the upper-side of the purple blocks right a third screen.


As Link moves through this room, four Floormasters will emerge from the floor. It is best to try and defeat them all as Link will be vulnerable while pushing the vases aside to clear a way forward. Toward the end of the path will be two final vases, one of which is needed to hold down the switch at the bottom of the room. Push the furthest vase on the right down twice, then move vase to the left of it in the following order: LEFT x 3, DOWN x 1, LEFT x 1, DOWN x 1, and LEFT onto the switch. Head down one screen through the opened doorway.


This area will be swarming with three Arm-Mimics and an Anti-Fairy. While the Anti-Fairy is pretty easy to evade, the Arm-Mimics will copy and move in the opposite direction of Link’s movement, causing them to crowd and run into Link. Defeat or avoid the enemies and bypass the staircase for now, heading left and down one screen each.


Equip the Power Bracelet and hold down the assigned button to push the rollers out of the way while navigating the perimeter of this room counter-clockwise to a chest containing a Small Key. Grab the key, then leave this room by pushing the purple block at the end of the path UP. Head up and right one screen each, then head up the staircase from earlier.


Defeat or avoid the two Pols Voice within the boxed-in area and push the out-of-place block at the top here UP and head up one screen. Defeat the two Mini-Moldorms here for a chest to appear containing 10 Bombs.


Toss a Bomb in the middle of the unique tiles on the section of uppermost wall, blowing open a hidden passage, and head through. Inside, grab the Dungeon Map from the chest.


Exit and head down two screens back to where the Pols Voice were and push the second-to-last block on the top row DOWN. Now, of the blocks on the left, push the third block up from the bottom LEFT and the one just below it DOWN. Continue one left one screen.


Here, Link must complete the puzzle by matching the statues on the bottom to the ones on the top. There are several ways to do this, one of which is shown in the images above. Once completed, the doorway on the left will open. Head through it left one screen.


Cross the passage, avoiding the Peahats flying about, left another screen. Either defeat or avoid the Mini-Moldorms in this room and continue left and up one screen each. Knock the Hardhat Beetles into the pits in this room so they don’t do the same to Link and head up one screen through the locked door.


This room has has moving tiles across the floor with a Green Blade trap spinning around the center platform, as well as four Arm-Mimics scattered about. It will be difficult to avoid contact damage here, but try to keep slashing with the sword while holding the directional buttons to lure the Arm-Mimics to Link. Once they are defeated, a chest will appear on the middle platform. Open it to obtain the Roc's Feather! This item allows Link to jump, making it easier to bypass the Blade Trap as you leave this room down one screen.


Head down the stairwell to the right and grab the 30 rupees from the chest on the left, then head back up the staircase. Using the newly obtained Roc’s Feather, jump across the gap on the left onto the moving platform, then jump over to the pit on the far left and fall down to the ledge below.


Walk along the ledge up to the stairwell and head down to the dungeon area below. Be mindful of the Keese flying about and jump across the columns to the right. Head right one screen and jump off the edge onto the middle moving platform below, then ride over to the ladder and climb up. Use the highest moving platform to reach the ladders hanging from the ceiling, then move over to the far right and head up the ladder out of this area.


The Owl Stone here reveals “Jumping up and on will send you even higher”, of course speaking about the trampoline in this room. Go ahead and jump onto the trampoline and hold DOWN after bouncing to reach the ledge in the room above. Open the chest here to obtain the Compass, then fall back down the pit to the room below.


Push the trampoline DOWN and RIGHT onto the purple tile at the bottom-right. Jump onto the trampoline and hold UP after bouncing to make it onto the ledge in the next room, then head right one screen.


Equip both the Power Bracelet and Roc’s Feather here and push the rollers aside while jumping over the spiked floors to navigate the path clockwise. On the other side, head right one screen and down the stairwell.


In this room, push the trampoline LEFT x3, DOWN x2, RIGHT x7, UP x2, and RIGHT x1 onto the brown tile. Jump onto it and hold LEFT after bouncing to reach the ledge in the room above. Grab the Small Key from the chest in this room, then fall back down the pit and head down the stairwell on the right to another dungeon area.


Watch out for the Keese flying around in here and head left. Ride the moving platforms up so that Link can jump from one onto the next, and finally onto the ledge on the far left, and continue left one screen. Jump across the columns and onto the Thwomp’s head, then wait for it to rise before continuing on, eventually reaching a ladder on the far left. Climb up to the room above.


Ride the moving green platform all the way left, then hop over the gap onto the floor and head around the upper-side of the purple blocks right one screen. As before, defeat the Floormasters and move the vase on the far right onto the switch, then head down one screen to the next room.


Continue past the enemies left one screen. With the Roc’s Feather, Link can now jump over the switch on the left which, if stepped on, would cause the bridge of brown tiles to fall. Jump over and head to the far left side of the room. Climb the stairs toward the moving floor above. Use the Roc’s Feather to jump over the Green Blade Trap that will propel toward Link when he enters the path, then continue hopping along the path until reach the other side where the floor is normal.


The Owl Stone here reveals “In water, it is invincible . . .”. This hint actually refers to the mini-boss of the dungeon which we will encounter very shortly. For now, continue right one screen and follow the path all the way to a chest containing a Gasha Seed. Now, backtrack all the way to the far left side of the bridge of brown tiles and head through the locked door left one screen to the room of the dungeon’s mini-boss: Omuai.


Omuai are a trio of squid-like creatures that will hide in the water within the room. Just before one sticks its head out, waves in the water where it is located will reveal its location. Omuai will shoot fireballs from the “mouth” on their heads towards Link after emerging from the water, but are vulnerable for a few moments after revealing themselves. It is during this moment of vulnerability that Link must use the Power Bracelet to lift on of the Omuai out of the water and toss it onto solid ground, preferably as far away from the water as possible. Out of water, the Omuai will bounce three times before landing on their feet and attempting to retreat back to the water. While they are on the ground, Link must slash them with his sword. Each Omuai requires four hits from the Wooden Sword to defeat, the last one of which will release a Fairy when defeated.


Head up the staircase that appears in the lower-right corner of the room to the floor above. Continue along this passage left two screens to the far end of the ledge. Walk into the plank to have Link automatically jump to the one on the other side. Follow the path around and fall down the pit to the floor below.


As soon as Link falls in this room, head along the path on the right and push the fourth block from the top in the vertical row RIGHT into the pit. If done quick enough, Link can avoid being hit by the Giant Orange Blade Trap circling the paths without having to jump over it. Jump across the pit where the block fell and open the chest to finally obtain the Boss Key!


Wait for the Giant Blade Trap to pass before jump back across the pit, then head down along the path and right. Push the furthest purple block at the bottom of the row RIGHT, then jump off the ledge and head right and down one screen each. Enter the portal to teleport back to the room of the mini-boss.


Go up the staircase again and this time head left one screen. Continue along the ledge and jump across the first set of planks, then continue along the path, eventually reaching the door leading to the dungeon’s boss. When ready, head through up one screen to face the boss of the dungeon: Mothula.


Mothula will descend to the middle of the room and release a few smaller Moths that will pursue Link. The boss will then fly around the perimeter of the room a few times, shooting fireballs at Link, before coming to the middle again to release one of two attacks: Either more small Moths as before, or a spinning circle of several orbs that will spread out around the room. Be very careful during the battle not to fall into any of the pits in this room as they will cause Link to fall to the floor below, where he will then have to use a trampoline to bounce back to the boss room, causing the battle to start over with Mothula at full-health.


The best strategy here is to stand on one of the two middle platforms and try to avoid the fireballs Mothula shoots. Link can make a risky attempt at a Spin Attack on Mothula as it flies by, but the safest way to damage it is done when it flies back to the middle. Slash away at Mothula as fast as possible to damage it before it takes off again, taking care of any small Moths it releases before they have a chance to attack. After enough damage has been dealt, Mothula will be defeated.


Grab the Heart Container at the upper section of the room and head down the stairwell that appears in the corner. Below, head through the opened doorway up one screen and climb the altar to claim the third Essence of Nature: The Bright Sun!
