- Chapter 1 – Eastern Palace
- Chapter 2 – House of Gales
- Chapter 3 – Tower of Hera
- Chapter 4 – Hyrule Castle
- Chapter 5 – Thieves’ Hideout
- Chapter 6 – Desert Palace
- Chapter 7 – Dark Palace
- Chapter 8 – Swamp Palace
- Chapter 9 – Skull Woods
- Chapter 10 – Turtle Rock
- Chapter 11 – Ice Ruins
- Chapter 12 – Lorule Castle
1.1 Sanctuary
Once Link has awoken, hop out of bed and exit the house. After speaking with Gulley, be sure to save at the Weather Vane. This not only saves your game, but it marks the weather vane on your map, which will be useful later in the quest. After saving, head west a screen and continue walking to the northwest, following Gulley.


Follow Gulley to the west and enter the house that he is standing by. After the cut-scene, Link will be tasked with delivering the sword to the Captain at Hyrule Castle. Grab the sword and exit the house.


The location is in the center of the overworld and it is marked with an X on your map. At this point, you can walk around and explore most of the overworld if you’d like. Make your way over to the Castle and speak with the soldier blocking the front gate. He will inform Link that the Captain was visiting the Sanctuary to the north. He will mark the location on your map.


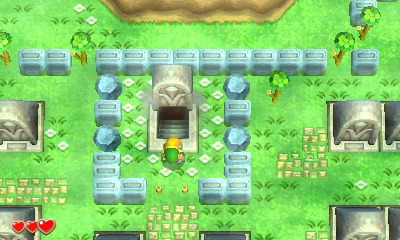
Walk to the west of Hyrule Castle and head left a screen. Continue to the X on the map and enter the Sanctuary. Once you reach the Sanctuary, you will speak with Seres and Dampè just outside before hearing a loud noise. The front door is locked so you’ll have to find another entrance into the Sanctuary. Dampè suggests using the Captain’s sword and to enter the Sanctuary using a secret entrance through the Graveyard.


Walk to the east to enter the Graveyard. In the center of the Graveyard there is a grave that has two green bushes just in front of it. Slash at the bushes and push the gravestone to reveal a secret staircase. Walk down to enter the sewers.

Slash at the pots and head forward to find a treasure chest that contains the Lamp. This item can be used to light torches, making it easier to see. At the top of the room there are two torches that Link can light with his newly acquired Lamp. Do so and head through the door that opens.


Once you enter, defeat the enemy rats and use the lamp to light some of the torches. Just to the left there is a treasure chest that contains a red rupee. Climb the steps on the left side of the room and you’ll find a locked door. Walk to the right on this higher ledger and you’ll eventually come to a treasure chest that contains the small key. Return to the locked door and head on through.


The door will slam behind you and you’ll encounter several Poes. Defeat them with a few sword slashes and head up through the door that opens. This last room as two levers. Pulling the one on the left will open the door so you can continue onward to the next room. If you pull the one on the right, you’ll encounter some enemy Rope, which are easily defeated with your sword. Run ahead in the Sanctuary to meet the cast of characters and watch a cut-scene.


1.2 Kakariko Village
NOTE: There are two heart pieces you can get at this time. For a full guide, check out our Heart Piece Locations.
Link will then awaken back at his house where he will meet a man named Ravio. He will give you Ravio’s Bracelet in exchange for letting him stay for a little while at your house.
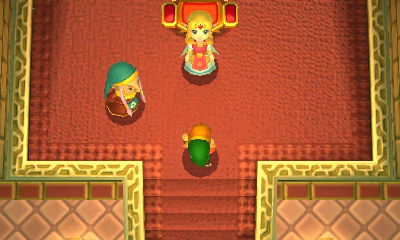
Exit the house and head north to Hyrule Castle. Speak with the soldier that is blocking the front door. After a short talk, Impa will come outside and will welcome Link into the castle. There are five paintings on the wall that you can look at if you’d like. After a few moments, Impa will come out and say that Princess Zelda is ready to see you. Climb the steps and head up a screen.


After speaking with Impa and Princess Zelda, it is suggested that Link visit the elder Sahasrahla at his home in Kakariko Village. Before leaving, Zelda will give Link a special charm. After getting the charm, go ahead and exit the room.

Before leaving the Castle, there is one other goodie for us to collect. From the main entrance room, head to the right a screen and then exit the Castle from the second floor. Follow the pathway on the right side and you’ll come to a treasure chest that contains a Purple rupee. Then go ahead and leap off the ledge.


Our next destination is at Kakariko Village and it’s marked on your map. Make your way over to the X and enter the building. Speak with Sahasrahla and he informs you one of the descendants of the seven sages is Osfala, and he has been lurking near the Eastern Palace. Sahasrahla will mark the location of the Eastern Palace on your map.


Before leaving Kakariko Village, there are a few goodies for us to collect. Near the center of town, be sure to examine the weather vane to save and to get it marked on your map. At the far northwest part of town there is a cave. You can enter the cave to find a treasure chest that contains a red rupee. There is a piece of heart in this cave as well, but we cannot quite get it.


There are a few things we want to buy in town, but they cost a total of 150 rupees. You can skip these for now, but they can be helpful when tackling the Eastern Palace. Just south of Kakariko Village there is a mini-game that Link can play to earn some extra money.
Link will find a cucco mini-game where he must avoid cuccos for a period of 30-seconds. There are 3 different levels, ranging from very to easy to quite hard. It costs 20 rupees to play the easiest level, 30 rupees on medium, and 50 rupees on hard. Once you get a hang of it, it becomes an easy money maker. If you beat the hard mode, Link will not only get 150 rupees, but also a Piece of Heart.


With the extra money there are a few goodies for us to collect in town. Near the northwest part of town there is a building with a large shield on the roof. This merchant shop sells some goodies, most notably is a shield for 50 rupees. Be sure to pick one up if you have the rupees.


Next to the shop, there is a Street Merchant that is selling a Bottle for 100 rupees. After acquiring a bottle, you can enter the house just to the southeast of the weather vane, where you will meet the Bee Guy who gives Link the Bug Catching Net.


The last thing to do is just to the north of town. Exit the town from the northeast corner and you’ll find the Fortune-Teller’s Hut. Speak to the fortune teller and you’ll get the Hint Glasses. These glasses will allow Link to find Hint Ghosts, which can help guide Link when he is stuck.


1.3 Finding the Palace
Journey across the overworld and make your way to the Eastern Palace, which is marked on your map. The entrance to the region is just to the southwest of the X on the map. Once you enter the region, climb the steps to the north and you’ll find a pair of pillars that have the symbol of a Bow on them. Nearby you will see a sign from Ravio that he is opening up a shop just south of the castle.


Turn back around and head to your house. Speak with Ravio and he’ll ask if you saw his signs. He asks which symbol you saw, which obviously was the Bow, the third option, so be sure to choose that one. Ravio will allow you to rent the Bow free of charge. Once you walk outside, Ravio will talk about your energy gauge. With the Bow in hand, return to the Eastern Palace grounds to the east.


Climb the few steps that are right next to the pillars that have the Bow symbols. There are two crystal orbs, one on each side. Shoot each of the orbs with an arrow and the door above will open up. Go through the passage that opens up and then head eastward. Disregard any secrets you may see along the way and make your way to the entrance of the Eastern Palace.


Once you reach the entrance, you will find Osfala. After a short talk, he will run on ahead into the Eastern Palace. Be sure to save using the weather vane and then head inside the first dungeon.


1.4 Eastern Palace
From the start of the dungeon, you will see a gap that is straight ahead. On the right side of the gap, there is an orb. Shoot an arrow at it, causing a bridge to appear. Continue onward up a screen.


Once you enter this room turn and look to the left. There is another orb across the gap. Shoot it with an arrow and the door below will open. Return to the previous room and go through this door on the left. Open the treasure chest found here to get a red rupee.
Return to the dungeon entrance and head up two screens. There is a series of bowling balls rolling down the center of the room. The small ones can be dodged, but the larger ones cover the whole width of the hallway. You can stand on the sides to avoid getting hit. Run to the top of the room and turn to the left. Continue walking this direction and head left through the door.


The door will shut behind you and you’ll encounter a trio of enemy Popo. These slimy creatures can be defeated with a single sword slash. After defeating three of them, four more will drop down. When all of them have been defeated, a treasure chest will appear on the higher platform. There are several doors in this room, including a secret door located underneath the treasure chest. Walk directly down to head to the next screen.


Step on the floor switch here to cause a treasure to appear. Open it up to get another red rupee. Return to the previous room and head through the door at the southwest corner. Make your way around this room and head up to get back to the previous room. Open the treasure chest to get the compass. This highlights the locations of all the treasure chests in the dungeon.


Walk back down a screen and step on the floor switch. Go through the door that opens to return to the large central room. Walk to the right side of the room and you’ll find a locked door. Take the narrow path northward and step on the switch to open the door. Beware of the enemy Armos that active, and then head right a screen.


Here you will find a moving platform, along with two orbs on each side of the room. Stand on the moving platform and shoot the two orbs when the orb is on the proper level. Run over to the treasure chest at the top-right corner to get a small key.
Before leaving, there is a secret fairy fountain nearby. When the moving platform is lowered, walk southward and continue to the next room. Here you will find a few fairies, as well as some rupees. If you have an empty bottle and the bug catching net, you can secure a fairy for later use. Return to the previous room and head through the door on the left to get back to the large central room.


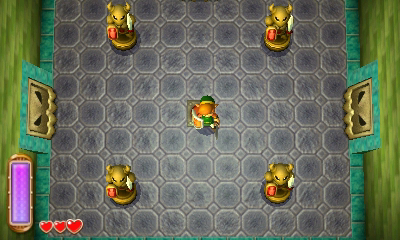
Use the small key on the locked door at the north end of the room and climb the steps to get to the second floor. Step on the floor switch and the four Armos Statues will come to life. Hit each of them with three hits and they will be defeated. A green portal will appear and the two doors will open. If Link steps into this portal, he will be taken back to the dungeon entrance.

Link can go to either the left or right here, but there is a treasure chest in both rooms. The room to the left has a series of bowling balls. Avoid them and step on the floor switch. Remain on it until the staircase appears and then quickly run up it. Watch out for the large bowling ball and make your way to the south end of the room.
Step on the floor switch here and the nearby staircase will disappear momentarily. Run over to where the staircase was and step on the switch here, causing a treasure chest to appear. Run over and open it to get some Monster Guts. There is another floor switch at the bottom-left part of the room that will open the nearby door. Run onward to the next room.


Optional: You can backtrack to the previous room where you fought the Armos Statues and this time head to the right. In this room you will find some wall turrets that will shoot arrows at you. These can easily be avoided, or you can block them with your shield. There are four Popos in this room and all four need to be defeated to cause the treasure chest to appear. There is one at the northeast corner of the room, another at the northeast corner on the higher ledge, the third one is at the southeast corner of the room, and finally at the southwest corner on the higher ledge. Once all four Popos have been defeated, open the treasure chest that appears to get some more monster guts. At the southwest corner of the room, on the higher ledge, there is a floor switch that will open the nearby door. Walk on through to enter this large chamber.Optional: Monster Guts Treasure Chest


Once you reach the large room, head to the northeast corner where you will find two orbs. Use your bow to shoot an arrow at the one closer to the top wall, which causes a nearby platform to move up and down. Stand on top of the moving platform and shoot the other orb with an arrow to open the nearby door and then head east.


There are a series of moving platforms in this room, as well as some wall turrets. You will find four orbs in the center of the room. Use your arrows to hit all the orbs and a treasure chest will appear. Open it up to get a small key and then head back to the previous room.


Stand next to the large locked door in the center of the room and turn to the left. Shoot an arrow out at the nearby orb, causing another moving platform to move on the left side of the room. Use the moving platform to reach the higher ledge and head through the locked door.


There are a trio of enemy Stalfos in this room. They can be defeated using your sword or more easily with the bow. Open the large treasure chest here to get the Big Key. Climb the steps on the left and head right a screen along the higher ledge.


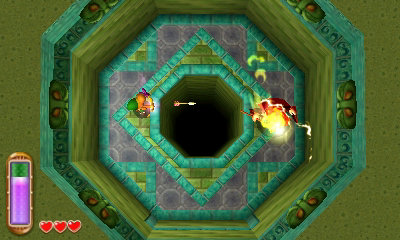
Hit the crystal orb here to cause the wall to shift near the final orb in this room. Backtrack through the previous room and you should now be able to shoot this final orb with an arrow. Do so and the floor will revolve, allowing you to reach the boss entrance. Use the Big Key on the locked door and you’ll catch up with Yuga and Osfala.


Stand on the opposite side of Yuga and shoot him with an arrow. Then quickly run up to him and deliver a pair of sword slashes. Yuga will turn into a painting and move along the wall. Wait for him to pop out of the painting and then deliver another arrow strike, following by sword swipes. If you are quick enough, you can hurt Yuga before he can even get off an attack. Repeat this process until Yuga has been defeated.

After a scene where Yuga turns Link into a Painting, the bracelet Link is wearing will pull Link off the wall. This will now give Link the ability to merge into the walls. Afterwards, walk over and grab the Heart Container.


At the north end of the room there is a very narrow gap. Stand against one of the walls just to the right of the opening and merge onto the wall. While on the wall, walk along it and through the narrow opening. Continue walk to get to the east part of the map. Once you find safe landing, press A to get off the wall. Jump down and open the nearby treasure chest to get a Silver Rupee.


Walk back along the wall to get to the west side of the building. Stand on the moving platform and have it carry you down to the lower floor. Walk southward and the floor will begin to move, forcing you against the wall. Quickly turn into a painting along the wall and wait until the floor comes back up. Continue southward and turn the corner.


There are a pair of moving walls found here. Turn into a painting when the moving wall is nearby, and quickly walk across the gap. Once you cross the gap, walk up against the wall on the right. Turn into a painting along the wall and walk to the left until you reach a treasure chest. Open it up to get a purple rupee. Walk back along the wall and go through the narrow gap in the wall to reach the dungeon entrance.


Before exiting the dungeon, there is one more treasure to get. Along the wall on the right there is a narrow gap. Turn into a painting and squeeze through to find a treasure chest containing a silver rupee. After grabbing it, go ahead and exit the dungeon.


You’ll meet up with Sahasrahla once again and you’ll appear back at Hyrule Castle. Sahasrahla tells Link that he must collect the three Pendants of Virtue to acquire the Master Sword. Luckily, Link already acquired the Pendant of Courage from Zelda earlier. After some more talk, you can save your game.
- Chapter 1 – Eastern Palace
- Chapter 2 – House of Gales
- Chapter 3 – Tower of Hera
- Chapter 4 – Hyrule Castle
- Chapter 5 – Thieves’ Hideout
- Chapter 6 – Desert Palace
- Chapter 7 – Dark Palace
- Chapter 8 – Swamp Palace
- Chapter 9 – Skull Woods
- Chapter 10 – Turtle Rock
- Chapter 11 – Ice Ruins
- Chapter 12 – Lorule Castle
