- Chapter 1 – Gnarled Root Dungeon
- Chapter 2 – Snake’s Remains
- Chapter 3 – Poison Moth’s Lair
- Chapter 4 – Dancing Dragon Dungeon
- Chapter 5 – Unicorn’s Cave
- Chapter 6 – Ancient Ruins
- Chapter 7 – Explorer’s Crypt
- Chapter 8 – Sword & Shield Maze
- Chapter 9 – Onox’s Castle
- Chapter 10 – Room of Rites
1.1 The Oracle of Seasons


From deep within Hyrule Castle, the Essence of the Triforce calls out to Link. Already an established Hero in this land, he is now needed elsewhere to stop a grand scheme that was born from the evil within Hyrule itself. Link is teleported to the land of Holodrum, falling from the sky and being knocked unconscious. A red-clad female is shown discovering him moments later.


Once Link awakens, walk right one screen toward the sound of music. Speak with the lady in red at the bottom of the screen, who will introduce herself as Impa, then talk to each member of the Troupe of Performers to gather some info before finally speaking with Din, who can be found dancing upon a stump. She will ask Link to dance, during which she will notice the Triforce symbol on the back of his left hand and realize that he must be a hero with a special fate.


Moments later the sky will turn dark and lightning will strike around the screen. A huge whirlwind will appear and knock many of the Troupe members off-screen before taking Din captive and disappearing. We then learn that the source of the attack is Onox, General of Darkness, and that Din is actually the Oracle of Seasons. By taking Din captive and causing the Temple of Seasons to sink into the ground, the seasons are thrown into a rapid state of constant change, creating the world of chaos that Onox longs for.
1.2 The Hero's Cave


We find Link lying in a snow-covered field being awoken from unconsciousness by Impa. She reveals that, because Zelda felt a dark presence growing around Din, she was instructed to bring the Oracle back safely to Hyrule. Due to the injuries sustained during the attack by Onox, Impa will be unable to fulfill her duties and instead request that Link seek the help of the “Maku Tree”. After Impa’s message, head down one screen into Horon Village.
From the northern entrance head right two screens to reach the home of Horon Village’s Mayor Ruul. Walk inside and speak with the mayor to receive a Gasha Seed. Outside of Mayor Ruul’s house is a patch of Soft Soil where the Gasha Seed can be planted. As indicated above, each Soft Soil location is rated by tier which ultimately decides what kind of item the Gasha Nut will produce after being planted.
Optional: Gasha Seed & Soft Soil Location #1 - Horon Village Mayor's Residence (Tier 1-2)


Two screens south of the Mayor’s house is Vasu Jewelers. This unique shop is ran by Vasu, who will give Link the L-1 Ring Box and a Magical Ring that appraises as the Friendship Ring when you speak with him for the first time. Vasu will appraise this first ring for free, but Link will have to pay 20 rupees for each one thereafter. If Link has a ring appraised that he has already collected, Vasu will return 30 rupees to Link. Vasu’s assistants, the Red Snake and Blue Snake offer additional services also related to Magical Rings.
Optional: Getting the L-1 Ring Box & Friendship Ring


Head left two screens and down one from Vasu Jewelers to reach Bipin's and Blossom's House. Inside, Link will find Bipin and Blossom, who will ask Link to suggest a name for their her newborn baby boy. Whatever name you choose will be the one Blossom and Bipin agree on. At certain points during Link’s quest, you can come back here to check on Bipin and Blossom's Son and offer assistance to Blossom for a variety of issues they have. Whether it be a simple suggestion or a request for rupees, the choices Link makes during these events will eventually determine the personality of the young man the baby becomes.
Optional: Meeting Bipin, Blossom, and their Son


For now, this is all we can do in Horon Village. Head to the northwest corner of the village to find a two-part house, the left of which belongs to the Know-It-All Birds, and the one on the right being the Advance Shop. When you are finished here, head left one screen into the Western Coast.


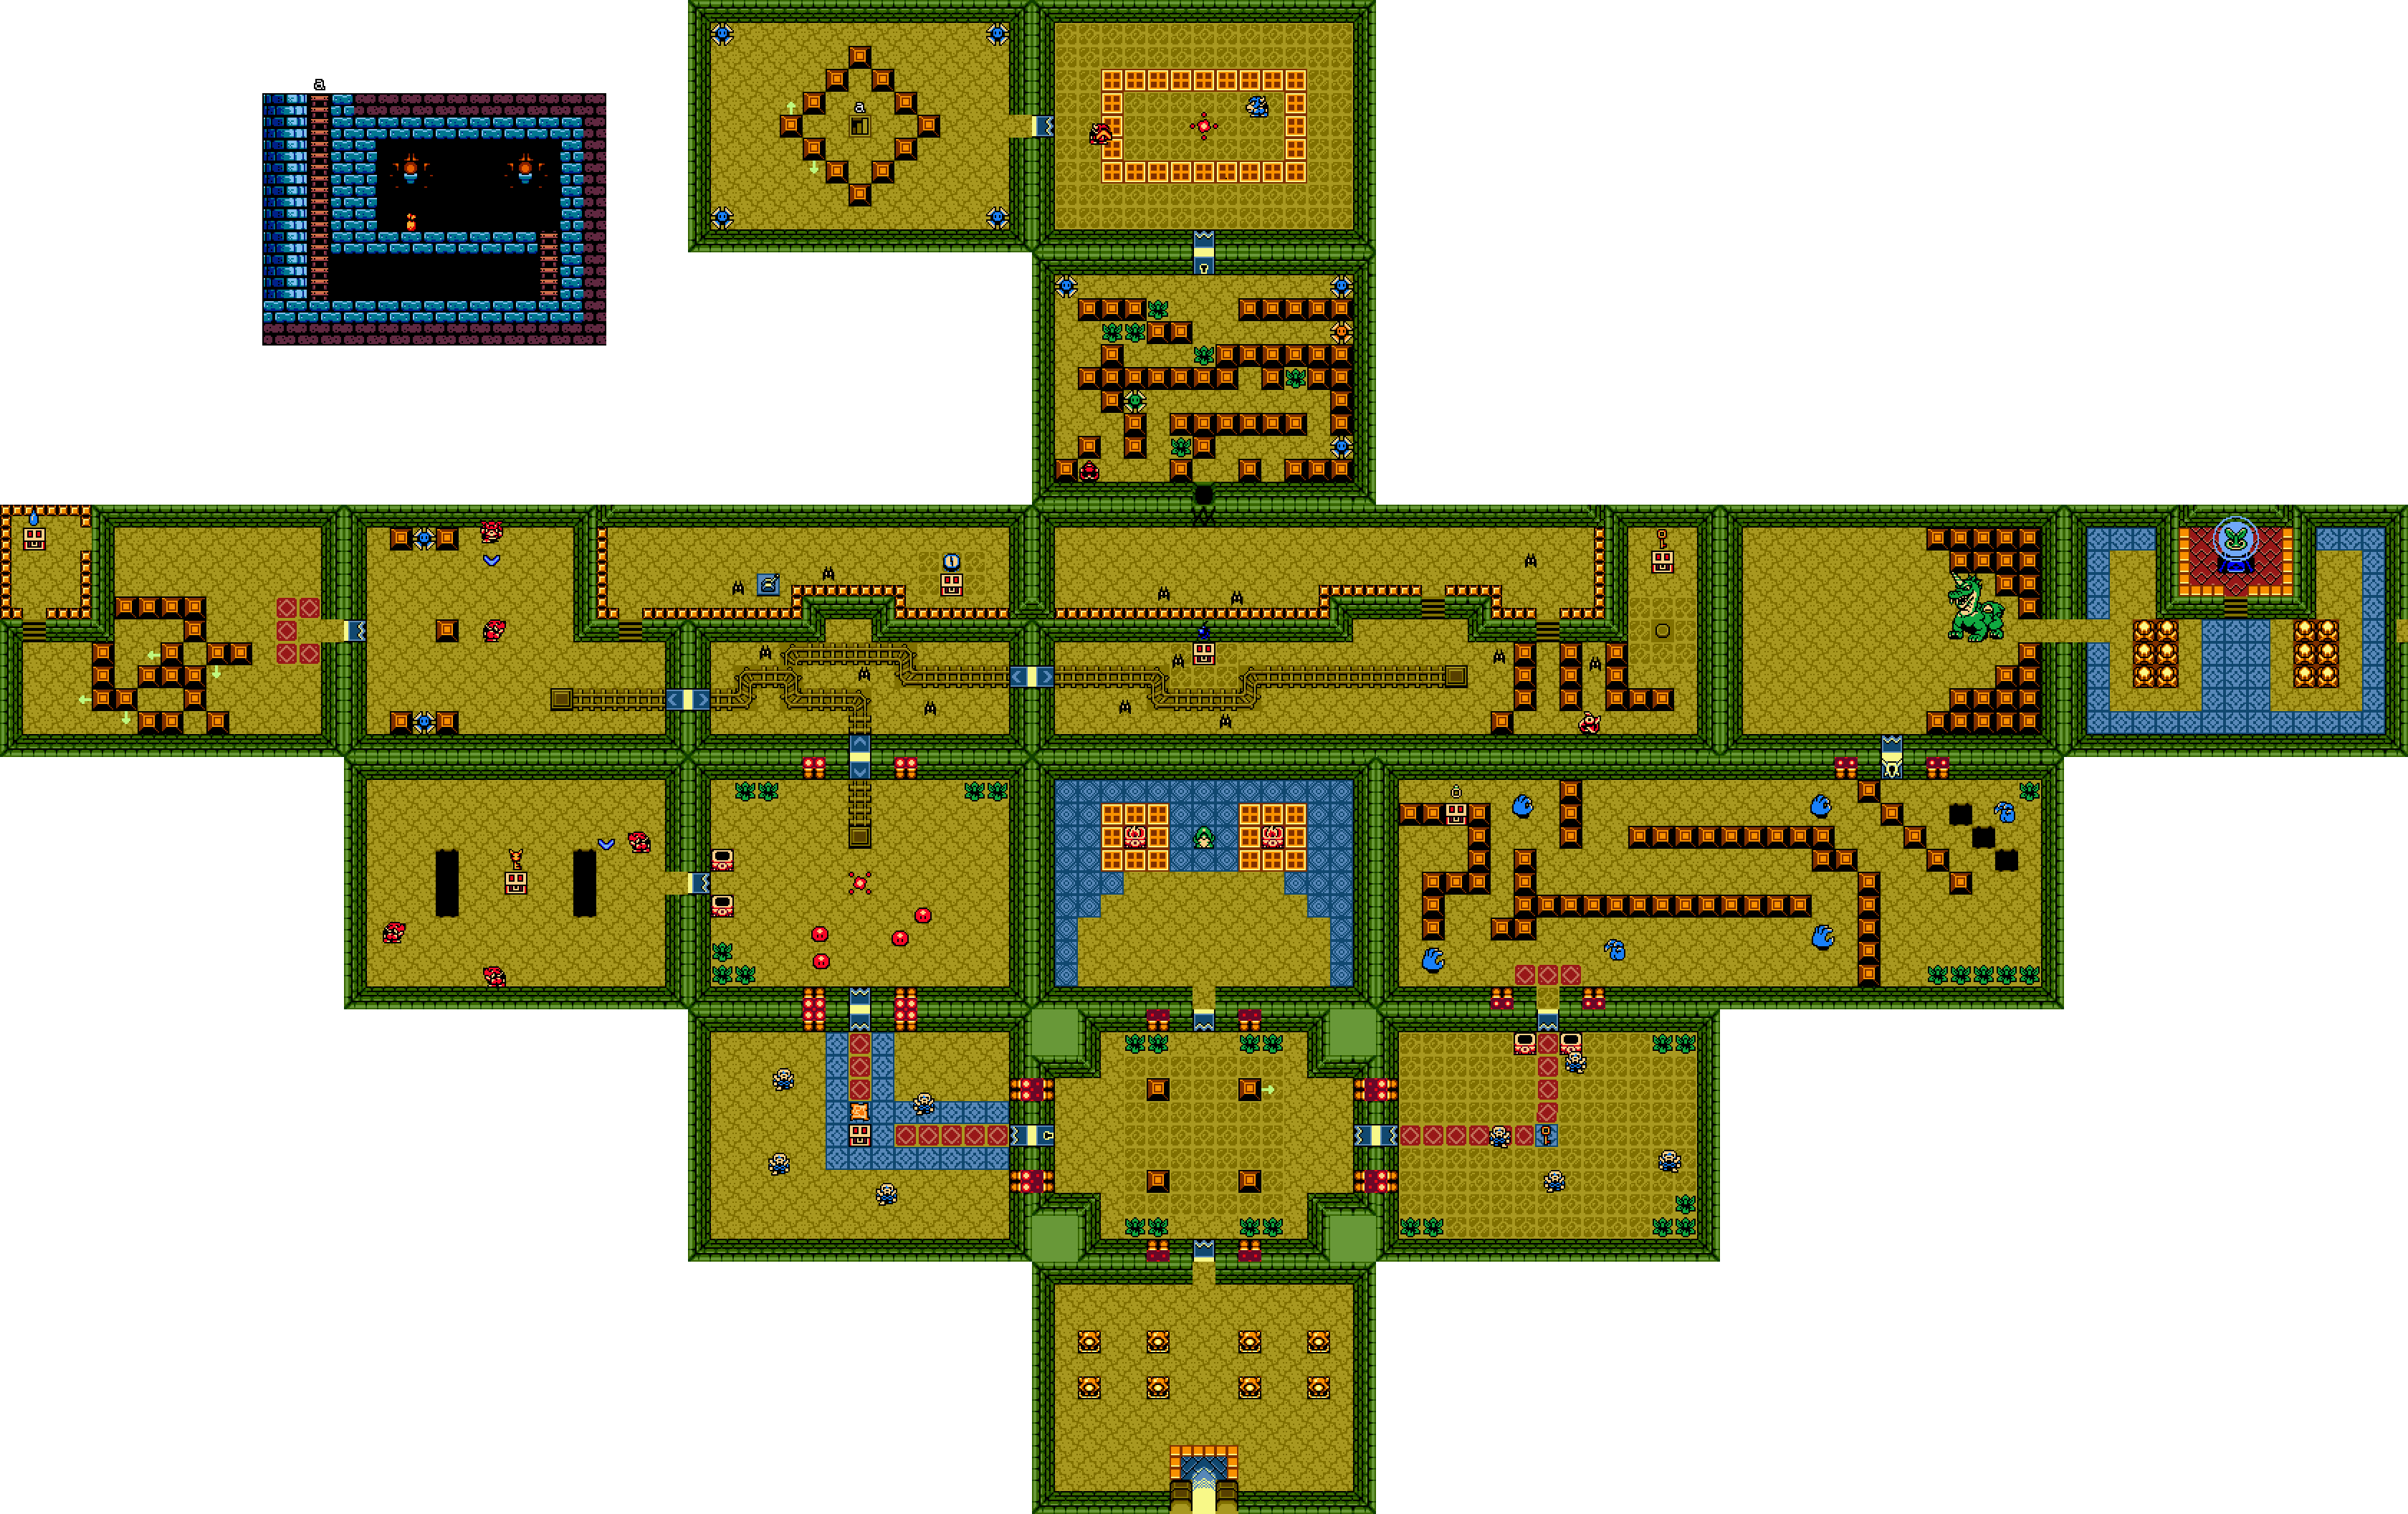
Upon entering the area, Link will encounter a Red Octorok. With no weapon yet to defeat the creature, simply avoid it and jump off the gap in the ledge to the area below. From here, the entrance to the Hero’s Cave can be seen below.
Just one screen left of where Link lands is a cave housing a Great Fairy Fountain. Inside, the Great Fairy will fully restore Link’s health.
Optional: Western Coast Great Fairy Fountain


Circle around to the lower side of the ledge to reach the Hero’s Cave. This is where you will obtain the item you need to access the Maku Tree, so go ahead and enter.


The Hero’s Cave is relatively short and only consists of a few rooms with very easy puzzles. In the first room, you will encounter four bat-like enemies known as Keese. For now, simply avoid them and continue right one screen. Push the single block in any direction to open the three doors which exit this room, then head up one screen.


Be careful to not fall down any of the bottomless pits in this room as the walkway is very narrow. Push the block obstructing the pathway up or down and walk along the path until you reach two more blocks. Push the left block down and the right block to the right and continue along the path right one screen.


This room has contains a chest guarded by Keese and small, red creatures called Gels. Avoid getting latched onto by the Gels and make your way to the right side of the room. Step onto the button and a chest will appear containing a Small Key. Grab the key and head back left one screen to the room with the narrow pathway.


When you come to the first two blocks push the left one up and the right one to the right. Then continue along the path and push the last block aside. Head down one screen and push the single block again to open the three doorways. This time head down one screen into a room with a few Keese creeping around. Use the Small Key obtained earlier to open the locked door on the right, then continue right one screen.


While avoiding the Gels, walk up and step on the switch to open the doorway on the right side of the pit. Walk counter-clockwise around the pit, avoiding a new enemy that will spawn here, the Green Zol, and head up one screen through the doorway. Open the chest on the altar to finally obtain the L-1 Wooden Sword!
With sword in-hand, Link can access a few previously unobtainable items from the Hero’s Cave. Circle around to the top of the screen and cut down the single bush which blocks a gap in the ledge. Hop off into the shoot below to land on a ledge within the Hero’s Cave where a chest awaits with 30 Rupees inside. Jump off this ledge to the left and push the single block to open the closed doorways, then head down one screen. Defeat the three Keese in this room and push the upper-left block in any direction to reveal a hidden staircase. Head down the stairs into a basement area to acquire a Gasha Seed! Leave the basement area and exit the Hero’s Cave by going up, left, and down one screen each.
Optional: Hero's Cave Treasures


1.3 Meeting the Maku Tree


After exiting the Hero’s Cave, head north back to Horon Village.
If playing on a Gameboy Advance System, the Advance Shop, located to the right of the Know-It-All Birds hut, will now be stocked with items. The items which can be purchased here include a Gasha Seed and two Magical Rings, each for the price of 100 rupees. The ring in the middle appraises as the GBA Nature Ring, while the ring on the right will appraise as one of the randomly obtainable rings. Unlike a regular shop, you can only purchase the items here once.
Optional: Advance Shop


Continue right one and down two screens and enter the Horon Village Shop. Currently, the shop will offer 10 Bombs for 20 rupees, a Wooden Shield for 30 rupees, and 3 Recovery Hearts for 10 rupees. Go ahead and purchase the Wooden Shield by picking it up and speaking with the shop owner, Stockwell.


Now, its time to go see the Maku Tree. Head east from the shop until you reach a large gate. Swing Link’s sword at the gate to have it open, then walk up one screen into the Maku Tree’s area.


Since the seasons are all out of order, the Maku Tree has lost much of his power and has thus withered down in size. Swing your sword at the bubble coming out of his face to wake him. He will request that Link gather the eight Essence of Nature to restore balance to the seasons of Holodrum and rescue Din. The Maku Tree will then provide Link with the Gnarled Key which is needed to access the dungeon where the first Essence lies. Pick up the key and leave the Maku Tree’s area.


The first dungeon lies just north of Horon Village. Exit the village via the northern entrance into the North Horon region. Continue up one screen where Link will find a new enemy, the River Zora, emerging from the water beyond the ledge.
On the screen above is a soil patch where a Gasha Seed can be planted. If you have one, plant it, as we will be entering the Gnarled Root Dungeon in just a moment where many enemies will inevitably be defeated, resulting in a better Gasha Nut item.
Optional: Soft Soil Location #2 - North Horon (Tier 1-2)


Continue right one screen and slash the bushes here to clear a path. Head up one screen and clear the bushes blocking the bridge on the left, then head across the bridge left one screen. Walk up to the rock with the keyhole to have Link insert the Gnarled Key into it, causing the large, dead tree here to emerge from the ground. Bearing a striking resemblance to the first dungeon in the original Legend of Zelda game, this too is no mere tree; it is the location of the Gnarled Root Dungeon.
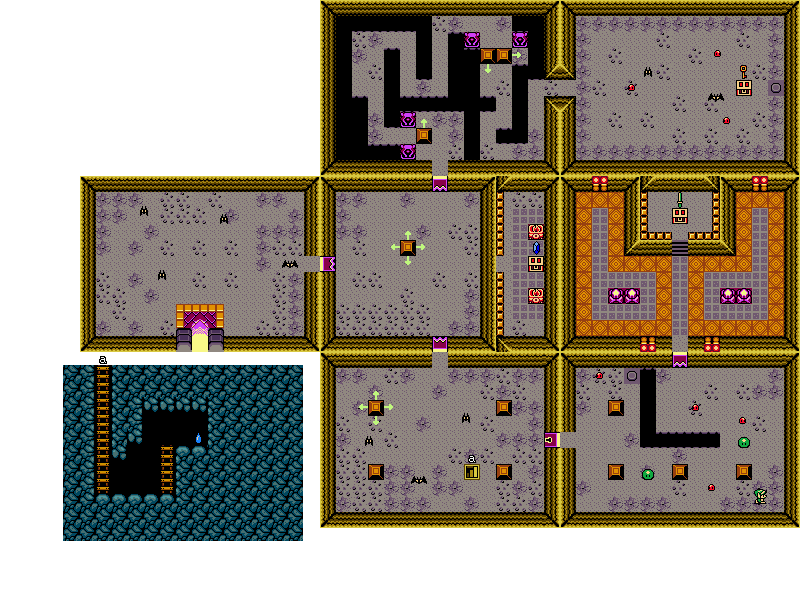
1.4 Gnarled Root Dungeon


From the first room, head up one screen. Note that the bushes on each side of this room contain contain a Fairy that will restore Link’s health if needed. The three doors exiting each direction in this room will shut upon Link entering. Push the upper-right block in any direction to reopen the doorways. One screen up is a Wise Old Man who will offer Link a hint about the dungeon.


Continue right one screen from the block-pushing room. Defeat all four Blue Stalfos and grab the Small Key that drops onto the blue tile in the center of the room. A Fairy is hidden under the bush in the upper-right section of this room if needed.


Head back left one screen and then another through the locked door. Defeat all four Blue Stalfos in this room and grab the Dungeon Map from the chest that appears, then continue up one screen.


Defeat or avoid the four Red Zols bouncing around in this room and hop into the blue cart at the top. It will empty Link into a room with two Red Moblins and Blue Blade Traps.


Defeat the Red Moblins and push the block between the Blade Traps into their path, then head through the unlocked doorway left one screen.


This room has many blocks, some of which must be pushed aside so Link can make it through the path. First, of the two blocks sticking out towards the rightmost wall, push the left one DOWN. Walk over to the block just to the left of the one you just moved and push it LEFT. Follow the path up and around to the set of blocks forming an “L” shape and push the lower block DOWN, and then push the adjacent block LEFT. You can now access the ledge at the upper-left corner of this room, so head up and grab the Gasha Seed from the chest. Hop off the ledge to the right and head back right one screen.


Bypass the Blue Blade Traps and head up the stairs at the far right side of this room and continue right one screen along the ledge. Slash the blue lever with Link’s sword to have it change the cart track below (the lever should be pointing left now). Continue right and grab the Compass from the chest.


Backtrack left one screen and hop into the blue cart. It will now travel two rooms to the right, where a tone will indicate the presence of a Small Key. Before we get to the key, walk left one screen and grab the 10 Bombs from the chest.


Now head back right one screen and follow the path on the right side of this room. Avoiding the Chaser along the path, step on the button at the end and grab the Small Key from the chest that appears.


Head back through the path and up the stairs to the ledge, then continue left one screen. Bomb the cracked wall and head through the opening up one screen.


Link will be in a large room filled with many Blade Traps, including the new Green Blade Trap and Orange Blade Trap. Simply lure the Blade Traps out and progress as they are retracting to safely navigate the passage. Once you reach the top of the room, head through the locked door to face the dungeon’s mini-boss, the Brother Goriyas.


After entering the room, walk towards the middle to trigger the battle. The Brother Goriyas will move in opposite directions around the room, passing a boomerang back and forth trying to hit Link. Keep Link’s Shield raised to avoid running into the Brothers or their boomerang and slash away on one when the opportunity comes. A good strategy is to focus on one of the Goriyas as defeating just one will end the fight. Once they are defeated, the doorway on the left will open and a warp portal will appear in the center of the room. Grab the Fairy that spawns as well if needed and head left one screen.


Watch out for the Blue Blade Traps and make your way to the left side of the blocks surrounding the staircase. Push the block on the far left UP and head down the stairs into a basement area to obtain the Seed Satchel with 20 Ember Seeds inside. Exit this area and push the block just below the one you pushed before DOWN.


Head right one screen to the mini-boss room and use the warp portal to get back to the room where we first encountered the Red Zols. Defeat or avoid the enemies, then use the Ember Seeds to light the torches on the left, opening the doorway.


Take out all three Red Moblins in this room to reveal a chest. Open it to obtain the Boss Key! Now all that remains is getting to the dungeon’s main boss, so head right one and down one screen each to the room where the Dungeon Map was found.


Defeat the Blue Stalfos to open the doors and head right one screen. Push the upper-right block to unlock the doorways as before and continue right one screen. Light the torches at the top of the room to open the doorway and head up one screen.
The last new enemy Link meets in this dungeon, the Floormaster, is present in this room. Defeating all four of them is recommended to have an easier time navigating the passage. Head to the left side of the room and open the chest to obtain a Magical Ring that will appraise as the Discovery Ring, then continue along the uppermost path right one screen.


There are four more Floormasters to dispatch of in this room and Fairies in the bushes at the bottom if needed. Head through the locked door at the top of the room to face the dungeon’s boss, Aquamentus.


Aquamentus will walk around the room and often shoot three fireballs at Link. It may also charge towards Link until reaching the leftmost wall, at which point it will fly back to its original position. Watch the single horn on Aquamentus’ head as it will flash red when it is about to attack.


A good strategy to use here is to stay above Aquamentus for better access in attacking the horn, as well as leaving Link in a good position to avoid oncoming attacks. Charging Link’s sword directly after entering the room to get a preemptive attack on the boss is also recommended. Keep slashing at Aquamentus’ horn until it breaks, resulting in the boss’ demise. Pick up the Heart Container that appears to add one heart onto Link’s health meter!


Head through the opened doorway on the right. Walk up the steps to the altar in this room to obtain the first Essence of Nature, the Fertile Soil! Upon obtaining Essence, Link will be teleported outside of the Gnarled Root Dungeon and greeted by a message from the Maku Tree. He will inform Link of a special item hidden within the Temple of Seasons that needs to be obtained next.
