- Chapter 1 – Skyloft
- Chapter 2 – Faron Woods
- Chapter 3 – Skyview Temple
- Chapter 4 – Eldin Volcano
- Chapter 5 – Earth Temple
- Chapter 6 – Lanayru Desert
- Chapter 7 – Lanayru Mining Facility
- Chapter 8 – Isle of Songs
- Chapter 9 – Lake Floria
- Chapter 10 – Ancient Cistern
- Chapter 11 – Lanayru Sand Sea
- Chapter 12 – Sandship
- Chapter 13 – Volcano Summit
- Chapter 14 – Fire Sanctuary
- Chapter 15 – Thunderhead
- Chapter 16 – Song of the Hero
- Chapter 17 – Sky Keep
- Chapter 18 – Final Showdown
11.1 Lanayru Desert: Silent Realm
After a short chat with Faron, run across the pond and use the bird statue to return to the sky. Our next destination is the Isle of Songs over in Thunderhead. Set the course and fly straight into the massive cloud.
Land on the Isle of Songs and crawl in through the small hole. Run on over and deliver a Skyward Strike to the emblem. After a cutscene with Fi, Link will learn the next song on the Harp, which is called Nayru’s Wisdom.


There are very minor things we can now do in Skyloft if you’d like, as nothing major has opened up yet. In particular if you visit Fledge a second time at nighttime, he has made some progress with his pushups but he will need a second stamina potion, so you can go ahead and purchase one for him (we will mention this again in the next section in greater detail if you’d rather wait until then). You can also visit the Bazaar or Beedle’s Air Shop to purchase or upgrade any goodies. Afterwards, let’s fly on over to the Lanayru Desert.
Once you arrive land at the North Desert, which is just outside the entrance to the Lanayru Mining Facility. You can use your dowsing mechanic and you’ll find that the entrance to the Silent Realm is located just north of the bird statue. Run on over and play the harp. After successfully playing Nayru’s Wisdom, strike your sword in the ground to enter the Silent Realm.


This time the Silent Realm is a bit more difficult as we have to deal with sink sand in the ground, as well as invisible platforms that you can stand on in the ground. It’s a good idea to lay beacons at the intersections where you can run across, so you have a good idea which parts you can reach quickly.
For this section, it is a good idea to NOT get the easy ones first and you can save them for later as they are often times a ‘free’ 90 seconds. This time around since the Desert is more open, when you get a Light Fruit, you should be able to see all the remaining tears, as there aren’t many structures in your way.
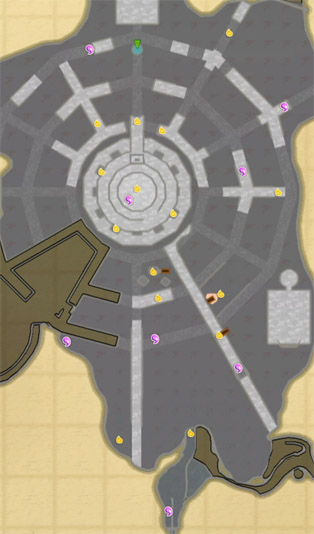
The route that I usually take is to move clockwise around the desert, starting with the one that is east of the entrance point. Remember that your in-game map will show you the locations of ones you have collected (even ones from previous attempts). Also be sure to grab any Dusk Relics you see. Potential spawn locations are shown in purple on the map below.


After collecting all 15 of these Tears of Nayru, you will be rewarded with the Clawshots. These are incredibly useful and make navigation in the desert so much easier. You can latch on to any of those targets that you see along the wall. Furthermore, there are so many new goodies we can get with the clawshots and they are all covered in section 11.2. If you’d like to continue on with the main quest, just jump on down to 11.3.
11.2 Clawshot Goodies
Right away there are a few goodies for us to collect here in the Lanayru Desert using the Clawshots. Just to the west of where you entered the Silent Realm, there is a higher platform that has a clawshot target. Claw on up to the top and open the treasure chest found here to get a Dusk Relic.
Our next stop is Goddess Cube #17, located at the northeast part of the Desert. You might have noticed this one earlier, but we couldn’t reach it. If you look at your map, there is a narrow, windy area of land at the northeast portion of this area, and we’ll need to traverse this area to reach the Goddess Cube. If you’ve been following along with the walkthrough, we previously blew up a secret passage at the northeast part of the map. If not, blow it up using a bomb and follow the pathway to a treasure chest that contains a Piece of Heart. Afterwards use the Clawshot to grab onto the nearby targets. Then claw from target to target until you reach the Godddess Cube.
Goddess Cube #18 is found in the desert as well, located just to the southwest of the Lanayru Mining Facility. You’ll see the cube on one of the higher ledges and you can use the clawshot on the nearby target to get up there. Perform a Skyward Strike to unlock the Goddess Cube.
It’s worth noting now that you have the Clawshots, you can unlock one of the Goddess Cubes found near the Floria Waterfall. However, the reward is extra rupees so it’s probably not worth the trouble to go out of your way to get it just yet. However, there are three Goddess Chests that you can now open in the sky.
- Goddess Chest #16 is found on the small island just north of the Waterfall on Skyloft and it contains a gold rupee. Use the clawshots to get to the top of the Waterfall and then drop down to the island below.
- Goddess Chest #17 can be found on an island at the Northeast part of the Sky, just west of Beedle Island. Land on the lower area and then dive into the water. Swim and do a water dash maneuver to get out of the water. Open the treasure chest to get another Heart Medal!
- Goddess Chest #18 contains a Life Medal and can be found just Northwest of Fun Fun Island. Land on the small island where you previously got a Goddess Chest. There are some vines you can climb down to reach the Goddess Chest that is at the bottom of the island.
Once you complete the Ancient Cistern, you can then do part 2 of Fledge’s side quest. If you return to Fledge’s room at nighttime, he is still doing pushups. However, if you speak to him, he no longer is at 5, 6, and 7 pushups, but he is now able to reach 55, 56, and 57. Still however he is getting tired and needs more stamina potion.
Purchase some stamina potion from the potion shop owner at the bazaar and then return to Fledge’s room at nighttime. Give him the potion and he’ll continue his strength training. Unfortunately this is as far as we can go in this quest for now, but we’ll soon be able to complete it.
Now that we have the Clawshots, there are a couple of Gratitude Crystal quests that we can now complete.
After you have the Clawshots, visit Luv’s house at night time. Luv is the potion shop owner and her house is located at the east end of Skyloft. Once you cross the bridge, walk up the ramp and the door is the first one on the left.
Speak with Bertie, Luv’s husband, and you’ll find that the baby has been keeping him up at night. Apparently the baby slept well before the family lost the baby rattle when a bird had picked it up and flew away with it.
Take a nap in the bed to make it daytime. The baby rattle that we are looking for is in the bird’s nest that sits atop of the windmill in the center of Skyloft. The windmill is found just above Kukiel’s house, but unfortunately we cannot reach it from here. In order to reach the bird’s nest you’ll have to use your Clawshots to get on top of the large waterfall. From there, walk over to the land just aside the waterfall and look towards the windmill. Get a running start and glide down to the top of the windmill.
Once you arrive on the windmill, pull out the gust bellows and blow the dust away from the Rattle and then collect it. Return to Luv’s house and sleep in the bed to make it nighttime. Speak with Bertie and give him the rattle. Bertie will thank you and he’ll finally be able to get some sleep. Link will be rewarded with five Gratitude Crystals for his work.
In order for this side quest to trigger, you’ll have to have spoken to Peatrice a number of times throughout the quest at the Bazaar. After speaking to her a number of times between dungeons, she eventually warms up to you quite a bit and starts to call you darling. At this point, enter Peatrice’s house at nighttime, located just east of the Bazaar.
Speak to Peatrice’s father Peater, the man who runs the mini-game on Bamboo Island, and he is worried that his daughter has an unwanted admirer. Peater asks you to keep an eye out for this certain somebody. Kind of hard if the certain somebody he is talking about is actually… you? Anyway, use the bed in the house to return to daytime.
Go back to the Bazaar and you’ll find a speech bubble over Peatrice’s head. Speak to her and she mentions that she wants you to visit her house tonight. Sure thing! Return to a bed in Skyloft to make it nighttime.
Return to Peatrice’s house at nighttime and speak to her. She will ask you how you feel about her and you have a choice on how to respond. If you speak to her and say that you like her, she’ll warm up to you and you’ll get five gratitude crystals!
The alternative is to say that Peatrice is just the girl at the item check and nothing more. While you did break her heart, it will lead to the same five gratitude crystals. Sleep in the bed nearby until the next night and then speak to her father Peater. He is pleased that his daughter has finally given her admirer the boot. As a reward for helping him out, he’ll give you five gratitude crystals!
There are three individual Gratitude Crystals remaining that we can now get. You can see the locations of these three below. If you haven’t gotten the 12 individual gratitude crystals earlier, now is a good time to get them. You can check out our Skyward Sword Gratitude Locations Guide for the full listing. Additionally, one of the Gratitude Crystals leads you to Piece of Heart #14.
- Found on top of the waterfall in Skyloft. Use your Clawshots to get on top of the waterfall and collect the Gratitude Crystal. Alternatively, if you have the upgraded Tough Beetle, you can get this crystal without having to climb up.
- Found inside of Zelda’s room at the Knight Academy. Climb on top of the roof of the Knight Academy and you’ll see a small chimney with a target inside. You can use your clawshot to latch onto the target here and you’ll drop inside. Crawl through the passageway and collect the Gratitude Crystal in Zelda’s Room. While you are here, open up her cabinet dresser to get Piece of Heart #14.
- Found on Beedle’s Island at nighttime. In order to reach this area, you’ll have to enter Beedle’s Air Shop and sleep in the bed. Once it is nighttime, leave the Air Shop and you’ll be outside on Beedle Island. The Gratitude Crystal is found above Beedle’s Air Shop near one of the propellers. Use the Beetle to grab it.
If you’ve collected all of the Gratitude Crystals up until this point, you should have 55 of them. The next reward Batreaux gives out is at the 50 Crystal Mark. So let’s run down to his house to collect the next reward, the Giant Wallet. This item allows you to hold a whopping 5,000 rupees!
With the Wallet on hand, let’s make our way back to the Lanayru Desert to progress with the main quest.
11.3 Lanayru Caves
Land at the West Desert statue, and then take a look at your map and you’ll see a question mark nearby. Run on over to the question mark on your map and you’ll find a series of clawshot targets. Claw on over and head through the cavern here. You’ll reach a new area known as the Lanayru Caves.


Run ahead and you’ll find a Goron that is using a pick-axe to break-up the rocks. This is a different Goron than Gorko, who we’ve seen a number of times already. You’ll also see a few blessed butterflies flying around. Play your harp in that area and a Gossip Stone will come up from underground, giving you an Evil Crystal treasure in the process. Open the nearby treasure chest to get a Monster Horn as well.
You want to head through the locked door to the west, but you need to find a key. Run on over and speak with Golo the Goron and you’ll find that he is researching the legend of the three dragons. This is information that we’ll use much later in the game. He makes a mention of the ancient Lanayru Sand Sea and he will give you a small key.
Use the clawshot on the target and open the locked door. Go through to enter the Lanayru Sand Sea.
11.4 Lanayru Sand Sea
There are a series of pillars, each with targets that Link can claw on over to. Once you attach yourself to the first target, use your second clawshot to reach the next one. Continue along until you reach the sandy area to the west.


Make your way over to the north end of the area and you’ll notice there is a clawshot target on one of the higher boxes. Claw on over and then enter the nearby cave. There are tons of Aracha in this room, so defeat them with a number of sword slashes. Use a Skyward Strike to activate Goddess Cube #19.
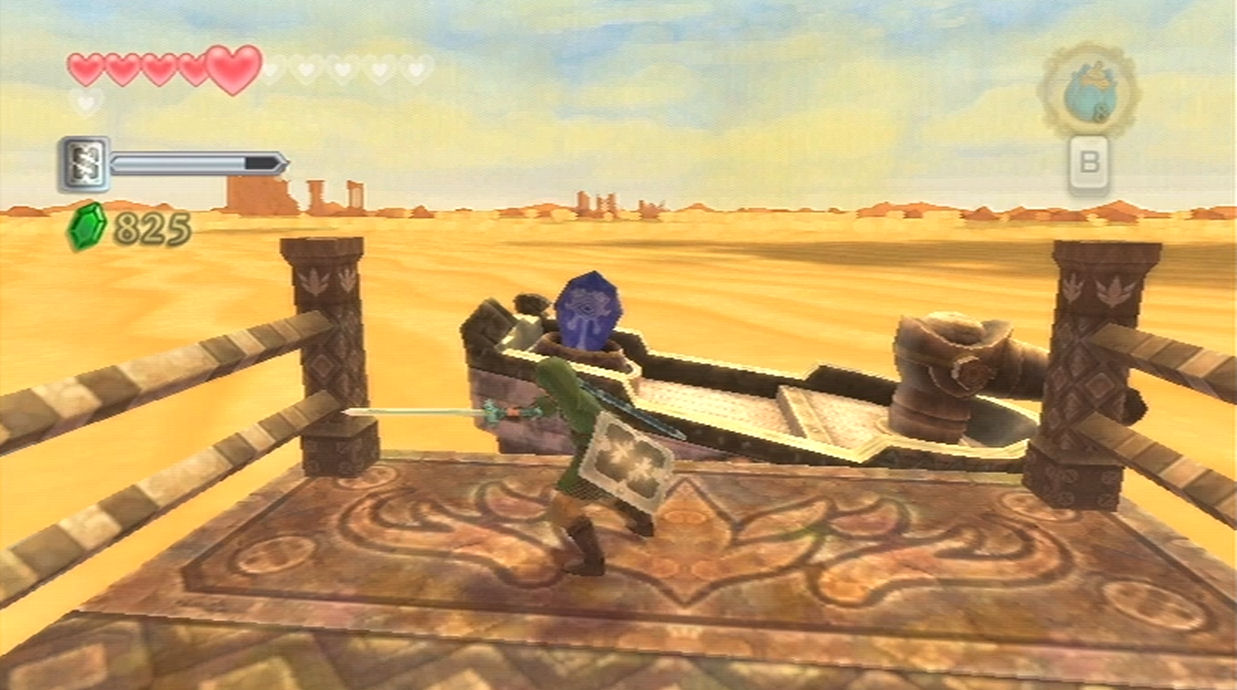
Our next destination is to the west, just past a bird statue that you should interact with to add to your map. You’ll find an old boat as well as an ancient robot here. Strike the timeshift stone that is found on the boat and it will activate the robot and create a pool of water underneath.
The robot here captains the ship that holds Nayru’s Flame. However, his ship was overrun with pirates and his crew was imprisoned. He mentions that the ship has the ability to become invisible. He asks you to help him search for his ship. He mentions that in order to properly navigate the sea, you’ll need to get a Sea Chart, and he has one over at his shack at Skipper’s Retreat.
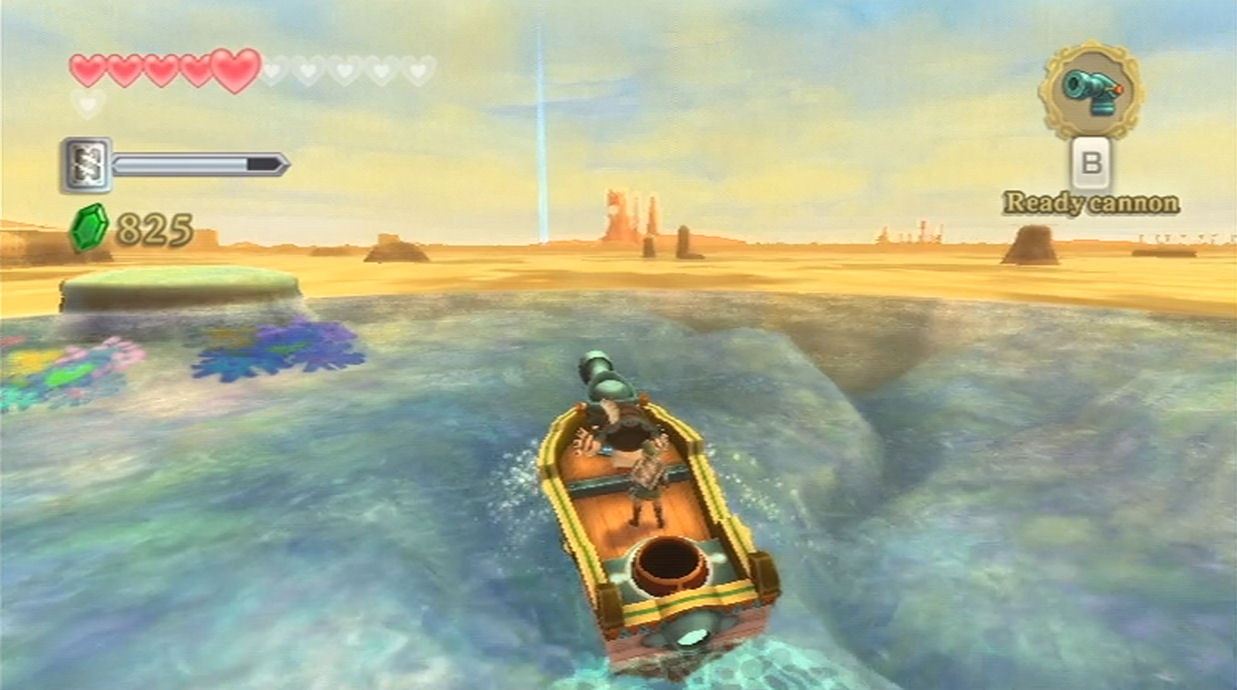
Jump on the boat and Skipper will mark an ‘X’ on your map. Ride the boat over to the retreat, using the nunchuck to change direction and the ‘A’ button to pick up speed. Hold up on the nunchuck and hold A at the same time to reach top speed. You can press ‘B’ to ready the cannon and then use the Wiimote to aim. Ride on over and dock at Skipper’s Retreat.
11.5 Skipper's Retreat
There’s a bird statue here to add to your map, and then take the pathway to the right and you’ll encounter two electro spume. Defeat them by throwing bombs and continue along the pathway. Use the clawshot to grapple over to the higher pillar. Defeat a few deku babas in this area and then turn to the north. There is a flying plant-like creature above known as a Peahat. You can use your clawshot to grapple on over. While hanging from the peahat, grapple over to the nearby pillar.
Defeat the very annoying yellow chuchu found here and then pull out your bombs. Toss a bomb at the boulder that is found here and then enter the cave. Note, if you don’t have any bombs, you can use the beetle and the bomb that is on the cactus nearby.


Defeat another annoying yellow chuchu and run through the tunnel. Grapple over to the peahat found here and continue from target to target until you reach a higher platform. There is a new variety of an enemy here known as a Metal Shield Moblin. Since you are battling on such a narrow platform, it is best to just run and jump over him, avoiding him all together.
Defeat the quadro baba and open the treasure chest to get 20 rupees. If you look to the southwest, there is a pillar that you can grapple over to. Do so and make your way around the pillar. Use the clawshots to grapple over to the next pillar and then climb on top of it. Deliver a Skyward Strike on the Goddess Cube to activate a treasure chest in the sky. Backtrack by the two pillars to get back to where you defeated the quadro baba.
Run to the north end of this pillar and use the clawshots to get over to the target. You’ll find an enemy furnix here, so use the whip to bring it over and defeat it. At the west end of this platform there is a strange plant peeking out from the ground. Use your whip to pull it and a peahat will pop into the air. Use the clawshots to grapple on the peahat. Ride the peahat northward and grapple towards the next target.


Run up to the top of the pillar and you’ll see another target in the distance. Send your beetle out first as there is a deku baba hanging from the ceiling. Cut off its stem and then grapple over with the clawshots. Claw on over to the higher pillar and defeat two more furnix enemies.
Continue to the next peahat and this part is a little tricky. You have to time your clawshots in order to reach the next peahat, as both peahats are moving and there is a large rock in your way. Afterwards, claw on over to the final target and enter Skipper’s room.


You can clear the room of dust and you’ll find a treasure chest on the left side. Open it up to get the Ancient Sea Chart. If you sit on the stool in the center of the room, you’ll restore your health, but Fi points out that there is a bug on the roof.
Exit the house and then climb to the top of the building to find some Sand Cicadas that you can catch with your net. Afterwards go to the west end of this cliff and you’ll see a bar attached to the pulley. Grab on it and Link will ride down to the pillar below. There is another pulley nearby, so do the same thing to get all the way back to the bottom of the area. Run on over and talk to the robot. Agree to set sail and the robot will mark a new ‘X’ on the map.


Set sail for the Shipyard and on your way you’ll encounter a few obstacles. There are explosive barrels found in the water, so avoid them if you can. Alternatively you can blow up these barrels using the cannon that is attached to your boat. You’ll also encounter some bokoblin archers that will shoot fire arrows at you. Don’t bother trying to defeat them as it’s easier to just ride right by. There are also Water Spume found in this area and they’ll shoot a ball of water towards you. These enemies are pretty much harmless and you can completely ignore them.
Ride on over and dock at the Shipyard.
New Section
Run forward and you can save your progress at the bird statue. Turn to the right and you’ll encounter two lizalfos. Now that we’ve upgraded the goddess sword, these enemies will appear much easier than they did early on in the game. Defeat them and continue along to enter the mine cart building.


You can speak to the Goron here who tells you that you should probably read the instructions on the wall as there are some safety concerns. You can do that if you’d like, but the basics are that once you are on the cart, you can use the Wiimote to pull your weight to the left or right. Whenever you come across tight turns, you want to pull your weight in the opposite direction so that you don’t fall off the rail. You can press ‘B’ at any point to slow down the mine cart.
It is fun to try to go at full speed, but slowing down the mine cart is the safer method. In this first set of rails, it’s a rather straight forward pathway and there are no forks in the rail, so just head along and try not to fall off the cart.
Jump off the cart and climb the steps nearby. You could use the pulley here to get back to the boat, but there is no need to do that just yet. Instead, take a right and ride on the second mine cart. It isn’t as straight forward this time around as there are forks in the rail. You’ll have to lean either right or left to go on a certain pathway. Once again, I suggest using ‘B’ to slow down to be safe. There are also times where you’ll have to jump as the rail is not connected. In order to do this, just shake the nunchuck and you’ll be able to properly land.


Ride the mine cart and at the first fork in the rail, make a right. Soon after you’ll find another fork in the road so make another right. There is a series of gaps straight ahead and your mine cart will glide through the air. You have to be moving at a decent pace in order to properly make the jump. Shake the nunchuck in order to properly land on the rails. Continue riding along and at the next fork in the rail, make a left. Continue riding and at the next fork, make a right. You’ll soon come to another fork and this one it doesn’t really matter which direction you go as the rails will connect. At the very end of the rail, there are a series of gaps where you will have to make two jumps. Do so and you’ll reach the end of the rail.
Save at the bird statue here and then head through the door to enter the Shipyard Construction Bay. Jump into the sand and begin to use your gust bellows to clear out the sand. What you’ll uncover is Moldarach! That’s right, another version of the boss from the Lanayru Mining Facility! He isn’t nearly as hard this time around as you have the upgraded goddess sword. Defeat him using the same exact methods you used before.


After defeating Moldarach, Fi will say there isn’t much reason to stay here. Exit through the door and return to the robot. Jump back on the ship and the Robot will mark another location on the map for the Pirate Stronghold. Sail on and over and dock at this next stop.
11.7 Pirate Stronghold
Once you arrive at the Pirate Stronghold run on over and save at the bird statue if you’d like. Afterwards take the pathway on the right and it will lead to a door. Enter it to enter this mini-dungeon of sorts.


Run forward and head through the door at the back-right of the room. Use the gust bellows to clear the sand and then run forward to find two more lizalfos. Defeat them just like before and continue progressing down the hallway. Defeat the electro spume and then run across the sand. Go through the door found here.
Run down the hallway and you’ll find a Timeshift Orb here. Lift it up and then carry it further down the hallway, causing the doorway to open. Continue along this pathway and the timeshift orb will activate two nearby technoblins. Defeat them and carry the orb through the next door.
A beamos awaits you in this room, so toss the orb aside and defeat the beamos. Carry the orb to the next room and you’ll see a treasure chest in the distance. Drop the orb a distance away, otherwise an electrical spark will block your path. Run on over and open the treasure chest to get a silver rupee. Pick up the orb once again and head through to the next room.
Drop down and pick up some ancient flowers that are on the ground here. This area is filled with quicksand, but if you carry the orb, the ground is solid. Carry the orb up the ramp on the left and then leap over to the higher platform that appears. Jump from platform to platform and head through the door at the northeast part of the room.


There is a gate that blocks your path and if you carry the timeshift orb to the left, there is an electric spark hindering your progress. Drop the orb in place and then run around the corner. Jump up and pull the lever here and the gate will come down, allowing for easy access. Pickup the timeshift orb and then progress further along to the next room.
Carry the orb around this room and you’ll face off with several deku baba. There is a treasure chest in the corner here, but if you bring the timeshift orb too close, pillars appear from the ground, preventing you from reaching it. Bring the timshift orb as close as possible without making the pillars come up. Run on over and open the treasure chest to get an Evil Crystal. Pick up the timeshift orb and carry it onward to the next room.
In the next hallway you’ll find three deku babas. Your best bet here is to roll a bomb and one of them will gobble it up. The explosion will defeat all three of them. Continue along and defeat the technoblin and deku babas in this area. In the next area you’ll face off with more enemies, so defeat them and make your way over to the southwest corner of the room. Keep the timeshift orb just outside of this small room, so that the electrical charge does not block one of the exits. Pull the block onto the floor switch and the gates in the room will change. Now run through the other exit, pick up the timeshift orb and head through to the next room.


Walk over to the adjacent room with the timeshift orb and defeat the two beamos that come to life. Take the timeshift orb and drop it at the northwest corner of this room. Return to the previous room and then head through the door to the west. The timeshift orb should be close enough that it is activating a nearby lever. Jump up and pull it down, lifting the nearby gate. Grab the timeshift orb and bring it to this later room.


Open the treasure chest in this room to get a Monster Horn. Bring the time shift orb to the corner of the room and you’ll activate two armos enemies. It’s a good idea to only bring it close enough to activate one at a time. Defeat both of the armos and the gate nearby will open.
Carry the timeshift orb and place it in the holder in this first room, causing the entire Pirate Stronghold to activate. Go through the door that opens up to get back outside. Immediately turn around and you’ll find a clawshot target above the door. Claw on over to it and then to the next target. Run straight ahead and you’ll find Goddess Cube #21.
Run back towards your boat and Fi will chime in, giving you some information about the flame you search. She will register the ship as one of your dowsing options. Run back over to the robot and speak with him. Jump back in the boat and set the course.
11.8 Finding the Sandship
This part can be a bit difficult as there is a lot going on. You have to ride around the sea while using the dowsing mechanic to search for the ship. Move your boat closer until the dowsing starts going wild, signifying that the Sandship is nearby. Since the ship is invisible, you’ll have to shoot a cannon shot randomly just to hit the ship.


The whole process can be a bit difficult as you have to steer your boat, use the dowsing mechanic, and use the cannon almost all at the same time… while watching for other enemies on the sea. Once you draw close enough, shoot a bomb at the ship. After the first hit, hit the ship two more times and the ship will become visible.
Link will automatically ride on over and jump aboard the Sandship. Join me in Chapter 12 where we will cover this journey.
- Chapter 1 – Skyloft
- Chapter 2 – Faron Woods
- Chapter 3 – Skyview Temple
- Chapter 4 – Eldin Volcano
- Chapter 5 – Earth Temple
- Chapter 6 – Lanayru Desert
- Chapter 7 – Lanayru Mining Facility
- Chapter 8 – Isle of Songs
- Chapter 9 – Lake Floria
- Chapter 10 – Ancient Cistern
- Chapter 11 – Lanayru Sand Sea
- Chapter 12 – Sandship
- Chapter 13 – Volcano Summit
- Chapter 14 – Fire Sanctuary
- Chapter 15 – Thunderhead
- Chapter 16 – Song of the Hero
- Chapter 17 – Sky Keep
- Chapter 18 – Final Showdown
