- Chapter 1 – Skyloft
- Chapter 2 – Faron Woods
- Chapter 3 – Skyview Temple
- Chapter 4 – Eldin Volcano
- Chapter 5 – Earth Temple
- Chapter 6 – Lanayru Desert
- Chapter 7 – Lanayru Mining Facility
- Chapter 8 – Isle of Songs
- Chapter 9 – Lake Floria
- Chapter 10 – Ancient Cistern
- Chapter 11 – Lanayru Sand Sea
- Chapter 12 – Sandship
- Chapter 13 – Volcano Summit
- Chapter 14 – Fire Sanctuary
- Chapter 15 – Thunderhead
- Chapter 16 – Song of the Hero
- Chapter 17 – Sky Keep
- Chapter 18 – Final Showdown
5.1 Bomb Bag
Once you enter the temple, run straight ahead and defeat several of the fire keese in this area. You could make a turn to the left and you’ll find Cobal who talks about his missing friends. At the east end of this room you’ll find a red chuchu lying around. There is also a soft soil spot that you can dig up to reveal an air geyser. This leads to a treasure chest containing a red rupee.


Continue northward in this room, defeating the fire keese and jumping over floating platforms. At the end of the room you’ll find a large drawbridge that is closed. If you look at each side of the room, there are two gears, each of them having ropes attached. Cut both of the ropes with your sword and the draw bridge partially opens. Just to the right of the drawbridge, there is another rope that can be cut, this time using the beetle. Do so and the bridge will fully open.
In the next room you’ll encounter your first Lizalfos. This creature acts somewhat like the bokoblin that we’ve fought before in that his arm guard will protect a part of his body. It moves much faster so you’ll have to be quick with your sword slashes. Just run up to them and slash away with your sword. The lizalfos will duck out of the way and will hold the arm guard up, protecting part of its body. Slash at him from the opposite direction and you’ll do harm. Follow up the initial sword slash with a number of consecutive slashes. Repeat this process until the lizalfos has been defeated.
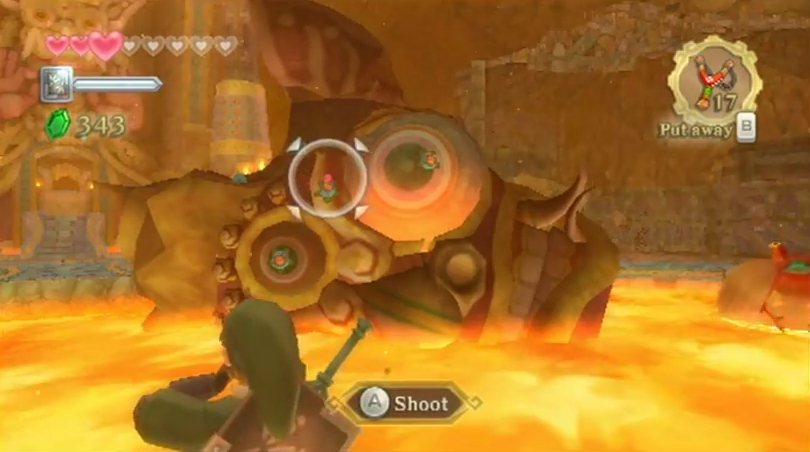
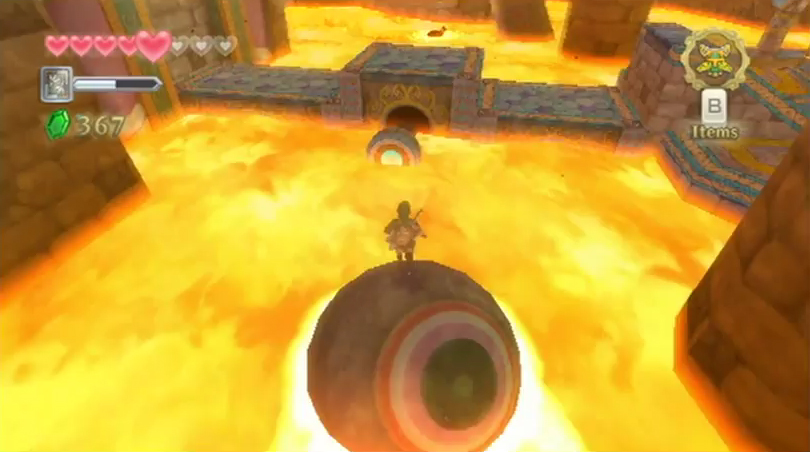
In the lava, you’ll find a large structure that has a number of bomb flowers attached to it. Use your slingshot to hit one of the bomb flowers, and once it explodes, a massive floating ball will come in your direction. This ball will be your primary form of transportation throughout much of the dungeon. Also in the lava, there are new enemies known as Magma Spume. These creatures will shoot fireballs at you, and to kill them, just roll the ball over them.
Jump on top of the ball and ride it to the left part of the room. There are a few bomb flowers found here, as well as a platform that occasionally rises due to the lava underneath. Pick up one of the bomb flowers and toss it on the platform when it is lowered. The platform will rise and the bomb explosion will blow-up the boulder. Hop on up to get a Golden Skull treasure from the chest.
Jump back on top of the ball and ride it to the northwest corner of the room. Jump off the ball here and open the treasure chest to get a Blue Bird Feather, another rare piece of treasure. Continue on the ball and ride it eastward just a bit. There is a switch in the lava that you can press by rolling into it with the ball. Do so and one of the near platforms will rise. We’ll get back to this much later on in the dungeon.
Now direct the ball to the southeast portion of the room. Jump off and speak with Ledd the Mogma, and he’ll ask you to get back his Bomb Bag. He mentions that it is behind the boulders that are blocking the pathway.
Crawl through the small hole found here and defeat the bokoblin that is nearby. Pick up one of the bomb flowers and roll it through the small hole that you crawled through. If you aimed it nicely, it will blow up the boulder. Before entering this next room, look around this area and you will find a ladder. Climb up the ladder and you can jump across the narrow ledge to reach two soft soil spots. Dig them up to get some rupees as well as a fairy to restore your life. You could catch it in a bottle if you’d like.
Afterwards head through the door that you revealed and you will take on the dungeon mini-boss in the form of two lizalfos. The battle is just like when you fought one of them, except there are two of them now. Not much has changed and usually only one of the lizalfos will attack you at a time. The key here is to be aggressive and once you’ve hit one of the lizalfos, continuously slash at them to get multiple hits in.


Once you have defeated both of the lizalfos, open the treasure chest that appears to get the Bomb Bag. Return to the previous room and speak with Ledd. He thanks you for getting the bomb bag, but tells you that you can keep it for yourself! How nice. Crawl through the small hole once again and lift up a bomb flower. Once lifted, you can press B to put it in your bomb bag. Walk around and fill up your bomb bag using the bomb flowers.
5.2 Dungeon Map
Now that you have the bomb bag, jump back on the ball that is floating in the lava. Ride it over towards the center platform and jump off. Walk to the west end of this area and toss a bomb to blow up the boulder that is blocking your way. Jump on over and defeat or avoid the lizalfos found here. Go through the door to the west.


Jump over to the right side and defeat the bokoblin. You can now defeat the Magma Spume found here by tossing a bomb at it. These enemies will always leave hearts as a reward, so use your beetle to collect them if needed.
Jump over to the west end of the room and wait for the platform to fall to the ground. Jump on it and when the lava rises up, jump over to where the bokoblin can be found. Open the treasure chest found here to get the Dungeon Map.
There is not much left for you to do in this area, so exit the room.
5.3 Dragon Sculpture
With the dungeon map and dungeon item now in hand, it’s time to search for the boss key. Jump back on the rolling ball and make your way to the east end of this room. If you look at your map, there is an X against the wall here and a pathway that leads behind it. Pull out your bombs and toss two of them at the wall to reveal a secret passage.
Roll along on the ball, avoiding the lava that is pouring out from the statue. Stop by at the first platform on the right to load up on bombs and then continue along on the ball. It appears that the pathway is blocked for your ball, but the truth is that there is another hidden wall. The wall straight ahead from where lava is pouring out from the statue can be bombed. Toss two bombs to reveal the passage.


While rolling around on the ball, if you look up you will find a statue. You can send your beetle within it to uncover a silver rupee, worth 100 rupees! Continue rolling around on the ball, defeating another magma spume along the way. Jump off the ball and land on the platform.
Looking ahead, there is a large gate that is blocking the path for your ball. Pull out the beetle and send it to the large gate and break the rope that is holding it in place. That only does half the job as there is another rope on the other side. Use the beetle once again, this time sending it through the passage on the left. Follow it along and hit the rope on the other side of the gate to clear the pathway.


Continue along on the ball and you can stop at the next platform if you’d like as it leads to a bird statue where you can save your game. Otherwise continue along, defeating some more enemies along the way. The lava pathway takes a strange turn in this area, so you’ll have to be a bit more careful. It’s nothing that should be too much of a challenge though, so keep on going until you make it back to the main room once again.
Turn to your left and you’ll find a lizalfos that is protecting a treasure chest containing a red rupee. Afterwards jump back on the ball and you’ll find another one of those switches within the lava. Roll on over and hit the switch, causing another platform to rise. Jump off the ball and head through the door at the north end of this room.


There is a large incline within this room and as you start sprinting up it, boulders will drop down towards you. Sprint up about half way and stop to rest in the small level area to the left. After the boulders have passed, continue to the top of this area.
There is another incline here, but we presently do not have a safe spot to land on the left as a boulder blocks the path. Instead, crawl through the small gap found on the right and load up on bombs. Dig the nearby soft soil and the air geyser will send you up to the higher ledge. Run up the staircase and you’ll find yourself next to that large incline once again. Pull out a bomb and toss it up the slope, but diagonally against the far wall. If you’ve timed it right, the bomb will explode next to that boulder, allowing a safe spot as your sprint up the incline.
Run back to the bottom of the incline and start to sprint your way up. Watch out for the falling boulders and stop to rest by the hole to the left. Once your stamina gauge is fully restored, run all the way to the top of this incline.


Run over to the circular stairs and climb up. Sprint up this long windy passage and collect the Dragon Sculpture. As you start to head down, a massive boulder appears from behind you and will chase you. Sprint downward and jump off the edge of the ledge. The boulder will miss you and it will clog up the lava that was shooting out of the statue.
It’s now time to take on the temple boss, so save your game if you’d like. Jump on over to the locked door and use the Wiimote to move the Dragon Sculpture around. Once it’s properly inserted, Link will automatically make his way into the boss’s lair.
5.4 Pyroclastic Fiend Scaldera


Run up the steps and you’ll see the gigantic boulder from the previous room rolling along. Continue forward and you’ll have a short confrontation with Ghirahim once again. That same boulder will roll on over to the other end of the room and this will awaken the temple boss, Scaldera.
During the first phase of the battle, Scaldera will come running up the long ramp. The boss will eventually run into one of the bomb flowers that can be found on the sides of the ramp, causing Scaldera to go crashing down below. At that point, Scaldera will shoot out a number of large sized fireballs from its mouth in different directions towards Link. Quickly move left and right to dodge these fireballs.
While the bomb flowers will keep Scaldera at bay, they won’t defeat him. After he is knocked down by the bomb flowers, run after Scaldera as he is falling back. He will get up and inhale, preparing for the fireball attack. While he is inhaling, quickly pull out a bomb and toss it inside of its mouth. This will bring Scaldera crumbling to the ground, shedding part of its outer shell, and revealing its eye weakness. Repeatedly slash away with your sword to damage Scaldera.


Rinse, wash, and repeat during this early phase of the battle. You can pick up bomb flowers from the sides of the room when you are running low, as well as recovery hearts at the other edge of the boss room.
As the battle progresses, Scaldera will begin to move a bit faster and will walk on its legs. During this phase, you can walk underneath Scaldera and when he comes rolling back down towards you, just stay on one of the sides. Also, as his shell begins to shed, he will move his eye around, making it harder to get sword slashes in. Once the shell is completely removed, a sword slash will finish off Scaldera.
Pick up the Heart Container that is left behind. Run to the top of the ramp and head through the door found here. This will trigger a scene with Zelda and that strange looking character.


Once you regain control of Link within the Earth Spring, run on over to the emblem and deliver a skyward strike. This will trigger another cut-scene with Fi and Link will acquire the Amber Tablet, which allow us to access the next area of the game, the Lanayru Desert.
- Chapter 1 – Skyloft
- Chapter 2 – Faron Woods
- Chapter 3 – Skyview Temple
- Chapter 4 – Eldin Volcano
- Chapter 5 – Earth Temple
- Chapter 6 – Lanayru Desert
- Chapter 7 – Lanayru Mining Facility
- Chapter 8 – Isle of Songs
- Chapter 9 – Lake Floria
- Chapter 10 – Ancient Cistern
- Chapter 11 – Lanayru Sand Sea
- Chapter 12 – Sandship
- Chapter 13 – Volcano Summit
- Chapter 14 – Fire Sanctuary
- Chapter 15 – Thunderhead
- Chapter 16 – Song of the Hero
- Chapter 17 – Sky Keep
- Chapter 18 – Final Showdown
