- Chapter 1 – Mercay Island
- Chapter 2 – Temple of Fire
- Chapter 3 – Ocean King Part II
- Chapter 4 – Temple of Wind
- Chapter 5 – Ocean King Part III
- Chapter 6 – Temple of Courage
- Chapter 7 – Ghost Ship
- Chapter 8 – Ocean King Part IV
- Chapter 9 – Goron Temple
- Chapter 10 – Temple of Ice
- Chapter 11 – Ocean King Part V
- Chapter 12 – Mutoh’s Temple
- Chapter 13 – Ocean King Part VI
3.1 Back to Mercay Island
Once you have completed the Temple of Fire, make your way back over to Astrid’s house at the west end of the island. After speaking with her, she rewards Link with his first Power Gem. After the chit-chat, make your way back over to the boat to set sail.


While Power Gems are an optional collectible throughout Link’s journey. This particular Power Gem is one of the few gems that Link is required to get. It serves no purpose at the moment, but we will be able to upgrade Link’s attack power after collecting a certain number of these gems.Power Gem #1

There are other goodies for us to find here at the Isle of Ember, but we will need additional items to reach them. There are, however, a few red rupees that can be collected at the moment, two of them found within trees that Link can roll into. One of these is found at the north end of the island, just east of the torch. A second tree can be found directly north of the entrance to the Temple of Fire on the second to lowest tier. From just outside the temple, if you continue walking clockwise around the volcano, you’ll find a treasure chest on the higher ledge that contains a red rupee.Optional: Extra Rupees


Nothing new has opened up on the Great Sea. You still don’t have enough rupees to buy any notable goodies at Beedle’s shop, so for now just travel back to Mercay Island.


Once you arrive back at Mercay, you’ll find that the Shipyard is open for business. There haven’t been many opportunities to find ship parts yet, but if you head inside you’ll find a treasure chest containing one. You can then speak to the worker here and he will customize your ship. At any point in time as you collect more ship parts, you can return here to get your ship customized. If you end up having multiple pieces from the same ship set, you will increase your ships health while at sea.Optional: Shipyard Now Open


Run over to the north side of the island and make your way back over to the Temple of the Ocean King.
3.2 Temple of the Ocean King II
As you enter the temple, you’ll be joined by Linebeck and Oshus. Once you gain control of Link, climb up to the altar and tap on the hourglass to acquire the Phantom Hourglass. This item will prevent Link’s life from draining while in the Temple, but at the moment it only holds 10 minutes of the Sand of Hours. Once depleted, Link’s life will begin to drain.
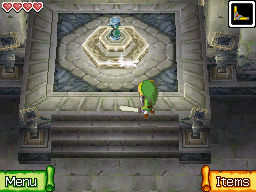

When standing in the purple safe zones, the time left in the hourglass will remain constant. As soon as Link steps out of the safe zones, the time will begin to decrease again. Quickly run north and tap on the door. Leaf will use its power to open it up, so head down to floor B1.
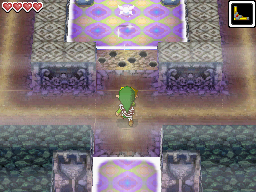

The Phantoms on this floor cannot be defeated. Wait until the nearby Phantom has moved to the southeast part of the room and then quickly run to the northeast corner. Slash at the switch, causing a torch at the south end of the room to light up. There is a second unlit torch just to the left of this lit torch. Avoid the Phantom and make your way towards these two torches. Use the Boomerang on the lit torch to light up the second torch. This will cause the nearby flames to go out. Quickly run over to the safe zone at the southwest portion of the room.


Wait until the Phantom is at the top of the screen and then run to the safe zone to the west. Now wait until the Phantom is at the bottom of the screen and run northward. Around the corner there is a floor switch that will open the pathway to the small key at the top-left portion of the room when stepped on.


There are a pair of red pots nearby. You can lift one up and toss it to any spot on the floor to create a small safe zone. It is a good idea to use a safe zone somewhere on the west side of the room to avoid the Phantom.
Grab the small key and then carefully maneuver from safe zone to safe zone, avoiding the Phantoms. Use the key on the locked door at the northeast part of the room and then head down to floor B2.


There is a Phantom to the left that stays put, just turning to look in different directions. This Phantom is guarding a lever that needs to be pulled. Additionally, there is a crystal switch just south of the entrance, along with a second crystal switch to the west of the Phantom. From the entrance, wait until the Phantom is looking away and then run southward. Slash at the crystal switch here.


The noise will draw the attention of the Phantom, so quickly run to the far left and then up, where you will find a second crystal switch. Hit this switch and, with both orbs activated, a small key will appear within the room.


If you have time, run over to the lever that the Phantom was previously guarding and pull at it. If you are in danger, you can always run back to the safe zone at the northeast corner of the room. If the Phantom has already retreated, move into its line of sight and allow it to chase after you. Run around the room and pull the lever that it is guarding, causing the nearby flames to lower.
Run to the west end of the room and break the red pot, causing a small safe zone to appear. Stand in the safe zone and use the Boomerang to trace a path to the crystal switch that is found just south of the flames. Hit it to cause the flames to lower.


There is a Phantom at the right side of the room here. Wait until it is at the bottom-right part of the room and begins to walk northward. At this point, quickly dash to the southeast corner of the room. Hit the red jar to create a safe zone that you can stand in.


Wait until the Phantom walks back westward and then run upwards. Step on the floor switch causing the nearby spikes to lower. While still standing on the floor switch, use the Boomerang to snatch up the small key that is located just to the left.
With the key in hand, now it’s time to make your way to the locked door on the left. You can carefully backtrack the same way you got here. Also, in the center of the room there are lowered blue blocks and a crystal switch nearby. You can run through this pathway and hit the switch, causing the red blocks to lower and allowing for quicker access to the locked door. Use the small key and head down to the next basement.


There are two Phantoms patrolling this room, one of which is holding a small key. At the northeast corner of the map there is a large safe zone and the goal is to bring all three Force Gems to this location. Run east and then turn northward. You will find a yellow pot that contains 30 extra seconds of sand. Continue westward and open the treasure chest to get the first force gem.


While holding a force gem, Link moves considerably slower. Make your way to the northeast corner of the room, carefully avoiding the two Phantoms. If at anytime a Phantom sees you, you can quickly drop the force gem and run into a safe zone. At the northeast corner of the map, drop the first force gem onto any one of the three triangular pedestals.


After dropping the first force gem in place, walk to the right and around the corner. Before leaping off, pull out the Boomerang a trace a path to the nearby crystal switch. This will cause the floor spikes to remain lowered. Leap off the ledge and carefully make your way to the southeast corner of the map. Here you will find the second force gem, so carefully take it back over to one of the force gem pedestals.
Make your way to the very southwest corner of the map. Here you will find a red lever, so go ahead and pull it. This causes the flames in the room to lower. Run east and climb the steps the flames were blocking. You can break the nearby red pot to create a safe zone if need be. In this area there are two floor switches, each corresponding to trap doors that are built into the floor. Wait until the Phantom is standing over one of the false floors and then step on the switch to send the Phantom falling to the abyss.


Run over and grab the small key that the Phantom has left behind. Use the small key on the locked door at the bottom-left part of the room to reach the third treasure chest containing a force gem. Place the final force gem in the pedestal and the door will open up. Continue onward to the next room.


The time in the hourglass will not change while on this floor. Run over to the northwest part of the room and open the treasure chest to get the Northwestern Sea Chart. Walk to the east and step into the blue portal to return to the entrance of the temple.
3.3 Cannon Island
Return to Linebeck’s ship and show him the newly acquired sea chart. The chart is dusty, so you’ll need to blow into the microphone to clean it up. Once you are ready, set sail with Linebeck.


If you try sailing northward, a whirlwind will appear and send you back to the center of the map. Instead, trace a path to the island to the southwest known as Cannon Island.
Once you arrive at the island, climb the steps and you’ll meet with the Postman. He’ll periodically deliver letters to you throughout your quest. Enter the building and speak with Fuzo. He opens the gate, allowing Link to navigate through much of the island.


The path is rather straightforward and you can just make your way to the southwest corner of the map. You will come across some enemy beehives and as long as you don’t get too close or bother them, they won’t harm you. At the southwest part of the map you will find a cave, so go ahead and enter it.
While navigating the island, the path turns to the east. If you head in this direction you will find a nearby treasure chest. Open it up to get the first Treasure Map. These will come in handy later on once we acquire an item that allows us to pull up treasure from the sea floor.Optional: Treasure Map #1


Defeat the enemy rats and you’ll find a pair of Bomb Flowers in the room. Pick one up and the bomb’s fuse will light. Quickly toss it over to the cracked blocks to the right, causing them to blow up, revealing a pathway.


In this area there is a block you can push, but a cracked block is in the way. Grab a bomb flower once again and stand just south of the fence. Face northward and toss the bomb over the fence, causing it to blow up the cracked block. Now you can push the block to the right and get past the fence.
If you run to the southeast corner of the map, you’ll find a cracked wall. You can blow this wall up with a bomb flower as well, but you’ll have to be quick as it is quite a distance away. Beyond the wall you will find a treasure chest containing a Power Gem.Optional: Power Gem #2


At the top-right, you’ll find a second block. Grab hold of it and pull it down three times and then left once. Head north to find another block that can be moved. Pull it right once and then up once, clearing the pathway.


Defeat the two rats and you’ll find another cracked block. Grab a bomb flower and quickly run through the maze, tossing the bomb at the cracked block to blow it up. Climb the steps at the end of the path to get out of the cavern.
Back outside, defeat the rats and use the bomb flowers to blowup the nearby cracked blocks. Just to the south you will find a treasure chest containing a red rupee. Walk around the rest of the island, defeating the rats that are in your way, as well as blowing up cracked blocks that are blocking your path.


Near the northeast part of the island, there is a trio of rocks, and just across the fence there are a few cracked blocks that are blocking your path. Get rid of the rocks to the clear the pathway. You will need to grab a bomb flower, jump off the ledge, and then quickly run over to the fence to toss the bomb at the blocks. With the blocks blown up, walk around to the pathway and enter the building at the northeast part of the island.


There are some extra rupees for us to find here on the island. At the southeast part of the island, right by the water there is a lone tree. Rolling into it will cause a big red rupee to drop. Grab it to get 200 rupees!Optional: Big Red Rupee


Speak with Eddo and he will sell you a Cannon at the price of 50 rupees. This item will allow Link to shoot at enemies and obstacles while on the Great Sea. Exit the building to the left and you’ll see a letter in the mailbox waiting for you. The first letter is from the postmaster and serves as an introduction to future letters. Return to Linebeck and set sail.


Our next stop as at the west part of this quadrant. Trace a path on the sea westward through the opening in the rocks. Along the way you will meet some of the first sea enemies if you haven’t done so already. One enemy is a Flying Fish, which you can just defeat by tapping it, which fires a cannonball at the enemy. You may also encounter a Sea Trap, which can be lowered by hitting the two sides of the trap using the cannon, or the easier option is to just jump over and avoid it. Once you sail near the opening, you’ll see large boulders are blocking the way. Destroy the boulders using your newly acquired cannon.


Once you reach the west portion of the quadrant, the clouds turn darker and the Ghost Ship will appear. Follow the Ghost Ship northward as it heads into the northwest quadrant. It will turn quite foggy once you enter the northwest quadrant, but just continue to follow the ship as much as possible. Be careful of your surroundings as there are bomb barrels and other enemies present.


Eventually, your ship will get sent back to the entrance of the northwest quadrant. Ciela suggests turning around, so do just that and head back to the southwest quadrant. Back in the southwest quadrant, set sail for the large island in the west known as Molida Island.
3.4 Molida Island
Once you arrive at the island you can talk to various villagers and read the tablets to get some general hints. You’ll also see the mailbox bouncing around which contains a non-important message from Astrid.
Walk to the east side of the island and enter the right-most hut. Once you are inside, speak with Romanos. After he talks, try to leave the hut. Romanos will interrupt you to tell you that there is a secret in the cave behind his house. Exit the house and you’ll now be allowed to enter the nearby cave, so go ahead and enter it.


Defeat the enemies and climb the steps. Jump from platform to platform heading eastward, and then walk northward to encounter an enemy Zora Warrior. This massive enemy will shoot fireballs out at you, as well as swipe its sword. Its shield will make it invulnerable from the front, so instead, quickly trace a path with the Boomerang to hit the warrior in the back, stunning it momentarily. While it is stunned, deliver five sword slashes to defeat it. Cross the bridge and go through the nearby door.


Make your way through this linear path and head back south on the west side of the room. There is a nearby cracked wall that can be blown up. Use a nearby bomb flower to blast it open and then head through. Inside, open the treasure chest to get the Shovel! This will allow you to dig up secrets on all of the islands. You can read the nearby journal for a secret concerning the whereabouts of a second secret location, which lies at the point where the stone tablets intersect.


Before leaving the room, just south of the treasure chest there is a patch of dirt that can be dug up with the shovel to reveal a big green rupee. These hidden patches are found throughout the game, so be sure to keep your eyes open. Backtrack to where you previously fought the Zora Warrior and you will find another patch of dirt that can be dug up. This one also holds a big green rupee!Optional: Big Green Rupees


Return to the entrance of the secret hideout where you got the shovel. To the left there is a staircase that leads back outside. Before heading up, be sure to blow up the nearby cracked blocks to make for easier navigation in the future. Once you are outside, turn to the left to find a treasure chest containing a common treasure. You will find the two remaining tablets here, so you can mark them on your map. Jump off the ledge to get back in front of Romanos’ house.
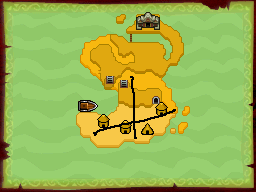
There are four tablets on the island and if you marked all four of them, you can now draw two lines on your map that intersect. It should look similar to the picture below. The intersection point is one spot south of a palm tree. Use the shovel to reveal a secret hole and then drop down inside.

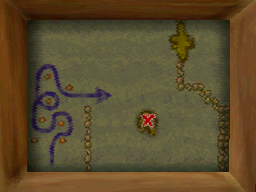
Once you drop down, read the journal entry and examine the picture on the wall. This notes the required path that it takes to get through the fog to the north. Be sure to trace this path onto your sea chart.
Within this second hideout, there is a small treasure chest, so be sure to open it to get another Treasure Map. We still can’t quite uncover what is at this point, but we will in due time.Optional: Treasure Map #2


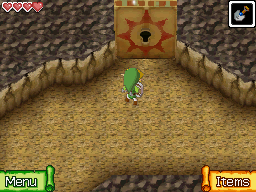
Now that you know the correct pathway through the fog, it’s time to leave Molida Island. On your way out you’ll notice a strange locked door with a sun symbol. We will be back here at a later time, so make note of it. Exit the cave and return to Linebeck’s ship to set sail.

Just in front of the palm tree by Romanos house, there is a soft spot in the ground that can be dug up to find yet another big green rupee! The house that is second from the left has a treasure chest inside. Go ahead and open the treasure chest to get a small treasure.Optional: Treasure and Rupees


3.5 Southwest Quadrant
OPTIONAL: This entire section is optional, so skip ahead to the next section if you wish to simply progress in the main story. However, there are a few new locations to check out, as well as goodies to collect with the Shovel.
Near Molida Island you will find a small ship sailing around. Sail over to the ship and inside you will find a group of Miniblins. These enemies can be defeated with a few simple sword slashes. After defeating all of the Miniblins, you can speak with Nyave a few times to get him to stand up. In exchange for helping him out, Nyave will give Link a treasure. That’s all there is to do here for now, but we’ll be back in the future.Optional: Traveler's Ship


Just south of Molida Island there are three rocks. Right in the center is an uncharted island known as Spirit Island. Here you will find the Shrine at Spirit Island, a chamber where you will later be able to upgrade your abilities by trading in Spirit Gems. There isn’t much here yet, but just southeast of the chamber you will find a treasure chest that contains the first Courage Gem.Optional: Courage Gem #1


Our next stop is back at the Isle of Ember at the southeast part of this quadrant, so sail on over. Once you arrive, return to the fortune teller and head down to the basement. There are two soft soil spots, with the one on the left hiding a red rupee and the one on the right hiding a Treasure Map.Optional: Treasure Map #3


Travel to the east end of the island where you met the ghost of Kayo. Speak with him and he tells you that a special Treasure Map is buried just northeast of the entrance to the Temple of Fire. Run over to this location and dig up the flowers to find another Treasure Map. That’s all there is to do here, so head back over to Linebeck’s ship.Optional: Treasure Map #4


By now you should have gathered at least 500 rupees. If so, you can now set sail for Beedle’s Ship and purchase a Wisdom Gem for 500 rupees. When purchasing items from Beedle’s ship, you’ll also earn membership points. These will become useful later in the game.Optional: Wisdom Gem #1


- Chapter 1 – Mercay Island
- Chapter 2 – Temple of Fire
- Chapter 3 – Ocean King Part II
- Chapter 4 – Temple of Wind
- Chapter 5 – Ocean King Part III
- Chapter 6 – Temple of Courage
- Chapter 7 – Ghost Ship
- Chapter 8 – Ocean King Part IV
- Chapter 9 – Goron Temple
- Chapter 10 – Temple of Ice
- Chapter 11 – Ocean King Part V
- Chapter 12 – Mutoh’s Temple
- Chapter 13 – Ocean King Part VI
