Mirro Shaz Shrine: Difference between revisions
m (Text replacement - "| item = ↵| reward = Spirit Orb reward = [[Spirit Orb | item = [[") |
|||
| (15 intermediate revisions by 10 users not shown) | |||
| Line 1: | Line 1: | ||
{{Infobox|shrine | |||
{{Infobox| | |||
| image = [[File:MirroShazShrine.jpg|258px]] | | image = [[File:MirroShazShrine.jpg|258px]] | ||
| caption = | |||
| game = ''[[The Legend of Zelda: Breath of the Wild|Breath of the Wild]]'' | | game = ''[[The Legend of Zelda: Breath of the Wild|Breath of the Wild]]'' | ||
| inhab = [[Mirro Shaz]] | | inhab = [[Mirro Shaz]] | ||
| location = North side of [[Pico Pond]] in the [[Great Hyrule Forest]] | |||
| pointsint = | | pointsint = | ||
| item = [[ | | reward = [[Spirit Orb]] | ||
| | | item = [[Iron Sledgehammer]] (X2)<br/>[[Giant Ancient Core]] | ||
| type = [[Shrine of Trials]] | |||
| related = | | related = | ||
| walkthrough = [https://www.youtube.com/watch?v=jM9NUS7lQEo Video Walkthrough] | | walkthrough = [https://www.youtube.com/watch?v=jM9NUS7lQEo Video Walkthrough] | ||
| Line 18: | Line 20: | ||
==Requirements== | ==Requirements== | ||
{{Shrine}}{{Clear|left}} | {{Shrine}}{{Clear|left}} | ||
The Mirro Shaz Shrine is located just east of the [[Woodland Stable]]. | |||
==Tempered Power== | ==Tempered Power== | ||
Drop down the elevator shaft on the right and open the treasure chest to get an [[Iron Sledgehammer]]. | |||
The goal here is to use [[Stasis]] on the [[Ancient Orb]], and then smack it enough times with the sledgehammer. When Stasis is released, it will launch itself ahead and the goal is get the ball in the hole. For this challenge, equip the Iron Sledgehammer and charge up an attack. While spinning, Link needs to hit the ball five times to give it the proper amount of energy. The arrow needs to be aligned so it is going straight ahead. | |||
If Link hits it off to the side, the ball will not go in the hole. If he hits the ball six times with the sledgehammer, the arrow will turn red and this will be too much power, preventing the ball from reaching the hole. Each time Link messed up, just hit the crystal switch on the right and a new ancient orb will drop. Once you hit the ball straight and it rolls into the hole, the wall to your left will open. | |||
There will be two ladders, one each to the left and right of a metal cube. Use Stasis on the cube and smack it twice with the sledgehammer so that it can knock the wall in front of you down to create a bridge. Climb the ladder and you'll see the altar. However, there is one more challenge around the corner. | |||
Run back to the elevator, take it up, go back through the corridor | We have another round of golf, but this one is a bit trickier. First off, open the nearby treasure chest to get another Iron Sledgehammer. From where the Ancient Orb initially, it is extremely difficult to get the ball into the hole. The best bet is to grab the orb and carry it so it is further away, near the back wall. Align it so there are no obstacles in the direct path. Use Stasis and hit the orb until the arrow turns red. From all the way back here, this should give it enough power to reach the hole, without overshooting it. Again, if it fails, just hit the switch and try again. | ||
A second option, if you are quick, is to hit the orb from its pedestal with the sledgehammer 5 times, and then hit it once with a one-handed weapon. You will barely have enough time before stasis runs out, though. If choosing this method, it is best to make the first strike with the one-handed weapon, as the sledgehammer can be troublesome to interrupt. | |||
This one might take a few tries, but once the ball reaches the hole, open the treasure chest nearby to get a [[Giant Ancient Core]]. | |||
Run back to the elevator, take it up, and go back through the corridor. Run up to the altar and speak with [[Mirro Shaz]] to collect the [[Spirit Orb]]. | |||
==Gallery== | |||
<gallery widths="400px" heights="220px"> | |||
File:Mirro-Shaz-Shrine-1.jpg|<center>Hit the [[Ancient Orb]] five times with the [[Iron Sledgehammer]].</center> | |||
File:Mirro-Shaz-Shrine-2.jpg|<center>If aimed correctly, five hits will get the ball in the hole.</center> | |||
File:Mirro-Shaz-Shrine-3.jpg|<center>Use stasis on the block and hit it with the sledgehammer.</center> | |||
File:Mirro-Shaz-Shrine-4.jpg|<center>It will create a ramp, leading to the altar..</center> | |||
File:Mirro-Shaz-Shrine-5.jpg|<center>Lift the orb and bring it back near the back end of the shrine..</center> | |||
File:Mirro-Shaz-Shrine-6.jpg|<center>Hit the ball with the sledgehammer until it turns red.</center> | |||
File:Mirro-Shaz-Shrine-7.jpg|<center>This will be just enough power to get it in the hole.</center> | |||
</gallery> | |||
{{Listbox|Breath of the Wild Shrines|hide=hide}} | |||
{{Listbox|Breath of the Wild Central Hyrule Locations}} | |||
{{Cat|Breath of the Wild Shrines}} | {{Cat|Breath of the Wild Shrines}} | ||
{{Cat|Breath of the Wild Central Hyrule Locations}} | |||
Latest revision as of 11:28, July 22, 2023

Games | ||
Location | North side of Pico Pond in the Great Hyrule Forest | |
Inhabitants | ||
Items | ||
Rewards | ||
| Attributes | ||
|---|---|---|
Type | ||
| Guides | ||
Walkthrough | ||
Mirro Shaz Shrine is one of the many Shrine of Trials from Breath of the Wild.
Requirements
The Mirro Shaz Shrine is located just east of the Woodland Stable.
Tempered Power
Drop down the elevator shaft on the right and open the treasure chest to get an Iron Sledgehammer.
The goal here is to use Stasis on the Ancient Orb, and then smack it enough times with the sledgehammer. When Stasis is released, it will launch itself ahead and the goal is get the ball in the hole. For this challenge, equip the Iron Sledgehammer and charge up an attack. While spinning, Link needs to hit the ball five times to give it the proper amount of energy. The arrow needs to be aligned so it is going straight ahead.
If Link hits it off to the side, the ball will not go in the hole. If he hits the ball six times with the sledgehammer, the arrow will turn red and this will be too much power, preventing the ball from reaching the hole. Each time Link messed up, just hit the crystal switch on the right and a new ancient orb will drop. Once you hit the ball straight and it rolls into the hole, the wall to your left will open.
There will be two ladders, one each to the left and right of a metal cube. Use Stasis on the cube and smack it twice with the sledgehammer so that it can knock the wall in front of you down to create a bridge. Climb the ladder and you'll see the altar. However, there is one more challenge around the corner.
We have another round of golf, but this one is a bit trickier. First off, open the nearby treasure chest to get another Iron Sledgehammer. From where the Ancient Orb initially, it is extremely difficult to get the ball into the hole. The best bet is to grab the orb and carry it so it is further away, near the back wall. Align it so there are no obstacles in the direct path. Use Stasis and hit the orb until the arrow turns red. From all the way back here, this should give it enough power to reach the hole, without overshooting it. Again, if it fails, just hit the switch and try again.
A second option, if you are quick, is to hit the orb from its pedestal with the sledgehammer 5 times, and then hit it once with a one-handed weapon. You will barely have enough time before stasis runs out, though. If choosing this method, it is best to make the first strike with the one-handed weapon, as the sledgehammer can be troublesome to interrupt.
This one might take a few tries, but once the ball reaches the hole, open the treasure chest nearby to get a Giant Ancient Core.
Run back to the elevator, take it up, and go back through the corridor. Run up to the altar and speak with Mirro Shaz to collect the Spirit Orb.
Gallery
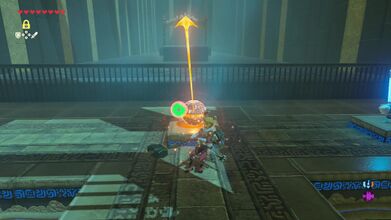
Hit the Ancient Orb five times with the Iron Sledgehammer. 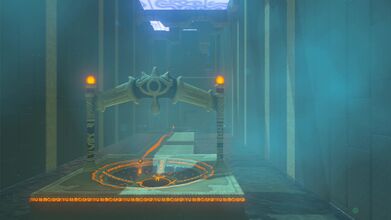
If aimed correctly, five hits will get the ball in the hole. 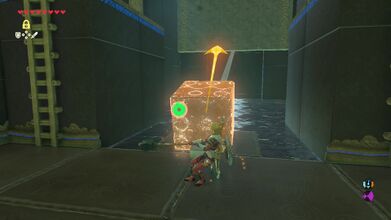
Use stasis on the block and hit it with the sledgehammer. 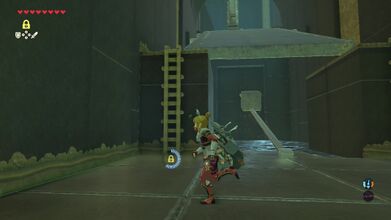
It will create a ramp, leading to the altar.. 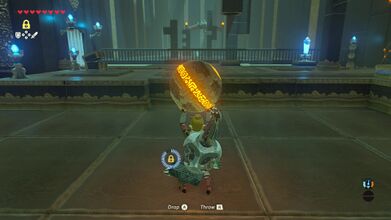
Lift the orb and bring it back near the back end of the shrine.. 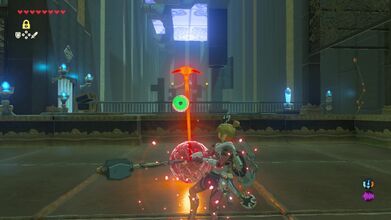
Hit the ball with the sledgehammer until it turns red. 
This will be just enough power to get it in the hole.


