Joloo Nah Shrine: Difference between revisions
mNo edit summary |
|||
| (4 intermediate revisions by 2 users not shown) | |||
| Line 1: | Line 1: | ||
{{Infobox| | {{Infobox|shrine | ||
| image = [[File:JolooNahShrine.jpg|400px]] | | image = [[File:JolooNahShrine.jpg|400px]] | ||
| caption = | | caption = | ||
| Line 6: | Line 6: | ||
| location = [[Mount Nabooru]] in [[Gerudo Canyon]] | | location = [[Mount Nabooru]] in [[Gerudo Canyon]] | ||
| pointsint = | | pointsint = | ||
| item = [[Golden Claymore]]<br/>[[Gerudo Spear]] | | item = [[Golden Claymore]]<br/>[[Gerudo Spear]] | ||
| | | reward = [[Spirit Orb]] | ||
| type = [[Shrine of Trials]] | |||
| related = | | related = | ||
| walkthrough = [https://www.youtube.com/watch?v=hj489D8V8EE Video Walkthrough] | | walkthrough = [https://www.youtube.com/watch?v=hj489D8V8EE Video Walkthrough] | ||
}}<section begin=summary /><includeonly> | }}<section begin=summary /><includeonly> | ||
''Joloo Nah Apparatus''<br><br> | ''Joloo Nah Apparatus''<br><br> | ||
'''Requirements:''' | '''Requirements:''' Gyro<br> | ||
'''Shrine Quest:''' {{MapLink|Test of Will}} | '''Shrine Quest:''' {{MapLink|Test of Will}} | ||
</includeonly><section end=summary /> | </includeonly><section end=summary /> | ||
| Line 52: | Line 53: | ||
File:Joloo-Nah-Shrine-05.jpg|<center>Place the block back on the other switch and then step on the nearby one. The wind will blow all four geysers.</center> | File:Joloo-Nah-Shrine-05.jpg|<center>Place the block back on the other switch and then step on the nearby one. The wind will blow all four geysers.</center> | ||
File:Joloo-Nah-Shrine-06.jpg|<center>Use [[Stasis]] on the floor switch to keep the gate open.</center> | File:Joloo-Nah-Shrine-06.jpg|<center>Use [[Stasis]] on the floor switch to keep the gate open.</center> | ||
File:Joloo-Nah-Shrine-07.jpg|<center>Shoot the treasure chest above with a [[Fire Arrow]] to get a [[Gerudo Spear]].</center> | File:Joloo-Nah-Shrine-07.jpg|<center>Shoot the treasure chest above with a [[Fire Arrow]] or use magnesis to move the lamp on to the leaf's to get a [[Gerudo Spear]].</center> | ||
File:Joloo-Nah-Shrine-08.jpg|<center>Place the chest on the switch to lower one of the pillars.</center> | File:Joloo-Nah-Shrine-08.jpg|<center>Place the chest on the switch to lower one of the pillars.</center> | ||
File:Joloo-Nah-Shrine-09.jpg|<center>Light up some of the torches and then use [[Stasis]] on the hydrant.</center> | File:Joloo-Nah-Shrine-09.jpg|<center>Light up some of the torches and then use [[Stasis]] on the hydrant.</center> | ||
Latest revision as of 05:29, January 7, 2024

Games | ||
Location | ||
Inhabitants | ||
Items | ||
Rewards | ||
| Attributes | ||
|---|---|---|
Type | ||
| Guides | ||
Walkthrough | ||
Joloo Nah Shrine is one of the many Shrine of Trials from Breath of the Wild. It appears after completion of the Shrine Quest "Test of Will", initiated by speaking to the Gorons from Gut Check Rock on Mount Nabooru. The puzzle in this shrine requires motion controls.
Requirements
Shrine Quest: Test of Will
- Main article: Test of Will
On Mount Nabooru, Link must endure extreme heat on two platforms longer than the three Goron Blood Brothers - Bayge, Heehl and Kabetta. If he succeeds, the shrine reveals itself. The first endurance challenge is meant to be completed by using the Desert Voe Set, whereas using a Fireproof Elixir allows the second challenge to be passed.
Joloo Nah Apparatus
For the first terminal, move the cube around so that all six sides are powered up.
In the next area, first look to your left to see a chest on a ledge. Use the terminal to align the wind in such a way as to help you reach and open that chest, which contains a Golden Claymore.
Now align the wind so that the left two and top right windmills all spin. This just leaves the bottom right.
Using Magnesis, take the metal cube from the switch for the left fan and move it to the switch for the right fan. Now the left fan isn't spinning.
Glide to the switch for the left fan, where the cube was, and step on the switch yourself. All four fans should spin, and the gate should open. Use Stasis to hold the switch down as you make a break for the gate.
In the final room, first look up and see the chest on the wooden ledge up above. Burn the ledge to bring it down and open it to get a Gerudo Spear.
Now the objective here is to light all the torches simultaneously. Multiple solutions exist. One easy method is to use the chest on the switch, this removes one of the water streams. You can then use motion control to light all the remaining torches, tilting carefully so none get wet. You can also use motion control just enough to get all the torches out of the water, then light them with Fire arrows. Whatever works.
You may also use Stasis to stop the water pour from the fountain as well.
Once done, head to the altar and speak with Joloo Nah to get the Spirit Orb.
Gallery
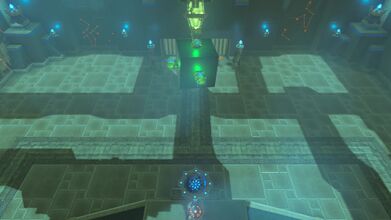
Maneuver the cube so all six switches are powered up. 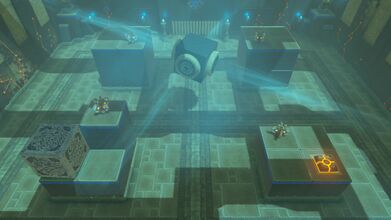
Maneuver the cube so wind is blowing towards the chest in the corner. 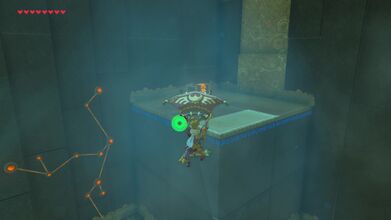
Use the with to Paraglide to the chest, which contains a Golden Claymore. 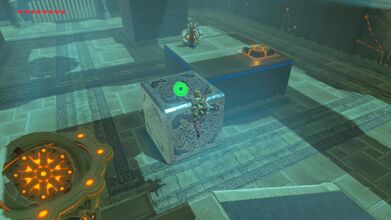
Link can move the block with Magnesis allowing him to reach the switch. 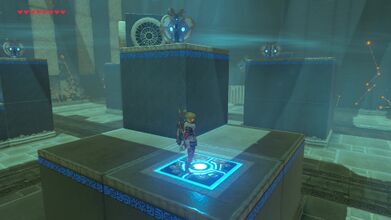
Place the block back on the other switch and then step on the nearby one. The wind will blow all four geysers. 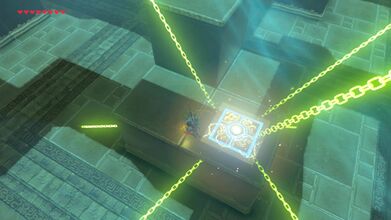
Use Stasis on the floor switch to keep the gate open. 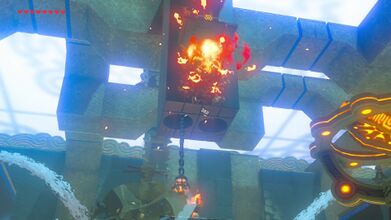
Shoot the treasure chest above with a Fire Arrow or use magnesis to move the lamp on to the leaf's to get a Gerudo Spear. 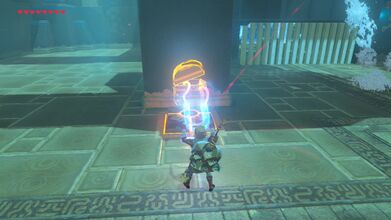
Place the chest on the switch to lower one of the pillars. 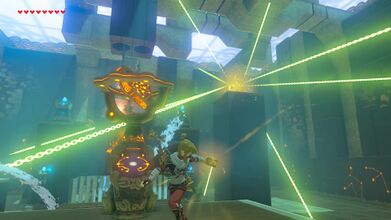
Light up some of the torches and then use Stasis on the hydrant. 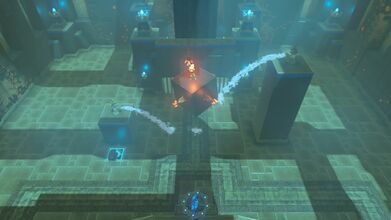
When all the torches are lit, the gate will open.


