Etsu Korima Shrine: Difference between revisions
No edit summary |
|||
| Line 18: | Line 18: | ||
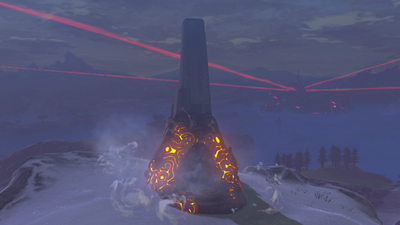
The '''Etsu Korima Shrine''', also known as '''Path of Light''', is one of the many [[Shrine of Trials]] from ''[[The Legend of Zelda: Breath of the Wild|Breath of the Wild]]''. | The '''Etsu Korima Shrine''', also known as '''Path of Light''', is one of the many [[Shrine of Trials]] from ''[[The Legend of Zelda: Breath of the Wild|Breath of the Wild]]''. | ||
This shrine is located northeast of the peak of [[Mount Hylia]], and is accessed during the Divine Beast Tamer's Trial, as a part of [[Breath of the Wild Expansion Pass|''The Champions' Ballad'' DLC pack]]. | This shrine is located northeast of the peak of [[Mount Hylia]], and is accessed during the Divine Beast Tamer's Trial, as a part of [[Breath of the Wild Expansion Pass|''The Champions' Ballad'' DLC pack]] as part of the [[EX The Champions' Ballad#One-Hit Obliterator Trial|One-Hit Obliterator Trial]]. | ||
==Requirements== | ==Requirements== | ||
Revision as of 23:03, March 30, 2021
Games | ||
Inhabitants | ||
Items | ||
Related | ||
The Etsu Korima Shrine, also known as Path of Light, is one of the many Shrine of Trials from Breath of the Wild.
This shrine is located northeast of the peak of Mount Hylia, and is accessed during the Divine Beast Tamer's Trial, as a part of The Champions' Ballad DLC pack as part of the One-Hit Obliterator Trial.
Requirements
- DLC pack 2: The Champions' Ballad downloaded.
- All four Divine Beasts completed.
Discovering the Shrine
This Shrine is only accessible after returning to the Shrine of Resurrection and obtaining the One-Hit Obliterator. This weapon is used exclusively during this Shrine, and is the only weapon Link has during the quest.
Take note that this area has a low temperature, so wear appropriate armor, as you will die in one hit. Also be aware of Ice Keese in the area. If you fast travel to Keh Namut you will have to pass a few groups of them.
If fast traveling in from Keh Namut shrine, stick to the right to avoid the Ice Keese and climb the peak between you and the target area, this being the peak east of Mount Hylia. This will give you a good vantage to take out enemies without them retaliating. The Blizzrobe in particular should be avoided as it has a wide area attack, and should be dispatched as soon as possible with Fire Arrows. Beware the fact that the peak is surrounded by Ice Keese, which will attack Link at the top of it.
Keep in mind that the Ice Keese and Ice Chuchus are not part of the required enemy kills. So there may still be enemies around after the shrine is revealed. If you blow up an Ice Keese, the dead body can still freeze and kill you as it flies through the air. Likewise with the Ice Chuchu frost explosions.
The aim here is to defeat all the enemies in the surrounding area. Use the One-Hit Obliterator on the more difficult enemies, such as the Silver Moblin. Ancient Arrows are also great for removing problematic enemies, as well as Fire Arrows for the Ice-Breath Lizalfos.
Your bow is your best friend here, use your arrows liberally to take out the lower tier enemies. Use Bombs if you want to save arrows.
"Long Range" bows like the Duplex Bow, Phrenic Bow, Swallow Bow, Falcon Bow, Great Eagle Bow, Golden Bow all have a base range of 40 (twice the default range). The Ancient Bow is 50, and amiibo-only Twilight Bow is infinite (shoots straight forever). These combined with Ancient Arrows will help you take out troublesome enemies from farther away than they can shoot you. You have to stock up on Ancient Arrows before starting the trial as leaving the plateau will end the trial.
Be careful of any beehives, as you only have ¼ of a heart, they are deadly.
After you eliminate all the enemies, the Shrine will appear.
Path of Light
When you enter the Shrine, you will notice it is pitch-black, such as with Divine Beast Vah Rudania.
Head into the next room to see many lasers, including some crossing your walkway. Crouch-walk underneath these, and wait until the moving laser dips below the surface to cross.
- Even though it won't highlight, it is possible to use Stasis on the laser.
The next room is slightly better lit, and features many rotating spike-walls. Walk carefully, and head to the northwest area of the room to find some dry leaves which lead to a chest on a platform above. Use a Fire Arrow or light a wooden arrow using one of the nearby torches to set the leaves on fire, which will drop the chest. Open it for a Gold Rupee.
Continue along and you'll come across a room filled with pillars of fire, which appear and reappear. Wait for one to disappear then cross quickly. Alternatively, if you have a full set of Flamebreaker armor enhanced to the second tier, you won't take any damage from the flames.
After this room you'll spot three Guardian Scouts which will quickly run at you. Use the One-Hit Obliterator if necessary, though they only have 13 HP and will die to one shot of any decent bow.
Follow the ramp upwards here to reach Etsu Korima. Speak with them to obtain a Spirit Orb.


