Kay Noh Shrine: Difference between revisions
Projectsix (talk | contribs) |
m (Text replacement - "<br/>Spirit Orb↵| " to " | reward = Spirit Orb | ") |
||
| (10 intermediate revisions by 7 users not shown) | |||
| Line 1: | Line 1: | ||
{{Infobox|shrine | |||
{{Infobox| | |||
| image = [[File:KayNohShrine.jpg|258px]] | | image = [[File:KayNohShrine.jpg|258px]] | ||
| caption = | |||
| game = ''[[The Legend of Zelda: Breath of the Wild|Breath of the Wild]]'' | | game = ''[[The Legend of Zelda: Breath of the Wild|Breath of the Wild]]'' | ||
| inhab = [[Kay Noh]] | | inhab = [[Kay Noh]] | ||
| location = Near the [[Gerudo Desert Gateway]] in [[Gerudo Canyon]] | |||
| pointsint = | | pointsint = | ||
| item = [[Spirit Orb]] | | item = [[Gerudo Scimitar]]<br> or <br> [[Moonlight Scimitar]] | ||
| | | reward = [[Spirit Orb]] | ||
| type = [[Shrine of Trials]] | |||
| related = | | related = | ||
| walkthrough = [https://www.youtube.com/watch?v=v1qD9p-lBls Video Walkthrough] | | walkthrough = [https://www.youtube.com/watch?v=v1qD9p-lBls Video Walkthrough] | ||
| Line 21: | Line 23: | ||
===Power of Electricity=== | ===Power of Electricity=== | ||
In the first room, pick up the | In the first room, pick up the [[Electric Orb]] and drop it on the charge point to open the door. | ||
In the next room, head to the far right and kill the [[Guardian Scout I]]. Cut the rope to drop the orb, and carry it back to the charge point. | In the next room, head to the far right and kill the [[Guardian Scout I]]. Cut the rope with an [[Arrow]] to drop the orb, and carry it back to the charge point on the other side of the room. This will cause the nearby conveyor belt to operate, moving the large block out of the way. Run ahead and open the treasure chest to get a small key. | ||
Use the small key on the locked door and defeat the [[Guardian Scout II]] that is up ahead. | |||
In the final room, | In the final room, run up ahead and then immediately turn around. Look up above and you'll find a treasure chest. Use [[Magnesis]] to pull it down and open it to get a [[Moonlight Scimitar]] or a [[Gerudo Scimitar]]. Look to the pool on the right and use [[Magnesis]] and you'll see that electricity is not fully flowing. Use Magnesis to arrange the cubes so they are close enough, causing electricity to flow. This will open up the gate leading to the altar. Speak with [[Kay Noh]] to get a [[Spirit Orb]]. | ||
==Gallery== | |||
<gallery widths="400px" heights="220px"> | |||
File:Kay-Noh-Shrine-1.jpg|<center>Place the [[Electric Orb]] on the spot on the right to open the door.</center> | |||
File:Kay-Noh-Shrine-2.jpg|<center>Shoot the rope with an [[Arrow]] to cut down the electric orb.</center> | |||
File:Kay-Noh-Shrine-3.jpg|<center>Carry the orb to the other side of the room.</center> | |||
File:Kay-Noh-Shrine-4.jpg|<center>Place it on the charge spot, causing the conveyor belt to activate.</center> | |||
File:Kay-Noh-Shrine-5.jpg|<center>Run over to the treasure chest and get a [[Small Key]].</center> | |||
File:Kay-Noh-Shrine-6.jpg|<center>Use [[Magnesis]] to pull down the chest from above.</center> | |||
File:Kay-Noh-Shrine-7.jpg|<center>Arrange the blocks so that electricity flows through.</center> | |||
</gallery> | |||
{{Listbox|Breath of the Wild Shrines|hide=hide}} | |||
{{Cat|Breath of the Wild Shrines}} | {{Cat|Breath of the Wild Shrines}} | ||
Latest revision as of 08:20, July 22, 2023

Games | ||
Location | Near the Gerudo Desert Gateway in Gerudo Canyon | |
Inhabitants | ||
Items | ||
Rewards | ||
| Attributes | ||
|---|---|---|
Type | ||
| Guides | ||
Walkthrough | ||
Kay Noh Shrine is one of the many Shrine of Trials from Breath of the Wild.
Requirements
Power of Electricity
In the first room, pick up the Electric Orb and drop it on the charge point to open the door.
In the next room, head to the far right and kill the Guardian Scout I. Cut the rope with an Arrow to drop the orb, and carry it back to the charge point on the other side of the room. This will cause the nearby conveyor belt to operate, moving the large block out of the way. Run ahead and open the treasure chest to get a small key.
Use the small key on the locked door and defeat the Guardian Scout II that is up ahead.
In the final room, run up ahead and then immediately turn around. Look up above and you'll find a treasure chest. Use Magnesis to pull it down and open it to get a Moonlight Scimitar or a Gerudo Scimitar. Look to the pool on the right and use Magnesis and you'll see that electricity is not fully flowing. Use Magnesis to arrange the cubes so they are close enough, causing electricity to flow. This will open up the gate leading to the altar. Speak with Kay Noh to get a Spirit Orb.
Gallery
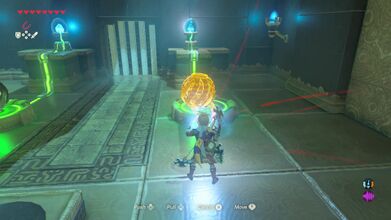
Place the Electric Orb on the spot on the right to open the door. 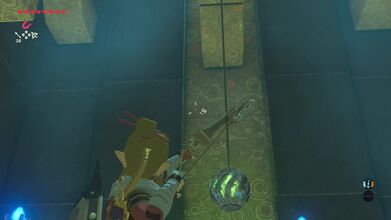
Shoot the rope with an Arrow to cut down the electric orb. 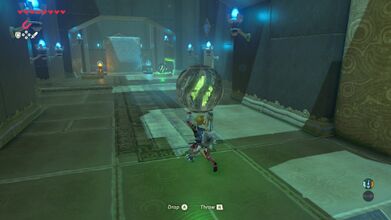
Carry the orb to the other side of the room. 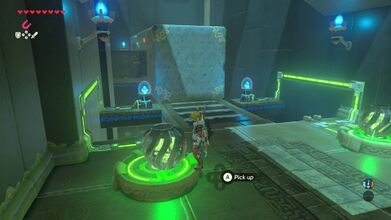
Place it on the charge spot, causing the conveyor belt to activate. 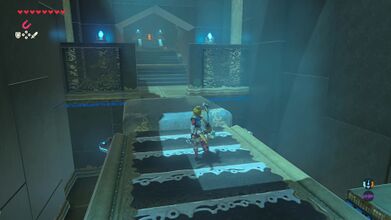
Run over to the treasure chest and get a Small Key. 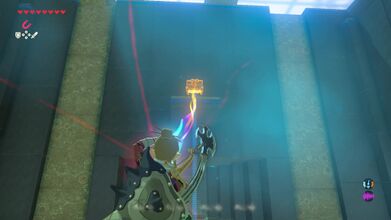
Use Magnesis to pull down the chest from above. 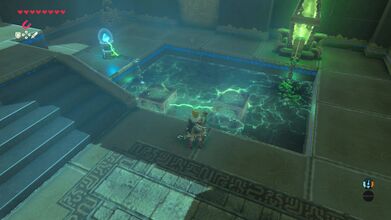
Arrange the blocks so that electricity flows through.


