Dow Na'eh Shrine: Difference between revisions
Molly O'Kami (talk | contribs) m (→Three Boxes) |
m (Text replacement - "| item = ↵| reward = Spirit Orb reward = [[Spirit Orb | item = [[") |
||
| (14 intermediate revisions by 8 users not shown) | |||
| Line 1: | Line 1: | ||
{{Infobox|shrine | |||
{{Infobox| | |||
| image = [[File:DowNa'ehShrine.jpg|258px]] | | image = [[File:DowNa'ehShrine.jpg|258px]] | ||
| caption = | |||
| game = ''[[The Legend of Zelda: Breath of the Wild|Breath of the Wild]]'' | | game = ''[[The Legend of Zelda: Breath of the Wild|Breath of the Wild]]'' | ||
| inhab = [[Dow Na'eh]] | | inhab = [[Dow Na'eh]] | ||
| location = Behind the waterfall of the [[Lanayru Promenade]] | |||
| pointsint = | | pointsint = | ||
| item = [[ | | reward = [[Spirit Orb]] | ||
| | | item = [[Amber]]<br/>[[Opal]]<br/>[[Zora Sword]] | ||
| type = [[Shrine of Trials]] | |||
| related = | | related = | ||
| walkthrough = [https://www.youtube.com/watch?v=JvVxSCzXGxU Video Walkthrough] | | walkthrough = [https://www.youtube.com/watch?v=JvVxSCzXGxU Video Walkthrough] | ||
| Line 17: | Line 19: | ||
{{Shrine}}{{Clear|left}} | {{Shrine}}{{Clear|left}} | ||
The shrine can be found at the south end of the [[Lanayru Promenade]], behind the waterfall. Link can access the shrine by walking along the path, just west of the waterfall. | |||
The shrine has some [[Luminous Ore Deposit]]s nearby. | |||
==Three Boxes== | ==Three Boxes== | ||
There is a large floor switch in the center of the shrine and the goal is to use [[Magnesis]] to place three treasure chests on top of it, which will be enough weight to weight the switch down. | |||
The first treasure chest is in the water, just to the right of the switch and it contains an [[Opal]] gem. | |||
A second treasure is up on a higher ledge. If Link stands right at the edge, he can grab it with Magnesis. Alternatively, Link can cut the ropes with [[Arrow]]s. The chest here contains a [[Zora Sword]]. Grab the chest with Magnesis and place it on the switch. | |||
The third treasure chest is on the moving platform at the back-right of the shrine and it contains an [[Amber]] gem. Grab it and place it on the large switch. | |||
With all three chests on the big chest, the nearby gate will open with a big metal cube found behind it. Grab it and take it over to the moving platform where one of the treasure chests was. Ride the platform up and then step off on the higher ledge. Then when the platform is lower, jump and land on top of the cube. When the platform rises, run over to the altar to meet with [[Dow Na'eh]] and get a [[Spirit Orb]]. | |||
==Gallery== | |||
<gallery widths="400px" heights="220px"> | |||
File:Dow-Naeh-Shrine-1.jpg|<center>Grab the chest that is underwater.</center> | |||
File:Dow-Naeh-Shrine-2.jpg|<center>Grab the chest on the higher ledge.</center> | |||
File:Dow-Naeh-Shrine-3.jpg|<center>Grab the chest on the moving platform.</center> | |||
File:Dow-Naeh-Shrine-4.jpg|<center>Place all three on the floor switch to press it down.</center> | |||
File:Dow-Naeh-Shrine-5.jpg|<center>Jump onto the metal box and ride it up to the higher platform.</center> | |||
</gallery> | |||
{{Listbox|Breath of the Wild Shrines|hide=hide}} | |||
{{Cat|Breath of the Wild Shrines}} | {{Cat|Breath of the Wild Shrines}} | ||
Latest revision as of 11:30, July 22, 2023

Games | ||
Location | Behind the waterfall of the Lanayru Promenade | |
Inhabitants | ||
Items | ||
Rewards | ||
| Attributes | ||
|---|---|---|
Type | ||
| Guides | ||
Walkthrough | ||
Requirements
The shrine can be found at the south end of the Lanayru Promenade, behind the waterfall. Link can access the shrine by walking along the path, just west of the waterfall.
The shrine has some Luminous Ore Deposits nearby.
Three Boxes
There is a large floor switch in the center of the shrine and the goal is to use Magnesis to place three treasure chests on top of it, which will be enough weight to weight the switch down.
The first treasure chest is in the water, just to the right of the switch and it contains an Opal gem.
A second treasure is up on a higher ledge. If Link stands right at the edge, he can grab it with Magnesis. Alternatively, Link can cut the ropes with Arrows. The chest here contains a Zora Sword. Grab the chest with Magnesis and place it on the switch.
The third treasure chest is on the moving platform at the back-right of the shrine and it contains an Amber gem. Grab it and place it on the large switch.
With all three chests on the big chest, the nearby gate will open with a big metal cube found behind it. Grab it and take it over to the moving platform where one of the treasure chests was. Ride the platform up and then step off on the higher ledge. Then when the platform is lower, jump and land on top of the cube. When the platform rises, run over to the altar to meet with Dow Na'eh and get a Spirit Orb.
Gallery
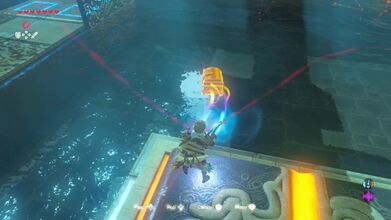
Grab the chest that is underwater. 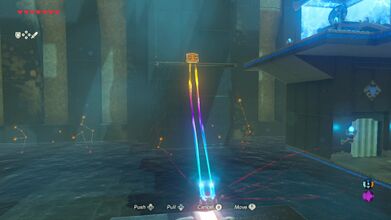
Grab the chest on the higher ledge. 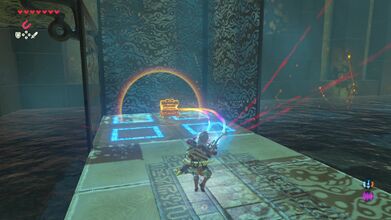
Grab the chest on the moving platform. 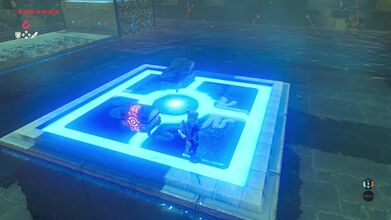
Place all three on the floor switch to press it down. 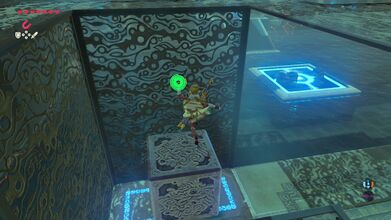
Jump onto the metal box and ride it up to the higher platform.


