Iron Knuckle: Difference between revisions
m (Added to MM Mini-Boss Cat) |
mNo edit summary |
||
| (40 intermediate revisions by 14 users not shown) | |||
| Line 1: | Line 1: | ||
{{Specify|this=the enemy|other=the boss from | {{Specify|this=the enemy|other=the boss from The Adventure of Link|link=[[Rebonack]]}} | ||
{{ | {{Infobox|enemy | ||
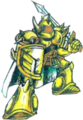
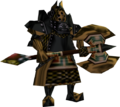
| | | image = [[File:Ironknuckle-Art1-AOL.png|200px]] | ||
| image = [[File:Ironknuckle-Art1-AOL.png| | | caption = Artwork from ''[[Zelda II: The Adventure of Link|The Adventure of Link]]'' | ||
| threat = 6 | |||
| attack = '''''Ocarina of Time'''''<br/>{{H|4}} Axe | |||
| game = ''[[Zelda II: The Adventure of Link|The Adventure of Link]]'' | | game = ''[[Zelda II: The Adventure of Link|The Adventure of Link]]'' | ||
''[[The Legend of Zelda: Ocarina of Time|Ocarina of Time]]'' | ''[[The Legend of Zelda: Ocarina of Time|Ocarina of Time]]'' | ||
''[[The Legend of Zelda: Majora's Mask|Majora's Mask]]'' | ''[[The Legend of Zelda: Majora's Mask|Majora's Mask]]'' | ||
| | | location = '''''Ocarina of Time'''''<br/>[[Spirit Temple (Ocarina of Time)|Spirit Temple]]<br/>[[Ganon's Castle]] | ||
| weapon = [[Sword]] | | weapon = [[Sword]] | ||
}} | }} | ||
'''Iron Knuckles''' are recurring enemies in [[The Legend of Zelda (Series)|''The Legend of Zelda'' series]]. They are most notable for being among the most challenging enemies. | |||
== | ==''The Adventure of Link''== | ||
Iron Knuckles, hulking armored knights, first appear in ''[[Zelda II: The Adventure of Link|The Adventure of Link]]'' as guardians of [[Dungeon|Palaces]], usually defending the Dungeon Item or corridors near the [[Boss]]. They are skilled with sword and shield, attacking [[Link]] relentlessly. Each variety from Orange to Red to Blue is more adept than the last, more adroitly blocking Link's attacks, countering, and absorbing more damage. Blue Iron Knuckles gain the additional ability to fire sword beams as Link does, requiring each of the knight's flurry of attacks, sometimes up to seven swings in a quick succession, to be blocked or evaded. When attacking, if Link squats, then immediately jumps and swings his sword with precise timing, Link can catch the Iron Knuckle in the head before it can raise its shield in defense. | |||
Iron Knuckles | |||
[[Rebonack]], the [[Boss]] of the [[Maze Island Palace]] and [[Mini-Boss|mini-boss]] of the [[Three-Eye Rock Palace]], confronts Link mounted on a horse. Once forced to dismount, Rebonack fights as a Blue Iron Knuckle. | |||
===Enemy Data=== | |||
{| class="wikitable" style="float:left; text-align:center; width:500px;" | |||
|+ style="text-align:left;" | <big>Orange Iron Knuckle</big> | |||
| rowspan="3" width="25%" |[[File:IronknuckleOrange-Sprite-AOL.png]] | |||
| width="25%" | [[Experience Point]]s || width="50%" | 50 | |||
|- | |||
| Item Drop || [[Magic Jar|Red Magic Jar]] or [[Point Bag|200 exp Point Bag]] | |||
|- | |||
| Enemy Habitat || height="90px" | [[Parapa Palace]]<br/>[[Midoro Palace]]<br/>[[Island Palace]]<br/>[[Palace on the Sea]] | |||
|- | |||
{{#vardefine:CommentBoxID|{{#if:{{#varexists:CommentBoxID}}|{{#expr:{{#var:CommentBoxID}}+1}}|1}}}} | |||
| class="{{#var:CommentBoxID}}Column0 _toggler-{{#var:CommentBoxID}}Column0 _toggler-{{#var:CommentBoxID}}Column1 _toggler-{{#var:CommentBoxID}}row" align="left" style="{{round|10}}; background:{{{buttonbackground|#F2F2F2}}}; text-align:center;"| {{{button1|Combat Data}}} | |||
| class="{{#var:CommentBoxID}}Column1 _toggler-{{#var:CommentBoxID}}Column0 _toggler-{{#var:CommentBoxID}}Column1 _toggler-{{#var:CommentBoxID}}row" align="left" style="{{round|10}}; background:{{{buttonbackground|#F2F2F2}}}; display:none; text-align: center;" | {{{button2|Hide}}} || colspan="5" style="text-align:left;" | | |||
|-class="{{#var:CommentBoxID}}row" style="display:none;" | |||
| colspan="6" | | |||
{| | |||
! colspan="2" style="text-align:left;" | Defensive Stats |||| colspan="3" style="text-align:left;"| Offensive Stats | |||
|- | |||
! Attack Level || Hits to Kill |||| Life Level || Contact Container Damage || Projectile Container Damage | |||
|- | |||
| 1 || 8 |||| 1 || 1.5 || - | |||
|- | |||
| 2 || 6 |||| 2 || 1.25 || - | |||
|- | |||
| 3 || 4 |||| 3 || 1.125 || - | |||
|- | |||
| 4 || 3 |||| 4 || 1 || - | |||
|- | |||
| 5 || 2 |||| 5 || .75 || - | |||
|- | |||
| 6 || 2 |||| 6 || 1.25 || - | |||
|- | |||
| 7 || 1 |||| 7 || .5 || - | |||
|- | |||
| 8 || 1 |||| 8 || .375 || - | |||
|} | |||
|} | |||
===Ocarina of Time | {| class="wikitable" style="float:left; text-align:center; width:500px;" | ||
|+ style="text-align:left;" | <big>Red Iron Knuckle</big> | |||
| rowspan="3" width="25%" |[[File:IronknuckleRed-Sprite-AOL.png]] | |||
| width="25%" | [[Experience Point]]s || width="50%" | 100 | |||
|- | |||
| Item Drop || [[Magic Jar|Red Magic Jar]] or [[Point Bag|200 exp Point Bag]] | |||
|- | |||
| Enemy Habitat || height="90px" | [[Midoro Palace]]<br/>[[Island Palace]]<br/>[[Maze Island Palace]]<br/>[[Palace on the Sea]]<br/>[[Three-Eye Rock Palace]] | |||
|- | |||
{{#vardefine:CommentBoxID|{{#if:{{#varexists:CommentBoxID}}|{{#expr:{{#var:CommentBoxID}}+1}}|1}}}} | |||
| class="{{#var:CommentBoxID}}Column0 _toggler-{{#var:CommentBoxID}}Column0 _toggler-{{#var:CommentBoxID}}Column1 _toggler-{{#var:CommentBoxID}}row" align="left" style="{{round|10}}; background:{{{buttonbackground|#F2F2F2}}}; text-align:center;"| {{{button1|Combat Data}}} | |||
| class="{{#var:CommentBoxID}}Column1 _toggler-{{#var:CommentBoxID}}Column0 _toggler-{{#var:CommentBoxID}}Column1 _toggler-{{#var:CommentBoxID}}row" align="left" style="{{round|10}}; background:{{{buttonbackground|#F2F2F2}}}; display:none; text-align: center;" | {{{button2|Hide}}} || colspan="5" style="text-align:left;" | | |||
|-class="{{#var:CommentBoxID}}row" style="display:none;" | |||
| colspan="6" | | |||
{| | |||
! colspan="2" style="text-align:left;" | Defensive Stats |||| colspan="3" style="text-align:left;"| Offensive Stats | |||
|- | |||
! Attack Level || Hits to Kill |||| Life Level || Contact Container Damage || Projectile Container Damage | |||
|- | |||
| 1 || 12 |||| 1 || 3 || - | |||
|- | |||
| 2 || 8 |||| 2 || 2.25 || - | |||
|- | |||
| 3 || 6 |||| 3 || 1.75 || - | |||
|- | |||
| 4 || 4 |||| 4 || 1.5 || - | |||
|- | |||
| 5 || 3 |||| 5 || 1.25 || - | |||
|- | |||
| 6 || 2 |||| 6 || 1 || - | |||
|- | |||
| 7 || 2 |||| 7 || .875 || - | |||
|- | |||
| 8 || 1 |||| 8 || .75 || - | |||
|} | |||
|} | |||
{{Clear}} | |||
{| class="wikitable" style="float:left; text-align:center; width:500px;" | |||
|+ style="text-align:left;" | <big>Blue Iron Knuckle</big> | |||
| rowspan="3" width="25%" |[[File:IronknuckleBlue-Sprite-AOL.png]] | |||
| width="25%" | [[Experience Point]]s || width="50%" | 200 | |||
|- | |||
| Item Drop || [[Magic Jar|Red Magic Jar]] or 200 exp [[Point Bag]] | |||
|- | |||
| Enemy Habitat || height="90px" | [[Island Palace]]<br/>[[Maze Island Palace]]<br/>[[Palace on the Sea]]<br/>[[Three-Eye Rock Palace]] | |||
|- | |||
{{#vardefine:CommentBoxID|{{#if:{{#varexists:CommentBoxID}}|{{#expr:{{#var:CommentBoxID}}+1}}|1}}}} | |||
| class="{{#var:CommentBoxID}}Column0 _toggler-{{#var:CommentBoxID}}Column0 _toggler-{{#var:CommentBoxID}}Column1 _toggler-{{#var:CommentBoxID}}row" align="left" style="{{round|10}}; background:{{{buttonbackground|#F2F2F2}}}; text-align:center;"| {{{button1|Combat Data}}} | |||
| class="{{#var:CommentBoxID}}Column1 _toggler-{{#var:CommentBoxID}}Column0 _toggler-{{#var:CommentBoxID}}Column1 _toggler-{{#var:CommentBoxID}}row" align="left" style="{{round|10}}; background:{{{buttonbackground|#F2F2F2}}}; display:none; text-align: center;" | {{{button2|Hide}}} || colspan="5" style="text-align:left;" | | |||
|-class="{{#var:CommentBoxID}}row" style="display:none;" | |||
| colspan="6" | | |||
{| | |||
! colspan="2" style="text-align:left;" | Defensive Stats |||| colspan="3" style="text-align:left;"| Offensive Stats | |||
|- | |||
! Attack Level || Hits to Kill |||| Life Level || Contact Container Damage || Projectile Container Damage | |||
|- | |||
| 1 || 29 |||| 1 || 3 || 3 | |||
|- | |||
| 2 || 19 |||| 2 || 2.25 || 2.25 | |||
|- | |||
| 3 || 15 |||| 3 || 1.75 || 1.75 | |||
|- | |||
| 4 || 10 |||| 4 || 1.5 || 1.5 | |||
|- | |||
| 5 || 7 |||| 5 || 1.25 || 1.25 | |||
|- | |||
| 6 || 5 |||| 6 || 1 || 1 | |||
|- | |||
| 7 || 4 |||| 7 || .875 || .875 | |||
|- | |||
| 8 || 3 |||| 8 || .75 || .75 | |||
|} | |||
|} | |||
{{Clear|left}} | |||
==''Ocarina of Time''== | |||
{{Navi|Iron Knuckle 2}} | {{Navi|Iron Knuckle 2}} | ||
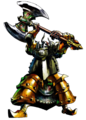
These behemoth warriors clad in armor are quite the force to be reckoned with. Their powerful ax can take a good chunk out of | These behemoth warriors clad in armor are quite the force to be reckoned with. Their powerful ax can take a good chunk out of Link's life in a single swing. The best method is to lure them to attack, then rush in and get a hit between strikes. [[Bomb]]s and [[Bombchu]]s can damage them too, but it's harder for the second part of the fight. Halfway through the battle, they lose a layer of armor and run faster, but it also makes them more vulnerable to Link's sword. | ||
If he can time it well, lure them to attack, jump back, and just as they are finishing their attack, use a Jump Attack to deal lots of damage before they can retaliate. Link can also use the [[Deku Stick]] + Jump Attack combo or [[Biggoron's Sword]] to deal with these enemies quickly. If he is having trouble with them, he can use [[Nayru's Love]] to become invincible for a short period of time; unfortunately, they still knock Link over when he gets hit, but he will not lose any life this way. | |||
The Iron Knuckle despite being one of the tougher enemies, has diverse methods of defeat. In Ocarina of Time, the bombs can be used to help deal with him and awake him allowing you to keep your distance and throw the bombs towards him. Deku Sticks can also strike him for a good bit of damage. Fairies are suggested for this battle, especially if a newer player dealing with this behemoth for the first time. When the Iron Knuckle strikes you, it strikes hard depleting a few hearts. Just avoid his strikes and use any of the strategies implemented above. | |||
===Nabooru as an Iron Knuckle=== | |||
{{Navi}} | {{Navi}} | ||
The Iron Knuckle just before the boss of the [[Spirit Temple]] is actually [[Nabooru]], after the [[Twinrova]] have brainwashed her. | The Iron Knuckle just before the boss of the [[Spirit Temple (Ocarina of Time)|Spirit Temple]] is actually [[Nabooru]], after the [[Twinrova]] have brainwashed her. | ||
== | ==''Majora's Mask''== | ||
{{Tatl}} | {{Tatl}} | ||
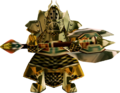
There are only | There are only three Iron Knuckles in ''[[The Legend of Zelda: Majora's Mask|Majora's Mask]]''. The first two can be found [[Beneath the Graveyard]], guarding [[Flat]]'s tomb and in a room where Link battles it. There, Link can learn the [[Song of Storms]]. The third is on the [[Moon]], after Link speaks with the [[Moon Children|Moon Child]] that is wearing [[Twinmold's Remains]]. The Iron Knuckles in this game look and behave almost exactly as they do in ''Ocarina of Time''. | ||
Being Young Link, another way to defeat them is to get right next to one and attack while defending (This doesn't work if you are Z-targeting). When doing this, its horizontal slashes should go right over Link's head; when it swings straight down, just simply take a few steps around it, guard, and keep attacking. Once Link knocks off a piece of its armor and it starts charging at him, just stay where Link is at and keep attacking while defended in its direction (he should hit it right as it goes to attack). The [[Bunny Hood]] is recommended, but not necessary. | |||
The Iron Knuckle in ''Majora's Mask'' remains equal to the ones in ''Ocarina of Time'', if not more difficult, since you remain a child. The Gilded Sword is recommended if you decide to use your sword to slash away at its armor, otherwise throwing bombs is effective, and so is the [[Blast Mask]]. You can even use a [[Powder Keg]] if you have one. Watch out for his attacks, and a [[Fairy]] may be a wise investment as usual for a battle with it. The shortness of Young Link may become an advantage, making you a less hittable target. | |||
==Gallery== | ==Gallery== | ||
<gallery> | <gallery> | ||
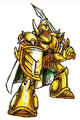
File:Ironknuckle-Art2-AOL.png| | File:Ironknuckle-Art2-AOL.png|Artwork (Nintendo Power) from ''[[Zelda II: The Adventure of Link|The Adventure of Link]]'' | ||
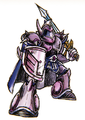
File: | File:Art-and-Artificats-Iron-Knuckle-Orange.png|Artwork from ''[[The Legend of Zelda: Art & Artifacts]]'' | ||
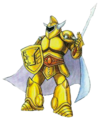
File: | File:Art-and-Artificats-Iron-Knuckle-Blue.png|Artwork from ''The Legend of Zelda: Art & Artifacts'' | ||
File:IronknuckleBlue-Sprite-AOL.png|Blue Iron Knuckle | File:AoL_futami_ironknuckle_gold.png|Artwork from ''[[Futami The Adventure of Link Strategy Guide]]'' | ||
File: | File:IronknuckleOrange-Sprite-AOL.png|Orange Iron Knuckle sprite from ''The Adventure of Link'' | ||
File:IronknuckleRed-Sprite-AOL.png|Red Iron Knuckle sprite from ''The Adventure of Link'' | |||
File:IronknuckleBlue-Sprite-AOL.png|Blue Iron Knuckle sprite from ''The Adventure of Link'' | |||
File:OoT-IronKnuckle.png|Gold Iron Knuckle artwork from ''[[The Legend of Zelda: Ocarina of Time|Ocarina of Time]]'' | |||
File:Red Iron Knuckle - OOT64 art.png|Red Iron Knuckle ([[Nabooru]]) artwork from ''Ocarina of Time'' | |||
File:Darknut-Beta-OOT.png|Iron Knuckle model in an early trailer for ''Ocarina of Time'' | |||
File:DarknutV2-Beta-OOT.jpg|Later Iron Knuckle model in the beta version of ''Ocarina of Time'' | |||
File:Iron-Knuckle-Ocarina.png|Model from ''Ocarina of Time'' | |||
File:Iron-Knuckle.png|Model from ''[[The Legend of Zelda: Majora's Mask|Majora's Mask]]'' | |||
</gallery> | </gallery> | ||
{{Listbox|The Adventure of Link|Enemies}} | |||
{{Listbox|Ocarina of Time Enemies}} | |||
{{Listbox|Majora's Mask Enemies}} | |||
{{Cat|The Adventure of Link Enemies}} | {{Cat|The Adventure of Link Enemies}} | ||
Latest revision as of 19:13, March 30, 2024
- This article is about the enemy. For the boss from The Adventure of Link, see Rebonack.

Games | ||
Location | Ocarina of Time | |
Threat | ||
Attacks | Ocarina of Time | |
Effective | ||
Iron Knuckles are recurring enemies in The Legend of Zelda series. They are most notable for being among the most challenging enemies.
The Adventure of Link
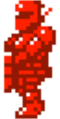
Iron Knuckles, hulking armored knights, first appear in The Adventure of Link as guardians of Palaces, usually defending the Dungeon Item or corridors near the Boss. They are skilled with sword and shield, attacking Link relentlessly. Each variety from Orange to Red to Blue is more adept than the last, more adroitly blocking Link's attacks, countering, and absorbing more damage. Blue Iron Knuckles gain the additional ability to fire sword beams as Link does, requiring each of the knight's flurry of attacks, sometimes up to seven swings in a quick succession, to be blocked or evaded. When attacking, if Link squats, then immediately jumps and swings his sword with precise timing, Link can catch the Iron Knuckle in the head before it can raise its shield in defense.
Rebonack, the Boss of the Maze Island Palace and mini-boss of the Three-Eye Rock Palace, confronts Link mounted on a horse. Once forced to dismount, Rebonack fights as a Blue Iron Knuckle.
Enemy Data
| Experience Points | 50 | ||||
| Item Drop | Red Magic Jar or 200 exp Point Bag | ||||
| Enemy Habitat | Parapa Palace Midoro Palace Island Palace Palace on the Sea | ||||
| Combat Data | |||||
| Experience Points | 100 | ||||
| Item Drop | Red Magic Jar or 200 exp Point Bag | ||||
| Enemy Habitat | Midoro Palace Island Palace Maze Island Palace Palace on the Sea Three-Eye Rock Palace | ||||
| Combat Data | |||||
| Experience Points | 200 | ||||
| Item Drop | Red Magic Jar or 200 exp Point Bag | ||||
| Enemy Habitat | Island Palace Maze Island Palace Palace on the Sea Three-Eye Rock Palace | ||||
| Combat Data | |||||
Ocarina of Time

|
Iron Knuckle |
|---|
These behemoth warriors clad in armor are quite the force to be reckoned with. Their powerful ax can take a good chunk out of Link's life in a single swing. The best method is to lure them to attack, then rush in and get a hit between strikes. Bombs and Bombchus can damage them too, but it's harder for the second part of the fight. Halfway through the battle, they lose a layer of armor and run faster, but it also makes them more vulnerable to Link's sword.
If he can time it well, lure them to attack, jump back, and just as they are finishing their attack, use a Jump Attack to deal lots of damage before they can retaliate. Link can also use the Deku Stick + Jump Attack combo or Biggoron's Sword to deal with these enemies quickly. If he is having trouble with them, he can use Nayru's Love to become invincible for a short period of time; unfortunately, they still knock Link over when he gets hit, but he will not lose any life this way.
The Iron Knuckle despite being one of the tougher enemies, has diverse methods of defeat. In Ocarina of Time, the bombs can be used to help deal with him and awake him allowing you to keep your distance and throw the bombs towards him. Deku Sticks can also strike him for a good bit of damage. Fairies are suggested for this battle, especially if a newer player dealing with this behemoth for the first time. When the Iron Knuckle strikes you, it strikes hard depleting a few hearts. Just avoid his strikes and use any of the strategies implemented above.
Nabooru as an Iron Knuckle
|
|
Iron Knuckle |
|---|
The Iron Knuckle just before the boss of the Spirit Temple is actually Nabooru, after the Twinrova have brainwashed her.
Majora's Mask
You know about the Iron |
There are only three Iron Knuckles in Majora's Mask. The first two can be found Beneath the Graveyard, guarding Flat's tomb and in a room where Link battles it. There, Link can learn the Song of Storms. The third is on the Moon, after Link speaks with the Moon Child that is wearing Twinmold's Remains. The Iron Knuckles in this game look and behave almost exactly as they do in Ocarina of Time.
Being Young Link, another way to defeat them is to get right next to one and attack while defending (This doesn't work if you are Z-targeting). When doing this, its horizontal slashes should go right over Link's head; when it swings straight down, just simply take a few steps around it, guard, and keep attacking. Once Link knocks off a piece of its armor and it starts charging at him, just stay where Link is at and keep attacking while defended in its direction (he should hit it right as it goes to attack). The Bunny Hood is recommended, but not necessary.
The Iron Knuckle in Majora's Mask remains equal to the ones in Ocarina of Time, if not more difficult, since you remain a child. The Gilded Sword is recommended if you decide to use your sword to slash away at its armor, otherwise throwing bombs is effective, and so is the Blast Mask. You can even use a Powder Keg if you have one. Watch out for his attacks, and a Fairy may be a wise investment as usual for a battle with it. The shortness of Young Link may become an advantage, making you a less hittable target.
Gallery
Artwork (Nintendo Power) from The Adventure of Link
Artwork from The Legend of Zelda: Art & Artifacts
Artwork from The Legend of Zelda: Art & Artifacts
Artwork from Futami The Adventure of Link Strategy Guide

Orange Iron Knuckle sprite from The Adventure of Link
Red Iron Knuckle sprite from The Adventure of Link

Blue Iron Knuckle sprite from The Adventure of Link
Gold Iron Knuckle artwork from Ocarina of Time

Red Iron Knuckle (Nabooru) artwork from Ocarina of Time
Iron Knuckle model in an early trailer for Ocarina of Time

Later Iron Knuckle model in the beta version of Ocarina of Time
Model from Ocarina of Time
Model from Majora's Mask


