Zol: Difference between revisions
No edit summary |
|||
| Line 2: | Line 2: | ||
{{Infobox|enemy | {{Infobox|enemy | ||
| image = [[File:Zol-LoZ-Art.png|200px]] | | image = [[File:Zol-LoZ-Art.png|200px]] | ||
| caption = | | caption = Artwork from [[The Legend of Zelda Instruction Manual|''The Legend of Zelda'' Instruction Booklet]] | ||
| game = ''[[The Legend of Zelda]]''<br/>''[[The Legend of Zelda: A Link to the Past|A Link to the Past]]''<br/>''[[The Legend of Zelda: Link's Awakening|Link's Awakening]]''<br/>''[[The Legend of Zelda: Oracle of Seasons|Oracle of Seasons]]''<br/>''[[The Legend of Zelda: Oracle of Ages|Oracle of Ages]]''<br/>''[[The Legend of Zelda: Four Swords|Four Swords]]''<br/>''[[The Legend of Zelda: Four Swords Adventures|Four Swords Adventures]]''<br/>''[[The Legend of Zelda: Phantom Hourglass|Phantom Hourglass]]'' | | game = ''[[The Legend of Zelda]]''<br/>''[[The Legend of Zelda: A Link to the Past|A Link to the Past]]''<br/>''[[The Legend of Zelda: Link's Awakening|Link's Awakening]]''<br/>''[[The Legend of Zelda: Oracle of Seasons|Oracle of Seasons]]''<br/>''[[The Legend of Zelda: Oracle of Ages|Oracle of Ages]]''<br/>''[[The Legend of Zelda: Four Swords|Four Swords]]''<br/>''[[The Legend of Zelda: Four Swords Adventures|Four Swords Adventures]]''<br/>''[[The Legend of Zelda: Phantom Hourglass|Phantom Hourglass]]'' | ||
| location = | | location = | ||
'''''A Link to the Past'''''<br/>[[Swamp Palace (A Link to the Past)|Swamp Palace]]<br/>[[Ice Palace]]<br/>[[Misery Mire (A Link to the Past)|Misery Mire]]<br/>[[Turtle Rock (A Link to the Past)|Turtle Rock]] | |||
'''''Link's Awakening'''''<br/><small>'''Green Zol'''</small><br/>[[Overworld]]<br/>[[Cave]]s<br/>[[Tail Cave]]<br/>[[Key Cavern]]<br/>[[Angler's Tunnel]]<br/>[[Catfish's Maw]]<br/>[[Face Shrine]]<br/>[[Eagle's Tower]]<br/><small>'''Red Zol'''</small><br/>[[Overworld]]<br/>[[Cave]]s<br/>[[Bottle Grotto]]<br/>[[Key Cavern]]<br/>[[Angler's Tunnel]]<br/>[[Catfish's Maw]]<br/>[[Face Shrine]]<br/>[[Eagle's Tower]]<br/>[[Turtle Rock (Link's Awakening)|Turtle Rock]] | |||
'''''Four Swords'''''<br/>[[Chambers of Insight]] | |||
| weapon = | | weapon = | ||
'''''Link's Awakening'''''<br/>All weapons - 1 hit | '''''Link's Awakening'''''<br/>All weapons - 1 hit | ||
'''''Oracle of Seasons'''''<br/>[[Sword]] - 1 hit | '''''Oracle of Seasons'''''<br/>[[Sword]] - 1 hit | ||
'''''Oracle of Ages'''''<br/>[[Sword]] - 1 hit | '''''Oracle of Ages'''''<br/>[[Sword]] - 1 hit | ||
'''''Four Swords'''''<br/>[[Sword]] - 1 hit | '''''Four Swords'''''<br/>[[Sword]] - 1 hit | ||
| Line 36: | Line 36: | ||
{{clear|left}} | {{clear|left}} | ||
==''Link's Awakening'', ''Oracle of Seasons'', ''Oracle of Ages''== | ==''Link's Awakening'', ''Oracle of Seasons'', and ''Oracle of Ages''== | ||
There are two forms of Zols, red and green. Red Zols are more powerful. With a weak weapon, a single hit causes one to break into two [[Gel]]s. If Link comes into contact with these, they do not damage him, but they slow him down and leave him unable to use any weapons. Green Zols only take one hit, but they can take Link by surprise. When Link walks across certain areas of the floor, green Zols come out of hiding and attack, though they are easy to defeat. | There are two forms of Zols, red and green. Red Zols are more powerful. With a weak weapon, a single hit causes one to break into two [[Gel]]s. If Link comes into contact with these, they do not damage him, but they slow him down and leave him unable to use any weapons. Green Zols only take one hit, but they can take Link by surprise. When Link walks across certain areas of the floor, green Zols come out of hiding and attack, though they are easy to defeat. | ||
| Line 54: | Line 54: | ||
==Gallery== | ==Gallery== | ||
<gallery> | <gallery> | ||
File:Zol-Gel-LoZ-Art.png|Zol splitting into Gel | File:Zol-Gel-LoZ-Art.png|Zol splitting into Gel artwork from [[The Legend of Zelda Instruction Manual|''The Legend of Zelda'' Instruction Booklet]] | ||
File:Zol-LoZ-Art-2.png|Zol | File:Zol-LoZ-Art-2.png|Zol artwork from [[Million Publications The Legend of Zelda Strategy Guide|Million Publications Strategy Guide]] for ''[[The Legend of Zelda]]'' | ||
File:Zol-Artwork-LoZ-Kodokawa-Shoten-Guide.png|Zol | File:Zol-Artwork-LoZ-Kodokawa-Shoten-Guide.png|Zol artwork from [[Kadokawa Shoten The Legend of Zelda Strategy Guide|Kadokawa Shoten Strategy Guide]] for ''The Legend of Zelda'' | ||
File:Zol-Green-LoZ-Sprite.png|Green Zol | File:Zol-Green-LoZ-Sprite.png|Green Zol sprite from ''The Legend of Zelda'' | ||
File:Zol-Black-LoZ-Sprite.png|Black Zol | File:Zol-Black-LoZ-Sprite.png|Black Zol sprite from ''The Legend of Zelda'' | ||
File:Zol-Red-2.png|Red Zol from ''A Link to the Past'' | File:Zol-Red-2.png|Red Zol from ''[[The Legend of Zelda: A Link to the Past|A Link to the Past]]'' | ||
File:Zol-Red-3.png|Red Zol jumping in ''A Link to the Past'' | File:Zol-Red-3.png|Red Zol jumping in ''A Link to the Past'' | ||
File:Zol-Red-4.png|Red Zol landing in ''A Link to the Past'' | File:Zol-Red-4.png|Red Zol landing in ''A Link to the Past'' | ||
| Line 73: | Line 73: | ||
File:Zol-Turquoise-1.png|Turquoise Zol jumping in ''A Link to the Past'' | File:Zol-Turquoise-1.png|Turquoise Zol jumping in ''A Link to the Past'' | ||
File:Zol-Turquoise-3.png|Turquoise Zol landing in ''A Link to the Past'' | File:Zol-Turquoise-3.png|Turquoise Zol landing in ''A Link to the Past'' | ||
File:Zol-Green-Oracle-Sprite.png|Green Zol | File:Zol-Green-Oracle-Sprite.png|Green Zol sprite from ''[[The Legend of Zelda: Link's Awakening DX|Link's Awakening DX]]'', ''[[The Legend of Zelda: Oracle of Seasons|Oracle of Seasons]]'', and ''[[The Legend of Zelda: Oracle of Ages|Oracle of Ages]]'' | ||
File:Zol-Red-Oracle-Sprite.png|Red Zol | File:Zol-Red-Oracle-Sprite.png|Red Zol sprite from ''Link's Awakening DX'', ''Oracle of Seasons'', and ''Oracle of Ages'' | ||
File:FS-Zol.png|Zol from ''Four Swords'' | File:FS-Zol.png|Zol from ''[[The Legend of Zelda: Four Swords|Four Swords]]'' | ||
File:Zol-TMC.png|The | File:Zol-TMC.png|The unused Green Zol sprite from ''[[The Legend of Zelda: The Minish Cap|The Minish Cap]]'' | ||
</gallery> | </gallery> | ||
Revision as of 17:40, April 9, 2023
| This article is a stub. You can help the Zelda Dungeon Wiki by expanding it. |

Games | ||
Location | A Link to the Past | |
Threat | ||
Attacks | Link's Awakening | |
Effective | ||
Related | ||
Zols are recurring enemies in The Legend of Zelda series.
The Legend of Zelda
In The Legend of Zelda, Zols are common enemies, first appearing in Level 3: The Manji. When attacked with the first sword, or any weapon with the same strength, it splits into two Gels. Otherwise, it is defeated.[1]
A Link to the Past
In A Link to the Past, Zols first appear while Link is making his way through the Swamp Palace. First coming in red form, Zols appear from underground when Link walks nearby. These slimy creatures slowly creep toward Link, occasionally jumping in his direction.
They are slowly moving and Link can get rid of them with one swipe from the Master Sword. A whole variety of projectile items work just as good, including the Hookshot. Unlike the Zol from The Legend of Zelda, these enemies do not split into smaller Gels. Instead, they are immediately defeated once they are harmed. If a Zol does come into contact with Link, it takes away two full hearts of damage.
In the Ice Palace, Green Zol make an appearance. However, they are completely identical to their Red Zol counterparts.
A Yellow Zol variant appears when Link enters Misery Mire. However, much like the Green Zol from the Ice Palace, this enemy is identical to its Red Zol counterpart.
A darker, more turquoise-colored Zol appears within Turtle Rock. Other than its color, it is identical to the Yellow, Red, and Green Zols that were previously encountered.
Link's Awakening, Oracle of Seasons, and Oracle of Ages
There are two forms of Zols, red and green. Red Zols are more powerful. With a weak weapon, a single hit causes one to break into two Gels. If Link comes into contact with these, they do not damage him, but they slow him down and leave him unable to use any weapons. Green Zols only take one hit, but they can take Link by surprise. When Link walks across certain areas of the floor, green Zols come out of hiding and attack, though they are easy to defeat.
Four Swords
Zol are small red blobs that appear. Link can use his sword or also his Pegasus Boots to defeat these enemies with a single hit. If Link uses a weaker weapon, such as a Boomerang, the Zols will be split into smaller Gels.
Four Swords Adventures
- Main article: Blue Zol
In Four Swords Adventures, a Blue Zol variant appears. These are very simple enemies that are defeated with a single slash from Link's Sword or a ranged item, such as a Boomerang. When Link uses the Quake Medallion, enemies on screen will be transformed into Blue Zol.
The Minish Cap
The sprite of the Zol can be found in the game data of The Minish Cap. However, it is unused in the final release of The Minish Cap. Like previous incarnations, the Zol splits into two Gels when Link attacks it.[2]
Phantom Hourglass
| This section is a stub. You can help the Zelda Dungeon Wiki by expanding it. |
Gallery
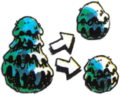
Zol splitting into Gel artwork from The Legend of Zelda Instruction Booklet

Zol artwork from Million Publications Strategy Guide for The Legend of Zelda

Zol artwork from Kadokawa Shoten Strategy Guide for The Legend of Zelda

Green Zol sprite from The Legend of Zelda

Black Zol sprite from The Legend of Zelda

Red Zol from A Link to the Past

Red Zol jumping in A Link to the Past

Red Zol landing in A Link to the Past

Green Zol from A Link to the Past

Green Zol from A Link to the Past

Green Zol jumping in A Link to the Past

Green Zol landing in A Link to the Past

Yellow Zol from A Link to the Past

Yellow Zol from A Link to the Past

Yellow Zol jumping in A Link to the Past

Yellow Zol landing in A Link to the Past

Turquoise Zol from A Link to the Past

Turquoise Zol jumping in A Link to the Past

Turquoise Zol landing in A Link to the Past

Green Zol sprite from Link's Awakening DX, Oracle of Seasons, and Oracle of Ages

Red Zol sprite from Link's Awakening DX, Oracle of Seasons, and Oracle of Ages

Zol from Four Swords

The unused Green Zol sprite from The Minish Cap


References
- ↑ "Zols pop out of the ground to surprise and attack their prey. If they are hit by an enemy, they split into miniature versions of themselves called Gels.", The Great Hyrule Encyclopedia
- ↑ The Cutting Room Floor