Dragon Roost Cavern: Difference between revisions
No edit summary |
No edit summary |
||
| Line 15: | Line 15: | ||
{{ZD|[https://www.zeldadungeon.net/the-wind-waker-walkthrough/dragon-roost-cavern/ ''The Wind Waker'' Walkthrough<br/>Chapter 5: Dragon Roost Cavern]}} | {{ZD|[https://www.zeldadungeon.net/the-wind-waker-walkthrough/dragon-roost-cavern/ ''The Wind Waker'' Walkthrough<br/>Chapter 5: Dragon Roost Cavern]}} | ||
The '''Dragon Roost Cavern''' is the first [[Dungeon]] in ''[[The Legend of Zelda: The Wind Waker|The Wind Waker]]''. It is located inside the large mountain on [[Dragon Roost Island]]. | The '''Dragon Roost Cavern''' is the first major [[Dungeon]] in ''[[The Legend of Zelda: The Wind Waker|The Wind Waker]]''. It is located inside the large mountain on [[Dragon Roost Island]]. | ||
The Sky Spirit, [[Valoo]], resides atop | ==Overview== | ||
The Sky Spirit, [[Valoo]], resides atop the large mountain on Dragon Roost Island. [[Link (The Wind Waker)|Link]] journeys inside of Dragon Roost Cavern in hopes to scaling the peak of the mountain and calming down Valoo.{{Ref|TWW|1694|Prince Komali}} | |||
When Link arrives inside the cavern, he'll find that it is infested with many [[Moblin]]s, [[Bokoblin]]s and other monsters. Link initially traverses the mountain to follow [[Medli]], a member of the [[Rito]] tribe. She was captured by Bokoblins and after rescuing Medli, Link receives the [[Grappling Hook]]. | |||
Using the Grappling Hook, Link later battles with the dungeon boss, [[Gohma (The Wind Waker)|Gohma]]. Gohma has caused Valoo to be distressed by pulling on his tail from inside the mountain, causing Valoo to become enraged and attack members of the Rito tribe seeking their wings. This scares [[Komali]], the chief's son, who tells Link that if he could prove that he was courageous enough to calm Valoo, he would talk to him. After clearing the dungeon, Link returns to the base of the mountain after calming Valoo to receive [[Din's Pearl]] from Komali, who apologizes to Link. | |||
==Treasure== | |||
*[[Dragon Tingle Statue]] - Available initially in the [[Nintendo GameCube]] version of the game, Link is able to obtain one of the [[Tingle Statue]]s. In the [[Nintendo Wii U]] version, Link will need to return to the dungeon, after acquiring [[Bomb]]s. The statue can be found along the northern corridor of the First Floor, along the path that leads to the [[Boss Key]]. When at the north end of the main central chamber of the dungeon, Link can use the Grappling Hook to grab the hook, opening the northern door. In this room, Link will see a seemingly useless ledge right in front of him. Link can use the [[Tingle Tuner]] to play a [[Tingle Bomb]] here, or a standard Bomb in 'HD' version of the game. This will cause a [[Treasure Chest]] to appear containing the Dragon Tingle Statue. | |||
*[[Treasure Chart 39]] - Located on the 2nd Floor of the Dungeon, just moments before Link acquires the Grappling Hook. In the natural progress of the dungeon, Link will reach a room that has a [[Blue Bokoblin]], along with two other Bokoblin who are hiding within pots on the side of room. Link will need to defeat these Bokoblin to advance in the dungeon. This room has two torches, with one of them unlit. Link can light the second torch to get the Treasure Chart. | |||
*[[Treasure Chart 11]] - Found near the entrance of the dungeon. Link can travel through the first door to make it to the main chamber of the dungeon. From there, he can take the door on the left, and then turn to the right. Here there is a gap that Link can swing across, using the Grappling Hook. After breaking the wooden planks, he'll reach the treasure chest with the Treasure Chart. | |||
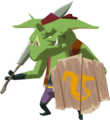
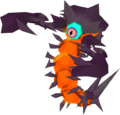
==Enemies== | ==Enemies== | ||
<gallery> | <gallery> | ||
File: | File:Blue-Bokoblin.png|[[Blue Bokoblin]] | ||
File:Green-Bokoblin.png|[[Green Bokoblin]] | File:Green-Bokoblin.png|[[Green Bokoblin]] | ||
File:TWW-Kargarok.png|[[Kargarok]] | File:TWW-Kargarok.png|[[Kargarok]] | ||
File:TWW-Keese-Model.png|[[Keese]] | File:TWW-Keese-Model.png|[[Keese]] | ||
File:TWW-Fire-Keese.png|[[Fire Keese]] | File:TWW-Fire-Keese.png|[[Fire Keese]] | ||
File: | File:Magtail.png|[[Magtail]] | ||
File:TWW-Moblin-Model.png|[[Moblin]] | File:TWW-Moblin-Model.png|[[Moblin]] | ||
File:TWW-Rat-Model.png|[[Rat]] | File:TWW-Rat-Model.png|[[Rat]] | ||
Revision as of 20:06, January 7, 2023
| This article is a stub. You can help the Zelda Dungeon Wiki by expanding it. |
Games | ||
Location | ||
Boss | ||
Mini-bosses | ||
Enemies | ||
Items | ||
Rewards | ||
| Guides | ||
|---|---|---|
Walkthrough | ||

|
In-depth guide:
The Wind Waker Walkthrough Chapter 5: Dragon Roost Cavern |
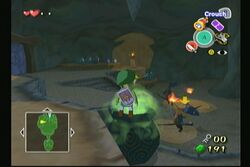
The Dragon Roost Cavern is the first major Dungeon in The Wind Waker. It is located inside the large mountain on Dragon Roost Island.
Overview
The Sky Spirit, Valoo, resides atop the large mountain on Dragon Roost Island. Link journeys inside of Dragon Roost Cavern in hopes to scaling the peak of the mountain and calming down Valoo.[1]
When Link arrives inside the cavern, he'll find that it is infested with many Moblins, Bokoblins and other monsters. Link initially traverses the mountain to follow Medli, a member of the Rito tribe. She was captured by Bokoblins and after rescuing Medli, Link receives the Grappling Hook.
Using the Grappling Hook, Link later battles with the dungeon boss, Gohma. Gohma has caused Valoo to be distressed by pulling on his tail from inside the mountain, causing Valoo to become enraged and attack members of the Rito tribe seeking their wings. This scares Komali, the chief's son, who tells Link that if he could prove that he was courageous enough to calm Valoo, he would talk to him. After clearing the dungeon, Link returns to the base of the mountain after calming Valoo to receive Din's Pearl from Komali, who apologizes to Link.
Treasure
- Dragon Tingle Statue - Available initially in the Nintendo GameCube version of the game, Link is able to obtain one of the Tingle Statues. In the Nintendo Wii U version, Link will need to return to the dungeon, after acquiring Bombs. The statue can be found along the northern corridor of the First Floor, along the path that leads to the Boss Key. When at the north end of the main central chamber of the dungeon, Link can use the Grappling Hook to grab the hook, opening the northern door. In this room, Link will see a seemingly useless ledge right in front of him. Link can use the Tingle Tuner to play a Tingle Bomb here, or a standard Bomb in 'HD' version of the game. This will cause a Treasure Chest to appear containing the Dragon Tingle Statue.
- Treasure Chart 39 - Located on the 2nd Floor of the Dungeon, just moments before Link acquires the Grappling Hook. In the natural progress of the dungeon, Link will reach a room that has a Blue Bokoblin, along with two other Bokoblin who are hiding within pots on the side of room. Link will need to defeat these Bokoblin to advance in the dungeon. This room has two torches, with one of them unlit. Link can light the second torch to get the Treasure Chart.
- Treasure Chart 11 - Found near the entrance of the dungeon. Link can travel through the first door to make it to the main chamber of the dungeon. From there, he can take the door on the left, and then turn to the right. Here there is a gap that Link can swing across, using the Grappling Hook. After breaking the wooden planks, he'll reach the treasure chest with the Treasure Chart.
Enemies
References
- ↑ "What? Are you trying to say that YOU can calm Valoo down? Psssssh! That's just a big, fat lie! It's easy to SAY you can do anything! Bragging doesn't cost a thing! I'll tell you what: If you can find me someone who can get past all the obstacles on Dragon Roost to get to Valoo... THEN I'll listen to anything you say!" — Prince Komali, The Wind Waker.


