|
|
| (12 intermediate revisions by 2 users not shown) |
| Line 1: |
Line 1: |
| {{Infobox|enemy | | {{Infobox|enemy |
| | image = [[File:Gold-Skulltula.png]] | | | image = [[File:Gold-Skulltula.png|250px]] |
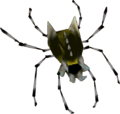
| | caption = A Gold Skulltula as shown in ''Majora's Mask''. | | | caption = A Gold Skulltula as seen in ''[[The Legend of Zelda: Majora's Mask|Majora's Mask]]'' |
| | game = ''[[The Legend of Zelda: Ocarina of Time|Ocarina of Time]]''<br/>''[[The Legend of Zelda: Majora's Mask|Majora's Mask]]'' | | | game = ''[[The Legend of Zelda: Ocarina of Time|Ocarina of Time]]''<br/>''[[The Legend of Zelda: Majora's Mask|Majora's Mask]]''<br/>''[[Hyrule Warriors]]'' |
| | location = <u>'''''Ocarina of Time'''''</u><br/>Throughout [[Hyrule]]<br/><u>'''''Majora's Mask'''''</u><br/>[[Swamp Spider House]]<br/>[[Oceanside Spider House]] | | | location = '''''Ocarina of Time'''''<br/>Throughout [[Hyrule]]<br/>'''''Majora's Mask'''''<br/>[[Swamp Spider House]]<br/>[[Oceanside Spider House]] |
| | weapon = [[Sword]]<br/>[[Slingshot]]<br/>[[Boomerang]]<br/>[[Hookshot]]<br/>[[Bow]] | | | weapon = [[Sword]]<br/>[[Slingshot]]<br/>[[Boomerang]]<br/>[[Hookshot]]<br/>[[Bow]] |
| | related = [[Skulltula]]<br/>[[Big Skulltula]]<br/>[[Skullwalltula]]<br/>[[Walltula]] | | | related = [[Skulltula]]<br/>[[Big Skulltula]]<br/>[[Skullwalltula]]<br/>[[Walltula]] |
| }} | | }} |
|
| |
|
| The '''Gold Skulltula''', also known as the '''Spider of the Curse''',{{Ref|OoT|647|[[Navi]]}} is an enemy and is part of an optional side quest from ''[[The Legend of Zelda: Ocarina of Time|Ocarina of Time]]'' and ''[[The Legend of Zelda: Majora's Mask|Majora's Mask]]''. Being able to be defeated with a multitude of weapons, a Gold Skulltula gives [[Link]] a [[Gold Skulltula Token]] when defeated. | | The '''Gold Skulltula''', also known as the '''Spider of the Curse''',{{Ref|OoT|647|[[Navi]]}} is an enemy and is part of an optional side quest from ''[[The Legend of Zelda: Ocarina of Time|Ocarina of Time]]'' and ''[[The Legend of Zelda: Majora's Mask|Majora's Mask]]''. Being able to be defeated with a multitude of weapons, a Gold Skulltula gives [[Link (Ocarina of Time)|Link]] a [[Gold Skulltula Token]] when defeated. |
|
| |
|
| In both games, a Gold Skulltula will make a rustling noise when nearby. They act just like normal wall [[Skulltula]]s from ''Ocarina of Time'' except that they do not move from their spot on the wall. They also take twice as many hits to defeat as the normal Skulltula. | | In both games, a Gold Skulltula will make a rustling noise when nearby. They act just like normal wall [[Skulltula]]s from ''Ocarina of Time'' except that they do not move from their spot on the wall. They also take twice as many hits to defeat as the normal Skulltula. |
|
| |
|
| ==Appearances== | | ==''Ocarina of Time''== |
| ===Ocarina of Time===
| | {{main|Ocarina of Time Gold Skulltulas}} |
| {{Navi|Gold Skulltula... | | {{float|right|{{Navi|Gold Skulltula<br/>This is also known as a Spider of the Curse.<br/>If you defeat it, you'll get a token as proof!}}}} |
| This is also known as a Spider of the Curse. If you defeat it, you'll get a token as proof!}} | |
|
| |
|
| | There are a total of [[Ocarina of Time Gold Skulltulas|100 Gold Skulltulas]] what [[Ganon]]dorf scattered throughout [[Hyrule]]. Their tokens will help to break the curse put on the [[Cursed Rich Family]] living in the [[House of Skulltula]]. After they are defeated, Gold Skulltula Tokens can be collected with the [[Boomerang]] or [[Hookshot]]. |
|
| |
|
| There are a total of 100 Gold Skulltulas scattered throughout [[Hyrule]]. Their tokens will help to break the curse put on the [[Cursed Rich Family]] living in the [[House of Skulltula]]. After they are defeated, Gold Skulltula Tokens can be collected with the [[Boomerang]] or [[Hookshot]].
| | After collecting a certain amount of Gold Skulltula Tokens, [[Link (Ocarina of Time)|Link]] can visit the House of Skulltulas to break the curse that Ganondorf put on various family members. These people will reward Link with a gift when spoken to. After collecting 10 tokens, Link is given the [[Adult Wallet#Ocarina of Time|Adult's Wallet]]. When 20 spiders are defeated, the family will give Link the [[Stone of Agony]]. When Link collects 30 tokens, he gets the [[Giant Wallet#Ocarina of Time|Giant's Wallet]]. When Link has defeated 40 Skulltulas, Link will be rewarded with [[Bombchu]]s. At 50, Link will get a [[Piece of Heart]], and at 100, Link will get unlimited Rupees. By the time Link collects all 100 Gold Skulltulas, the free Rupees will be almost worthless. |
|
| |
|
| ====Locations==== | | ==''Majora's Mask''== |
| {| class="wikitable" | | {{main|Majora's Mask Skulltula Houses}} |
| |-
| | As with many enemies in ''[[The Legend of Zelda: Majora's Mask|Majora's Mask]]'', Gold Skulltulas are identical to the ones in ''[[The Legend of Zelda: Ocarina of Time|Ocarina of Time]]''. The only difference between them is that Gold Skulltulas in ''Majora's Mask'' can only be found in spider houses. There are two of these houses found in the game; the [[Swamp Spider House]], and the [[Oceanside Spider House]]. Each of these have 30 Skulltulas each. |
| ! Skulltula #
| |
| ! Location
| |
| ! Description
| |
| ! Day/Night
| |
| ! Past/Future
| |
| |-
| |
| | 1
| |
| | [[Inside the Deku Tree]]
| |
| | In the same room with the compass, raise the platforms and use them to get on to the platform on the left side.
| |
| | N/A
| |
| | Past
| |
| |-
| |
| | 2
| |
| | Inside the Deku Tree
| |
| | On the vines leading back up to the main room.
| |
| | N/A
| |
| | Past
| |
| |-
| |
| | 3
| |
| | Inside the Deku Tree
| |
| | On the grate near the water.
| |
| | N/A
| |
| | Past
| |
| |-
| |
| | 4
| |
| | Hyrule Castle Market
| |
| | At the exit of the Market leading to Hyrule Field, there is a [[Guard House|guardhouse]] off to the side. Roll into the rightmost crate in the far back to reveal a Skulltula stowaway.
| |
| | N/A
| |
| | Past
| |
| |-
| |
| | 5
| |
| | [[Hyrule Castle|Hyrule Castle Grounds]]
| |
| | At the entrance to the Hyrule Castle area is a lone tree just begging to be rolled into.
| |
| | Day
| |
| | Past
| |
| |-
| |
| | 6
| |
| | [[Lon Lon Ranch]]
| |
| | Roll into the tree next to the ranch house.
| |
| | Day
| |
| | Past
| |
| |-
| |
| | 7
| |
| | Lon Lon Ranch
| |
| | On the back of the feeding corral.
| |
| | Night
| |
| | Past
| |
| |-
| |
| | 8
| |
| | [[Kokiri Forest]]
| |
| | Behind the house of the [[Know-It-All Brothers]]. You'll either need the Boomerang or to Jump Attack/Backflip to collect this token. | |
| | Night
| |
| | Past
| |
| |-
| |
| | 9
| |
| | [[Kakariko Village Graveyard]]
| |
| | Use a bottle of bugs on the soft soil in the corner. Just be sure to step back.
| |
| | N/A
| |
| | Past
| |
| |-
| |
| | 10
| |
| | [[Kakariko Village]]
| |
| | Hiding amongst the construction area near the center of the village.
| |
| | Night
| |
| | Past
| |
| |-
| |
| | 11
| |
| | Kakariko Village
| |
| | Against the side of the Skulltula House.
| |
| | Night
| |
| | Past
| |
| |-
| |
| | 12
| |
| | Kakariko Village
| |
| | Roll into the tree in the entrance of the village.
| |
| | Night
| |
| | Past
| |
| |-
| |
| | 13
| |
| | Kakariko Village
| |
| | On the upper part of the ladder of the lookout tower.
| |
| | Night
| |
| | Past
| |
| |-
| |
| | 14
| |
| | Kakariko Village
| |
| | Up against the side of the house closest to [[Death Mountain]].
| |
| | Night
| |
| | Past
| |
| |-
| |
| | 15
| |
| | [[Dodongo's Cavern]]
| |
| | In the room with the giant steps, waiting for you on the vines at the top.
| |
| | N/A
| |
| | Past
| |
| |-
| |
| | 16
| |
| | Dodongo's Cavern
| |
| | In the small corridor with tons of Baby Dodongos, lay a bomb or lure a Baby Dodongo and defeat it next to the bombable wall to reveal a hidden room. Inside, defeat the Keese and claim the token.
| |
| | N/A
| |
| | Past
| |
| |-
| |
| | 17
| |
| | Dodongo's Cavern
| |
| | In the zigzagging room a little before the boss, you'll come to a bombable wall that reveals a hidden doorway. Inside, defeat the Armos and collect the Skulltula token behind it.
| |
| | N/A
| |
| | Past
| |
| |-
| |
| | 18
| |
| | [[Death Mountain Trail]]
| |
| | Along the path, close to Kakariko, is a funny looking wall. Use a bomb on it to reveal a Skulltula hiding there.
| |
| | Day
| |
| | Past
| |
| |-
| |
| | 19
| |
| | Death Mountain Trail
| |
| | Use a bottle of bugs on the soft soil in front of the entrance to Dodongo's Cavern.
| |
| | N/A
| |
| | Past
| |
| |-
| |
| | 20
| |
| | [[Goron City]] | |
| | In the top part of Goron City, there is an area blocked off by three boulders, which you can blow up or tightrope-walk across the ropes to get to the back room in the top left corner of the city. Once back there, bomb the right boulder, left boulder, left boulder, and the third boulder from the left to find the Skulltula.
| |
| | Day
| |
| | Past
| |
| |-
| |
| | 21
| |
| | [[Death Mountain|Death Mountain Crater]]
| |
| | Roll into the crate at the exit leading to Death Mountain Trail.
| |
| | N/A
| |
| | Past
| |
| |-
| |
| | 22
| |
| | [[Zora's River]]
| |
| | Roll into the tree at the entrance.
| |
| | N/A
| |
| | Past
| |
| |-
| |
| | 23
| |
| | Zora's River
| |
| | There is a Skulltula on the ladder leading up to the twisting platforms in front of the waterfall.
| |
| | Night
| |
| | Past
| |
| |-
| |
| | 24
| |
| | [[Lake Hylia]]
| |
| | Use a bottle of bugs on the soft soil beside the Lakeside Laboratory.
| |
| | N/A
| |
| | Past
| |
| |-
| |
| | 25
| |
| | Lake Hylia
| |
| | Waiting for you on the little island where you get the Fire Arrows.
| |
| | Night
| |
| | Past
| |
| |-
| |
| | 26
| |
| | [[Inside Jabu-Jabu's Belly]]
| |
| | In the room with the water ditch and switch in the center, there is a Skulltula on the nearby vines. Defeat it and raise the water to collect the token.
| |
| | N/A
| |
| | Past
| |
| |-
| |
| | 27
| |
| | Inside Jabu-Jabu's Belly
| |
| | After defeating all the tentacles, when you fall down into the lower floor, just before fighting Big Octo, there are two Skulltulas waiting for you to use the Boomerang.
| |
| | N/A
| |
| | Past
| |
| |-
| |
| | 28
| |
| | Inside Jabu-Jabu's Belly
| |
| | After defeating all the tentacles, when you fall down into the lower floor, just before fighting Big Octo, there are two Skulltulas waiting for you to use the Boomerang.
| |
| | N/A
| |
| | Past
| |
| |-
| |
| | 29
| |
| | Inside Jabu-Jabu's Belly
| |
| | In the room right before the boss, waiting for you on the vines.
| |
| | N/A
| |
| | Past
| |
| |-
| |
| | 30
| |
| | [[Zora's Fountain]]
| |
| | Roll into the lone tree in the far corner of the area.
| |
| | N/A
| |
| | Past
| |
| |-
| |
| | 31
| |
| | Zora's Fountain
| |
| | There is a Skulltula against the western wall, just around the corner from the entrance to this area. Stand on the log and use the Boomerang to collect the token.
| |
| | Night
| |
| | Past
| |
| |-
| |
| | 32
| |
| | Lon Lon Ranch
| |
| | On one of the upper windows of the ranch house. You'll need the Boomerang.
| |
| | Night
| |
| | Past
| |
| |-
| |
| | 33
| |
| | Lon Lon Ranch
| |
| | On one of the outer walls, near the feeding silo. You'll need the Boomerang.
| |
| | Night
| |
| | Past
| |
| |-
| |
| | 34
| |
| | [[Hyrule Field]]
| |
| | Lay a Bomb at the base of the tree between Hyrule Castle and Kakariko Village, towards the corner of the wall to reveal a hole. Inside, defeat the Big Skulltula guarding our little Skulltula friend.
| |
| | N/A
| |
| | N/A
| |
| |-
| |
| | 35
| |
| | Kakariko Village Graveyard
| |
| | Waiting against the south wall for you to use your Boomerang.
| |
| | Night
| |
| | Past
| |
| |-
| |
| | 36
| |
| | Inside the Deku Tree
| |
| | Once you have Bombs and the Boomerang, return to the Deku Tree and work your way back to the room with the Gohma Larva falling from the ceiling. Light a Deku Stick on the nearby torch and set aflame the northwest corridor. Defeat the Deku Baba and blow up the bombable wall behind it to reveal a door. Inside the small room, use the Boomerang to defeat and collect the token of the Gold Skulltula against the wall.
| |
| | N/A
| |
| | Past
| |
| |-
| |
| | 37
| |
| | Kokiri Forest
| |
| | Use a bottle of bugs on the soft patch of soil behind the shop.
| |
| | N/A
| |
| | Past
| |
| |-
| |
| | 38
| |
| | [[Lost Woods]]
| |
| | From the start, go left twice. Use a bottle of bugs on the soft soil here.
| |
| | N/A
| |
| | Past
| |
| |-
| |
| | 39
| |
| | Lost Woods
| |
| | Use a bottle of bugs on the soft soil in the hidden meadow. (Right, left, right, left, left)
| |
| | N/A
| |
| | Past
| |
| |-
| |
| | 40
| |
| | Lake Hylia
| |
| | Against the backside of the Lakeside Laboratory.
| |
| | Night
| |
| | Past
| |
| |-
| |
| | 41
| |
| | Hyrule Field
| |
| | Use a Bomb in the center of the lonely circle of stones in the dry, dusty area leading to Gerudo Valley to reveal a hole. Inside, use Din's Fire or Fire Arrows to burn the cobwebs. There is a [[cow]] in one of these smaller areas hiding a Skulltula.
| |
| | N/A
| |
| | N/A
| |
| |-
| |
| | 42
| |
| | [[Gerudo Valley]]
| |
| | Right at the entrance at the little waterfall next to the plank-bridge.
| |
| | Night
| |
| | Past
| |
| |-
| |
| | 43
| |
| | Gerudo Valley
| |
| | Use a bottle of bugs on the soft soil in the lower part of the valley.
| |
| | N/A
| |
| | Past
| |
| |-
| |
| | 44
| |
| | Kakariko Village
| |
| | Up on the roof of Impa's House. Use your Hookshot to get on top of the Skulltula House and then on to this roof.
| |
| | Night
| |
| | Future
| |
| |-
| |
| | 45
| |
| | [[Ganon's Tower|Ganon's Tower Grounds]]
| |
| | In the area surrounding Ganon's Castle is the last remnants of pillars still standing. There is a Skulltula just above the lava that you can use your Hookshot on.
| |
| | N/A
| |
| | Future
| |
| |-
| |
| | 46
| |
| | Kokiri Forest
| |
| | On the roof of the Twin's House. You'll need the Hookshot to collect the token.
| |
| | Night
| |
| | Future
| |
| |-
| |
| | 47
| |
| | Lost Woods
| |
| | Plant a Magic Bean in the hidden meadow and then return in the future to find a Skulltula up on the platform.
| |
| | Night
| |
| | Future
| |
| |-
| |
| | 48
| |
| | [[Sacred Forest Meadow]]
| |
| | There is a Skulltula up high on the eastern wall. You'll need the Hookshot to collect it.
| |
| | Night
| |
| | Future
| |
| |-
| |
| | 49
| |
| | [[Forest Temple (Ocarina of Time)|Forest Temple]]
| |
| | In the entrance room, climb up the vines on the right and get on to the top of the tree. Use the Hookshot to defeat the Skulltula and collect the token.
| |
| | N/A
| |
| | Future
| |
| |-
| |
| | 50
| |
| | Forest Temple
| |
| | In the main room, at the back next to the staircase.
| |
| | N/A
| |
| | Future
| |
| |-
| |
| | 51
| |
| | Forest Temple
| |
| | In one of the forest rooms, up high against a platform. To get up there, Hookshot to the front side of the small chest. Alternatively, you can drop down from the door above later on from the checkerboard floor room with the ceiling that falls down.
| |
| | N/A
| |
| | Future
| |
| |-
| |
| | 52
| |
| | Forest Temple
| |
| | In one of the forest rooms, up high against a platform. To get up there, Hookshot to the front side of the small chest. Alternatively, you can drop down from the door above later on from the checkerboard floor room with the ceiling that falls down.
| |
| | N/A
| |
| | Future
| |
| |-
| |
| | 53
| |
| | Forest Temple
| |
| | In the last room before the boss where you push the walls, in one of the cubbies.
| |
| | N/A
| |
| | Future
| |
| |-
| |
| | 54
| |
| | Dodongo's Cavern
| |
| | Re-enter the dungeon after you've cleared it and use the elevator to get to the second floor and then work your way back until you get to the room with the giant stone steps. Either go around the left side and climb the vines or jump off so you land on the steps themselves in order to find this hidden area. You'll need either the Boomerang or the Hookshot to collect the token.
| |
| | N/A
| |
| | N/A
| |
| |-
| |
| | 55
| |
| | Dodongo's Cavern
| |
| | In the small corridor with tons of Baby Dodongos, find the spot where Navi flies up and turns green. Play the Scarecrow's Song and use the Hookshot on Pierre to find a Skulltula's hiding spot.
| |
| | N/A
| |
| | Future
| |
| |-
| |
| | 56
| |
| | Goron City
| |
| | There is a Gold Skulltula on the back of the pedestal suspended by ropes that used to house Goron's Ruby.
| |
| | Night
| |
| | Future
| |
| |-
| |
| | 57
| |
| | Death Mountain Crater
| |
| | Use a bottle of bugs on the soft patch of soil near the teleport pad.
| |
| | N/A
| |
| | Past
| |
| |-
| |
| | 58
| |
| | [[Fire Temple (Ocarina of Time)|Fire Temple]]
| |
| | In the lava room, head to the left side and when you see the Time Block above the door, step back and play the Song of Time to move it down low. Use it to get up and find the guarded Skulltula.
| |
| | N/A
| |
| | Future
| |
| |-
| |
| | 59
| |
| | Fire Temple
| |
| | Following the outer wall of the boulder room, you'll come to a wall where you can hear a Skulltula behind it. Slash it until it sounds funny and then use a bomb to reveal our little friend.
| |
| | N/A
| |
| | Future
| |
| |-
| |
| | 60
| |
| | Fire Temple
| |
| | At the upper door of the boulder room, turn to the right and play the Scarecrow's Song to make Pierre appear above. Hookshot to him, turn around and Hookshot again. In the next room, you'll find a Skulltula.
| |
| | N/A
| |
| | Future
| |
| |-
| |
| | 61
| |
| | Fire Temple
| |
| | Shortly after collecting #60, climb up and enter the next area. Walk forward and turn left.
| |
| | N/A
| |
| | Future
| |
| |-
| |
| | 62
| |
| | Fire Temple
| |
| | Within the statue at the entrance is a series of rooms to get the Boss Key. You'll find a Skulltula in one of these rooms.
| |
| | N/A
| |
| | Future
| |
| |-
| |
| | 63
| |
| | Death Mountain Trail
| |
| | Use the Megaton Hammer on the red boulders on the path to the top of Death Mountain. There is a Skulltula behind the one closest to the climbable wall.
| |
| | Night
| |
| | Future
| |
| |-
| |
| | 64
| |
| | Death Mountain Trail
| |
| | Use the Megaton Hammer on the red boulder in the fenced area just above the entrance to Dodongo's Cavern to find a Skulltula.
| |
| | Night
| |
| | Future
| |
| |-
| |
| | 65
| |
| | Zora's River
| |
| | You can get up on the platform in the middle to collect this token by taking the ladder on the side, or by using the Magic Bean Plant.
| |
| | Night
| |
| | Future
| |
| |-
| |
| | 66
| |
| | Zora's River
| |
| | There is a Skulltula up high on a wall near the waterfall. If you stand on the fence, you can reach it with just the Hookshot.
| |
| | Night
| |
| | Future
| |
| |-
| |
| | 67
| |
| | [[Zora's Domain]]
| |
| | There is a Skulltula against the wall near the top of the frozen waterfall. Stand out just at the edge of it, turn left and use your Hookshot.
| |
| | Night
| |
| | Future
| |
| |-
| |
| | 68
| |
| | Ice Cavern
| |
| | In the main room with the spinning ice blade, this Skulltula is against the wall near some icy stalagmites.
| |
| | N/A
| |
| | Future
| |
| |-
| |
| | 69
| |
| | Ice Cavern
| |
| | In the room with the Compass and Piece of Heart frozen in red ice, there is a Skulltula hiding behind a stalactite.
| |
| | N/A
| |
| | Future
| |
| |-
| |
| | 70
| |
| | Ice Cavern
| |
| | In the room with the ice block puzzle, there is a Skulltula against the eastern wall.
| |
| | N/A
| |
| | Future
| |
| |-
| |
| | 71
| |
| | Lake Hylia
| |
| | Sink down to the bottom of the water in the Lakeside Laboratory and roll into the crate.
| |
| | N/A
| |
| | Future
| |
| |-
| |
| | 72
| |
| | [[Water Temple (Ocarina of Time)|Water Temple]]
| |
| | When the water is at the lowest level, enter the south corridor and blow a hole through the cracked floor. Sink down and come up in the new room, step on the switch, defeat the Tektites and use a Spin Attack while standing next to the grating to hit the crystal switch inside.
| |
| | N/A
| |
| | Future
| |
| |-
| |
| | 73
| |
| | Water Temple
| |
| | After defeating [[Dark Link]] and getting the Longshot, play the Song of Time for the Time Block in the back of the Longshot Room and drop down into the river cavern. Follow the path and around the bend you'll see the Skulltula on the wall.
| |
| | N/A
| |
| | Future
| |
| |-
| |
| | 74
| |
| | Water Temple
| |
| | After you get the Longshot, return to the room with the platforms that go down the huge waterfall. Defeat the Skulltula on the north wall.
| |
| | N/A
| |
| | Future
| |
| |-
| |
| | 75
| |
| | Water Temple
| |
| | After you get the Longshot, return to the center column and use your increased range to get the Skulltula at the very top.
| |
| | N/A
| |
| | Future
| |
| |-
| |
| | 76
| |
| | Water Temple
| |
| | When you re-emerge in the room with the rolling boulders after the Stinger room, snag the Skulltula in the waterfall where one of the boulders originates.
| |
| | N/A
| |
| | Future
| |
| |-
| |
| | 77
| |
| | Lake Hylia
| |
| | On the tree right above the Water Temple. Use the Longshot to get on to the branch.
| |
| | Night
| |
| | Future
| |
| |-
| |
| | 78
| |
| | Hyrule Castle Grounds
| |
| | Sneak past all the guards and once you get to the end of this outer area, near where you pushed and pulled the milk crates to sneak into the castle courtyard, there is a lone tree at the corner of the fence. Play the Song of Storms while standing next to it to reveal a hidden hole. Inside, bomb the left wall to find a Gold Skulltula. There is a little trick here where you can Boomerang the token and back up onto the pedestal, so that when you reappear, the Skulltula is still there... Cheating this way, you can get all the way to 100 Skulltulas.
| |
| | N/A
| |
| | Past
| |
| |-
| |
| | 79
| |
| | [[Bottom of the Well]]
| |
| | In the center of the main room, there are two locked doors. In the left one is a lone Deku Baba and some killer jars, along with a Skulltula on the back wall.
| |
| | N/A
| |
| | Past
| |
| |-
| |
| | 80
| |
| | Bottom of the Well
| |
| | In the center of the main room, there are two locked doors. In the right one are several Keese and an invisible walkway. In the corner is a Skulltula.
| |
| | N/A
| |
| | Past
| |
| |-
| |
| | 81
| |
| | Bottom of the Well
| |
| | In the northeast corner of the dungeon is a hole you can crawl through. Do so, go through the locked door, traverse the invisible pit filled room, and in the next room is a Like Like guarding a Skulltula.
| |
| | N/A
| |
| | Past
| |
| |-
| |
| | 82
| |
| | [[Shadow Temple]]
| |
| | In the giant guillotine cavern, once you get through the chopping gauntlet, turn left and use the Lens of Truth to see invisible platforms. Use them to get to a hidden room rewarding a Skulltula after defeating all the enemies.
| |
| | N/A
| |
| | Future
| |
| |-
| |
| | 83
| |
| | Shadow Temple
| |
| | In the room with the stone umbrella, push the stone to the second deadly trap and then find the Skulltula in one of the side areas.
| |
| | N/A
| |
| | Future
| |
| |-
| |
| | 84
| |
| | Shadow Temple
| |
| | In the first skull room, where you get a small key, you'll find a Skulltula patiently awaiting you behind the skull.
| |
| | N/A
| |
| | Future
| |
| |-
| |
| | 85
| |
| | Shadow Temple
| |
| | When you get on the Shadow Ferry, stand near the front of the boat to make Navi fly over to a platform up high. Play the Scarecrow's Song to make Pierre appear, who you can pull yourself on to with the Longshot and then acquire the Skulltula here.
| |
| | N/A
| |
| | Future
| |
| |-
| |
| | 86
| |
| | Shadow Temple
| |
| | Near the end, there is a room that splits off into a room in each compass direction. The skull room (west) has a Skulltula behind the three spinning skulls.
| |
| | N/A
| |
| | Future
| |
| |-
| |
| | 87
| |
| | Gerudo Valley
| |
| | Behind the carpenter's tent.
| |
| | Night
| |
| | Future
| |
| |-
| |
| | 88
| |
| | Gerudo Valley
| |
| | Against the backside of some stone pillars near the carpenter's tent.
| |
| | Night
| |
| | Future
| |
| |-
| |
| | 89
| |
| | [[Gerudo's Fortress]]
| |
| | Hiding against a wall near the top of the fortress. When you come out the door next to that "low down, climbable part," just turn right.
| |
| | Night
| |
| | Future
| |
| |-
| |
| | 90
| |
| | Gerudo's Fortress
| |
| | On the large target at the Horseback Archery Range as far away from civilization as it can get.
| |
| | Night
| |
| | Future
| |
| |-
| |
| | 91
| |
| | [[Haunted Wasteland]]
| |
| | When you come to the stone structure halfway through the desert, hop down inside it and you'll find this Skulltula awaiting you.
| |
| | N/A
| |
| | Future
| |
| |-
| |
| | 92
| |
| | [[Desert Colossus]]
| |
| | Use a bottle of bugs on the soft soil in front of the temple.
| |
| | N/A
| |
| | Past
| |
| |-
| |
| | 93
| |
| | Desert Colossus
| |
| | Ride the Magic Bean Plant in front of the temple until it takes you to one of the islands that has this Skulltula on it.
| |
| | Night
| |
| | Future
| |
| |-
| |
| | 94
| |
| | Desert Colossus
| |
| | In the branches of one of the palm trees at the oasis to the south.
| |
| | Night
| |
| | Future
| |
| |-
| |
| | 95
| |
| | [[Spirit Temple]]
| |
| | On the first floor there is a room with several Keese against some iron grating where you'll find a Skulltula on one side.
| |
| | N/A
| |
| | Past
| |
| |-
| |
| | 96
| |
| | Spirit Temple
| |
| | Near the main room, there is a little room where you use Bombchus to reveal sunlight for the sun face in order to proceed. There is a Skulltula on the wall where you climbed up.
| |
| | N/A
| |
| | Past
| |
| |-
| |
| | 97
| |
| | Spirit Temple
| |
| | In the hallway just before fighting the Iron Knuckle, turn around to find a Skulltula.
| |
| | N/A
| |
| | Past
| |
| |-
| |
| | 98
| |
| | Spirit Temple
| |
| | In the room where the boulders roll back and forth, use the Song of Time to move the Time Block covering one of the cubbies and uncover a Skulltula.
| |
| | N/A
| |
| | Future
| |
| |-
| |
| |99
| |
| | Spirit Temple
| |
| | In the main room (with the Colossus) there is a Skulltula on the platform in the northwest corner of the room. You can get to it by getting on to the top of the southwest platform and playing the Scarecrow's Song to make Pierre appear. Use the Longshot to get across.
| |
| | N/A
| |
| | Future
| |
| |-
| |
| | 100
| |
| | [[Zora's Fountain]]
| |
| | Lift the silver boulder in the far corner of the area to reveal a hidden gauntlet of invisible Big Skulltulas. At the end, climb the ladder and find a Skulltula off to the left.
| |
| | Night
| |
| | Future
| |
| |}
| |
|
| |
|
| ====Rewards====
| | After defeating all 30 Skulltulas in the Swamp Spider House, the man at the entrance has been cured of his curse and will give [[Link (Ocarina of Time)#Majora's Mask|Link]] the [[Mask of Truth]]. |
| After collecting a certain amount of Gold Skulltula Tokens, Link can visit the House of Skulltulas to break the curse put on various family members. These people will reward Link with a gift when spoken to. After collecting 10 tokens, Link is given the [[Adult's Wallet]]. When 20 spiders are defeated, the family will give Link the [[Stone of Agony]]. When Link collects 30 tokens, he gets the [[Giant's Wallet]]. When Link has defeated 40 Skulltulas, Link will be rewarded with [[Bombchu]]s. At 50, Link will get a [[Piece of Heart]], and at 100, Link will get unlimited Rupees. By the time Link collects all 100 Gold Skulltulas, the free Rupees will be almost worthless. Alternatively, you could continuously collect Gold Skulltula token number 78. | |
|
| |
|
| ===Majora's Mask===
| | In the Oceanside Spider House, a man will appear wanting to buy the house. In the N64 version, he will give Link a wallet upgrade if he has cleared the house on the [[First Day]], or rupees if it is done on the [[Second Day|Second]] or [[Final Day]]. In ''[[The Legend of Zelda: Majora's Mask 3D|Majora's Mask 3D]]'', he will give Link the wallet upgrade regardless of which day it is. |
| As with many enemies in ''Majora's Mask'', Gold Skulltulas are identical to the ones in ''Ocarina of Time''. The only difference between them is that Gold Skulltulas in ''Majora's Mask'' can only be found in spider houses. There are two of these houses found in the game; the [[Swamp Spider House]], and the [[Oceanside Spider House]]. Each of these have 30 Skulltulas each. After defeating all 30 Skulltulas in a spider house, the man at the entrance has been revived of his curse and will give you a gift. The item in question varies depending on what day you finish.
| |
| | |
| ====Locations====
| |
| =====Swamp Spider House=====
| |
| {{Main|Swamp Spider House}}
| |
| | |
| =====Oceanside Spider House=====
| |
| {{Main|Oceanside Spider House}}
| |
|
| |
|
| ==Non-Canon Appearances== | | ==Non-Canon Appearances== |
| ===Hyrule Warriors===
| |
| {{Non-Canon|section}} | | {{Non-Canon|section}} |
| | | ===''Hyrule Warriors''=== |
| Gold Skulltulas are a collectible in ''[[Hyrule Warriors]]''. Like in ''Ocarina of Time'', a total of 100 Gold Skulltulas can be found throughout all of the [[Hyrule Warriors Stages|stages]]. However, they only appear after specific requirements are met in the stage. Also, there are cases where they may not appear when certain characters are on the stage or certain weapons are used. When a character fulfills the requirements, a spider web appears on the map showing where the Gold Skulltula has appeared in the stage. One example of a place where they can hide is inside a boulder, making the character use [[bomb]]s to destroy it. The Gold Skulltula escapes after a set amount of time, so the characters have to find them quickly. As the character gets closer, rustling noises can be heard, revealing it is nearby. Once they have uncovered and defeated a Gold Skulltula, they will receive a puzzle piece that gets them one step closer to completing an illustration.{{Ref|Fan Translation|http://kantopia.wordpress.com/2014/07/24/hyrule-warriors-famitsu-scan-translations-723-7/|''[[Wikipedia:Famitsu|Famitsu]]''}} | | {{float|right|[[File:HW Icon Gold Skulltula.png|Gold Skulltula icon from Hyrule Warriors]]}} |
| | {{main|Hyrule Warriors Gold Skulltulas}} |
| | {{stub|section|Out of date}} |
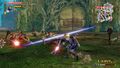
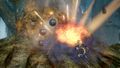
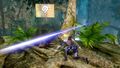
| | Gold Skulltulas are a collectible in ''[[Hyrule Warriors]]''. Like in ''[[The Legend of Zelda: Ocarina of Time|Ocarina of Time]]'', a total of 100 Gold Skulltulas can be found throughout all of the [[Hyrule Warriors Stages|stages]]. However, they only appear after specific requirements are met in the stage. Also, there are cases where they may not appear when certain characters are on the stage or certain weapons are used. When a character fulfills the requirements, a spider web appears on the map showing where the Gold Skulltula has appeared in the stage. One example of a place where they can hide is inside a boulder, making the character use [[bomb]]s to destroy it. The Gold Skulltula escapes after a set amount of time, so the characters have to find them quickly. As the character gets closer, rustling noises can be heard, revealing it is nearby. Once they have uncovered and defeated a Gold Skulltula, they will receive a puzzle piece that gets them one step closer to completing an illustration. |
|
| |
|
| ==Gallery== | | ==Gallery== |
| <gallery> | | <gallery> |
| Gold Skulltula - OOT64 promo render.png|Promotional render of a Gold Skulltula from ''[[The Legend of Zelda: Ocarina of Time|Ocarina of Time]]'' | | Gold Skulltula - OOT64 promo render.png|Promotional render from ''[[The Legend of Zelda: Ocarina of Time|Ocarina of Time]]'' |
| GoldSkulltulaG.png|Gold Skulltula render from ''Ocarina of Time'' | | GoldSkulltulaG.png|Render from ''Ocarina of Time'' |
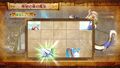
| Hyrule Warriors Screenshot Gold Skulltula Map.jpg|''A spider web on the map marking the appearance of a Gold Skulltula in Hyrule Warriors'' | | Hyrule Warriors Screenshot Gold Skulltula Map.jpg|A spider web on the map marking the appearance of a Gold Skulltula in ''[[Hyrule Warriors]]'' |
| Hyrule Warriors Screenshot Gold Skulltula Boulder.jpg|''A boulder which conceals a Gold Skulltula in Hyrule Warriors'' | | Hyrule Warriors Screenshot Gold Skulltula Boulder.jpg|A boulder which conceals a Gold Skulltula in ''Hyrule Warriors'' |
| Hyrule Warriors Screenshot Gold Skulltula Boulder Bomb.jpg|''Sheik using bombs to destroy a boulder where a Gold Skulltula is in Hyrule Warriors'' | | Hyrule Warriors Screenshot Gold Skulltula Boulder Bomb.jpg|Sheik using bombs to destroy a boulder where a Gold Skulltula is in ''Hyrule Warriors'' |
| Hyrule Warriors Screenshot Gold Skulltula Under Boulder.jpg|''Sheik finding a Gold Skulltula after destroying a boulder in Hyrule Warriors'' | | Hyrule Warriors Screenshot Gold Skulltula Under Boulder.jpg|Sheik finding a Gold Skulltula after destroying a boulder in ''Hyrule Warriors'' |
| Hyrule Warriors Screenshot Gold Skulltula Sheik Obtain Puzzle Piece.jpg|''Sheik defeating a Gold Skulltula in Hyrule Warriors'' | | Hyrule Warriors Screenshot Gold Skulltula Sheik Obtain Puzzle Piece.jpg|Sheik defeating a Gold Skulltula in ''Hyrule Warriors'' |
| Hyrule Warriors Screenshot Gold Skulltula Puzzle Piece.jpg|''Sheik receiving a puzzle piece from defeating a Gold Skulltula in Hyrule Warriors'' | | Hyrule Warriors Screenshot Gold Skulltula Puzzle Piece.jpg|Sheik receiving a puzzle piece from defeating a Gold Skulltula in ''Hyrule Warriors'' |
| </gallery> | | </gallery> |
|
| |
|
| {{References}} | | {{References}} |
|
| |
|
| | {{clear}} |
| {{Listbox|Ocarina of Time Enemies}} | | {{Listbox|Ocarina of Time Enemies}} |
| {{Listbox|Majora's Mask Enemies}} | | {{Listbox|Majora's Mask Enemies}} |
|
| |
|
| |
|
| {{Cat|Ocarina of Time Enemies}} | | {{Cat|Ocarina of Time Enemies}} |
| {{Cat|Majora's Mask Enemies}} | | {{Cat|Majora's Mask Enemies}} |
| {{Cat|Hyrule Warriors Enemies}} | | {{Cat|Hyrule Warriors Enemies}} |