Akkala Tower (Scenario): Difference between revisions
No edit summary |
m (Text replacement - "{{References}}↵↵{{Listbox|" to "{{References}} {{clear}} {{Listbox|") |
||
| (28 intermediate revisions by 6 users not shown) | |||
| Line 2: | Line 2: | ||
{{stub}} | {{stub}} | ||
{{Infobox|scenario | {{Infobox|scenario | ||
| image = | | name = Akkala Tower | ||
| image = [[File:Akkala-Tower-Scenario.png|400px]] | |||
| caption = | | caption = | ||
| number = Chapter 4-1 | | number = Chapter 4-1 | ||
| Line 11: | Line 12: | ||
| next = [[Destroy the Yiga Clan!]] | | next = [[Destroy the Yiga Clan!]] | ||
| simultaneous = | | simultaneous = | ||
| warriors = [[Link]], [[Zelda]], any other unlocked (story)<br/>Any three unlocked (replay) | | warriors = [[Link (Breath of the Wild)#Age of Calamity|Link]], [[Zelda (Breath of the Wild)#Age of Calamity|Zelda]], any other unlocked (story)<br/>Any three unlocked (replay) | ||
| allies = [[Link (Breath of the Wild)#Age of Calamity|Link]], [[Zelda (Breath of the Wild)#Age of Calamity|Zelda]], [[Urbosa]] (if not selected for play) | |||
| recommended level = Lv. 25 | | recommended level = Lv. 25 | ||
| conditions = | | conditions = | ||
| battlefield materials = [[Stealthfin Trout]] | | battlefield materials = [[Stealthfin Trout]]<br/>[[Armored Carp]]<br/>[[Staminoka Bass]]<br/>[[Endura Shroom]]<br/>[[Hightail Lizard]] | ||
| boss = [[Sooga]]<br/>[[Blue-Maned Lynel]] | | boss = [[Sooga]]<br/>[[Blue-Maned Lynel]] | ||
| miniboss = [[Yiga Blademaster]] | | miniboss = [[Yiga Blademaster]] (6×)<br/>[[Blue Moblin]] (4×)<br/>[[Fire Wizzrobe]]<br/>[[Ice Wizzrobe]] | ||
| enemies = [[Yiga Footsoldier]] | | enemies = [[Yiga Footsoldier]]<br/>[[Blue Bokoblin]]<br/>[[Blue Lizalfos]]<br/>[[Keese]]<br/>[[Electric Lizalfos]] | ||
| characters = [[Master Kohga]]<br/>[[Astor]] | | characters = [[Purah]]<br/>[[King Rhoam]]<br/>[[Master Kohga]]<br/>[[Astor]] | ||
| members = | | members = | ||
| objective = | | objective = | ||
| Line 32: | Line 34: | ||
| gallery = | | gallery = | ||
}} | }} | ||
{{quote|The party heads for the Akkala region, hoping to activate the [[Sheikah Tower]]s. The tower has fallen into the Yiga Clan's hands, and the party must fight to recapture it|In-game description}} | {{quote|The party heads for the [[Akkala]] region, hoping to activate the [[Sheikah Tower]]s. The tower has fallen into the Yiga Clan's hands, and the party must fight to recapture it|In-game description}} | ||
'''Akkala Tower''' is the first [[Age of Calamity Scenarios|scenario]] of ''[[Hyrule Warriors: Age of Calamity|Age of Calamity]]'' Chapter 4. It is unlocked by completing [[The Road Home, Besieged]], and must be completed before progressing in the story. | '''Akkala Tower''' is the first [[Age of Calamity Scenarios|scenario]] of ''[[Hyrule Warriors: Age of Calamity|Age of Calamity]]'' Chapter 4. It is unlocked by completing [[The Road Home, Besieged]], and must be completed before progressing in the story. | ||
*'''Victory Condition''': Reclaim Akkala Citadel | *'''Victory Condition''': Reclaim Akkala Citadel | ||
*'''Defeat Condition''': Link, Zelda, or | *'''Defeat Condition''': [[Link (Breath of the Wild)#Age of Calamity|Link]], [[Zelda (Breath of the Wild)#Age of Calamity|Zelda]], or [[Urbosa]] flees | ||
==Objectives== | ==Objectives== | ||
*Head for Akkala Citadel | *Head for [[Akkala Citadel]] | ||
*Defeat the Yiga | *Defeat the [[Yiga Blademaster]]s (2) | ||
*Head for Akkala Citadel | *Head for Akkala Citadel | ||
*Capture the Outpost | *Capture the Outpost | ||
| Line 50: | Line 52: | ||
*Head for Akkala Citadel | *Head for Akkala Citadel | ||
*Reclaim Akkala Citadel | *Reclaim Akkala Citadel | ||
**Defeat Sooga and reclaim Akkala Citadel | **Defeat [[Sooga]] and reclaim Akkala Citadel | ||
*Seek out and defeat Sooga | *Seek out and defeat Sooga | ||
==Cutscenes== | |||
===Akkala Tower (Part 1) [text]=== | |||
{{quote|As the pilots learned to manipulate the arcane machinery of their Divine Beasts, Purah led a research expedition to the otherworldly ediface that had appeared on Hyrule Field.|In-game Gallery description}} | |||
<!--yes, it's "part 1" despite no "part 2" in the Gallery... *shrugs*--> | |||
===Determination=== | |||
{{quote|As Zelda prepares to depart and investigate the [[Central Tower]], King Rhoam once again confronts her on where her focus lies. Zelda musters all of her courage to express her intentions to him, but...|In-game Gallery description}} | |||
===Disharmony=== | |||
{{quote|As Zelda departs [[Hyrule Castle (Breath of the Wild)|Hyrule Castle]], Master Kohga and Sooga scheme with Astor about preventing the activation of the Sheikah Towers. Quietly, however, Sooga harbors his own doubts...|In-game Gallery description}} | |||
===The Sheikah Towers Are Activated=== | |||
{{quote|Guided by the little Guardian, Link presents the [[Sheikah Slate]] to the terminal of the Central Tower, causing the tower to activate and rise up into the air. At the same time, the towers in other regions also rise up. Purah, observing this, cries out in excitement.|In-game Gallery description}} | |||
===A Game Changer=== | |||
{{quote|Having successfully activated all of the Sheikah Towers, Zelda takes in the expansive view. Purah has been busy analysing the functions of the tower and, after lauding their usefulness in the defense of Hyrule, declares her intention to demonstrate their value.|In-game Gallery description}} | |||
==Dialogue== | |||
{| class="wikitable" style="text-align:left;" | |||
!Character Speaking | |||
!Dialogue | |||
|- | |||
|<center>.</center> | |||
|. | |||
|- | |||
|} | |||
==Treasure Chests== | |||
{{See also|Age of Calamity Treasure Chests}} | |||
<section begin=treasure /> | |||
<center><gallery widths="740px" heights="600px"> | |||
File:HWAoC-Akkala-Tower-Chest-Map.png|<center>There are 7 treasure chests found in [[Akkala Tower (Scenario)|Akkala Tower]].</center> | |||
</gallery></center> | |||
<center><gallery widths="400px" heights="220px"> | |||
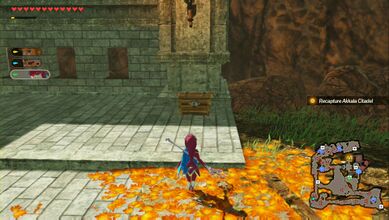
File:HWAoC-Akkala-Tower-Chest-01.jpg|<center>100 [[Rupee]]s</center><center>After entering the citadel, follow the path to the left, in the first room with [[Sooga]], up the stairs on the balcony next to the [[Korok]].</center> | |||
File:HWAoC-Akkala-Tower-Chest-02.jpg|<center>[[Big Hearty Radish]] x5</center><center>After entering the citadel, follow the path to the right, through an outpost, and outside. The chest is along the north wall.</center> | |||
File:HWAoC-Akkala-Tower-Chest-03.jpg|<center>[[Knight's Halberd]]</center><center>Southeast corner of the map.</center> | |||
File:HWAoC-Akkala-Tower-Chest-04.jpg|<center>[[Ancient Overclock Unit]]</center><center>Follow the southern path towards the east, turn north and head back towards the west. The chest is at the western edge of the path, under the stone bridge.</center> | |||
File:HWAoC-Akkala-Tower-Chest-05.jpg|<center>[[Guardian Spear+]]</center><center>Northeastern area of the map, outside the eastern wall of the Outpost.</center> | |||
File:HWAoC-Akkala-Tower-Chest-06.jpg|<center>[[Faithful Kodachi]]</center><center>In the far northeast corner.</center> | |||
File:HWAoC-Akkala-Tower-Chest-07.jpg|<center>[[Giant Ancient Core]] x3</center><center>On the lower level of the central tower (once inside the citadel, take the path to the right).</center> | |||
</gallery></center> | |||
<section end=treasure /> | |||
==Koroks== | ==Koroks== | ||
{{ | {{See also|Age of Calamity Koroks}} | ||
<section begin=koroks /> | <section begin=koroks /> | ||
<center><gallery widths="740px" heights="600px"> | |||
File:Akkala-Tower-Map.png|<center>There are 5 Koroks found in [[Akkala Tower (Scenario)|Akkala Tower]]</center> | |||
</gallery></center> | |||
<gallery widths="400px" heights="220px"> | |||
File:Akkala-Tower-03.jpg|<center>Just east of the northernmost outpost, east of the [[Ancient Furnace]], there is an open area. Examine the yellow flower at the south end of this section.</center> | |||
File:Akkala-Tower-05.jpg|<center>When first entering the Citadel, turn to the right and follow the path to get back outside. In the outdoor area just south of the citadel, there are some cannons with a Pinwheel.</center> | |||
File:Akkala-Tower-02.jpg|<center>From the very start of the mission, head northeast and you'll find an Ancient Furnace. Examine the pinwheel right next to it.</center> | |||
File:Akkala-Tower-01.jpg|<center>From the southeastern outpost, head directly north and you'll find a tree stump.</center> | |||
File:Akkala-Tower-04.jpg|<center>When entering the Citadel, turn left and you'll encounter [[Sooga]]. After defeating him, climb up the steps and examine the light that is next to the chest..</center> | |||
</gallery> | |||
<section end=koroks /> | <section end=koroks /> | ||
== | ==Challenges & Quests Unlocked== | ||
[[Age of Calamity Challenges]]: | |||
*[[Anti-Ice Training: II]] | |||
*[[Innkeeper's Request]] | |||
*[[Anti-Flame Training: II]] | |||
*[[Anti-Lightning Training: II]] | |||
*[[Strike It Rich]] | |||
*[[Hair-Width Trial: Intermediate]] | |||
*[[Coliseum: Beginner]] | |||
[[Age of Calamity Quests]]: | |||
*[[The Treasure Hunter's Technique]], [[Training Ground Pest Problem]] and [[A Moss-Covered Goddess]] ([[Link (Breath of the Wild)#Age of Calamity|Link]]) | |||
*[[Helping Out at Hateno Pasture]] ([[Impa]]) | |||
*[[Soothing Tensions]] and [[In Case of Emergency...]] ([[Zelda (Breath of the Wild)#Age of Calamity|Zelda]]) | |||
*[[Diving as Battle Training]] ([[Mipha]]) | |||
*[[To Stand atop the Lava]] ([[Daruk]]) | |||
*[[Stealth Mission]] ([[Urbosa]]) | |||
*[[Out of the Woods]], [[The Mushroom Shop]] and [[It's Shakala Time]] ([[Hestu]]) | |||
*[[Offering Help on the Road]] ([[Great Fairies]]) | |||
*[[Explosive Endeavors]], [[Shocking Fear]], [[A Stasis on Research]] and [[Keep a Cool Head]] ([[Rune|Sheikah Runes]]) | |||
*[[Feed the Research]] ([[Sheikah Sensor]]) | |||
*[[What Bad Weather?]], [[Lighting the Way]], [[Tactics for Small Foes]], [[A Sparkling Solution]] ([[Age of Calamity Services|Improve Services]]) | |||
*[[A Rumor about Skull Lake]] ([[Age of Calamity Materials|Material]]) | |||
*[[Stumped by Shrooms]] ([[Cooking]]) | |||
*[[A Most Peculiar Korok]] (Battle Support) | |||
*[[Feed the Research]] ([[Sheikah Sensor]]) | |||
*[[The Hope of All Hyrule]], [[The Hope of Central Hyrule]], [[The Hope of Hebra]], [[The Hope of Akkala]], [[The Hope of Eldin]], [[The Hope of Lanayru]], [[The Hope of Necluda]], [[The Hope of Faron]], [[The Hope of Gerudo]] (Contribution Level) | |||
==Trivia== | ==Trivia== | ||
{{References}} | {{References}} | ||
{{clear}} | |||
{{Listbox|Age of Calamity Scenarios}} | {{Listbox|Age of Calamity Scenarios}} | ||
{{Cat|Age of Calamity Scenarios}} | {{Cat|Age of Calamity Scenarios}} | ||
Latest revision as of 17:17, June 20, 2023
| Spoiler Alert! This article describes a subject that is sensitive to plot development. |
| This article is a stub. You can help the Zelda Dungeon Wiki by expanding it. |

Number | Chapter 4-1 | |
Games | ||
Stage | ||
Previous | ||
Next | ||
Boss | ||
Mini-bosses | ||
Enemies | ||
Key Characters | ||
Points of | ||
Battlefield-Specific Materials | ||
Warriors | ||
Allies | ||
Recommended Level | Lv. 25 | |
Related | Opal (1), Ancient Core (5) | |
"The party heads for the Akkala region, hoping to activate the Sheikah Towers. The tower has fallen into the Yiga Clan's hands, and the party must fight to recapture it"
Akkala Tower is the first scenario of Age of Calamity Chapter 4. It is unlocked by completing The Road Home, Besieged, and must be completed before progressing in the story.
Objectives
- Head for Akkala Citadel
- Defeat the Yiga Blademasters (2)
- Head for Akkala Citadel
- Capture the Outpost
- Activate the simple ancient furnace
- Head for Akkala Citadel
- Defeat the Yiga Blademaster
- Activate the simple ancient furnaces (4)
- Head for Akkala Citadel
- Reclaim Akkala Citadel
- Defeat Sooga and reclaim Akkala Citadel
- Seek out and defeat Sooga
Cutscenes
Akkala Tower (Part 1) [text]
"As the pilots learned to manipulate the arcane machinery of their Divine Beasts, Purah led a research expedition to the otherworldly ediface that had appeared on Hyrule Field."
Determination
"As Zelda prepares to depart and investigate the Central Tower, King Rhoam once again confronts her on where her focus lies. Zelda musters all of her courage to express her intentions to him, but..."
Disharmony
"As Zelda departs Hyrule Castle, Master Kohga and Sooga scheme with Astor about preventing the activation of the Sheikah Towers. Quietly, however, Sooga harbors his own doubts..."
The Sheikah Towers Are Activated
"Guided by the little Guardian, Link presents the Sheikah Slate to the terminal of the Central Tower, causing the tower to activate and rise up into the air. At the same time, the towers in other regions also rise up. Purah, observing this, cries out in excitement."
A Game Changer
"Having successfully activated all of the Sheikah Towers, Zelda takes in the expansive view. Purah has been busy analysing the functions of the tower and, after lauding their usefulness in the defense of Hyrule, declares her intention to demonstrate their value."
Dialogue
| Character Speaking | Dialogue |
|---|---|
| . |
Treasure Chests
- See also: Age of Calamity Treasure Chests
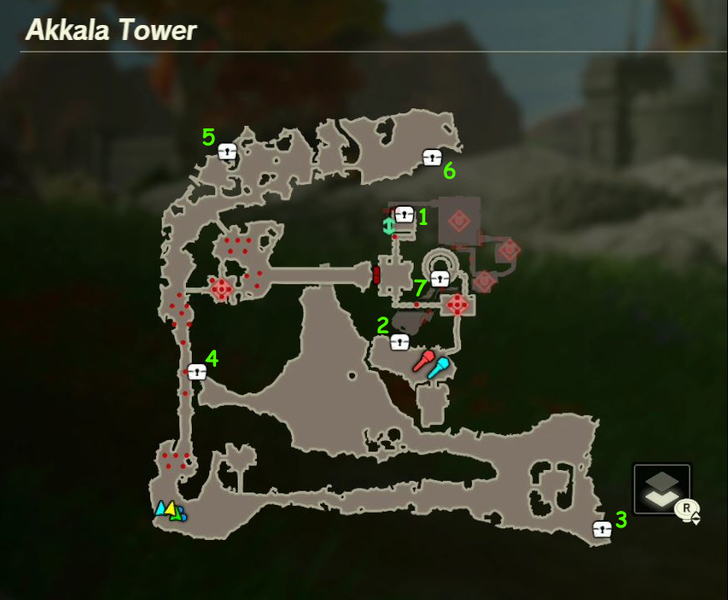
There are 7 treasure chests found in Akkala Tower.

Big Hearty Radish x5 After entering the citadel, follow the path to the right, through an outpost, and outside. The chest is along the north wall. 
Knight's Halberd Southeast corner of the map. 
Ancient Overclock Unit Follow the southern path towards the east, turn north and head back towards the west. The chest is at the western edge of the path, under the stone bridge. 
Guardian Spear+ Northeastern area of the map, outside the eastern wall of the Outpost. 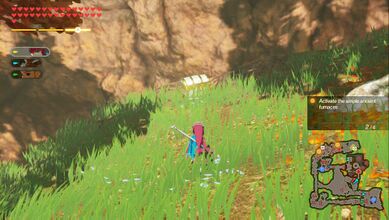
Faithful Kodachi In the far northeast corner. 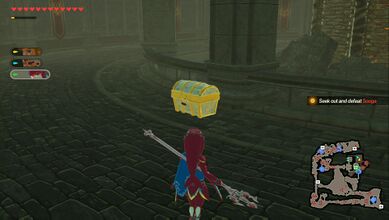
Giant Ancient Core x3 On the lower level of the central tower (once inside the citadel, take the path to the right).


Koroks
- See also: Age of Calamity Koroks
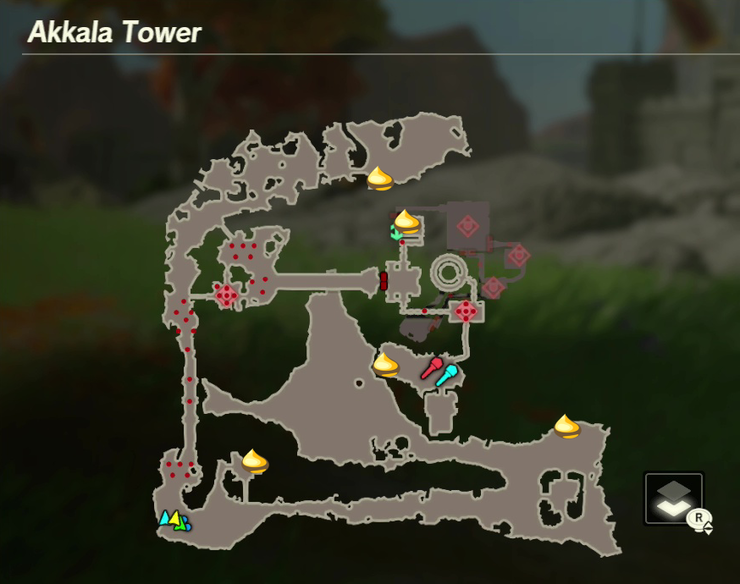
There are 5 Koroks found in Akkala Tower

Just east of the northernmost outpost, east of the Ancient Furnace, there is an open area. Examine the yellow flower at the south end of this section. 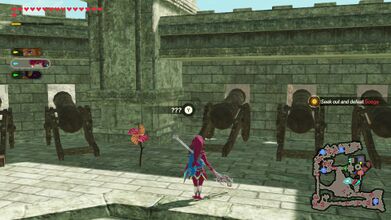
When first entering the Citadel, turn to the right and follow the path to get back outside. In the outdoor area just south of the citadel, there are some cannons with a Pinwheel. 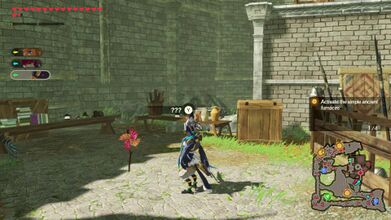
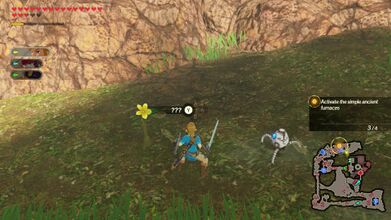
From the very start of the mission, head northeast and you'll find an Ancient Furnace. Examine the pinwheel right next to it. 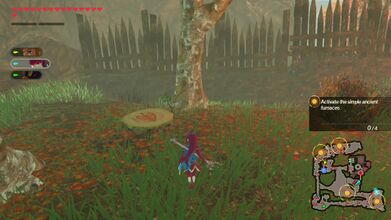
From the southeastern outpost, head directly north and you'll find a tree stump. 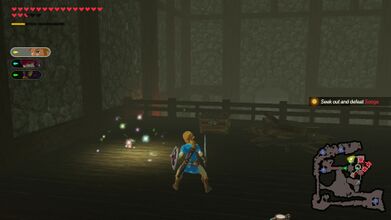
When entering the Citadel, turn left and you'll encounter Sooga. After defeating him, climb up the steps and examine the light that is next to the chest..


Challenges & Quests Unlocked
- Anti-Ice Training: II
- Innkeeper's Request
- Anti-Flame Training: II
- Anti-Lightning Training: II
- Strike It Rich
- Hair-Width Trial: Intermediate
- Coliseum: Beginner
- The Treasure Hunter's Technique, Training Ground Pest Problem and A Moss-Covered Goddess (Link)
- Helping Out at Hateno Pasture (Impa)
- Soothing Tensions and In Case of Emergency... (Zelda)
- Diving as Battle Training (Mipha)
- To Stand atop the Lava (Daruk)
- Stealth Mission (Urbosa)
- Out of the Woods, The Mushroom Shop and It's Shakala Time (Hestu)
- Offering Help on the Road (Great Fairies)
- Explosive Endeavors, Shocking Fear, A Stasis on Research and Keep a Cool Head (Sheikah Runes)
- Feed the Research (Sheikah Sensor)
- What Bad Weather?, Lighting the Way, Tactics for Small Foes, A Sparkling Solution (Improve Services)
- A Rumor about Skull Lake (Material)
- Stumped by Shrooms (Cooking)
- A Most Peculiar Korok (Battle Support)
- Feed the Research (Sheikah Sensor)
- The Hope of All Hyrule, The Hope of Central Hyrule, The Hope of Hebra, The Hope of Akkala, The Hope of Eldin, The Hope of Lanayru, The Hope of Necluda, The Hope of Faron, The Hope of Gerudo (Contribution Level)