Freeing Korok Forest: Difference between revisions
(Created page with "{{spoiler}} {{stub}} {{Infobox|scenario | image = | caption = | number = Chapter 3-1 | weaponavailable = | game = ''Hyrule Warriors:...") |
|||
| (9 intermediate revisions by 4 users not shown) | |||
| Line 2: | Line 2: | ||
{{stub}} | {{stub}} | ||
{{Infobox|scenario | {{Infobox|scenario | ||
| image = | | image = [[File:Freeing-Korok-Forest.jpg|400px]] | ||
| caption = | | caption = | ||
| number = Chapter 3-1 | | number = Chapter 3-1 | ||
| Line 9: | Line 9: | ||
| stage = [[Great Hyrule Forest]] | | stage = [[Great Hyrule Forest]] | ||
| previous = [[The Yiga Clan Attacks!]] | | previous = [[The Yiga Clan Attacks!]] | ||
| next = [[The Road Home, | | next = [[The Road Home, Besieged]] | ||
| simultaneous = | | simultaneous = | ||
| warriors = [[Divine Beast]] [[Vah Medoh]] ([[Revali]]); Ground: [[Link]], [[Zelda]], [[Hestu]] and one other unlocked (story)<br/>Vah Medoh, plus any | | warriors = [[Divine Beast]] [[Vah Medoh]] ([[Revali]]); Ground: [[Link]], [[Zelda]], [[Hestu]] and one other unlocked (story)<br/>Vah Medoh, plus Hestu and any other three unlocked (replay) | ||
| recommended level = Lv. 22 | | recommended level = Lv. 22 | ||
| battlefield materials = | | battlefield materials = [[Chickaloo Tree Nut]]<br/>[[Acorn]]<br/>[[Bird Egg]]<br/>[[Hot-Footed Frog]]<br/>[[Tireless Frog]] | ||
| boss = [[Stalnox]]<br/>[[Astor]] | | boss = [[Stalnox]]<br/>[[Astor]] | ||
| miniboss = [[Stalmoblin]]<br/>[[Fire Wizzrobe]]<br/>[[Ice Wizzrobe]]<br/>[[Electric Wizzrobe]]<br/>[[Fire Moblin]]<br/>[[Electric Moblin]]<br/>[[Ice Moblin]]<br/>[[Hollow]]s (Mipha, Daruk, Revali, Urbosa) | | miniboss = [[Stalmoblin]]<br/>[[Fire Wizzrobe]]<br/>[[Ice Wizzrobe]]<br/>[[Electric Wizzrobe]]<br/>[[Fire Moblin]]<br/>[[Electric Moblin]]<br/>[[Ice Moblin]]<br/>[[Hollow]]s (Mipha, Daruk, Revali, Urbosa) | ||
| enemies = [[Stalkoblin]]s<br/>[[Keese]]<br/>[[Fire Chuchu]]<br/>[[Stalizalfos]]<br/>[[Electric Lizalfos]]<br/>[[Fire | | enemies = [[Stalkoblin]]s<br/>[[Keese]]<br/>[[Fire Chuchu]]<br/>[[Stalizalfos]]<br/>[[Electric Lizalfos]]<br/>[[Fire-Breath Lizalfos]]<br/>[[Ice-Breath Lizalfos]]<br/>[[Fire Keese]]<br/>[[Ice Keese]]<br/>[[Electric Keese]]<br/>[[Blue Bokoblin]] | ||
| characters = | | characters = [[Great Deku Tree]] | ||
| members = | | members = | ||
| objective = | | objective = | ||
| Line 24: | Line 24: | ||
| prereq = | | prereq = | ||
| start = | | start = | ||
| reward = [[Master Sword]]<br/>[[Diamond]] (1), [[Korok Seed]] (3)<br>[[Hylian Set]] ([[Hylian Hood]], [[Hylian Tunic]], [[Hylian Trousers]])<br>[[Hard-Boiled Egg]] recipe<br/>[[Hestu]] unlocked | | reward = [[Master Sword]]<br/>[[Diamond]] (1), [[Korok Seed]] (3)<br/>[[Hylian Set]] ([[Hylian Hood]], [[Hylian Tunic]], [[Hylian Trousers]])<br/>[[Hard-Boiled Egg]] recipe<br/>[[Hestu]] unlocked | ||
| related = | | related = | ||
| release = | | release = | ||
| Line 31: | Line 31: | ||
| gallery = | | gallery = | ||
}} | }} | ||
{{quote||In-game description}} | {{quote|At long last, the party sets out for the Master Sword. They use Vah Medoh to sweep away a horde of monsters, then set their sights on Korok Forest.|In-game description}} | ||
''' | '''Freeing Korok Forest''' is the first [[Age of Calamity Scenarios|scenario]] of ''[[Hyrule Warriors: Age of Calamity|Age of Calamity]]'' Chapter 3. It is unlocked by completing [[The Yiga Clan Attacks!]], and must be completed before progressing in the story. | ||
The scenario begins with a [[Divine Beast]] [[Vah Medoh]] section, where [[Revali]] must destroy 27 Outposts in and over [[Lake Mekar]]. The mission that follows has Link and Zelda leading the Divine Beast pilots into the [[Lost Woods (Breath of the Wild)|Lost Woods]], where [[Hestu]] guides them toward [[Korok Forest]] until a [[Malice]] swamp laid down by [[Astor]] blocks their path. They must defeat [[Hollow]]s based on [[Mipha]], [[Daruk]], Revali and [[Urbosa]] to move past it, and for Link to claim the [[Master Sword]] in the face of Astor's opposition. | |||
Completing the scenario unlocks the Master Sword for [[Link]], and [[Hestu]] as a playable character. | |||
;Divine Beast: | ;Divine Beast: | ||
| Line 55: | Line 43: | ||
*'''Defeat Condition''': No defeat conditions | *'''Defeat Condition''': No defeat conditions | ||
;Regular | ;Regular | ||
*'''Victory Condition''': Acquire the Master Sword → Defeat ??? → Defeat [[Astor]] | *'''Victory Condition''': Acquire the Master Sword → Defeat ??? → Defeat [[Astor]] | ||
*'''Defeat Condition''': [[Link]], [[Zelda]] or [[Hestu]] flees | *'''Defeat Condition''': [[Link]], [[Zelda]] or [[Hestu]] flees | ||
| Line 70: | Line 58: | ||
*Defeat the Hollows (4, again) | *Defeat the Hollows (4, again) | ||
*Defeat Astor | *Defeat Astor | ||
==Cutscenes== | |||
===Freeing Korok Forest [text]=== | |||
{{quote|The king issued his first order to the Divine Beast pilots–seek out the knight who could wield the sword that seals the darkness. This would require that they vanquish the monsters in Korok Forest, where the legendary blade slept.|In-game Gallery description}} | |||
===Divine Beast Vah Medoh=== | |||
{{quote|In order to more easily secure the sword that seals the darkness, the Master Sword, the king of Hyrule orders all monsters within Korok Forest be eradicated. A plan centred around the Divine Beast Vah Medoh is made, but its pilot, Revali, seems unsure about their leader.|In-game Gallery description}} | |||
===To the Lost Woods=== | |||
{{quote|Thanks to the power of Vah Medoh, the monsters are cleared away and the party is able to continue on to the Lost Woods. Unbeknownst to them, however, Astor, the Yiga Clan and others have already infiltrated the forest depths.|In-game Gallery description}} | |||
===A Guide through the Mists=== | |||
{{quote|Perhaps due to the monsters' influence, the Lost Woods is enveloped in a thick mist that obscures the surroundings. The party continues forward regardless, wary of enemy attacks, when they suddenly encounter Hestu the Korok.|In-game Gallery description}} | |||
===The Master Sword Emerges=== | |||
{{quote|The party at last arrives in Korok Forest, but they find their way obstructed by Astor. Despite the confusion caused by the Hollows in the shape of his allies, Link unsheathes the sword that seals the darkness.|In-game Gallery description}} | |||
===The Knight Who Seals the Darkness=== | |||
{{quote|With the Great Deku Tree's wait for the hero now complete, it passes along words of advice to Link, who wields the sword that seals the darkness. It also offers Zelda encouragement with awakening her power, before settling back into a deep slumber to nurse its wounds.|In-game Gallery description}} | |||
==Treasure Chests== | |||
{{See also|Age of Calamity Treasure Chests}} | |||
<section begin=treasure /> | |||
<center><gallery widths="740px" heights="600px"> | |||
File:HWAoC-Freeing-Korok-Forest-Chest-Map.png|<center>There are 5 treasure chests found in [[Freeing Korok Forest]].</center> | |||
</gallery></center> | |||
<center><gallery widths="400px" heights="220px"> | |||
File:HWAoC-Freeing-Korok-Forest-Chest-01.jpg|<center>[[Faithful Kodachi]]</center><center>After encountering the [[Malice]], just outside the southwest arena where the [[Mipha]] [[Hollow]] is found.</center> | |||
File:HWAoC-Freeing-Korok-Forest-Chest-02.jpg|<center>300 [[Rupee]]s</center><center>In the southeast portion of the map, south of the arena where the [[Daruk]] Hollow is found.</center> | |||
File:HWAoC-Freeing-Korok-Forest-Chest-03.jpg|<center>[[Maracas]]</center><center>In the northeast portion of the map, near an [[Electric Wizzrobe]].</center> | |||
File:HWAoC-Freeing-Korok-Forest-Chest-04.jpg|<center>[[Topaz]] 5x</center><center>In the northwest portion of the map, just past the [[Stalmoblin]].</center> | |||
File:HWAoC-Freeing-Korok-Forest-Chest-05.jpg|<center>[[Woodcutter's Axe]]</center><center>After encountering the [[Malice]], take the eastern path then turn north. Follow the path north past the Outpost until you reach the pool of Malice.</center> | |||
</gallery></center> | |||
<section end=treasure /> | |||
==Koroks== | ==Koroks== | ||
{{ | {{See also|Age of Calamity Koroks}} | ||
<section begin=koroks /> | <section begin=koroks /> | ||
<center><gallery widths="740px" heights="600px"> | |||
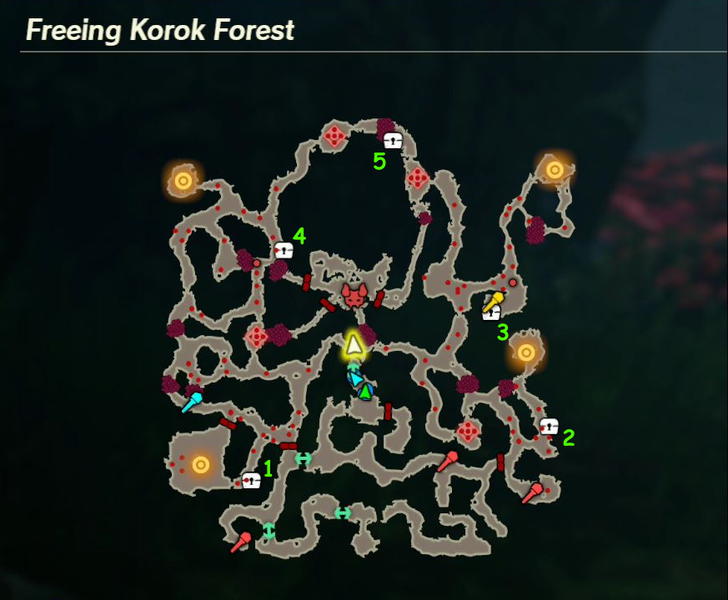
File:Freeing-Korok-Forest-Map.png|<center>There are 10 Koroks found in [[Freeing Korok Forest]]</center> | |||
</gallery></center> | |||
<gallery widths="400px" heights="220px"> | |||
File:Freeing-Korok-Forest-01.jpg|<center>Right at the start of the mission, break the crates to find the Korok.</center> | |||
File:Freeing-Korok-Forest-03.jpg|<center>From the start of the mission, run straight ahead and [[Hestu]] will open a passage. Just to the right, there is a pinwheel.</center> | |||
File:Freeing-Korok-Forest-04.jpg|<center>From the start, head to the west side of the map and then travel north. The gate straight to the north is closed, but a pinwheel is found just beside it.</center> | |||
File:Freeing-Korok-Forest-05.jpg|<center>In the first half of the stage, after defeating a [[Stalmoblin]] and [[Fire Wizzrobe]] near the center of the map, travel east and then take the path south. Examine the yellow flower found here.</center> | |||
File:Freeing-Korok-Forest-02.jpg|<center>Examine the yellow flower immediately to the right of the starting outpost.</center><!-- Confirmed --> | |||
File:Freeing-Korok-Forest-06.jpg|<center>At the far southeast end of the map, shoot the balloon.</center> | |||
File:Freeing-Korok-Forest-07.jpg|<center>In the first half of the level, travel to the far east and a pinwheel can be found in front of the gate.</center> | |||
File:Freeing-Korok-Forest-08.jpg|<center>Just west of the center of the map, where you fight the [[Stalnox]], find the yellow flower tucked away amongst some rubble.</center> | |||
File:Freeing-Korok-Forest-09.jpg|<center>In the center of the map, after fighting the Stalnox, examine the area to the north to find the yellow flower on the east side.</center> | |||
File:Freeing-Korok-Forest-10.jpg|<center>Found at the far north end of the map. There are two outposts with a closed gate. The yellow flower is east of the gate, found in the grass.</center> | |||
</gallery> | |||
<section end=koroks /> | <section end=koroks /> | ||
== | ==Challenges & Quests Unlocked== | ||
Completing Freeing Korok Forest opens: | |||
*The [[Age of Calamity Challenges|Challenges]] [[Daily Drills: Zora]], [[Hestu's Training]] & [[Echoing Footsteps]] | |||
*The [[Age of Calamity Quests|Quests]]: | |||
**[[The Blade that Pierces the Eye]] (Link) | |||
**[[Village Training Secrets]] ([[Impa]]) | |||
**[[Preparing for Field Work]] ([[Zelda]]) | |||
**[[To the Zora Voe and Vai]] ([[Mipha]]) | |||
**[[Playing Cucco]] ([[Daruk]]) | |||
**[[Beyond the Wall of Thunder]] ([[Revali]]) | |||
**[[Colorful Kara Kara Bazaar]] ([[Urbosa]]) | |||
**[[Pinwheel, No-Spinwheel]], [[Frown-Reversal Magic]] and [[Otherworldly Objects]] ([[Hestu]]) | |||
**[[From Rusty to Trusty]] ([[Age of Calamity Services|Improve Services]]) | |||
**[[More Rattle, More Dance!]] (Battle Support) | |||
==Trivia== | ==Trivia== | ||
Revision as of 23:11, January 18, 2021
| Spoiler Alert! This article describes a subject that is sensitive to plot development. |
| This article is a stub. You can help the Zelda Dungeon Wiki by expanding it. |

Number | Chapter 3-1 | |
Games | ||
Stage | ||
Previous | ||
Next | ||
Boss | ||
Mini-bosses | Stalmoblin | |
Enemies | ||
Key Characters | ||
Battlefield-Specific Materials | ||
Rewards | Master Sword | |
Warriors | ||
Recommended Level | Lv. 22 | |
"At long last, the party sets out for the Master Sword. They use Vah Medoh to sweep away a horde of monsters, then set their sights on Korok Forest."
Freeing Korok Forest is the first scenario of Age of Calamity Chapter 3. It is unlocked by completing The Yiga Clan Attacks!, and must be completed before progressing in the story.
The scenario begins with a Divine Beast Vah Medoh section, where Revali must destroy 27 Outposts in and over Lake Mekar. The mission that follows has Link and Zelda leading the Divine Beast pilots into the Lost Woods, where Hestu guides them toward Korok Forest until a Malice swamp laid down by Astor blocks their path. They must defeat Hollows based on Mipha, Daruk, Revali and Urbosa to move past it, and for Link to claim the Master Sword in the face of Astor's opposition.
Completing the scenario unlocks the Master Sword for Link, and Hestu as a playable character.
- Divine Beast
- Victory Condition: Defeat the monsters attacking Korok Forest
- Defeat Condition: No defeat conditions
- Regular
- Victory Condition: Acquire the Master Sword → Defeat ??? → Defeat Astor
- Defeat Condition: Link, Zelda or Hestu flees
Objectives
Divine Beast Objectives
- Destroy all the Outposts (27)
Regular Objectives
- Head for Korok Forest
- Defeat the Stalnox
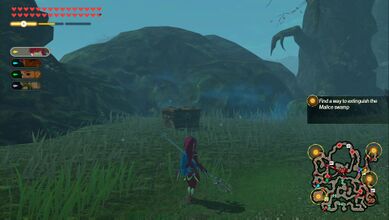
- Find a way to extinguish the Malice swamp
- Defeat the Hollows (4)
- Defeat the Hollows (4, again)
- Defeat Astor
Cutscenes
Freeing Korok Forest [text]
"The king issued his first order to the Divine Beast pilots–seek out the knight who could wield the sword that seals the darkness. This would require that they vanquish the monsters in Korok Forest, where the legendary blade slept."
Divine Beast Vah Medoh
"In order to more easily secure the sword that seals the darkness, the Master Sword, the king of Hyrule orders all monsters within Korok Forest be eradicated. A plan centred around the Divine Beast Vah Medoh is made, but its pilot, Revali, seems unsure about their leader."
To the Lost Woods
"Thanks to the power of Vah Medoh, the monsters are cleared away and the party is able to continue on to the Lost Woods. Unbeknownst to them, however, Astor, the Yiga Clan and others have already infiltrated the forest depths."
A Guide through the Mists
"Perhaps due to the monsters' influence, the Lost Woods is enveloped in a thick mist that obscures the surroundings. The party continues forward regardless, wary of enemy attacks, when they suddenly encounter Hestu the Korok."
The Master Sword Emerges
"The party at last arrives in Korok Forest, but they find their way obstructed by Astor. Despite the confusion caused by the Hollows in the shape of his allies, Link unsheathes the sword that seals the darkness."
The Knight Who Seals the Darkness
"With the Great Deku Tree's wait for the hero now complete, it passes along words of advice to Link, who wields the sword that seals the darkness. It also offers Zelda encouragement with awakening her power, before settling back into a deep slumber to nurse its wounds."
Treasure Chests
- See also: Age of Calamity Treasure Chests
There are 5 treasure chests found in Freeing Korok Forest.

Faithful Kodachi After encountering the Malice, just outside the southwest arena where the Mipha Hollow is found. 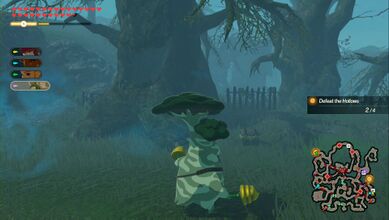
Maracas In the northeast portion of the map, near an Electric Wizzrobe. 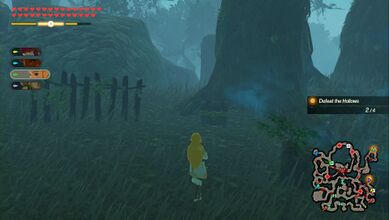
Topaz 5x In the northwest portion of the map, just past the Stalmoblin. 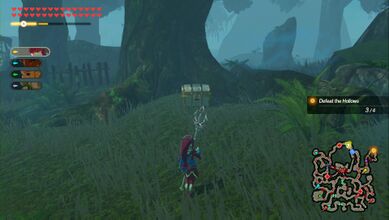
Woodcutter's Axe After encountering the Malice, take the eastern path then turn north. Follow the path north past the Outpost until you reach the pool of Malice.


Koroks
- See also: Age of Calamity Koroks
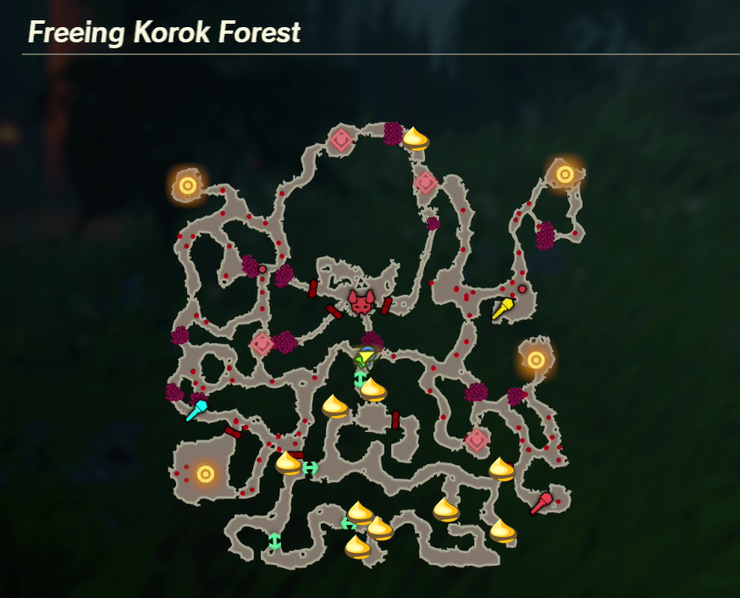
There are 10 Koroks found in Freeing Korok Forest


Right at the start of the mission, break the crates to find the Korok. 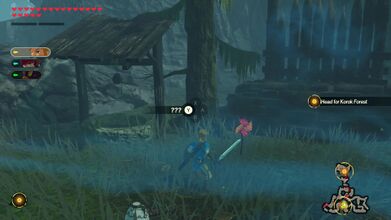
From the start of the mission, run straight ahead and Hestu will open a passage. Just to the right, there is a pinwheel. 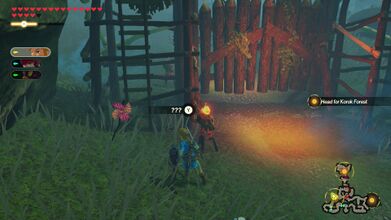
From the start, head to the west side of the map and then travel north. The gate straight to the north is closed, but a pinwheel is found just beside it. 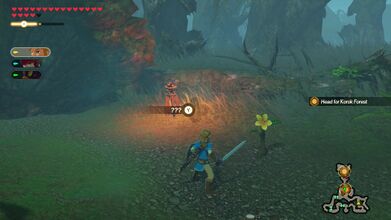
In the first half of the stage, after defeating a Stalmoblin and Fire Wizzrobe near the center of the map, travel east and then take the path south. Examine the yellow flower found here. 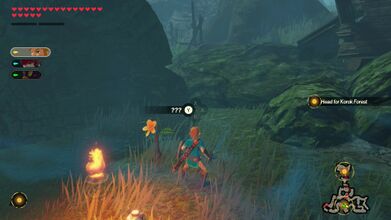
Examine the yellow flower immediately to the right of the starting outpost. 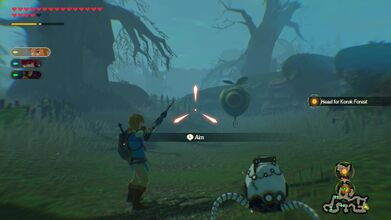
At the far southeast end of the map, shoot the balloon. 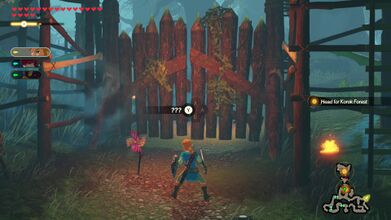
In the first half of the level, travel to the far east and a pinwheel can be found in front of the gate. 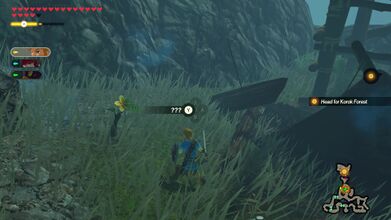
Just west of the center of the map, where you fight the Stalnox, find the yellow flower tucked away amongst some rubble. 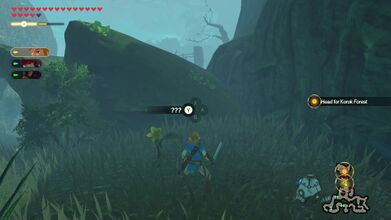
In the center of the map, after fighting the Stalnox, examine the area to the north to find the yellow flower on the east side. 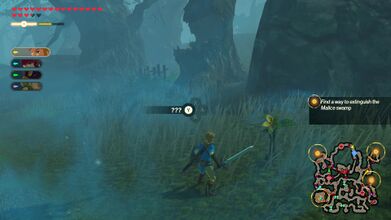
Found at the far north end of the map. There are two outposts with a closed gate. The yellow flower is east of the gate, found in the grass.


Challenges & Quests Unlocked
Completing Freeing Korok Forest opens:
- The Challenges Daily Drills: Zora, Hestu's Training & Echoing Footsteps
- The Quests:
- The Blade that Pierces the Eye (Link)
- Village Training Secrets (Impa)
- Preparing for Field Work (Zelda)
- To the Zora Voe and Vai (Mipha)
- Playing Cucco (Daruk)
- Beyond the Wall of Thunder (Revali)
- Colorful Kara Kara Bazaar (Urbosa)
- Pinwheel, No-Spinwheel, Frown-Reversal Magic and Otherworldly Objects (Hestu)
- From Rusty to Trusty (Improve Services)
- More Rattle, More Dance! (Battle Support)