Western Hyrule: Difference between revisions
Jump to navigation
Jump to search
Want an adless experience? Log in or Create an account.
Curmudgeon (talk | contribs) mNo edit summary |
mNo edit summary |
||
| (12 intermediate revisions by 5 users not shown) | |||
| Line 1: | Line 1: | ||
{{Infobox|location | {{Infobox|location | ||
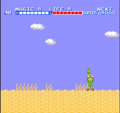
|image = [[File:Western_Hyrule.gif]] | |image = [[File:Western_Hyrule.gif]] | ||
|game = ''[[Zelda II: The Adventure of Link|The Adventure of Link]]'' | |game = ''[[Zelda II: The Adventure of Link|The Adventure of Link]]'' | ||
| Line 15: | Line 14: | ||
'''Western Hyrule''' is first of two major regions of [[Hyrule]] in ''[[Zelda II: The Adventure of Link|The Adventure of Link]]'', encompassing the first half of the game. | '''Western Hyrule''' is first of two major regions of [[Hyrule]] in ''[[Zelda II: The Adventure of Link|The Adventure of Link]]'', encompassing the first half of the game. | ||
==Enemies== | |||
===Overworld Enemies=== | |||
{{Gallery|size=80|pad=5}} | |||
{{Gallery/Box|file=AcheBlue-Sprite-AOL.png|link=Ache|caption=[[Ache|Ache (Blue)]]}} | |||
{{Gallery/Box|file=AchePurple-Sprite-AOL.png|link=Ache|caption=[[Ache|Ache (Purple)]]}} | |||
{{Gallery/Box|file=RedAche-Sprite-AOL.png|link=Acheman|caption=[[Acheman|Acheman (Bat Form)]]}} | |||
{{Gallery/Box|file=Acheman-Sprite-AOL.png|link=Acheman|caption=[[Acheman|Acheman]]}} | |||
{{Gallery/Box|file=AirBubble-Sprite-AOL.png|link=Air Bubble|caption=[[Air Bubble]]}} | |||
{{Gallery/Box|file=WhiteBagoBago-Sprite-AOL.png|link=Bago-Bago|caption=[[Bago-Bago|Bago-Bago (White)]]}} | |||
{{Gallery/Box|file=Bit-Sprite-AOL.png|link=Bit|caption=[[Bit]]}} | |||
{{Gallery/Box|file=BotBlue-Sprite-AOL.gif|link=Bot|caption=[[Bot|Bot (Blue)]]}} | |||
{{Gallery/Box|file=Boulder-Sprite-AoL.png|link=Boulder|caption=[[Boulder]]}} | |||
{{Gallery/Box|file=DairaOrange.gif|link=Daira|caption=[[Daira|Daira (Orange)]]}} | |||
{{Gallery/Box|file=DairaRed.png|link=Daira|caption=[[Daira|Daira (Red)]]}} | |||
{{Gallery/Box|file=DeelerRed-Sprite-AOL.png|link=Deeler|caption=[[Deeler|Deeler (Red)]]}} | |||
{{Gallery/Box|file=DeelerBlue-Sprite-AOL.png|link=Deeler|caption=[[Deeler|Deeler (Blue)]]}} | |||
{{Gallery/Box|file=Geldarm-Sprite-AOL.png|link=Geldarm|caption=[[Geldarm]]}} | |||
{{Gallery/Box|file=GoriyaOrange-Sprite-AOL.gif|link=Goriya|caption=[[Goriya|Goriya (Orange)]]}} | |||
{{Gallery/Box|file=GoriyaRed-Sprite-AOL.gif|link=Goriya|caption=[[Goriya|Goriya (Red)]]}} | |||
{{Gallery/Box|file=GoriyaBlue-Sprite-AOL.png|link=Goriya|caption=[[Goriya|Goriya (Blue)]]}} | |||
{{Gallery/Box|file=Lowder-Sprite-AOL.png|link=Lowder|caption=[[Lowder]]}} | |||
{{Gallery/Box|file=Megmat-Sprite-AOL.png|link=Megmat|caption=[[Megmat]]}} | |||
{{Gallery/Box|file=MoaRed-Sprite-AOL.png|link=Moa|caption=[[Moa|Moa (Red)]]}} | |||
{{Gallery/Box|file=MoblinOrange-Sprite-AOL.png|link=Moblin|caption=[[Moblin|Moblin (Orange)]]}} | |||
{{Gallery/Box|file=MoblinRed-Sprite-AOL.png|link=Moblin|caption=[[Moblin|Moblin (Red)]]}} | |||
{{Gallery/Box|file=MoblinBlue-Sprite-AOL.png|link=Moblin|caption=[[Moblin|Moblin (Blue)]]}} | |||
{{Gallery/Box|file=Moby-Sprite-AOL.png|link=Moby|caption=[[Moby]]}} | |||
{{Gallery/Box|file=Myu-Sprite-AOL.png|link=Myu|caption=[[Myu]]}} | |||
{{Gallery/Box|file=OctorokRed-Sprite-AOL.png|link=Octorok|caption=[[Octorok|Octorok (Red)]]}} | |||
{{Gallery/Bottom}} | |||
===Palace Enemies=== | |||
{{Gallery|size=80|pad=5}} | |||
{{Gallery/Box|file=Red_Armored_Stalfos.png|link=Armored Stalfos|caption=[[Armored Stalfos|Armored Stalfos (Red)]]}} | |||
{{Gallery/Box|file=ArmoredStalfos2.png|link=Armored Stalfos|caption=[[Armored Stalfos|Armord Stalfos (Blue)]]}} | |||
{{Gallery/Box|file=BotDarkBlue-Sprite-AOL.png|link=Bot|caption=[[Bot|Bot (Dark Blue)]]}} | |||
{{Gallery/Box|file=Bubble-Sprite-AOL.png|link=Bubble|caption=[[Bubble]]}} | |||
{{Gallery/Box|file=Doomknocker-Sprite-AOL.png|link=Doomknocker|caption=[[Doomknocker]]}} | |||
{{Gallery/Box|file=Guma-Sprite-AOL.png|link=Guma|caption=[[Guma]]}} | |||
{{Gallery/Box|file=IronknuckleOrange-Sprite-AOL.png|link=Iron Knuckle|caption=[[Iron Knuckle|Iron Knuckle (Orange)]]}} | |||
{{Gallery/Box|file=IronknuckleRed-Sprite-AOL.png|link=Iron Knuckle|caption=[[Iron Knuckle|Iron Knuckle (Red)]]}} | |||
{{Gallery/Box|file=IronknuckleBlue-Sprite-AOL.png|link=Iron Knuckle|caption=[[Iron Knuckle|Iron Knuckle (Blue)]]}} | |||
{{Gallery/Box|file=Mau-Sprite-AOL.png|link=Mau|caption=[[Mau|Mau/ Wolf Head]]}} | |||
{{Gallery/Box|file=MoaFire-Sprite-AOL.png|link=Moa|caption=[[Moa|Moa (Fire)]]}} | |||
{{Gallery/Box|file=Myu-Sprite-AOL.png|link=Myu|caption=[[Myu]]}} | |||
{{Gallery/Box|file=RaBlue-Sprite-AOL.png|link=Ra|caption=[[Ra|Ra/ Dragon Head (Blue)]]}} | |||
{{Gallery/Box|file=RopeBlue-Sprite-AOL.png|link=Rope|caption=[[Rope|Rope (Blue)]]}} | |||
{{Gallery/Box|file=StalfosRed-Sprite-AOL.png|link=Stalfos|caption=[[Stalfos|Stalfos (Red)]]}} | |||
{{Gallery/Box|file=StalfosBlue-Sprite-AOL.png|link=Stalfos|caption=[[Stalfos|Stalfos (Blue)]]}} | |||
{{Gallery/Box|file=|link=Stone Statue|caption=[[Stone Statue]]}} | |||
{{Gallery/Box|file=Tinsuit-Sprite-AOL.png|link=Wosu|caption=[[Wosu]]}} | |||
{{Gallery/Bottom}} | |||
==Items== | |||
===Containers=== | |||
<gallery> | |||
file:AOL_Heart_Container_1.png|[[Heart Container]] | |||
file:AOL_Heart_Container_2.png|[[Heart Container]] | |||
file:AOL_Magic_Container_1.png|[[Magic Container]] | |||
file:AOL_Magic_Container_2.png|[[Magic Container]] | |||
</gallery> | |||
===Inventory=== | |||
<gallery> | |||
file:AOL_Candle.png|[[Candle]] | |||
file:AOL_Handy_Glove.png|[[Handy Glove]] | |||
file:AOL_Hammer.png|[[Hammer]] | |||
file:AOL_Raft.png|[[Raft]] | |||
</gallery> | |||
===Miscellaneous=== | |||
<gallery> | |||
file:AOL_Link_Doll.png|Two [[Link Doll]]s | |||
file:PointBag.png|Various [[Point Bag]]s | |||
</gallery> | |||
===Spells=== | |||
<gallery> | |||
file:Wise_Man_Saria.png|[[Shield Spell]] | |||
file:Wise_Man_Rauru.png|[[Jump Spell]] | |||
file:Wise_Man_Saria.png|[[Life Spell]] | |||
file:Wise_Man_Mido.png|[[Fairy Spell]] | |||
</gallery> | |||
==Locations== | ==Locations== | ||
===Palaces=== | ===Palaces=== | ||
<gallery> | |||
file:Parapa_Palace_Entrance.png|[[Parapa Palace]] | |||
file:Midoro_Palace_Entrance.png|[[Midoro Palace]] | |||
file:Island_Palace_Entrance.png|[[Island Palace]] | |||
</gallery> | |||
===Regions=== | ===Regions=== | ||
<gallery> | |||
file:Death_Mountain_Area_OW.png|[[Death Mountain (The Adventure of Link)|Death Mountain]] | |||
file:Graveyard_Area_OW.png|[[Graveyard (The Adventure of Link)|Graveyard]] | |||
file:Kings_Tomb_OW.png|[[King's Tomb]] | |||
file:Midoro_Swamp_Area_OW.png|[[Midoro Swamp]] | |||
file:Moruge_Swamp_OW.png|[[Moruge Swamp]] | |||
file:N_of_River_OW.png|[[North of River]] | |||
file:North_Palace_OW.png|[[North Castle]] | |||
file:Parapa_Desert_Area_OW.png|[[Parapa Desert]] | |||
file:Tantari_Desert_OW.png|[[Tantari Desert]] | |||
</gallery> | |||
===Towns=== | |||
<gallery> | |||
file:Welcome_to_Rauru.png|[[Town of Rauru]] | |||
file:Welcome_to_Ruto.png|[[Town of Ruto]] | |||
file:Welcome_to_Saria.png|[[Water Town of Saria]] | |||
file:Welcome_to_Mido.png|[[Harbor Town of Mido]] | |||
</gallery> | |||
{{Listbox|The Adventure of Link|Items}} | |||
{{Listbox|The Adventure of Link|Enemies}} | |||
{{Listbox|The Adventure of Link|Locations}} | |||
{{Cat|The Adventure of Link Locations}} | {{Cat|The Adventure of Link Locations}} | ||
Latest revision as of 21:43, October 15, 2023
Western Hyrule

Games | ||
Related | ||
Western Hyrule is first of two major regions of Hyrule in The Adventure of Link, encompassing the first half of the game.
Enemies
Overworld Enemies

Palace Enemies

Items
Containers


Inventory


Miscellaneous
Two Link Dolls

Various Point Bags


