Gel: Difference between revisions
No edit summary |
No edit summary |
||
| Line 36: | Line 36: | ||
==Gallery== | ==Gallery== | ||
<gallery> | <gallery> | ||
File:Gel-LoZ-Art-2.png| | File:Gel-LoZ-Art-2.png|Artwork from ''[[The Legend of Zelda]]'' | ||
File:Gel-LoZ-Sprite.png| | File:Gel-LoZ-Sprite.png|Sprite from ''The Legend of Zelda'' | ||
File:Gel-Oracle-Sprite.png| | File:Gel-Oracle-Sprite.png|Sprite from ''[[The Legend of Zelda: Oracle of Seasons|Oracle of Seasons]]'' and ''[[The Legend of Zelda: Oracle of Ages|Oracle of Ages]]'' | ||
File:FS-Gel-Sprite.png| | File:FS-Gel-Sprite.png|Sprite from ''[[The Legend of Zelda: Four Swords|Four Swords]]'' | ||
File:Gel-TMC.png|Unused | File:Gel-TMC.png|Unused sprite from ''[[The Legend of Zelda: The Minish Cap|The Minish Cap]]'' | ||
File:PH-Gel.png|Green Slime from ''[[The Legend of Zelda: Phantom Hourglass|Phantom Hourglass]]'' | File:PH-Gel.png|Green Slime model from ''[[The Legend of Zelda: Phantom Hourglass|Phantom Hourglass]]'' | ||
File:GreenSlime.PH.gif|Green Slime | File:GreenSlime.PH.gif|Green Slime in ''Phantom Hourglass'' | ||
</gallery> | </gallery> | ||
Revision as of 16:38, April 13, 2023
| This article is a stub. You can help the Zelda Dungeon Wiki by expanding it. |

Games | ||
Location | Link's Awakening | |
Threat | ||
Attacks | Link's Awakening | |
Effective | ||
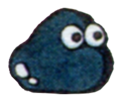
Gels are recurring enemies in The Legend of Zelda series.[1] They are not to be confused with ChuChus.
The Legend of Zelda
Gels are a common enemy in The Legend of Zelda, though they are often seen after attacking a Zol. When a Zol is attacked with the original Sword, two Gels appear.[2] They are one of the few enemies that can be defeated with the Boomerang, the other being Keese.
Link's Awakening and Oracle of Seasons
Gels appear when Link hits a red Zol with a weak weapon. They do not cause him any damage, but they do slow him down and prevent him from using weapons.
Oracle of Ages
- Main article: Color-Changing Gel
While standard Gel appear, just as they were in Link's Awakening and Oracle of Seasons, there are also special Color-Changing Gel. This special variant of the Gel has a way of changing its color to blend in with the background, making it more difficult for Link to spot where they are.
Four Swords
In Four Swords, Zol appear and if Link attacks them with his sword, he'll defeat them with a single hit. However, if he uses a weaker attack, such as hitting them with a Boomerang, they will split into two smaller Gel. Virtually every single weapon in the game will defeat a Gel with a single hit.
Four Swords Adventures
| This section is a stub. You can help the Zelda Dungeon Wiki by expanding it. |
The Minish Cap
The sprite of the Gel can be found in the game data of The Minish Cap. However, it is unused in the final release of the game. Like previous incarnations, two Gels appear when a Zol is attacked by Link.[3]
Phantom Hourglass
Gels appear in most of the dungeons in Phantom Hourglass. They do not cause Link any damage, they just slow his movement, making it easier for him to be attacked.
Gallery
Artwork from The Legend of Zelda

Sprite from The Legend of Zelda

Sprite from Oracle of Seasons and Oracle of Ages

Sprite from Four Swords

Unused sprite from The Minish Cap

Green Slime model from Phantom Hourglass

Green Slime in Phantom Hourglass


References
- ↑ The Legend of Zelda: Encyclopedia, pg. 179
- ↑ "Gels are the teeming offspring released by injured Zols.", The Great Hyrule Encyclopedia
- ↑ The Cutting Room Floor