Gallery:Breath of the Wild Locations: Difference between revisions
Jump to navigation
Jump to search
Want an adless experience? Log in or Create an account.
mNo edit summary |
(....yeah this will take a while) |
||
| Line 21: | Line 21: | ||
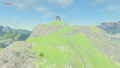
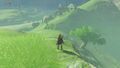
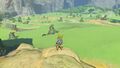
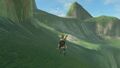
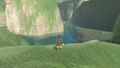
{{Gallery/Box|file=Hills-of-Baumer.jpg|link=Hills of Baumer|caption=[[Hills of Baumer]]}} | {{Gallery/Box|file=Hills-of-Baumer.jpg|link=Hills of Baumer|caption=[[Hills of Baumer]]}} | ||
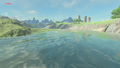
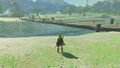
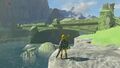
{{Gallery/Box|file=Squabble-River.png|link=Squabble River|caption=[[Squabble River]]}} | {{Gallery/Box|file=Squabble-River.png|link=Squabble River|caption=[[Squabble River]]}} | ||
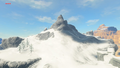
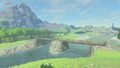
{{Gallery/Box | {{Gallery/Box|link=Dueling Peaks|caption=[[Dueling Peaks]]}} | ||
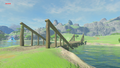
{{Gallery/Box|file=Big-Twin-Bridge.jpg|link=Big Twin Bridge|caption=[[Big Twin Bridge]]}} | {{Gallery/Box|file=Big-Twin-Bridge.jpg|link=Big Twin Bridge|caption=[[Big Twin Bridge]]}} | ||
{{Gallery/Box|file=Little-Twin-Bridge.jpg|link=Little Twin Bridge|caption=[[Little Twin Bridge]]}} | {{Gallery/Box|file=Little-Twin-Bridge.jpg|link=Little Twin Bridge|caption=[[Little Twin Bridge]]}} | ||
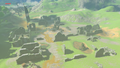
{{Gallery/Box|file=Hickaly-Woods.jpg|link=Hickaly Woods|caption=[[Hickaly Woods]]}} | {{Gallery/Box|file=Hickaly-Woods.jpg|link=Hickaly Woods|caption=[[Hickaly Woods]]}} | ||
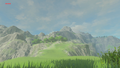
{{Gallery/Box|file=Mount-Rozudo.png|link=Mount Rozudo|caption=[[Mount Rozudo]]}} | {{Gallery/Box|file=Mount-Rozudo.png|link=Mount Rozudo|caption=[[Mount Rozudo]]}} | ||
| Line 47: | Line 45: | ||
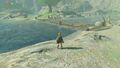
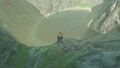
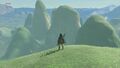
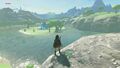
{{Gallery/Box|file=Mable-Ridge.jpg|link=Mable Ridge|caption=[[Mable Ridge]]}} | {{Gallery/Box|file=Mable-Ridge.jpg|link=Mable Ridge|caption=[[Mable Ridge]]}} | ||
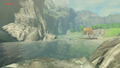
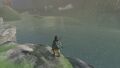
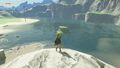
{{Gallery/Box|file=South-Nabi-Lake.jpg|link=South Nabi Lake|caption=[[South Nabi Lake]]}} | {{Gallery/Box|file=South-Nabi-Lake.jpg|link=South Nabi Lake|caption=[[South Nabi Lake]]}} | ||
{{Gallery/Bottom}}</center> | |||
===Hateno=== | |||
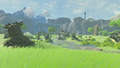
{{Gallery/Box|file=Great-Plateau.jpg|link=The Great Plateau|caption=[[Quatta's Shelf]]}} | |||
{{Gallery/Box|file=Great-Plateau.jpg|link=The Great Plateau|caption=[[Rabia Plain]]}} | |||
{{Gallery/Box|file=Great-Plateau.jpg|link=The Great Plateau|caption=[[Lanayru Road - West Gate]]}} | |||
{{Gallery/Box|file=Great-Plateau.jpg|link=The Great Plateau|caption=[[Trotter's Downfall]]}} | |||
{{Gallery/Box|file=Great-Plateau.jpg|link=The Great Plateau|caption=[[Pierre Plateau]]}} | |||
{{Gallery/Box|file=Great-Plateau.jpg|link=The Great Plateau|caption=[[Lanayru Heights]]}} | |||
{{Gallery/Box|file=Great-Plateau.jpg|link=The Great Plateau|caption=[[Phalian Highlands]]}} | |||
{{Gallery/Box|file=Great-Plateau.jpg|link=The Great Plateau|caption=[[Lanayru Promenade]]}} | |||
{{Gallery/Box|file=Great-Plateau.jpg|link=The Great Plateau|caption=[[Lanayru Bluff]]}} | |||
{{Gallery/Box|file=Great-Plateau.jpg|link=The Great Plateau|caption=[[Lanayru Road - West Gate]]}} | |||
{{Gallery/Box|file=Great-Plateau.jpg|link=The Great Plateau|caption=[[Peak of Awakening]]}} | |||
{{Gallery/Box|file=Great-Plateau.jpg|link=The Great Plateau|caption=[[Spring of Wisdom]]}} | |||
{{Gallery/Box|file=Great-Plateau.jpg|link=The Great Plateau|caption=[[Naydra Snowfield]]}} | |||
{{Gallery/Box|file=Great-Plateau.jpg|link=The Great Plateau|caption=[[Nirvata Plateau]]}} | |||
{{Gallery/Box|file=Great-Plateau.jpg|link=The Great Plateau|caption=[[Purifier Lake]]}} | |||
{{Gallery/Box|file=Great-Plateau.jpg|link=The Great Plateau|caption=[[Robred Dropoff]]}} | |||
{{Gallery/Box|file=Great-Plateau.jpg|link=The Great Plateau|caption=[[Nirvata Lake]]}} | |||
{{Gallery/Box|file=Great-Plateau.jpg|link=The Great Plateau|caption=[[Madorna Mountain]]}} | |||
{{Gallery/Box|file=Great-Plateau.jpg|link=The Great Plateau|caption=[[Lanayru Range]]}} | |||
{{Gallery/Box|file=Great-Plateau.jpg|link=The Great Plateau|caption=[[Afromsia Coast]]}} | |||
{{Gallery/Box|file=Great-Plateau.jpg|link=The Great Plateau|caption=[[Walnot Mountain]]}} | |||
{{Gallery/Box|file=Great-Plateau.jpg|link=The Great Plateau|caption=[[Lake Sumac]]}} | |||
{{Gallery/Box|file=Great-Plateau.jpg|link=The Great Plateau|caption=[[Retsam Forest]]}} | |||
{{Gallery/Box|file=Great-Plateau.jpg|link=The Great Plateau|caption=[[Zelkoa Pond]]}} | |||
{{Gallery/Box|file=Great-Plateau.jpg|link=The Great Plateau|caption=[[Ovli Plain]]}} | |||
{{Gallery/Box|file=Great-Plateau.jpg|link=The Great Plateau|caption=[[Camphor Pond]]}} | |||
{{Gallery/Box|file=Great-Plateau.jpg|link=The Great Plateau|caption=[[Ginner Woods]]}} | |||
{{Gallery/Box|file=Great-Plateau.jpg|link=The Great Plateau|caption=[[Cliffs of Quince]]}} | |||
{{Gallery/Box|file=Great-Plateau.jpg|link=The Great Plateau|caption=[[Fir River]]}} | |||
{{Gallery/Box|file=Great-Plateau.jpg|link=The Great Plateau|caption=[[Fort Hateno]]}} | |||
{{Gallery/Box|file=Great-Plateau.jpg|link=The Great Plateau|caption=[[Midla Woods]]}} | |||
{{Gallery/Box|file=Great-Plateau.jpg|link=The Great Plateau|caption=[[Lake Jarrah]]}} | |||
{{Gallery/Box|file=Great-Plateau.jpg|link=The Great Plateau|caption=[[Firly Pond]]}} | |||
{{Gallery/Box|file=Great-Plateau.jpg|link=The Great Plateau|caption=[[Solewood Range]]}} | |||
{{Gallery/Box|file=Great-Plateau.jpg|link=The Great Plateau|caption=[[Marblod Plain]]}} | |||
{{Gallery/Box|file=Great-Plateau.jpg|link=The Great Plateau|caption=[[Hateno Beach]]}} | |||
{{Gallery/Box|file=Great-Plateau.jpg|link=The Great Plateau|caption=[[Firly Plateau]]}} | |||
{{Gallery/Box|file=Great-Plateau.jpg|link=The Great Plateau|caption=[[Hateno Bay]]}} | |||
{{Gallery/Box|file=Great-Plateau.jpg|link=The Great Plateau|caption=[[Mapla Point]]}} | |||
{{Gallery/Box|file=Great-Plateau.jpg|link=The Great Plateau|caption=[[Deepback Bay]]}} | |||
{{Gallery/Box|file=Great-Plateau.jpg|link=The Great Plateau|caption=[[Ebon Mountain]]}} | |||
{{Gallery/Box|file=Great-Plateau.jpg|link=The Great Plateau|caption=[[Tenoko Island]]}} | |||
{{Gallery/Box|file=Great-Plateau.jpg|link=The Great Plateau|caption=[[Kitano Bay]]}} | |||
{{Gallery/Box|file=Great-Plateau.jpg|link=The Great Plateau|caption=[[Loshla Harbor]]}} | |||