Gatanisis Shrine: Difference between revisions
Jump to navigation
Jump to search

Video Walkthrough of Gatanisis Shrine
Want an adless experience? Log in or Create an account.
m (Text replacement - "↵{{Cat|Tears of the Kingdom Shrines}}" to " {{Listbox|Tears of the Kingdom Shrines}} {{Cat|Tears of the Kingdom Shrines}}") |
No edit summary |
||
| (8 intermediate revisions by 6 users not shown) | |||
| Line 1: | Line 1: | ||
{{Infobox| | {{Infobox|shrine | ||
| image = | | image = [[File:TotK Gatanisis Shrine.png]] | ||
| caption = | | caption = | ||
| game = ''[[The Legend of Zelda: Tears of the Kingdom|Tears of the Kingdom]]'' | | game = ''[[The Legend of Zelda: Tears of the Kingdom|Tears of the Kingdom]]'' | ||
| Line 6: | Line 6: | ||
| location = | | location = | ||
| pointsint = | | pointsint = | ||
| counterpart_header = Depths Counterpart | |||
| counterpart = [[Sisinatag Lightroot]] | | counterpart = [[Sisinatag Lightroot]] | ||
| reward = [[Light of Blessing]] | | reward = [[Light of Blessing]] | ||
| item = | | item = [[Bomb Flower]] x5 | ||
| related = | | related = | ||
| type = [[Shrine of Light]] | | type = [[Shrine of Light]] | ||
| Line 18: | Line 19: | ||
==A Well-Timed Bounce== | ==A Well-Timed Bounce== | ||
* | * Have [[Link (Breath of the Wild)#Tears of the Kingdom|Link]] use [[Recall]] on the platform shortly after it bounces back up to drop it down again and launch the [[Iron Ball]] into the target on the ceiling. | ||
* | * Link can use [[Ascend]] underneath the ceiling switch to reach the [[Treasure Chest]] containing 5 [[Bomb Flower]]s. | ||
* Where the ball falls down onto the bouncy platform, there is a small area on the left that Link can safely stand on. Due so and repeat the above action of Recall to launch Link into the air and glide to the altar room. | |||
==Video Walkthrough== | |||
{{Youtube|o4F9PSCK1GU|360|Video Walkthrough of Gatanisis Shrine}} | |||
{{Clear}} | |||
==Gallery== | ==Gallery== | ||
<gallery widths="400px" heights="220px"> | |||
File:Gatanisis-Shrine-1.jpg|<center>Use [[Recall]] when the ball is about halfway down the ramp</center> | |||
File:Gatanisis-Shrine-2.jpg|<center>It will launch up and hit the green target</center> | |||
File:Gatanisis-Shrine-3.jpg|<center>Use [[Ascend]] to get through the target to reach the chest that has 5 [[Bomb Flower]]s</center> | |||
File:Gatanisis-Shrine-4.jpg|<center>Stand on the small area to the left and use Recall on the platform once again</center> | |||
File:Gatanisis-Shrine-5.jpg|<center>Glide over to the altar</center> | |||
</gallery> | |||
{{Listbox|Tears of the Kingdom Shrines}} | {{Listbox|Tears of the Kingdom Shrines}} | ||
{{Cat|Tears of the Kingdom Shrines}} | {{Cat|Tears of the Kingdom Shrines}} | ||
{{Cat|Tears of the Kingdom Akkala Shrines}} | |||
Latest revision as of 16:07, January 22, 2024
Gatanisis Shrine

Games | ||
Depths Counterpart | ||
Items | Bomb Flower x5 | |
Rewards | ||
| Attributes | ||
|---|---|---|
Type | ||
Gatanisis Shrine, also known as A Well-Timed Bounce, is a Shrine of Light from Tears of the Kingdom.
The Shrine is located far southeast of Tarrey Town, up the cliff on the coast of Lanayru Sea.
A Well-Timed Bounce
- Have Link use Recall on the platform shortly after it bounces back up to drop it down again and launch the Iron Ball into the target on the ceiling.
- Link can use Ascend underneath the ceiling switch to reach the Treasure Chest containing 5 Bomb Flowers.
- Where the ball falls down onto the bouncy platform, there is a small area on the left that Link can safely stand on. Due so and repeat the above action of Recall to launch Link into the air and glide to the altar room.
Video Walkthrough
Video Walkthrough of Gatanisis Shrine
Gallery
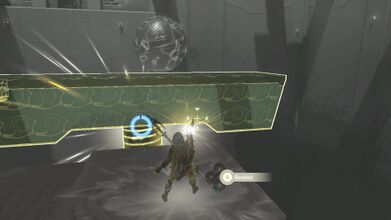
Use Recall when the ball is about halfway down the ramp 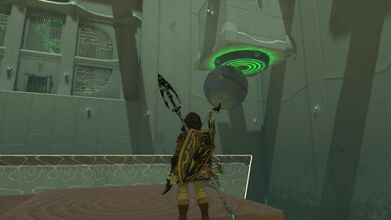
It will launch up and hit the green target 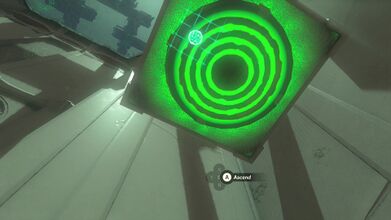
Use Ascend to get through the target to reach the chest that has 5 Bomb Flowers 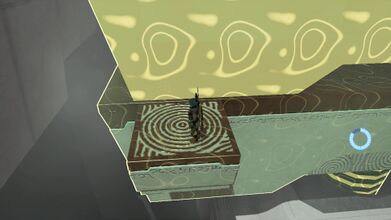
Stand on the small area to the left and use Recall on the platform once again 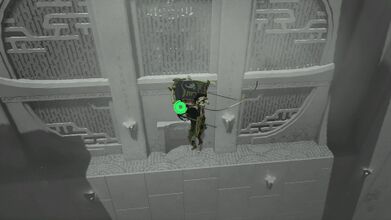
Glide over to the altar


