Tukarok Shrine: Difference between revisions
Jump to navigation
Jump to search
Video Walkthrough of Tukarok Shrine
Want an adless experience? Log in or Create an account.
m (Text replacement - "↵{{Cat|Tears of the Kingdom Shrines}}" to " {{Listbox|Tears of the Kingdom Shrines}} {{Cat|Tears of the Kingdom Shrines}}") |
No edit summary |
||
| (8 intermediate revisions by 6 users not shown) | |||
| Line 1: | Line 1: | ||
{{Infobox| | {{Infobox|shrine | ||
| image = | | image = [[File:TotK Tukarok Shrine.png]] | ||
| caption = | | caption = | ||
| game = ''[[The Legend of Zelda: Tears of the Kingdom|Tears of the Kingdom]]'' | | game = ''[[The Legend of Zelda: Tears of the Kingdom|Tears of the Kingdom]]'' | ||
| Line 6: | Line 6: | ||
| location = [[Hyrule Field (Breath of the Wild)#Tears of the Kingdom|Hyrule Field]] | | location = [[Hyrule Field (Breath of the Wild)#Tears of the Kingdom|Hyrule Field]] | ||
| pointsint = | | pointsint = | ||
| counterpart_header = Depths Counterpart | |||
| counterpart = [[Korakut Lightroot]] | | counterpart = [[Korakut Lightroot]] | ||
| reward = [[Light of Blessing]] | | reward = [[Light of Blessing]] | ||
| Line 19: | Line 20: | ||
==Forward Force== | ==Forward Force== | ||
*Run forward and drop down below. Grab the large [[Orb]] and attach it on top of the car. Stand on the car and activate it to ride across the lava. Grab the Ball and separate it from the Car and climb up ahead. | *Run forward and drop down below. Grab the large [[Orb]] and attach it on top of the car. Stand on the car and activate it to ride across the lava. Grab the Ball and separate it from the Car and climb up ahead. | ||
* | *Attach the Orb to the top of the platform on the rail. | ||
* | *Attach the axle of the [[Big Wheel]] side of the long stone slab. | ||
*In this area there are two mechanized rafts. In the area between | *Attach the Big Wheel's tire to the lower front of the railed platform, making sure the arrows on the front-facing side of the wheel point towards the nearby wall. | ||
* | *Activate the Big Wheel. This should allow it to push itself upwards, propping itself up against the diagonal bars with the stone slab. | ||
* | *Climb up the ladder and grab the Orb from the railed platform. | ||
*In this area there are two mechanized rafts. In the area between them, in the water, there is a [[Treasure Chest]]. Use [[Ultrahand]] to pull it up and open it to get a [[Strong Zonaite Sword]]. | |||
*Attach the Orb to one of the rafts with Big Wheels on its sides. | |||
*Attach a wood plank to the center of the outer ends of each wheel, creating paddles. | |||
*Activate the device, making sure not to destroy the raft, and let the wheels paddle it to the other side. | |||
*Grab the Orb on the other side and step on the switch here to open the door. | |||
*Place the orb in the hole and run up to the Altar to get a [[Light of Blessing]]. | *Place the orb in the hole and run up to the Altar to get a [[Light of Blessing]]. | ||
===Alternative Strategy=== | |||
*The second puzzle may also be solved by moving the railed platform to the top, climbing up the ladder, and using [[Recall]]. | |||
*The third puzzle may also be solved by using the wooden planks and rafts to build a bridge to the other end of the water. | |||
==Video Walkthrough== | |||
{{Youtube|E7-NzYt_t4Y|360|Video Walkthrough of Tukarok Shrine}} | |||
{{Clear}} | |||
==Gallery== | ==Gallery== | ||
<gallery widths="400px" heights="220px"> | |||
File:Tukarok-Shrine-01.jpg|<center>Attach the giant orb to the middle of the stone slab</center> | |||
File:Tukarok-Shrine-02.jpg|<center>Activate the big wheels and ride the device across the lava</center> | |||
File:Tukarok-Shrine-03.jpg|<center>Attach the orb on top of the rectangular block on the wall</center> | |||
File:Tukarok-Shrine-04.jpg|<center>Attach the [[Big Wheel]] to the side of the block</center> | |||
File:Tukarok-Shrine-05.jpg|<center>Also atach the platform</center> | |||
File:Tukarok-Shrine-06.jpg|<center>Shoot the Big Wheel with an [[Arrow]] to activate it</center> | |||
File:Tukarok-Shrine-07.jpg|<center>The wheel will flip the platform, slowly climbing up the wall</center> | |||
File:Tukarok-Shrine-08.jpg|<center>The orb will reach the top of the room</center> | |||
File:Tukarok-Shrine-09.jpg|<center>Attach the orb to the center of the wooden platform</center> | |||
File:Tukarok-Shrine-10.jpg|<center>Be sure to grab the chest out of the water to get a [[Strong Zonaite Sword]]</center> | |||
File:Tukarok-Shrine-11.jpg|<center>Attach a wooden plank to the side of the big wheel in the water</center> | |||
File:Tukarok-Shrine-12.jpg|<center>Attach a second plank to the other big wheel</center> | |||
File:Tukarok-Shrine-13.jpg|<center>Activate the big wheel and the device will paddle across the water</center> | |||
File:Tukarok-Shrine-14.jpg|<center>Climb up the ladder and run across to the other side of the room</center> | |||
File:Tukarok-Shrine-15.jpg|<center>Grab the orb and step on the floor switch</center> | |||
File:Tukarok-Shrine-16.jpg|<center>Place the orb in the hole to open the gate and then run to the altar</center> | |||
</gallery> | |||
{{Listbox|Tears of the Kingdom Shrines}} | {{Listbox|Tears of the Kingdom Shrines}} | ||
{{Cat|Tears of the Kingdom Shrines}} | {{Cat|Tears of the Kingdom Shrines}} | ||
{{Cat|Tears of the Kingdom Lanayru Shrines}} | |||
Latest revision as of 01:19, February 7, 2024
Tukarok Shrine

Games | ||
Location | ||
Depths Counterpart | ||
Items | ||
Rewards | ||
| Attributes | ||
|---|---|---|
Type | ||
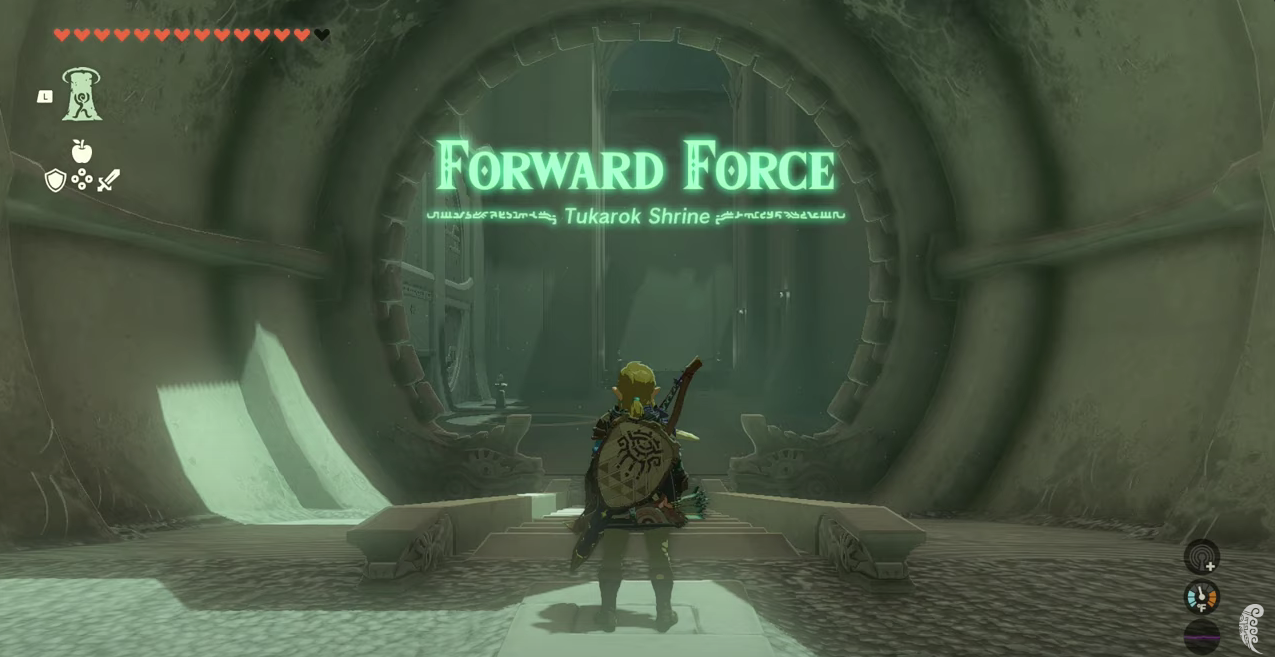
Tukarok Shrine, also known as Forward Force, is a Shrine of Light from Tears of the Kingdom.
The Shrine is located just south of the Wetland Stable.
Forward Force
- Run forward and drop down below. Grab the large Orb and attach it on top of the car. Stand on the car and activate it to ride across the lava. Grab the Ball and separate it from the Car and climb up ahead.
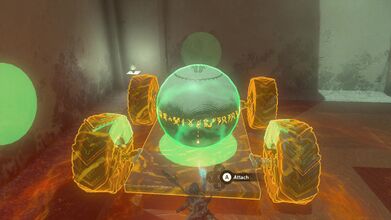
- Attach the Orb to the top of the platform on the rail.
- Attach the axle of the Big Wheel side of the long stone slab.
- Attach the Big Wheel's tire to the lower front of the railed platform, making sure the arrows on the front-facing side of the wheel point towards the nearby wall.
- Activate the Big Wheel. This should allow it to push itself upwards, propping itself up against the diagonal bars with the stone slab.
- Climb up the ladder and grab the Orb from the railed platform.
- In this area there are two mechanized rafts. In the area between them, in the water, there is a Treasure Chest. Use Ultrahand to pull it up and open it to get a Strong Zonaite Sword.
- Attach the Orb to one of the rafts with Big Wheels on its sides.
- Attach a wood plank to the center of the outer ends of each wheel, creating paddles.
- Activate the device, making sure not to destroy the raft, and let the wheels paddle it to the other side.
- Grab the Orb on the other side and step on the switch here to open the door.
- Place the orb in the hole and run up to the Altar to get a Light of Blessing.
Alternative Strategy
- The second puzzle may also be solved by moving the railed platform to the top, climbing up the ladder, and using Recall.
- The third puzzle may also be solved by using the wooden planks and rafts to build a bridge to the other end of the water.
Video Walkthrough
Video Walkthrough of Tukarok Shrine
Gallery
Attach the giant orb to the middle of the stone slab 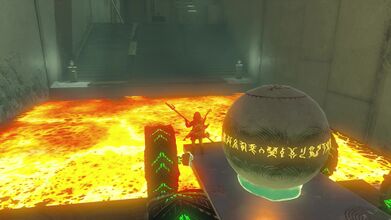
Activate the big wheels and ride the device across the lava 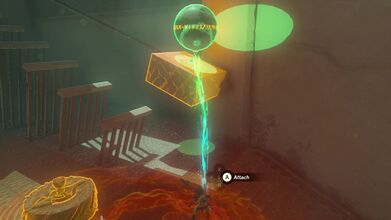
Attach the orb on top of the rectangular block on the wall 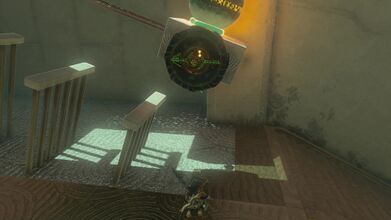
Attach the Big Wheel to the side of the block 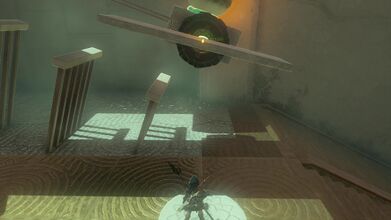
Also atach the platform 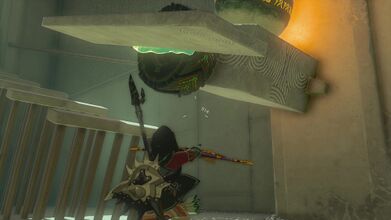
Shoot the Big Wheel with an Arrow to activate it 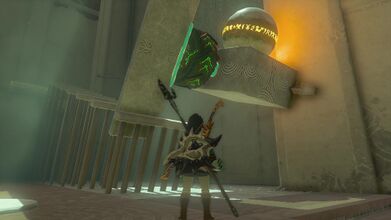
The wheel will flip the platform, slowly climbing up the wall 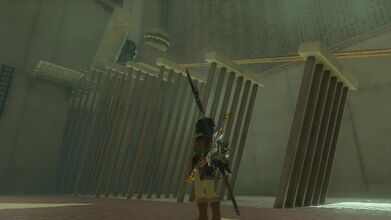
The orb will reach the top of the room 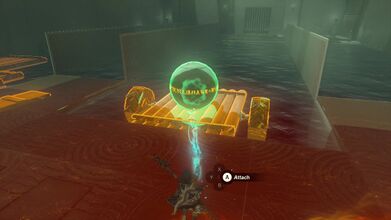
Attach the orb to the center of the wooden platform 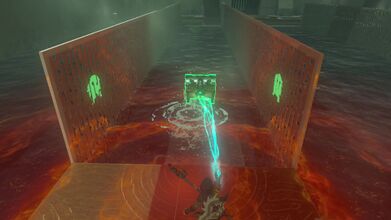
Be sure to grab the chest out of the water to get a Strong Zonaite Sword 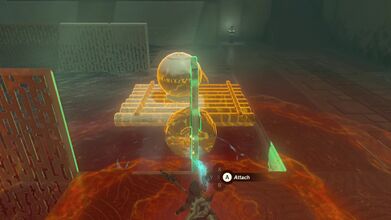
Attach a wooden plank to the side of the big wheel in the water 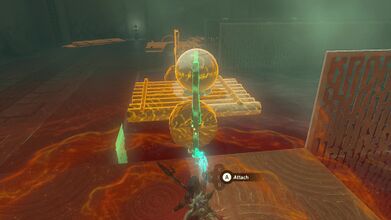
Attach a second plank to the other big wheel 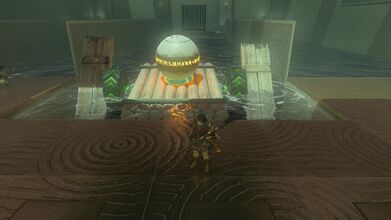
Activate the big wheel and the device will paddle across the water 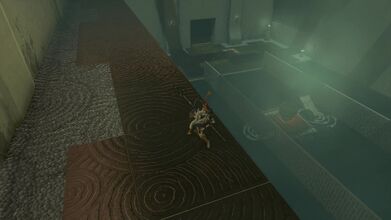
Climb up the ladder and run across to the other side of the room 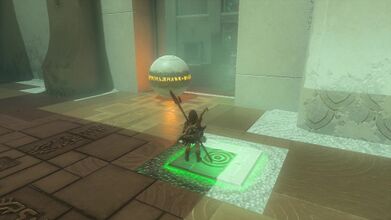
Grab the orb and step on the floor switch 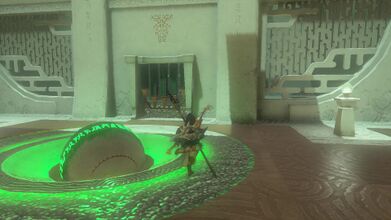
Place the orb in the hole to open the gate and then run to the altar


