Fire Keese: Difference between revisions
No edit summary |
No edit summary |
||
| Line 7: | Line 7: | ||
<u>'''''Oracle of Ages'''''</u><br/>{{H|1}} Contact | <u>'''''Oracle of Ages'''''</u><br/>{{H|1}} Contact | ||
| game = {{Hide|''[[The Legend of Zelda: A Link to the Past|A Link to the Past]]''<br/>''[[The Legend of Zelda: Ocarina of Time|Ocarina of Time]]''<br/>''[[The Legend of Zelda: Majora's Mask|Majora's Mask]]''<br/>''[[The Legend of Zelda: Oracle of Seasons|Oracle of Seasons]]''<br/>''[[The Legend of Zelda: Oracle of Ages|Oracle of Ages]]''<br/>''[[The Legend of Zelda: The Wind Waker|The Wind Waker]]''<br/>''[[The Legend of Zelda: Twilight Princess|Twilight Princess]]''<br/>''[[The Legend of Zelda: Phantom Hourglass|Phantom Hourglass]]''<br/>''[[The Legend of Zelda: Spirit Tracks|Spirit Tracks]]''<br/>''[[The Legend of Zelda: Skyward Sword|Skyward Sword]]''<br/>''[[The Legend of Zelda: Tri Force Heroes|Tri Force Heroes]]''<br/>''[[The Legend of Zelda: Breath of the Wild|Breath of the Wild]]''}} | | game = {{Hide|''[[The Legend of Zelda: A Link to the Past|A Link to the Past]]''<br/>''[[The Legend of Zelda: Ocarina of Time|Ocarina of Time]]''<br/>''[[The Legend of Zelda: Majora's Mask|Majora's Mask]]''<br/>''[[The Legend of Zelda: Oracle of Seasons|Oracle of Seasons]]''<br/>''[[The Legend of Zelda: Oracle of Ages|Oracle of Ages]]''<br/>''[[The Legend of Zelda: The Wind Waker|The Wind Waker]]''<br/>''[[The Legend of Zelda: Twilight Princess|Twilight Princess]]''<br/>''[[The Legend of Zelda: Phantom Hourglass|Phantom Hourglass]]''<br/>''[[The Legend of Zelda: Spirit Tracks|Spirit Tracks]]''<br/>''[[The Legend of Zelda: Skyward Sword|Skyward Sword]]''<br/>''[[The Legend of Zelda: Tri Force Heroes|Tri Force Heroes]]''<br/>''[[The Legend of Zelda: Breath of the Wild|Breath of the Wild]]''}} | ||
| location = <u>'''''Ocarina of Time'''''</u><br/>{{Hide|[[Dodongo's Cavern]]<br/>[[Fire Temple (Ocarina of Time)|Fire Temple]]}}<br/><u>'''''Majora's Mask'''''</u><br/>{{Hide|Various}}<br/><u>'''''Oracle of Seasons'''''</u><br/>{{Hide|[[Sword & Shield Maze]]}}<br/><u>'''''Oracle of Ages'''''</u><br/>{{Hide|[[Skull Dungeon]]}}<br/><u>'''''The Wind Waker'''''</u><br/>{{Hide|[[Dragon Roost Cavern]]<br/>[[Great Sea]]}}<br/><u>'''''Twilight Princess'''''</u><br/>{{Hide|[[Goron Mines]]}}<br/><u>'''''Phantom Hourglass'''''</u><br/>{{Hide|[[Temple of Fire]]}}<br/><u>'''''Spirit Tracks'''''</u><br/>{{Hide|[[Tower of Spirits]]<br/>[[Fire Sanctuary (Spirit Tracks)|Fire Sanctuary]]<br/>[[Fire Temple (Spirit Tracks)|Fire Temple]]}}<br/><u>'''''Skyward Sword'''''</u><br/>{{Hide|[[Eldin Volcano]]<br/>[[Volcano Summit]]<br/>[[Earth Temple (Skyward Sword)|Earth Temple]]<br/>[[Fire Sanctuary (Skyward Sword)|Fire Sanctuary]]}}<br/><u>'''''Breath of the Wild'''''</u><br/>{{Hide|[[Death Mountain]]}} | | location = <u>'''''Ocarina of Time'''''</u><br/>{{Hide|[[Dodongo's Cavern]]<br/>[[Fire Temple (Ocarina of Time)|Fire Temple]]}}<br/>[[Bottom of the Well]]<br/>[[Shadow Temple]]<br/>[[Spirit Temple]]<u>'''''Majora's Mask'''''</u><br/>{{Hide|Various}}<br/><u>'''''Oracle of Seasons'''''</u><br/>{{Hide|[[Sword & Shield Maze]]}}<br/><u>'''''Oracle of Ages'''''</u><br/>{{Hide|[[Skull Dungeon]]}}<br/><u>'''''The Wind Waker'''''</u><br/>{{Hide|[[Dragon Roost Cavern]]<br/>[[Great Sea]]}}<br/><u>'''''Twilight Princess'''''</u><br/>{{Hide|[[Goron Mines]]}}<br/><u>'''''Phantom Hourglass'''''</u><br/>{{Hide|[[Temple of Fire]]}}<br/><u>'''''Spirit Tracks'''''</u><br/>{{Hide|[[Tower of Spirits]]<br/>[[Fire Sanctuary (Spirit Tracks)|Fire Sanctuary]]<br/>[[Fire Temple (Spirit Tracks)|Fire Temple]]}}<br/><u>'''''Skyward Sword'''''</u><br/>{{Hide|[[Eldin Volcano]]<br/>[[Volcano Summit]]<br/>[[Earth Temple (Skyward Sword)|Earth Temple]]<br/>[[Fire Sanctuary (Skyward Sword)|Fire Sanctuary]]}}<br/><u>'''''Breath of the Wild'''''</u><br/>{{Hide|[[Death Mountain]]}} | ||
| weapon = <u>'''''Oracle of Seasons'''''</u><br/>[[Sword]] - 1 hit<br/><u>'''''Oracle of Ages'''''</u><br/>[[Sword]] - 1 hit<br/><u>'''''In General'''''</u><br/>[[Sword]]<br/>[[Slingshot]]<br/>[[Hero's Bow]]<br/>[[Boomerang]]<br/>[[Whip]] | | weapon = <u>'''''Oracle of Seasons'''''</u><br/>[[Sword]] - 1 hit<br/><u>'''''Oracle of Ages'''''</u><br/>[[Sword]] - 1 hit<br/><u>'''''In General'''''</u><br/>[[Sword]]<br/>[[Slingshot]]<br/>[[Hero's Bow]]<br/>[[Boomerang]]<br/>[[Whip]] | ||
| related = [[Keese]]<br/>[[Ice Keese]] | | related = [[Keese]]<br/>[[Ice Keese]] | ||
Revision as of 05:44, January 14, 2019

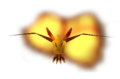
Fire Keese Concept Art from Skyward Sword
Games | ||
Location |
Ocarina of Time [show] Bottom of the Well Shadow Temple Spirit TempleMajora's Mask [show] Various Oracle of Seasons [show] Oracle of Ages [show] The Wind Waker [show] Twilight Princess [show] Phantom Hourglass [show] Spirit Tracks [show] Skyward Sword [show] Breath of the Wild [show] | |
Threat | ||
Attacks | Ocarina of Time | |
Effective | ||
Related | ||
Fire Keese are a variation of the standard Zelda enemies, the Keese. They are basically the same thing, the only difference is a Fire Keese is encased with fire, therefore harming Link upon contact.
Appearances
A Link to the Past

While very similar to the Fire Keese, the Blazing Bats are seen in A Link to the Past and are summoned by Ganon in the battle against Link for the Triforce.
Link's Awakening
Like previously, while not known as the Fire Keese, the Blazing Bats play the same role as the previous game in Link's Awakening where they are summoned by Nightmare's Ganon form.
Ocarina of Time

|
Fire Keese |
|---|
Fire Keese make their debut in Ocarina of Time and are first encountered within Dodongo's Cavern. If they attack Link, their fire will go out, turning back into regular Keese. They can then dive into another torch to reignite. If they attack Link while he has the Deku Shield equipped, the shield will burn up. It is recommended that Link use the Hylian Shield to avoid having his Deku Shield burned up.
As with regular Keese, projectiles work best in defeating them, with the Slingshot in particular working very well.
Majora's Mask
Don't tell me you don't know about |
Fire Keese act the same as Ocarina of Time.
Oracle of Seasons/Ages
Fire Keese appear in the Sword & Shield Maze and Skull Dungeon in Oracle of Seasons and Oracle of Ages, respectively. Due to their higher flight path, Roc's Feather or Roc's Cape may be necessary for Link to defeat Fire Keese.
The Wind Waker
Fire Keese behave as in most previous games. They appear in Dragon Roost Cavern, caves and various areas in the Great Sea.
Twilight Princess
Fire Keese in Twilight Princess appear fairly often. They can be found in the Goron Mines, and in some dark caverns that can be accessed in the overworld. They are easily defeated with a swing of Link's sword. Like in Ocarina of Time, if Link has the Ordon Shield or the Wooden Shield equipped when he gets hit by them, it will burn up and he will lose it. This won't happen with the Hylian Shield.
Phantom Hourglass
Fire Keese are first encountered in the Temple of Fire and must be defeated with a ranged weapon such as the Bow or Boomerang.
Spirit Tracks
Fire Keese must be defeated with a ranged weapon such as the Bow, Boomerang or Whip. Fire Keese respawn infinitely by some fire pits.
Skyward Sword
Fire Keese are a fiery variety of Keese and act similarly to their ordinary counterparts. If they get too close, they will burn Link and damage his Wooden Shield.
Tri Force Heroes
| This section is a stub. You can help the Zelda Dungeon Wiki by expanding it. |
Breath of the Wild
This type of Keese can be found in the Eldin region of the game, and are easy to spot due to their bright flames. They will hover around Link for a short amount of time before charging at him, potentially setting him alight.
Gallery
Fire Keese from Ocarina of Time and Majora's Mask.

Fire Keese from Oracle of Seasons and Oracle of Ages

Fire Keese Model from Phantom Hourglass

Fire Keese Model from Skyward Sword

Fan Artwork of a Fire Keese from Spirit Tracks created by timoteilol.
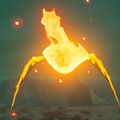
Fire Keese from Breath of the Wild.


