Daruk, the Goron Hero: Difference between revisions
mNo edit summary |
m (Text replacement - "{{References}}↵↵{{Listbox|" to "{{References}} {{clear}} {{Listbox|") |
||
| (23 intermediate revisions by 5 users not shown) | |||
| Line 3: | Line 3: | ||
{{stub}} | {{stub}} | ||
{{Infobox|scenario | {{Infobox|scenario | ||
| image = | | image = [[File:Daruk-the-Goron-Hero.jpg|400px]] | ||
| caption = | | caption = | ||
| number = Chapter 2-2 | | number = Chapter 2-2 | ||
| Line 10: | Line 10: | ||
| stage = [[Death Mountain (Breath of the Wild)|Death Mountain]] | | stage = [[Death Mountain (Breath of the Wild)|Death Mountain]] | ||
| previous = [[Road to the Ancient Lab]] | | previous = [[Road to the Ancient Lab]] | ||
| next = | | next = [[The Yiga Clan Attacks!]] | ||
| simultaneous = [[Mipha, the Zora Princess]]<br/>[[Revali, the Rito Warrior]]<br/>[[Urbosa, the Gerudo Chief]] | | simultaneous = [[Mipha, the Zora Princess]]<br/>[[Revali, the Rito Warrior]]<br/>[[Urbosa, the Gerudo Chief]] | ||
| warriors = [[Link]], [[Daruk]], one other unlocked, plus [[Divine Beast]] [[Vah Rudania]] (story)<br/>Any three unlocked, plus Vah Rudania (replay) | | warriors = [[Link (Breath of the Wild)#Age of Calamity|Link]], [[Daruk]], one other unlocked, plus [[Divine Beast]] [[Vah Rudania]] (story)<br/>Any three unlocked, plus Vah Rudania (replay) | ||
| allies = [[Link (Breath of the Wild)#Age of Calamity|Link]], [[Daruk]], [[Zelda (Breath of the Wild)#Age of Calamity|Zelda]], [[Impa]] (if not selected for play)<br/>[[Goron Captain]] (2×) | |||
| recommended level = Lv. 5 | | recommended level = Lv. 5 | ||
| battlefield materials = | | battlefield materials = [[Fireproof Lizard]]<br/>[[Smotherwing Butterfly]]<br/>[[Spicy Pepper]]<br/>[[Warm Safflina]]<br/>[[Warm Darner]] | ||
| boss = [[Igneo Talus]] | | boss = [[Igneo Talus]] (2×) | ||
| miniboss = [[Fire Moblin]]<br/>[[Ice Moblin]]<br/>[[Fire Wizzrobe]]<br/>[[Electric Wizzrobe]] | | miniboss = [[Moblin]] (5×)<br/>[[Fire Moblin]] (9×)<br/>[[Ice Moblin]]<br/>[[Fire Wizzrobe]] (3×)<br/>[[Electric Wizzrobe]] (2×)<br/>[[Ice Wizzrobe]] | ||
| enemies = [[Lizalfos]]<br/>[[Fire-Breath Lizalfos]]<br/>[[Igneo Pebblit]]<br/>[[Rock Octorok]] | | enemies = [[Bokoblin]]<br/>[[Lizalfos]]<br/>[[Fire-Breath Lizalfos]]<br/>[[Igneo Pebblit]]<br/>[[Rock Octorok]]<br/>[[Fire Chuchu]]<br/>[[Fire Keese]] | ||
| characters = | | characters = | ||
| members = | | members = | ||
| | | objective = | ||
| pointsint = | | pointsint = | ||
| item = | | item = | ||
| Line 34: | Line 35: | ||
{{quote|Daruk happily accepts the role of Vah Rudania's pilot, but the Divine Beast is located on Death Mountain. With the mountain overrun with enemies, Daruk and the party must fight their way up.|In-game description}} | {{quote|Daruk happily accepts the role of Vah Rudania's pilot, but the Divine Beast is located on Death Mountain. With the mountain overrun with enemies, Daruk and the party must fight their way up.|In-game description}} | ||
'''Daruk, the Goron Hero''' is the second listed [[Age of Calamity Scenarios|scenario]] of ''[[Hyrule Warriors: Age of Calamity|Age of Calamity]]'' Chapter 2, although the four Chapter 2 scenarios can be completed in any order. | '''Daruk, the Goron Hero''' is the second listed [[Age of Calamity Scenarios|scenario]] of ''[[Hyrule Warriors: Age of Calamity|Age of Calamity]]'' Chapter 2, although the four main Chapter 2 scenarios can be completed in any order. | ||
*'''Victory Condition''': | *'''Victory Condition''': | ||
*'''Defeat Condition''': | *'''Defeat Condition''': | ||
== | ==Objectives== | ||
===Regular | ===Regular Objectives=== | ||
{{stub|section}} | {{stub|section}} | ||
===Divine Beast | ===Divine Beast Objectives=== | ||
{{stub|section}} | {{stub|section}} | ||
==Cutscenes== | ==Cutscenes== | ||
| Line 63: | Line 59: | ||
===Daruk's Wishes=== | ===Daruk's Wishes=== | ||
{{quote|Daruk mops up the monsters swarming over Death Mountain then reaffirms his intention to pilot the Divine Beast. With words of thanks to Link and the party, Daruk hands over a treasured gift.|In-game Gallery description}} | {{quote|Daruk mops up the monsters swarming over Death Mountain then reaffirms his intention to pilot the Divine Beast. With words of thanks to Link and the party, Daruk hands over a treasured gift.|In-game Gallery description}} | ||
==Dialogue== | |||
{| class="wikitable" style="text-align:left;" | |||
!Character Speaking | |||
!Dialogue | |||
|- | |||
|<center>.</center> | |||
|. | |||
|- | |||
|} | |||
==Treasure Chests== | |||
{{See also|Age of Calamity Treasure Chests}} | |||
<section begin=treasure /> | |||
<center><gallery widths="740px" heights="600px"> | |||
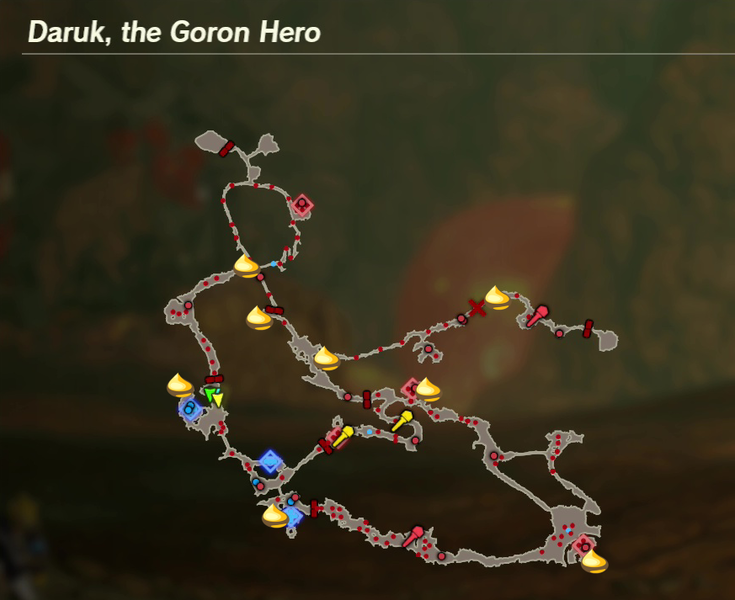
File:HWAoC-Daruk,-the-Goron-Hero-Chest-Map.png|<center>There are 6 treasure chests found in [[Daruk, the Goron Hero]].</center> | |||
</gallery></center> | |||
<center><gallery widths="400px" heights="220px"> | |||
File:HWAoC-Daruk,-the-Goron-Hero-Chest-01.jpg|<center>[[Cobble Crusher]]</center><center>Near the center of the map, inside the structure near the [[Electric Wizzrobe]].</center> | |||
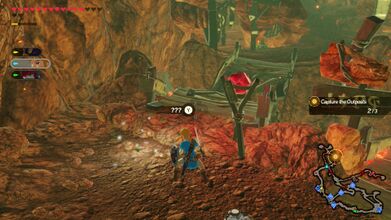
File:HWAoC-Daruk,-the-Goron-Hero-Chest-02.jpg|<center>[[Sapphire]] x5</center><center>Outside the outpost in the southeast corner of the map.</center> | |||
File:HWAoC-Daruk,-the-Goron-Hero-Chest-03.jpg|<center>[[Soldier's Broadsword]]</center><center>On the eastern edge of the map, far north of the southeastern outpost.</center> | |||
File:HWAoC-Daruk,-the-Goron-Hero-Chest-04.jpg|<center>[[Cobble Crusher]]</center><center>On the eastern path towards the final [[Igneo Talus]], behind a rock formation near the [[Fire Moblin]] and [[Fire Wizzrobe]].</center> | |||
File:HWAoC-Daruk,-the-Goron-Hero-Chest-05.jpg|<center>[[Traveler's Sword]]</center><center>On the eastern path leading to the center Outpost, take the short path towards the southwest near a [[Fire Moblin]] to find the chest.</center> | |||
File:HWAoC-Daruk,-the-Goron-Hero-Chest-06.jpg|<center>[[Ruby]] x5</center><center>In the northern area of the map, south of the northernmost outpost.</center> | |||
</gallery></center> | |||
<section end=treasure /> | |||
==Koroks== | |||
{{See also|Age of Calamity Koroks}} | |||
<section begin=koroks /> | |||
<!-- Sets are provided to try to determine the correct ordering. Set A were obtained in one pass, Set B obtained in another pass. Koroks within a set may be swapped, but a korok in one set may not be swapped with one in another set. --> | |||
<center><gallery widths="740px" heights="600px"> | |||
File:Daruk-the-Goron-Hero-Map.png||<center>There are 8 Koroks found in [[Daruk, the Goron Hero]].</center> | |||
</gallery></center> | |||
<gallery widths="400px" heights="220px"> | |||
File:Daruk-the-Goron-Hero-05.jpg|<center>Right at the crossroads when entering [[Goron City (Breath of the Wild)|Goron City]]. Examine the sparkling flowers before the bridge.</center> <!-- Set A --> | |||
File:Daruk-the-Goron-Hero-01.jpg|<center>Right at the start, head through the base at the west side of the map where [[Zelda (Breath of the Wild)#Age of Calamity|Zelda]] and [[Impa]] are and examine the pinwheel that's behind.</center> <!-- Confirmed --> | |||
File:Daruk-the-Goron-Hero-03.jpg|<center>In the outpost at the southeast portion of the map. Enter the stone structure and examine the pinwheel.</center> <!-- Set A --> | |||
File:Daruk-the-Goron-Hero-06.jpg|<center>After crossing the large bridge with a Moblin, while heading to [[Death Mountain (Breath of the Wild)|Death Mountain]], the pinwheel is off to the west.</center> <!-- Confirmed --> | |||
File:Daruk-the-Goron-Hero-02.jpg|<center>At the south central part of the map where two [[Moblin]]s were fought, near the two outposts. Cross the lava bridge and examine the stump.</center> <!-- Confirmed --> | |||
File:Daruk-the-Goron-Hero-04.jpg|<center>Examine the tree stump, just east of the central outpost.</center> <!-- Set A --> | |||
File:Daruk-the-Goron-Hero-07.jpg|<center>Examine the yellow flower that is at the east side of the hot spring, near the center of the map.</center> <!-- Set A --> | |||
File:Daruk-the-Goron-Hero-08.jpg|<center>After defeating the two [[Fire Moblin]]s near the end of the stage, cross the bridge and examine the sparkling leaves on the side.</center> <!-- Set A --> | |||
</gallery> | |||
<section end=koroks /> | |||
{{References}} | {{References}} | ||
{{clear}} | |||
{{Listbox|Age of Calamity Scenarios}} | {{Listbox|Age of Calamity Scenarios}} | ||
{{Cat|Age of Calamity Scenarios}} | {{Cat|Age of Calamity Scenarios}} | ||
Latest revision as of 16:37, June 20, 2023
- This article is about the story scenario from Age of Calamity. For the character which it is named after, see Daruk.
| Spoiler Alert! This article describes a subject that is sensitive to plot development. |
| This article is a stub. You can help the Zelda Dungeon Wiki by expanding it. |

Number | Chapter 2-2 | |
Games | ||
Stage | ||
Previous | ||
Next | ||
Simultaneous | ||
Boss | Igneo Talus (2×) | |
Mini-bosses | Moblin (5×) | |
Enemies | ||
Battlefield-Specific Materials | ||
Rewards | Flamebreaker Armor | |
Warriors | Link, Daruk, one other unlocked, plus Divine Beast Vah Rudania (story) | |
Allies | Link, Daruk, Zelda, Impa (if not selected for play) | |
Recommended Level | Lv. 5 | |
"Daruk happily accepts the role of Vah Rudania's pilot, but the Divine Beast is located on Death Mountain. With the mountain overrun with enemies, Daruk and the party must fight their way up."
Daruk, the Goron Hero is the second listed scenario of Age of Calamity Chapter 2, although the four main Chapter 2 scenarios can be completed in any order.
- Victory Condition:
- Defeat Condition:
Objectives
Regular Objectives
| This section is a stub. You can help the Zelda Dungeon Wiki by expanding it. |
Divine Beast Objectives
| This section is a stub. You can help the Zelda Dungeon Wiki by expanding it. |
Cutscenes
Daruk, the Goron Hero [text]
"The rugged Gorons lived in Goron City, a town carved into Death Mountain. They were forged in volcanic heat, their bodies as hard as stone."
Reaching Vah Rudania
"Daruk agrees to become the pilot of a Divine Beast, but it is revealed that a swarm of monsters has overrun Death Mountain, the location of Vah Rudania. Daruk makes for the mountain with the rest of the party in tow."
Divine Beast Vah Rudania
"The party somehow makes it to the peak of the mountain. Daruk, led by the small Guardian, climbs into Vah Rudania and engages the monsters swarming over Death Mountain in pitched battle."
Daruk's Wishes
"Daruk mops up the monsters swarming over Death Mountain then reaffirms his intention to pilot the Divine Beast. With words of thanks to Link and the party, Daruk hands over a treasured gift."
Dialogue
| Character Speaking | Dialogue |
|---|---|
| . |
Treasure Chests
- See also: Age of Calamity Treasure Chests

There are 6 treasure chests found in Daruk, the Goron Hero.

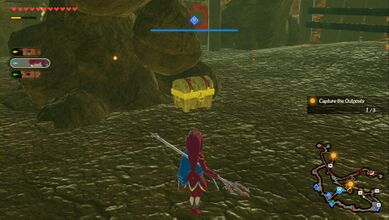
Cobble Crusher Near the center of the map, inside the structure near the Electric Wizzrobe. 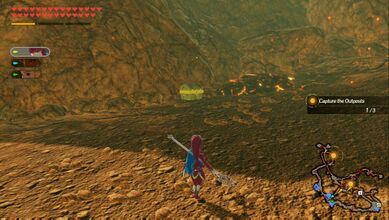
Sapphire x5 Outside the outpost in the southeast corner of the map. 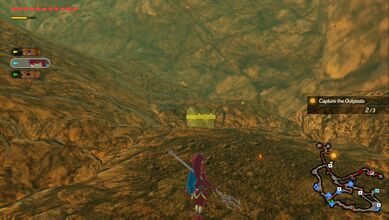
Soldier's Broadsword On the eastern edge of the map, far north of the southeastern outpost. 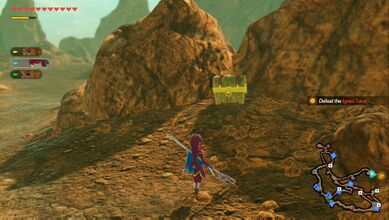
Cobble Crusher On the eastern path towards the final Igneo Talus, behind a rock formation near the Fire Moblin and Fire Wizzrobe. 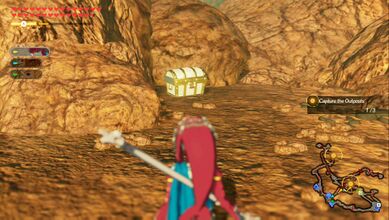
Traveler's Sword On the eastern path leading to the center Outpost, take the short path towards the southwest near a Fire Moblin to find the chest. 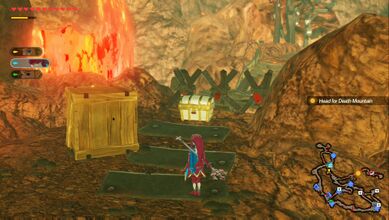
Ruby x5 In the northern area of the map, south of the northernmost outpost.


Koroks
- See also: Age of Calamity Koroks
There are 8 Koroks found in Daruk, the Goron Hero.

Right at the crossroads when entering Goron City. Examine the sparkling flowers before the bridge. 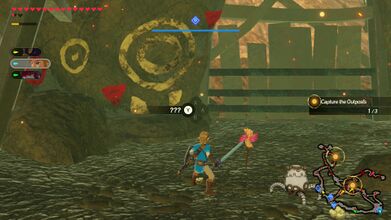
In the outpost at the southeast portion of the map. Enter the stone structure and examine the pinwheel. 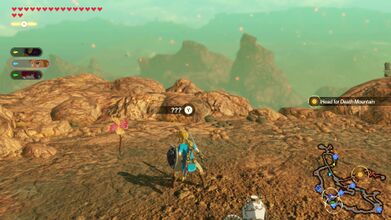
After crossing the large bridge with a Moblin, while heading to Death Mountain, the pinwheel is off to the west. 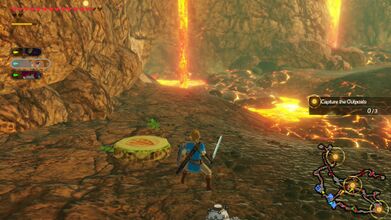
At the south central part of the map where two Moblins were fought, near the two outposts. Cross the lava bridge and examine the stump. 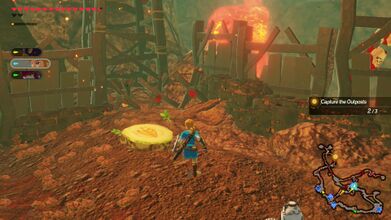
Examine the tree stump, just east of the central outpost. 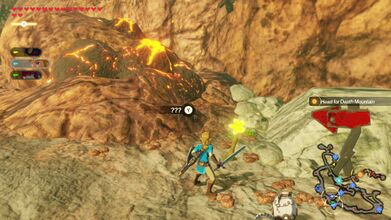
Examine the yellow flower that is at the east side of the hot spring, near the center of the map. 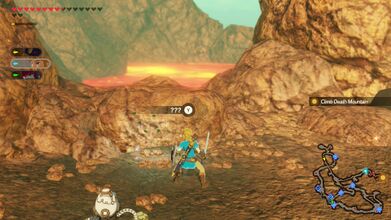
After defeating the two Fire Moblins near the end of the stage, cross the bridge and examine the sparkling leaves on the side.


