Cave of Ordeals: Difference between revisions
m (Text replacement - "{{Listbox\|(.*)\|(.*)}}" to "{{Listbox|$1 $2}}") |
mNo edit summary |
||
| (3 intermediate revisions by 3 users not shown) | |||
| Line 1: | Line 1: | ||
{{Infobox|dungeon | {{Infobox|dungeon | ||
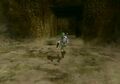
| image = [[File:Cave of Ordeals Entrance New.jpg]] | | image = [[File:Cave of Ordeals Entrance New.jpg]] | ||
| caption = The | | caption = The entrance to the Cave of Ordeals | ||
| game = ''[[The Legend of Zelda: Twilight Princess|Twilight Princess]]'' | | game = ''[[The Legend of Zelda: Twilight Princess|Twilight Princess]]'' | ||
| location = [[Gerudo Desert]] | | location = [[Gerudo Desert]] | ||
| Line 7: | Line 7: | ||
| boss = Three [[Darknut]]s | | boss = Three [[Darknut]]s | ||
| reward = [[Great Fairy's Tears]] | | reward = [[Great Fairy's Tears]] | ||
| walkthrough = [ | | walkthrough = [[zd:twilight-princess-walkthrough/cave-of-ordeals|Text Walkthrough (HD)]] | ||
[[zd:twilight-princess-walkthrough/cave-of-ordeals-wii|Text Walkthrough (Wii)]] | |||
[https://www.youtube.com/watch?v=iIlr1m3ewUY Video Walkthrough (Floors 1-10)] | |||
[https://www.youtube.com/watch?v=mD_5Q9Kfxy0 Video Walkthrough (Floors 10-20)] | |||
[https://www.youtube.com/watch?v=LxFPqjGal2A Video Walkthrough (Floors 20-30)] | |||
[https://www.youtube.com/watch?v=cTiT_5nT-cM Video Walkthrough (Floors 30-40)] | |||
[https://www.youtube.com/watch?v=qCvUES99k-c Video Walkthrough (Floors 40-47)] | |||
[https://www.youtube.com/watch?v=K5kqPlM4UIc Video Walkthrough (Floors 48-50)] | |||
}} | }} | ||
The '''Cave of Ordeals''' is | The '''Cave of Ordeals''' is an optional 50-floor [[dungeon]] in ''[[The Legend of Zelda: Twilight Princess|Twilight Princess]]''. It is found within a hole on the [[Gerudo Mesa]] deep within the [[Gerudo Desert]]. Link can only access the cave after he has removed the obstacle guarding the entrance, which is, conveniently, a section of the broken [[Bridge of Eldin|Eldin Bridge]]. Each floor has a range of enemies seen throughout the game; however, on certain floors, Link is able to collect a reward from the [[Great Fairy]]. Some of the floors change after the 1st time completing it. For example, different enemies, or enemy variations, appear. | ||
==Rewards== | ==Rewards== | ||
Link earns a specific prize, given by the Great Fairy, every 10th floor. On completion of the 10th floor, [[Fairy|Fairies]] are released into [[Ordon Spring]], finishing the 20th floor releases Fairies into the [[Faron Spring]], while completing both the 30th and 40th floor releases Fairies into the remaining springs, [[Eldin Spring|Eldin]] and [[Lanayru Spring|Lanayru]]. If Link makes it past the 50th and final floor, he is rewarded with a free [[Bottle]] of [[Great Fairy's Tears]]. | Link earns a specific prize, given by the Great Fairy, every 10th floor. On completion of the 10th floor, [[Fairy|Fairies]] are released into [[Ordon Spring]], finishing the 20th floor releases Fairies into the [[Faron Spring]], while completing both the 30th and 40th floor releases Fairies into the remaining springs, [[Eldin Spring|Eldin]] and [[Lanayru Spring|Lanayru]]. If Link makes it past the 50th and final floor, he is rewarded with a free [[Bottle]] of [[Great Fairy's Tears]]. | ||
==Floors== | ==Floors== | ||
| Line 22: | Line 29: | ||
|- | |- | ||
| 1 | | 1 | ||
| 1st time: | | 1st time: 1× [[Bokoblin#Twilight Princess|Blue Bokoblin]]. 2nd time: 1× [[Bokoblin#Twilight Princess|Red Bokoblin]] | ||
|- | |- | ||
| 2 | | 2 | ||
| | | 3× [[Rat]]s and 3× [[Keese]] | ||
|- | |- | ||
| 3 | | 3 | ||
| | | 4× [[Baba Serpent]]. Take note of the 3 on the ceiling. | ||
|- | |- | ||
| 4 | | 4 | ||
| | | 3× [[Skulltula]] | ||
|- | |- | ||
| 5 | | 5 | ||
| | | 3× [[Bulblin Archer]] | ||
|- | |- | ||
| 6 | | 6 | ||
| Line 40: | Line 47: | ||
|- | |- | ||
| 7 | | 7 | ||
| [[Fire Keese]] and | | [[Fire Keese]] and 2× [[Dodongo]] | ||
|- | |- | ||
| 8 | | 8 | ||
| | | 4× [[Tektite#Twilight Princess|Red Tektite]] and 2× [[Tektite#Twilight Princess|Blue Tektite]] | ||
|- | |- | ||
| 9 | | 9 | ||
| 1st time: | | 1st time: 2× [[Bulblin Archer]], 2× [[Lizalfos]]. 2nd time: 4× [[Bulblin Archer]], 3× [[Lizalfos]] | ||
|- | |- | ||
| 10 | | 10 | ||
| Line 52: | Line 59: | ||
|- | |- | ||
| 11 | | 11 | ||
| | | 3× [[Helmasaur]] and lots of [[Rat]]s | ||
|- | |- | ||
| 12 | | 12 | ||
| 1st time: | | 1st time: 1× Giant [[Chu|Purple Chu]]. 2nd time: 2× Giant [[Chu|Purple Chu]] | ||
|- | |- | ||
| 13 | | 13 | ||
| | | 4× [[Chu Worm]] | ||
|- | |- | ||
| 14 | | 14 | ||
| Line 73: | Line 80: | ||
|- | |- | ||
| 18 | | 18 | ||
| | | 8× [[Leever]] | ||
|- | |- | ||
| 19 | | 19 | ||
| Line 82: | Line 89: | ||
|- | |- | ||
| 21 | | 21 | ||
| | | 5× [[Bokoblin#Twilight Princess|Blue Bokoblin]] and [[Ice Keese]] | ||
|- | |- | ||
| 22 | | 22 | ||
| Line 91: | Line 98: | ||
|- | |- | ||
| 24 | | 24 | ||
| | | 5× [[ReDead]]s | ||
|- | |- | ||
| 25 | | 25 | ||
| | | 1× [[Bulblin Archer]], 2× [[Bulblin Archer]] and a [[Bulblin|Bulblin Warrior]] | ||
|- | |- | ||
| 26 | | 26 | ||
| 1st time: | | 1st time: 3× [[Stalfos]]. 2nd time: 5× [[Stalfos]] | ||
|- | |- | ||
| 27 | | 27 | ||
| | | 3× [[Skulltula]] and [[Bubble]]s | ||
|- | |- | ||
| 28 | | 28 | ||
| | | 2× [[Dinolfos]] and 6× [[Bokoblin#Twilight Princess|Red Bokoblin]] | ||
|- | |- | ||
| 29 | | 29 | ||
| | | 2× [[Stalfos]], [[Red Bubble]]s and [[Stalkin]] | ||
|- | |- | ||
| 30 | | 30 | ||
| Line 112: | Line 119: | ||
|- | |- | ||
| 31 | | 31 | ||
| | | 5× [[Beamos]] and [[Keese]] | ||
|- | |- | ||
| 32 | | 32 | ||
| | | 2× [[Dodongo]], [[Torch Slug]]s, [[Fire Keese]] and [[Red Bubble]]s | ||
|- | |- | ||
| 33 | | 33 | ||
| | | 4× [[ReDead]], [[Imp Poe]] (Only 1st time) | ||
|- | |- | ||
| 34 | | 34 | ||
| Line 124: | Line 131: | ||
|- | |- | ||
| 35 | | 35 | ||
| | | 1× [[Freezard]] and [[Ice Keese]] | ||
|- | |- | ||
| 36 | | 36 | ||
| 1st time: | | 1st time: 4× [[Chilfos]]. 2nd time: 7× [[Chilfos]] | ||
|- | |- | ||
| 37 | | 37 | ||
| Line 133: | Line 140: | ||
|- | |- | ||
| 38 | | 38 | ||
| | | 2× [[Freezard]], 4× [[Chilfos]], [[Ice Bubble]]s and [[Ice Keese]] | ||
|- | |- | ||
| 39 | | 39 | ||
| 1st time: | | 1st time: 2× [[Darknut]]. 2nd time: 3× [[Darknut]] | ||
|- | |- | ||
| 40 | | 40 | ||
| Line 142: | Line 149: | ||
|- | |- | ||
| 41 | | 41 | ||
| | | 9× [[Armos]] | ||
|- | |- | ||
| 42 | | 42 | ||
| | | 6× [[Bokoblin#Twilight Princess|Red Bokoblin]] and 6× [[Baba Serpent]] | ||
|- | |- | ||
| 43 | | 43 | ||
| | | 3× [[Dinolfos]] and 6× [[Bulblin Archer]] | ||
|- | |- | ||
| 44 | | 44 | ||
| | | 4× [[Dinolfos|Dynalfos]], [[Imp Poe]] (Only 1st Time) | ||
|- | |- | ||
| 45 | | 45 | ||
| 1st time: | | 1st time: 5× [[ReDead]], 2× [[Bulblin Archer]], [[Chu]]s. 2nd time: 5× [[ReDead]] and 3× [[Bulblin Archer]] | ||
|- | |- | ||
| 46 | | 46 | ||
| | | 2× [[Freezard]], 3× [[Chilfos]] and [[Ghoul Rat]]s | ||
|- | |- | ||
| 47 | | 47 | ||
| | | 1× [[Bokoblin#Twilight Princess|Blue Bokoblin]], Lots of hidden [[Stalkin]] and [[Rat]]s | ||
|- | |- | ||
| 48 | | 48 | ||
| | | 2× [[Aeralfos]], 1× [[Darknut]] | ||
|- | |- | ||
| 49 | | 49 | ||
| 1st time: | | 1st time: 3× [[Darknut]]. 2nd time: 4× [[Darknut]] | ||
with different colors | with different colors | ||
|- | |- | ||
| Line 176: | Line 183: | ||
==Gallery== | ==Gallery== | ||
<gallery> | <gallery> | ||
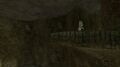
File:Cave of Ordeals Inner Entrance.jpg| | File:Cave of Ordeals Inner Entrance.jpg|Entrance to the first room | ||
File:Cave of Ordeals Interior.jpg| | File:Cave of Ordeals Interior.jpg|Link entering the first room | ||
File:Great Fairy Fountain TP.jpg| | File:Great Fairy Fountain TP.jpg|Link and the Great Fairy within the Fountain | ||
</gallery> | </gallery> | ||
{{Listbox|Twilight Princess Dungeons}} | {{Listbox|Twilight Princess Dungeons}} | ||
{{Cat|Twilight Princess Dungeons}} | {{Cat|Twilight Princess Dungeons}} | ||
{{Cat|Twilight Princess Locations}} | {{Cat|Twilight Princess Locations}} | ||
Latest revision as of 21:13, October 4, 2023

The entrance to the Cave of Ordeals
Games | ||
Location | ||
Boss | Three Darknuts | |
Inhabitants | ||
Rewards | ||
| Guides | ||
|---|---|---|
Walkthrough | ||
The Cave of Ordeals is an optional 50-floor dungeon in Twilight Princess. It is found within a hole on the Gerudo Mesa deep within the Gerudo Desert. Link can only access the cave after he has removed the obstacle guarding the entrance, which is, conveniently, a section of the broken Eldin Bridge. Each floor has a range of enemies seen throughout the game; however, on certain floors, Link is able to collect a reward from the Great Fairy. Some of the floors change after the 1st time completing it. For example, different enemies, or enemy variations, appear.
Rewards
Link earns a specific prize, given by the Great Fairy, every 10th floor. On completion of the 10th floor, Fairies are released into Ordon Spring, finishing the 20th floor releases Fairies into the Faron Spring, while completing both the 30th and 40th floor releases Fairies into the remaining springs, Eldin and Lanayru. If Link makes it past the 50th and final floor, he is rewarded with a free Bottle of Great Fairy's Tears.
Floors
| Floor | Enemies & Description |
|---|---|
| 1 | 1st time: 1× Blue Bokoblin. 2nd time: 1× Red Bokoblin |
| 2 | 3× Rats and 3× Keese |
| 3 | 4× Baba Serpent. Take note of the 3 on the ceiling. |
| 4 | 3× Skulltula |
| 5 | 3× Bulblin Archer |
| 6 | Lots of Torch Slugs |
| 7 | Fire Keese and 2× Dodongo |
| 8 | 4× Red Tektite and 2× Blue Tektite |
| 9 | 1st time: 2× Bulblin Archer, 2× Lizalfos. 2nd time: 4× Bulblin Archer, 3× Lizalfos |
| 10 | 1st Great Fairy. Fairies now occupy Ordon Spring |
| 11 | 3× Helmasaur and lots of Rats |
| 12 | 1st time: 1× Giant Purple Chu. 2nd time: 2× Giant Purple Chu |
| 13 | 4× Chu Worm |
| 14 | Lots of Bubbles |
| 15 | Lots of Bulblins |
| 16 | Rats and Keese |
| 17 | Stalhounds, Imp Poe (Only 1st time) |
| 18 | 8× Leever |
| 19 | Lots of Chus |
| 20 | 2nd Great Fairy. Fairies now occupy Faron Spring |
| 21 | 5× Blue Bokoblin and Ice Keese |
| 22 | Rats, Keese, and Ghoul Rats |
| 23 | Lots of Stalkin |
| 24 | 5× ReDeads |
| 25 | 1× Bulblin Archer, 2× Bulblin Archer and a Bulblin Warrior |
| 26 | 1st time: 3× Stalfos. 2nd time: 5× Stalfos |
| 27 | 3× Skulltula and Bubbles |
| 28 | 2× Dinolfos and 6× Red Bokoblin |
| 29 | 2× Stalfos, Red Bubbles and Stalkin |
| 30 | 3rd Great Fairy. Fairies now occupy Eldin Spring |
| 31 | 5× Beamos and Keese |
| 32 | 2× Dodongo, Torch Slugs, Fire Keese and Red Bubbles |
| 33 | 4× ReDead, Imp Poe (Only 1st time) |
| 34 | Lots of Chus and Ghoul Rats |
| 35 | 1× Freezard and Ice Keese |
| 36 | 1st time: 4× Chilfos. 2nd time: 7× Chilfos |
| 37 | Bubbles, Ice Bubbles and Leevers |
| 38 | 2× Freezard, 4× Chilfos, Ice Bubbles and Ice Keese |
| 39 | 1st time: 2× Darknut. 2nd time: 3× Darknut |
| 40 | 4th Great Fairy. Fairies now occupy Lanayru Spring |
| 41 | 9× Armos |
| 42 | 6× Red Bokoblin and 6× Baba Serpent |
| 43 | 3× Dinolfos and 6× Bulblin Archer |
| 44 | 4× Dynalfos, Imp Poe (Only 1st Time) |
| 45 | 1st time: 5× ReDead, 2× Bulblin Archer, Chus. 2nd time: 5× ReDead and 3× Bulblin Archer |
| 46 | 2× Freezard, 3× Chilfos and Ghoul Rats |
| 47 | 1× Blue Bokoblin, Lots of hidden Stalkin and Rats |
| 48 | 2× Aeralfos, 1× Darknut |
| 49 | 1st time: 3× Darknut. 2nd time: 4× Darknut
with different colors |
| 50 | Link is given a free Bottle filled with Great Fairy's Tears |
Gallery
Entrance to the first room
Link entering the first room
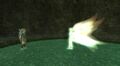
Link and the Great Fairy within the Fountain


