Turakawak Shrine: Difference between revisions
Jump to navigation
Jump to search
Video Walkthrough of Turakawak Shrine
Want an adless experience? Log in or Create an account.
DrakonisGTR (talk | contribs) |
No edit summary |
||
| (6 intermediate revisions by 4 users not shown) | |||
| Line 1: | Line 1: | ||
{{Infobox| | {{Infobox|shrine | ||
| image = | | image = [[File:TotK Turakawak Shrine.png]] | ||
| caption = | | caption = | ||
| game = ''[[The Legend of Zelda: Tears of the Kingdom|Tears of the Kingdom]]'' | | game = ''[[The Legend of Zelda: Tears of the Kingdom|Tears of the Kingdom]]'' | ||
| Line 16: | Line 16: | ||
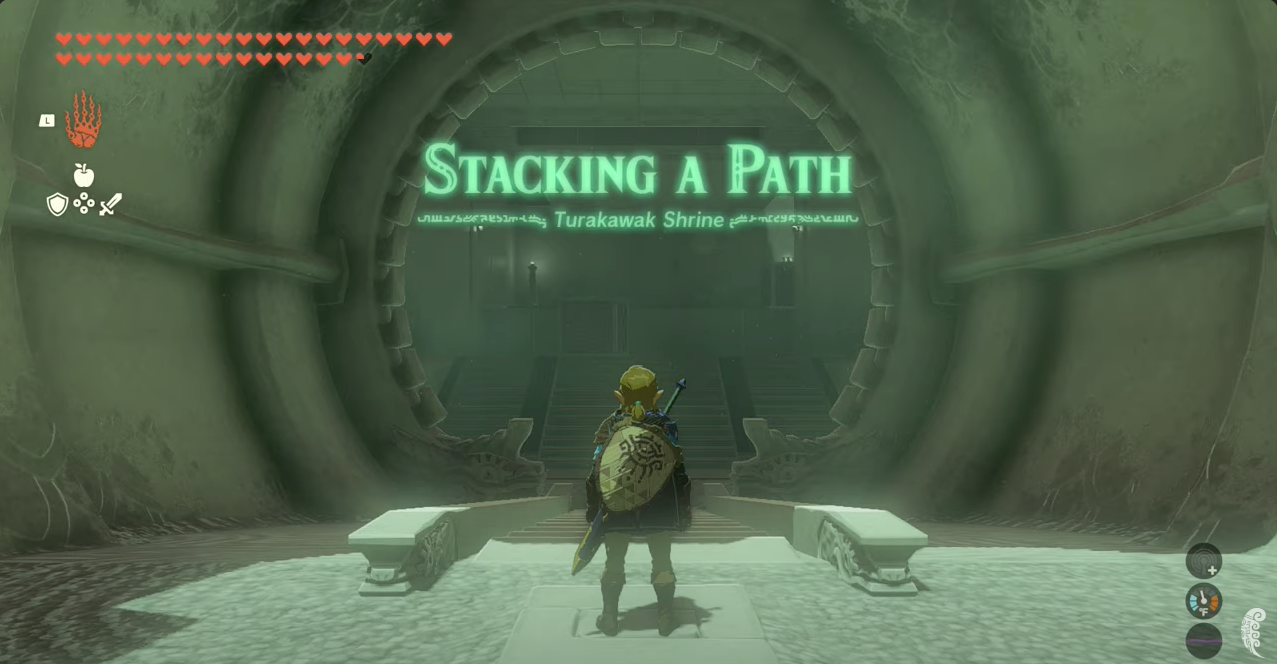
'''Turakawak Shrine''', also known as ''Stacking a Path'', is a [[Shrine of Light]] from ''[[The Legend of Zelda: Tears of the Kingdom|Tears of the Kingdom]]''. | '''Turakawak Shrine''', also known as ''Stacking a Path'', is a [[Shrine of Light]] from ''[[The Legend of Zelda: Tears of the Kingdom|Tears of the Kingdom]]''. | ||
The Shrine is located | The Shrine is located at [[Lake Illumeni]] south of [[Tanagar Canyon]]. | ||
==Stacking a Path== | ==Stacking a Path== | ||
*Use [[Ultrahand]] to move the large climbable block in the center of the room over to ledge in the back, and then climb up. | *Use [[Ultrahand]] to move the large climbable block in the center of the room over to the ledge in the back, and then climb up. | ||
*Use | *Use Ultrahand to grab the other climbable block on the ledge, and attach it to the top of the block you used previously, making a double stack. | ||
*To get this shrine's chest, move the double stack you have made directly underneath the long grate in the ceiling in the first room. Climb on top of the stack and then use [[Ascend]] to get up through the grate and enter the cage that the chest is in. The chest contains a [[Magic Rod (Tears of the Kingdom)|Magic Rod]]. | |||
To get this shrine's chest, move the double stack you have made directly underneath the long grate in the ceiling | *Use [[Ascend]] again to leave the cage, and head back down to the lower floor using the hole against the right-hand wall. | ||
Use [[Ascend]] again to leave the cage, and head back down to the lower floor using the hole against the right-hand wall. | |||
*Move the double stack over to the partial ladder that you see against the right-hand wall, and then climb up to the next floor. | *Move the double stack over to the partial ladder that you see against the right-hand wall, and then climb up to the next floor. | ||
*Once up there, grab your double stack again, and pull it up to the second floor, and move it over to the side of the cage with a chest in it. Then grab the large metal block and move it over towards the cage as well. | *Once up there, grab your double stack again, and pull it up to the second floor, and move it over to the side of the cage with a chest in it. Then grab the large metal block and move it over towards the cage as well. | ||
*Climb up the stack to the top of the cage, and once you are up there, grab your double stack and attach it to the top of the metal block, making a triple stack. | *Climb up the stack to the top of the cage, and once you are up there, grab your double stack and attach it to the top of the metal block, making a triple stack. Make sure the metal block is the one on the bottom. | ||
*Move the triple stack over to the corner of the cage that is closest to the upper level, so that you can climb to the top of the stack and then jump onto the ledge. | *Move the triple stack over to the corner of the cage that is closest to the upper level, so that you can climb to the top of the stack and then jump onto the ledge. Make sure that the blocks are stacked so the arrangement of the grate on the block is horizontal. If it is vertical, Link will slip when trying to climb. | ||
*Paraglider over and grab onto the block. Then climb the rest of the way up. | |||
*Proceed to the next chamber and claim your [[Light of Blessing]]. | *Proceed to the next chamber and claim your [[Light of Blessing]]. | ||
==Video Walkthrough== | |||
{{Youtube|BGuPL1pcHqc|360|Video Walkthrough of Turakawak Shrine}} | |||
{{Clear}} | |||
==Gallery== | ==Gallery== | ||
<gallery widths="400px" heights="220px"> | |||
File:Turakawak-Shrine-01.jpg|<center>In the first room, move the [[Metal Mesh Block]] straight ahead and climb up</center> | |||
File:Turakawak-Shrine-02.jpg|<center>Stack the two Metal Mesh Blocks on top of each other</center> | |||
File:Turakawak-Shrine-03.jpg|<center>Position the blocks near the entrance, below the opening in the ceiling</center> | |||
File:Turakawak-Shrine-04.jpg|<center>Use [[Ascend]] to get up through to the next floor</center> | |||
File:Turakawak-Shrine-05.jpg|<center>Open a chest to get a [[Magic Rod (Tears of the Kingdom)|Magic Rod]]</center> | |||
File:Turakawak-Shrine-06.jpg|<center>Back down a level, position the attached metal blocks by the broken staircase and climb up</center> | |||
File:Turakawak-Shrine-07.jpg|<center>Then pull the two blocks up to the higher floor</center> | |||
File:Turakawak-Shrine-08.jpg|<center>Position the mesh blocks and [[Iron Box]] so they are close to the grate with the treasure chest</center> | |||
File:Turakawak-Shrine-09.jpg|<center>Stack the three so the Iron Box is at the bottom and metal mesh blocks are at the top</center> | |||
File:Turakawak-Shrine-10.jpg|<center>Position them close to the ledge and also be sure the mesh pattern is running horizontally so it can be climbed</center> | |||
File:Turakawak-Shrine-11.jpg|<center>Glide over to the blocks and climb up to reach the altar</center> | |||
</gallery> | |||
{{Listbox|Tears of the Kingdom Shrines}} | {{Listbox|Tears of the Kingdom Shrines}} | ||
{{Cat|Tears of the Kingdom Shrines}} | {{Cat|Tears of the Kingdom Shrines}} | ||
{{Cat|Tears of the Kingdom Gerudo Shrines}} | |||
Latest revision as of 16:51, February 10, 2024
Turakawak Shrine

Games | ||
Depths Counterpart | ||
Items | ||
Rewards | ||
| Attributes | ||
|---|---|---|
Type | ||
Turakawak Shrine, also known as Stacking a Path, is a Shrine of Light from Tears of the Kingdom.
The Shrine is located at Lake Illumeni south of Tanagar Canyon.
Stacking a Path
- Use Ultrahand to move the large climbable block in the center of the room over to the ledge in the back, and then climb up.
- Use Ultrahand to grab the other climbable block on the ledge, and attach it to the top of the block you used previously, making a double stack.
- To get this shrine's chest, move the double stack you have made directly underneath the long grate in the ceiling in the first room. Climb on top of the stack and then use Ascend to get up through the grate and enter the cage that the chest is in. The chest contains a Magic Rod.
- Use Ascend again to leave the cage, and head back down to the lower floor using the hole against the right-hand wall.
- Move the double stack over to the partial ladder that you see against the right-hand wall, and then climb up to the next floor.
- Once up there, grab your double stack again, and pull it up to the second floor, and move it over to the side of the cage with a chest in it. Then grab the large metal block and move it over towards the cage as well.
- Climb up the stack to the top of the cage, and once you are up there, grab your double stack and attach it to the top of the metal block, making a triple stack. Make sure the metal block is the one on the bottom.
- Move the triple stack over to the corner of the cage that is closest to the upper level, so that you can climb to the top of the stack and then jump onto the ledge. Make sure that the blocks are stacked so the arrangement of the grate on the block is horizontal. If it is vertical, Link will slip when trying to climb.
- Paraglider over and grab onto the block. Then climb the rest of the way up.
- Proceed to the next chamber and claim your Light of Blessing.
Video Walkthrough
Video Walkthrough of Turakawak Shrine
Gallery
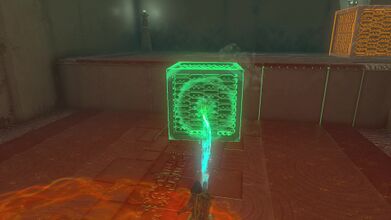
In the first room, move the Metal Mesh Block straight ahead and climb up 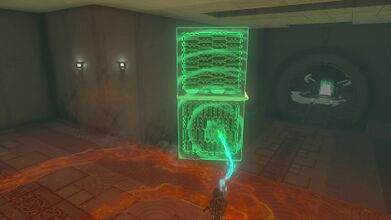
Stack the two Metal Mesh Blocks on top of each other 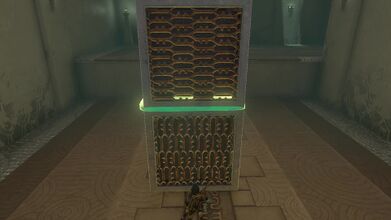
Position the blocks near the entrance, below the opening in the ceiling 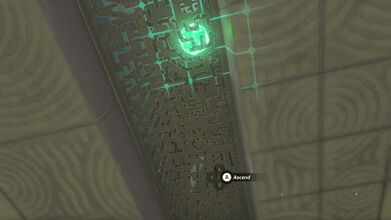
Use Ascend to get up through to the next floor 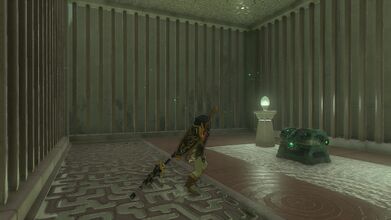
Open a chest to get a Magic Rod 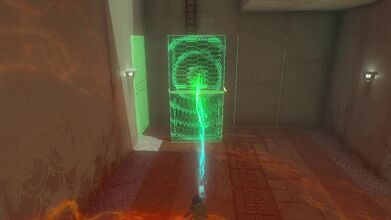
Back down a level, position the attached metal blocks by the broken staircase and climb up 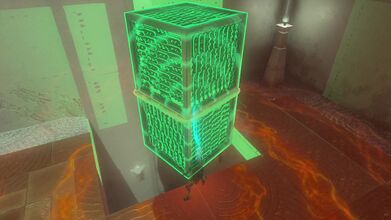
Then pull the two blocks up to the higher floor 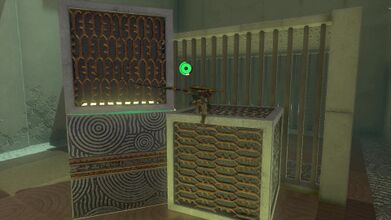
Position the mesh blocks and Iron Box so they are close to the grate with the treasure chest 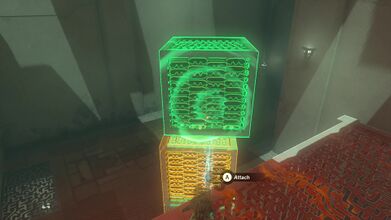
Stack the three so the Iron Box is at the bottom and metal mesh blocks are at the top 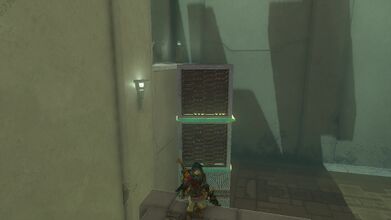
Position them close to the ledge and also be sure the mesh pattern is running horizontally so it can be climbed 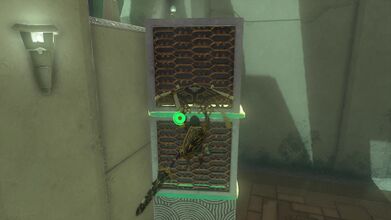
Glide over to the blocks and climb up to reach the altar


