Kitawak Shrine: Difference between revisions
Jump to navigation
Jump to search
Want an adless experience? Log in or Create an account.
No edit summary |
No edit summary |
||
| Line 1: | Line 1: | ||
{{Infobox|location | {{Infobox|location | ||
| image = | | image = [[File:Kitawak-Shrine-01.jpg|400px]] | ||
| caption = | | caption = | ||
| game = ''[[The Legend of Zelda: Tears of the Kingdom|Tears of the Kingdom]]'' | | game = ''[[The Legend of Zelda: Tears of the Kingdom|Tears of the Kingdom]]'' | ||
| Line 24: | Line 24: | ||
==Gallery== | ==Gallery== | ||
<gallery widths="320px" heights="180px"> | |||
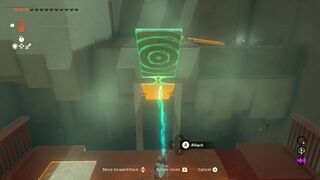
File:Kitawak-Shrine-02.jpg|Attach the first platform to the edge of the existing one | |||
File:Kitawak-Shrine-03.jpg|This will create a larger bridge that Link can walk across | |||
File:Kitawak-Shrine-04.jpg|Connect a platform to the moving gear | |||
File:Kitawak-Shrine-05.jpg|Ride across to reach a chest that contains ten [[Arrow]]s | |||
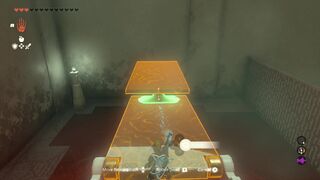
File:Kitawak-Shrine-06.jpg|Attach a platform to front of the seasaw so it drops down | |||
File:Kitawak-Shrine-07.jpg|Move the other platform to create a bridge that Link can climb up | |||
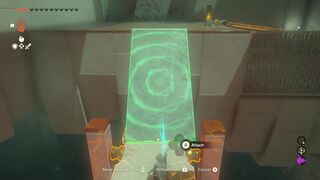
File:Kitawak-Shrine-08.jpg|Attach a platform to the very edige of the existing one | |||
File:Kitawak-Shrine-09.jpg|Stand at the edge and aim an arrow at the stone switch | |||
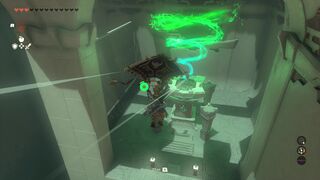
File:Kitawak-Shrine-10.jpg|It will launch Link into the air and he can paraglide to the altar. | |||
</gallery> | |||
{{Listbox|Tears of the Kingdom Shrines}} | {{Listbox|Tears of the Kingdom Shrines}} | ||
{{Cat|Tears of the Kingdom Shrines}} | {{Cat|Tears of the Kingdom Shrines}} | ||
Revision as of 01:11, May 23, 2023
Kitawak Shrine

Games | ||
Counterpart | ||
Items | ||
Rewards | ||
| Attributes | ||
|---|---|---|
Type | ||
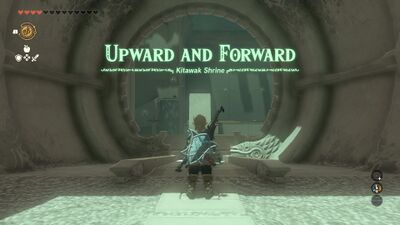
Kitawak Shrine, also known as Upward and Forward, is a Shrine of Light from Tears of the Kingdom.
The Shrine is located in the Gerudo Highlands.
Upward and Forward
- In the first area, there is a platform on the right side. Use Ultrahand to attach it to the edge of the existing platform, creating a larger bridge. The extra weight will cause the bridge to fall down, allowing Link to cross.
- On the left side, there is a spinning gear. Grab the platform that we just attached to the bridge and wiggle it free. This time attach it to the spinning gear. Jump on the platform and ride it to the other side side. Climb up and open the chest to get ten Arrows.
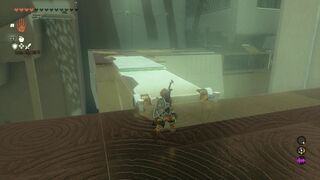
- Once again grab the same platform and wiggle it free. Up ahead, there is a diagonal platform. Attach the platform you have with you to the front edge of the platform. The weight of it will cause it to fall down, creating a ramp. Another platform can be found on the ground. Grab it and attach it to the other side, creating a large bridge that Link can cross.
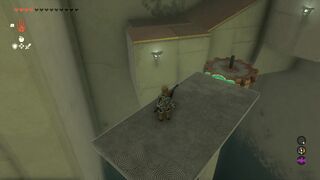
- Here there is a yellow stone switch that Link can hit, causing the nearby platform to bounce up. Link can use this to shoot himself up in the air. However, we doesn't have quite enough momentum. Again, wiggle one of the old platforms free from the last puzzle. This time attach it to the edge of the existing platform and stand at the far edge. From there aim an arrow and shoot the yellow stone. This will launch Link up into the air and he can glide over to the altar to get the Light of Blessing.
Gallery
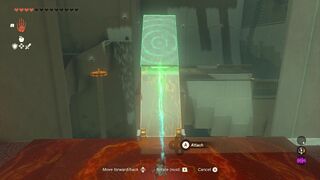
Attach the first platform to the edge of the existing one
This will create a larger bridge that Link can walk across

Connect a platform to the moving gear
Ride across to reach a chest that contains ten Arrows
Attach a platform to front of the seasaw so it drops down
Move the other platform to create a bridge that Link can climb up
Attach a platform to the very edige of the existing one

Stand at the edge and aim an arrow at the stone switch
It will launch Link into the air and he can paraglide to the altar.


