Level 8 (Second Quest)

Games | ||
Boss | Three Dodongos | |
Mini-bosses | ||
Enemies | ||
Inhabitants | ||
Items | Magical Key | |
Prerequisite | ||
Rewards | ||
Related | ||
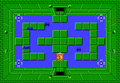
Level 8 is the eighth dungeon found in the Second Quest of The Legend of Zelda. This dungeon hides the final Triforce fragment, which when collected and combined with the rest of the shards creates the full Triforce of Wisdom. Link comes here in search of that final shard after he has collected the first seven. Its location is hidden in a wall at the base of Death Mountain that must be bombed to be found. The location of the entrance, from the Starting Screen, is one screen right, six screens up, one screen left, one screen up, and finally two screens right. The Boss of this dungeon is a pack of three Dodongos, which also serve as multiple Mini-Bosses throughout the dungeon. The level is shaped like a larger counter-clockwise spiral, fitting perfectly around the shape of the previous level.
Items
This dungeon contains two main items that can be obtained by Link. The first is called the Magical Rod. If Link acquired the Book of Magic in Level 4, then the Magical Rod will already be upgraded, creating a flame after its beam hits an object. The Magical Rod is found in a side-scrolling section of the dungeon. The entrance to the underground area is found, from the dungeon entrance, one room up, then down the hidden staircase that is revealed by pushing one of the blocks, one room down through a passable wall, then one more room down through a Locked Door. Defeat the Wallmasters here and push a block to reveal the staircase that leads to the Magical Rod. The second item is called the Magical Key. This special key acts as a universal key that can unlock any and all Locked Doors found throughout each dungeon. This item makes all keys found or currently owned useless. This item is especially useful in Level 9, where Locked Doors are everywhere. This key can be found by traveling, from the entrance, seven rooms up, five rooms left and down a hidden staircase, then left one room and down another hidden staircase. Beneath the staircase is the Magical Key. Oddly enough, neither of these items are required to complete the game.
Enemies
All the enemies are listed below.
- Enemies in Level 8 of the Second Quest
Aquamentus
- Main article: Aquamentus (The Legend of Zelda)
The Mini-Bosses of Level 8 are previous bosses returning as mini-bosses. The first one, called Aquamentus, is a green dragon that shoots fireballs at Link and was the Boss of Level 1, as well as a Mini-Boss of Level 4. He appears near the end of the dungeon, blocking the path to an Old Man offering to sell Link a Bomb upgrade.
Digdogger
- Main article: Digdogger (The Legend of Zelda)
The second Mini-Boss that appears in this dungeon is known as Digdogger. Link must play the Recorder to cause Digdogger to split into three mini-Digdoggers, which he can then attack and defeat. Link must fight Digdogger at least once in this dungeon, but will miss collecting the Magical Key if he does not at least enter the room with the second and last Digdogger. However, Link can bomb the west wall of that room and run past this Digdogger if he wishes to.
Dodongo
Also a previous boss returning from previous dungeons, Dodongos appear as mini-bosses and as the boss in this dungeon. Each time that they are encountered, there are fought in a group of three. The final pack of three guard the final Triforce fragment of the game. Their tactics have not changed since previous encounters. The Dodongos walk around the room absentmindedly, almost ignoring Link's presence. Their only attack is to make contact with Link, which causes a full heart of damage. After killing them with a couple of well placed Bombs each, the Dodongos are defeated, and the locked doors open allowing access to the room containing the eighth and final Triforce fragment.
Old Man Locations
There is only one Old Man that Link can visit in this dungeon. This Old Man gives Link the opportunity to increase the amount of bombs that he can carry from a maximum of 12 to a maximum to 16. He says, "I BET YOU'D LIKE TO HAVE MORE BOMBS."[1] Also, there is a Rupee symbol underneath the Old Man and "-100" underneath the Rupee symbol. By touching the symbol, Link loses one hundred Rupees and gets the upgrade, as well as instantly restocking his bombs.
Hungry Goriya
The Hungry Goriya returns in this dungeon and can be found blocking the path near the entrance of the dungeon. This Goriya just sits there and blocks the way, mumbling "GRUMBLE, GRUMBLE.."[2] It only moves out of the way if Link feeds it the Food, which can be bought at some shops across Hyrule. After the Goriya is fed, he disappears, enabling Link to pass to the next room. If Link doesn't mind missing the valuable Magical Key, he can simply ignore this Goriya and travel towards the boss from a secret staircase in the previous room.
Compass & Dungeon Map
The Compass and Dungeon Map both appear in this dungeon.
Compass
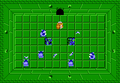
The Compass is used by Link in this dungeon to show him where the final Triforce fragment is via a blinking spot on his map. The room the Compass is found in contains a total of four Blade Traps and four Keese guarding it. Once all of the Keese are defeated, the Compass will appear in the center of the room. This room is found six rooms up from the entrance, immediately following the Hungry Goriya.
Dungeon Map
The Dungeon Map shows Link the layout of the dungeon after he has collected it. This assists Link in exploring all the rooms in the dungeon. The Dungeon Map is found in a room that contains five Blue Goriyas. After Link has defeated all of the Goriyas, the Map appears in the middle of the room. This room is found by going, from the dungeon entrance, up two rooms, down the hidden staircase and up the other side, then down one room through a bombable wall.
Keys & Locked Doors
This dungeon contains its fair share of Locked Doors and Small Keys. In total, there are three Small Keys available to be collected and five Locked Doors that need to be unlocked. There are less Small Keys than Locked Doors in this dungeon, however, acquiring the Magical Key as early as possible makes getting through the rest of the dungeon much easier. Alternatively, if Link doesn't wish to find the Magical Key, he can skip two of the Locked Doors that block it, though he will also miss one of the keys that is behind one of these Locked Doors. If he also elects to skip the Magical Rod, he can skip a third Locked Door, giving him access to two keys and two Locked Doors.
Gallery
Room with the Compass
Room with the Dungeon Map
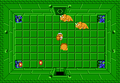
Room with Dodongos


References
- ↑ "I BET YOU'D LIKE TO HAVE MORE BOMBS" — Old Man, The Legend of Zelda.
- ↑ "GRUMBLE,GRUMBLE.." — Hungry Goriya, The Legend of Zelda.