Level 9 (Second Quest)

Games | ||
Boss | ||
Mini-bosses | ||
Enemies | ||
Inhabitants | ||
Items | ||
Rewards | Completion of Game | |
Related | ||
Level 9 is the ninth and final dungeon found in the Second Quest of The Legend of Zelda. It is here where Ganon has imprisoned Princess Zelda. Link can only enter this dungeon if he has already collected all eight Triforce fragments, reuniting the complete Triforce of Wisdom. This dungeon is one of the hardest dungeons in the entire The Legend of Zelda series, and easily the hardest dungeon in the game. This dungeon's entrance is found in the top-left corner of the overworld map and revealed by bombing the wall near the ladder. To get to this area from the Starting Screen, go right one screen, up five screens, left one screen, up one screen, left four screens, up one screen, and left three screens. The Boss of this dungeon is Ganon, who is also the main antagonist of the game. Defeating Ganon allows Link to free Princess Zelda and save Hyrule. The dungeon is filled with one-way passages and fake walls that exist to confuse Link.
This dungeon's layout is shaped to represent Ganon's face.
Items
A rarity for final dungeons, Level 9 has not one, but two main items that Link can collect as he searches for Ganon. The first item is required to complete the game, and it is known as the Silver Arrow. This upgrade of the common Arrow is used by Link to deliver the final strike to Ganon. From the entrance, you can find the Silver Arrows by going up two screens, right two screens, up one screen, and left one screen. The second dungeon item is optional and is called the Red Ring. This Ring cuts damage taken by Link by a quarter compared to his original Green Tunic. This is helpful to Link because of the fact that this dungeon is full of the hardest enemies this game has to offer. The ring is found in a side-scrolling section of the dungeon whose entrance is found in the room in the very top-left corner of the dungeon. The easiest way to get to the room with the Red Ring from the entrance to the dungeon is to follow the left perimeter as much as possible and make your way to the top-left corner of the map. When you get to the Old Man who says, "GO TO THE NEXT ROOM.", be sure to go left.
Enemies
This dungeon features a mix of the hardest enemies The Legend of Zelda has to offer. It also introduces two new enemies, the Lanmola and the Patra.
- Enemies in Level 9 of the Second Quest
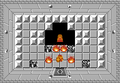
Ganon

The boss of Death Mountain is also the main antagonist of the game, Ganon. Ganon is a pig-like monster that attacks Link by warping around the room, while invisible, shooting fireballs at Link. Before the battle, Link walks into the room and shows off his Triforce of Wisdom. With this in hand, Ganon becomes visible and snarls at Link. This begins the battle. After Link has hit Ganon with the Sword enough times, Ganon becomes brownish in color, and this is Link's chance to shoot it with the Silver Arrow. Doing so turns Ganon into ashes, leaving behind the Triforce of Power. After collecting the Triforce of Power, Link can continue into the next room, where Princess Zelda awaits to be freed.
Old Man Location
There are two Old Man locations in this dungeon. The first is in the second room of the dungeon. However, the Old Man only appears in this room if Link hasn't collected all eight fragments of the Triforce of Wisdom. If that is the case, the Old Man says to Link, "ONES WHO DOES NOT HAVE TRIFORCE CAN'T GO IN."[1] If Link has collected all the shards, this room is empty, and Link can advance into the meat of the dungeon. The second location is located further along in the dungeon. The Old Man at this location says, "GO TO THE NEXT ROOM."[2] This is a reference to the fact that although this room looks like a dead end, it is possible to walk through the wall to the left or right to access other rooms.
Compass & Dungeon Map
The Compass and Dungeon Map both can be obtained and used by Link in Level 9, similarly to previous dungeons.
Compass
The Compass appears in this dungeon, but has a different use then that of previous dungeons. It shows Link the location of Princess Zelda via a blinking spot on the map. This item leads Link right to his goal; Princess Zelda. It is found in an unmarked room; the right eye of the face. This room can only be entered by travelling down from the room above it. Defeat all of the Zols in this room and the Compass will appear in the lower-right portion of the room. The Compass is not required to complete the game.
Dungeon Map
Different than the Compass, the Dungeon Map has the exact same use that it has had throughout the entire game. It shows Link the layout of the dungeon and also shows the sheer size of this dungeon. It is guarded by a Patra, a new enemy introduced in Level 9. After defeating this specific Patra, Link can grab the Dungeon Map and use it however he wants.
Keys & Locked Doors
There is a very odd mix of Small Keys and Locked Doors in Level 9. In fact, there is only one Small Key that can be found throughout the entire dungeon. However, there is a total of five Locked Doors that block Link's path through the dungeon, three of which are required to open to complete the dungeon. If Link did not collect the Magical Key from the previous dungeon, it makes Level 9 much more difficult. With the Magical Key, getting past those Locked Doors is a breeze.
Gallery
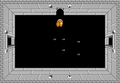
Room with the Compass
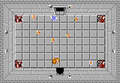
Room with the Dungeon Map
Room with Ganon
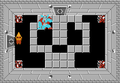
Room with Zelda


References
- ↑ "ONES WHO DOES NOT HAVE TRIFORCE CAN'T GO IN" — Old Man, The Legend of Zelda.
- ↑ "GO TO THE NEXT ROOM" — Old Man, The Legend of Zelda.