Level 7: The Demon

Games | ||
Boss | ||
Mini-bosses | ||
Enemies | ||
Inhabitants | ||
Items | Red Candle | |
Prerequisite | ||
Rewards | ||
Related | ||
| Guides | ||
|---|---|---|
Walkthrough | ||
In-depth guide:
Legend of Zelda Walkthrough Chapter 8: The Demon |
Level 7: The Demon is the seventh dungeon in The Legend of Zelda. Link travels here in search of the seventh fragment of the Triforce of Wisdom. It is one of the most complicated dungeons of the game, and features a mix of three repeating bosses that must be fought by Link in order to complete the dungeon. This dungeon is nicknamed The Demon based on the layout of the dungeon being a demonic looking face. This dungeon is one of the most difficult to find in the game, as its appearance is not that of a usual dungeon. In order to find the entrance, Link must go to the lone Fairy Fountain in the game that does not house a Fairy and play his Recorder. This, and only this, opens the entrance to The Demon. This screen can be found by traveling up one screen, left three screens, up one screen, left two screens, and finally up one screen from the Starting Screen. This is also the first dungeon that Link cannot complete without using Bombs to break open specific walls.
Items
The main item Link can find in this dungeon is called the Red Candle. This item is an upgrade of the Blue Candle, and does all the things the Blue Candle did, including lighting rooms, burning bushes, and harming enemies. However, the one and only difference between the two is that the Blue Candle has a restriction that only allows it to be used once in a screen. The Red Candle can be used multiple times in a room, making it a much more viable option in a room full of enemies. The Red Candle, similarly to most items in the game, is found a side-scrolling section that can be entered via a staircase. This staircase is found in the room that is, from the entrance, up four rooms, left one room, up two rooms, and right two rooms. This room contains a mix of Goriyas. Defeating them all grants Link the ability to move the block blocking the staircase and enter the area where the Red Candle is found.
Enemies
The Demon presents the largest mix of enemies any dungeon in The Legend of Zelda. All the enemies found are listed below.
- Enemies in Level 7: The Demon
Digdogger
- Main article: Digdogger (The Legend of Zelda)
The Mini-Boss of The Demon is known as Digdogger, and is a repeating boss from a previous dungeon, Level 6: The Dragon. Link fights Digdogger not once, not twice, but thrice in this dungeon. Each battle is almost exactly the same as the last. Most of the time Digdogger is simply guarding a door that leads into the next room. The first Digdogger splits into one mini-Digdogger after Link has played the Recorder, while the second and third ones split into three mini-Digdoggers, adding slightly more difficulty to the battles.
Aquamentus
- Main article: Aquamentus (The Legend of Zelda)
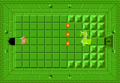
The boss of The Demon is known as Aquamentus, and similarly to the Mini-Boss Digdogger, Aquamentus is a repeating Boss that appeared previously in the first dungeon of the game, Level 1: The Eagle. The battle is exactly the same, and if Link has acquired the Magical Sword, this battle is very simple. This is because it takes only two hits with the Magical Sword to defeat Aquamentus. After Link has defeated Aquamentus, he gains access to the final room of the dungeon, where the seventh and penultimate Triforce fragment lies.
Old Man Location
There are two Old Man locations found in this dungeon. They are both found relatively close to the beginning of the dungeon, and thus are encountered almost immediately after Link starts searching through the dungeon. The first location is found on the east side of the dungeon, only one room up, two rooms right, and lastly one room up from the entrance. This time the Old Man gives a hint on this dungeon. He says, "THERE'S A SECRET IN THE TIP OF THE NOSE".[1] This is a reference to the room that is located at the very tip of the nose in this dungeon. The trick to this room is that Link must defeat all the Wallmasters found here and then push the center block to the right revealing the staircase that leads towards the boss. The second location is slightly further along, and is quite easily the more useful one. Here, the Old Man offers Link a Bomb capacity upgrade from a maximum of 12 to a maximum to 16. He says, "I BET YOU'D LIKE TO HAVE MORE BOMBS."[2] Also, there is a Rupee symbol underneath the Old Man and "-100" underneath the Rupee symbol. By touching the symbol, Link loses one hundred Rupees and gets the upgrade, as well as receiving as many bombs as he can hold.
Hungry Goriya
Unique to this dungeon, there is a Hungry Goriya that can be found blocking the path in the middle section of the dungeon. This Goriya just sits there and blocks the way, mumbling "GRUMBLE, GRUMBLE.."[3] It only moves out of the way if Link feeds it the Food, which can be bought at some shops across Hyrule. After the Goriya is fed, he disappears and allows Link to pass.
Compass & Dungeon Map
Similar to previous dungeons in this game, the Compass and Dungeon Map both appear in this dungeon.
Compass
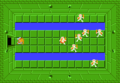
The Compass is found in this dungeon and is used to show Link the location of the Triforce fragment that is hidden in the dungeon on his map via a blinking spot. This spot easily leads Link right to his goal. The Compass is found in a room that contains multiple Stalfos; eight to be exact. One of them holds the Compass, and this one must be killed in order for Link to collect it. This room is found one room up, one room right, and lastly one room up from the entrance.
Dungeon Map
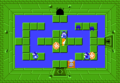
The Dungeon Map shows Link the layout of the dungeon after he has collected it. This helps Link find and enter all the rooms in this dungeon. The room this item is found in contains three Keese, three Blue Goriyas, and two Bubbles. The Map can be found in the middle of the room, just waiting to be grabbed. This room is found by going up four rooms, left one room, and up two rooms from the entrance.
Keys & Locked Doors
There are a bunch of Small Keys and Locked Doors scattered throughout the dungeon. To be exact, there are four Small Keys and five Locked Doors. However, by bombing his way through a secret room in the top-left corner of the map, Link can bypass one of the five Locked Doors. He can also ignore a Locked Door that only leads to a room with two Moldorms, and another that leads to the Old Man offering him the ability to carry more bombs, if he chooses to.
Gallery
Room with the Compass
Room with the Dungeon Map
Room with Aquamentus

Artwork of The Demon


References
- ↑ "THERE'S A SECRET IN THE TIP OF THE NOSE" — Old Man, The Legend of Zelda.
- ↑ "I BET YOU'D LIKE TO HAVE MORE BOMBS" — Old Man, The Legend of Zelda.
- ↑ "GRUMBLE,GRUMBLE.." — Hungry Goriya, The Legend of Zelda.