Level 2 (Second Quest)

Games | ||
Boss | ||
Mini-bosses | ||
Enemies | ||
Inhabitants | ||
Items | ||
Rewards | ||
Related | ||
Level 2 is the second dungeon in the Second Quest of The Legend of Zelda. After obtaining the first Triforce fragment from the first dungeon, Level 2 can be reached by travelling, from the Starting Screen, one screen north, four screens west, and three more screens north. From here, Link must awaken the center Armos on the top row, which is standing on top of the staircase leading into the dungeon. The second Triforce fragment is located here, being guarded by a Gleeok, the boss of the dungeon. After defeating the Dodongo, Link can collect the Triforce fragment and head to the next dungeon.
This dungeon's layout is shaped to form the letter "A". When re-ordered, the layouts of the first five dungeons will spell "ZELDA".
Items
There is only one obtainable item found in this dungeon, the Recorder. To find it from the starting position, go up six times, then right, then down once, then down again through a passable wall, then finally down the staircase.
Enemies
There is a wide variety of enemies in this dungeon, especially for it being only the second dungeon. They are listed below.
- Enemies in Level 2 of the Second Quest
Manhandla
- Main article: Manhandla (The Legend of Zelda)
The Mini-Boss of this dungeon is Manhandla, a plant-like monster who appears a couple of rooms before the Recorder. Much like Link did in The Manji during the First Quest, he must defeat Manhandla with his Sword, or more ideally, a single well-placed Bomb beneath its core.
Gleeok
- Main article: Gleeok (The Legend of Zelda)
The Boss of Level 2 is a multi-headed dragon called Gleeok. It guards the door that leads to the Triforce fragment, and uses its heads to attack any who approach it. Link must use his sword to stab the heads in order to separate each head from the main body, which kills Gleeok. It takes ten hits with the Wooden Sword to remove Gleeok's first head, and six hits for the next one. Defeating Gleeok results in a Heart Container appearing, as well as the entrance to where the Triforce fragment lies.
Dungeon Map & Compass
Similarly to the first dungeon of the game, Level 2 features the Dungeon Map and the Compass.
Compass
- Main article: Compass
The Compass is an item that shows Link the location of the Triforce fragment in this dungeon. It represents it with a flashing circle on the map. It helps show Link a more clear path through the dungeon into the direction of the Triforce fragment. It is found in the room that's up two rooms and right one room from the entrance of the dungeon, where there are three Red Darknuts. After the Darknuts are defeated, the Compass appears in the lower-right portion of the room.
Dungeon Map
- Main article: Dungeon Map
The Dungeon Map is yet again found in Level 2. It is used by Link to show the layout of the dungeon, revealing that the dungeon is shaped like the letter "A". It is found in the room that is six rooms up, one room right, and finally one room up from the entrance to the dungeon. Inside this room there are multiple Blade Traps and Zols. Once the Zols are defeated, the Map appears in the center of the room.
Keys & Locked Doors
Level 2 features quite a few Small Keys and Locked Doors throughout the dungeon. In total, there are seven keys available to be collected throughout the dungeon. These keys can be obtained by defeating all the enemies in one room. Along with these seven keys, there are four Locked Doors, though Link can skip one of them by bombing his way up through the room holding the Compass, and another by simply never unlocking the door holding the Dungeon Map.
Gallery
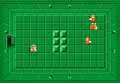
Room with the Compass
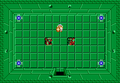
Room with the Dungeon Map
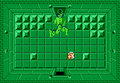
Room with Gleeok


