Level 1 (Second Quest)

Games | ||
Boss | ||
Mini-bosses | ||
Enemies | ||
Inhabitants | ||
Items | ||
Rewards | ||
Related | ||
Level 1 is the first dungeon in the Second Quest of The Legend of Zelda. It is found by going one to the right, four up, and then one left from the Starting Screen, which takes Link to the entrance. This dungeon holds the first of the eight fragments of the Triforce of Wisdom, and Link must travel through the dungeon all the way to the end, where he meets up with the Boss of the dungeon, Aquamentus. After defeating Aquamentus, Link can collect the first of eight Triforce fragments.
This dungeon's layout is shaped to form the letter "E". When re-ordered, the layouts of the first five dungeons will spell "ZELDA".
Items
The only item Link can obtain in this dungeon is the Boomerang, which is one of the most useful items in the game. It can be used to stun larger enemies and kill smaller ones. Unfortunately, this type of Boomerang only travels half the screen. However, later on Link receives an upgrade; the Magical Boomerang, which travels the full length of the screen. The Boomerang is found one room to the right of the entrance. Here, Link encounters five Red Goriyas. After defeating all five Goriyas, the Boomerang appears in the middle of the room.
Enemies
Being the first dungeon in the game, most of the enemies in this dungeon are the simplest enemies found in the game. They include:
- Enemies in Level 1 of the Second Quest
Aquamentus
- Main article: Aquamentus (The Legend of Zelda)
The boss of The Eagle is known as Aquamentus, who is a green dragon that shoots fireballs at Link. This battle takes place right before the room where the Triforce fragment is located, and Aquamentus is standing right in front of the door. With the original Sword, it takes a total of six hits to kill Aquamentus. If Link gets hit by one of the fireballs shot from Aquamentus, he loses half a heart, same if he comes in contact with Aquamentus. After defeating it, Link collects a Heart Container and enters the next room, where he can collect the first Triforce fragment.
Dungeon Map & Compass
This dungeon features the first ever edition of the Dungeon Map and the Compass.
Compass
The Compass is used to show Link the location of the Triforce fragment, which is represented by a flashing circle on Link's map. It is found, from the entrance, up two rooms. Inside this room, there are multiple Stalfos that Link must defeat for the Compass to appear in the lower right portion of the room.
Dungeon Map
The Dungeon Map is used to show Link the layout of the dungeon on his sub-screen. The Dungeon Map is found, from the entrance, four rooms up, one room right, and finally one room down. Inside, Link finds four Keese flying around, along with some Blade Traps. The Dungeon Map can be seen on the floor in upper right portion of the room.
Keys & Locked Doors
Inside Level 1, there are a total of two Small Keys that are scattered throughout the dungeon. These keys can be found by defeating all the enemies in a specific room. Using these keys, Link can unlock each of the two Locked Doors that are also found in the dungeon. However, since one of these Locked Doors only leads to a Dodongo and the Dungeon Map, Link only needs to use one of his keys.
Gallery
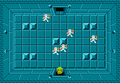
Room with the Compass
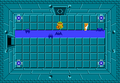
Room with the Dungeon Map
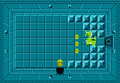
Room with Aquamentus


