Link's Awakening Secret Seashells: Difference between revisions
Theherostyx (talk | contribs) m (Typo fix) |
Theherostyx (talk | contribs) m (Added quick links to some descriptions for further clarity if needed) |
||
| Line 47: | Line 47: | ||
'''Required Item''': [[Sword]] | '''Required Item''': [[Sword]] | ||
'''Secret Seashell #07''' - Just outside of the Seashell Mansion, there are some bushes just to the east. Slash away at the bushes to find a Secret Seashell.}}<section end=Shell07 /> | '''Secret Seashell #07''' - Just outside of the [[Seashell Mansion]], there are some bushes just to the east. Slash away at the bushes to find a Secret Seashell.}}<section end=Shell07 /> | ||
<section begin=Shell08 />{{Gallery/Box|file=Seashell-08.jpg|caption='''Location''': [[Ukuku Prairie]] | <section begin=Shell08 />{{Gallery/Box|file=Seashell-08.jpg|caption='''Location''': [[Ukuku Prairie]] | ||
| Line 53: | Line 53: | ||
'''Required Item''': [[Power Bracelet]] | '''Required Item''': [[Power Bracelet]] | ||
'''Secret Seashell #08''' - From the Seashell Mansion, head to the southwest and you'll find an area with a a number of Pig [[Moblin]]s. There is a lone stone in this area that can be lifted to discover a Secret Seashell.}}<section end=Shell08 /> | '''Secret Seashell #08''' - From the [[Seashell Mansion]], head to the southwest and you'll find an area with a a number of Pig [[Moblin]]s. There is a lone stone in this area that can be lifted to discover a Secret Seashell.}}<section end=Shell08 /> | ||
<section begin=Shell09 />{{Gallery/Box|file=Seashell-09.jpg|caption='''Location''': [[Ukuku Prairie]] | <section begin=Shell09 />{{Gallery/Box|file=Seashell-09.jpg|caption='''Location''': [[Ukuku Prairie]] | ||
| Line 59: | Line 59: | ||
'''Required Items''': [[Bomb]]s, [[Shovel]] | '''Required Items''': [[Bomb]]s, [[Shovel]] | ||
'''Secret Seashell #09''' - From the Seashell Mansion, head to the southwest and enter the cave in this direction. Inside make your way to the left and toss a bomb against the cracked wall on the left side of the room. Navigate through the rest of the cave to make your way outside. Just to the north is an owl statue and if you dig just southwest of the statue, a Secret Seashell will pop up.}}<section end=Shell09 /> | '''Secret Seashell #09''' - From the [[Seashell Mansion]], head to the southwest and enter the cave in this direction. Inside make your way to the left and toss a bomb against the cracked wall on the left side of the room. Navigate through the rest of the cave to make your way outside. Just to the north is an owl statue and if you dig just southwest of the statue, a Secret Seashell will pop up.}}<section end=Shell09 /> | ||
<section begin=Shell10 />{{Gallery/Box|file=Seashell-10.jpg|caption='''Location''': [[Martha's Bay]] | <section begin=Shell10 />{{Gallery/Box|file=Seashell-10.jpg|caption='''Location''': [[Martha's Bay]] | ||
| Line 71: | Line 71: | ||
'''Required Items''': [[Bomb]]s, [[Shovel]] | '''Required Items''': [[Bomb]]s, [[Shovel]] | ||
'''Secret Seashell #11''' - Located just southwest of Kanalet Castle and directly east from the east exit of Mabe Village. There is a large skull on the ground that Link can blowup with a bomb. Within the rubble, there is a soft soil spot right in the middle. Dig it up with the shovel to get | '''Secret Seashell #11''' - Located just southwest of [[Kanalet Castle]] and directly east from the east exit of Mabe Village. There is a large skull on the ground that Link can blowup with a bomb. Within the rubble, there is a soft soil spot right in the middle. Dig it up with the shovel to get a Secret Seashell.}}<section end=Shell11 /> | ||
<section begin=Shell12 />{{Gallery/Box|file=Seashell-14.jpg|caption='''Location''': [[Mysterious Woods|Mysterious Forest]] | <section begin=Shell12 />{{Gallery/Box|file=Seashell-14.jpg|caption='''Location''': [[Mysterious Woods|Mysterious Forest]] | ||
| Line 131: | Line 131: | ||
'''Required Item''': [[Ocarina]], [[Ballad of the Wind Fish]] | '''Required Item''': [[Ocarina]], [[Ballad of the Wind Fish]] | ||
'''Secret Seashell #21''' - At the northeast portion of the Desert, Link will find an Owl Statue. Use the shovel and dig up the sand that is just south of the owl statue right up against the cactus to uncover a Secret Seashell.}}<section end=Shell21 /> | '''Secret Seashell #21''' - At the northeast portion of the [[Yarna Desert]], Link will find an Owl Statue. Use the shovel and dig up the sand that is just south of the owl statue right up against the cactus to uncover a Secret Seashell.}}<section end=Shell21 /> | ||
<section begin=Shell22 />{{Gallery/Box|file=Seashell-29.jpg|caption='''Location''': [[Yarna Desert]] | <section begin=Shell22 />{{Gallery/Box|file=Seashell-29.jpg|caption='''Location''': [[Yarna Desert]] | ||
| Line 143: | Line 143: | ||
'''Required Item''': [[Ocarina]], [[Ballad of the Wind Fish]] | '''Required Item''': [[Ocarina]], [[Ballad of the Wind Fish]] | ||
'''Secret Seashell #23''' - Return to where the Walrus was located and once again play the Ballad of the Wind Fish. The Walrus will reappear in the water and will spit out a Secret Seashell for Link.}}<section end=Shell23 /> | '''Secret Seashell #23''' - Return to where the [[Walrus]] was located and once again play the Ballad of the Wind Fish. The Walrus will reappear in the water and will spit out a Secret Seashell for Link.}}<section end=Shell23 /> | ||
<section begin=Shell24 />{{Gallery/Box|file=Seashell-25.jpg|caption='''Location''': [[Martha's Bay]] | <section begin=Shell24 />{{Gallery/Box|file=Seashell-25.jpg|caption='''Location''': [[Martha's Bay]] | ||
| Line 221: | Line 221: | ||
'''Required Item''': [[Flippers]] | '''Required Item''': [[Flippers]] | ||
'''Secret Seashell #36''' - Just northeast of Key Cavern, there is a small island. Swim over and slash the bush to find Secret Seashell.}}<section end=Shell36 /> | '''Secret Seashell #36''' - Just northeast of [[Key Cavern]], there is a small island. Swim over and slash the bush to find a Secret Seashell.}}<section end=Shell36 /> | ||
<section begin=Shell37 />{{Gallery/Box|file=Seashell-41.jpg|caption='''Location''': [[Animal Village]] | <section begin=Shell37 />{{Gallery/Box|file=Seashell-41.jpg|caption='''Location''': [[Animal Village]] | ||
| Line 227: | Line 227: | ||
'''Required Item''': [[Magnifying Lens]] | '''Required Item''': [[Magnifying Lens]] | ||
'''Secret Seashell #37''' - After acquiring the Magnifying Lens, return to Animal Village and enter the house at the northeast corner. The [[Zora]] is now visible and if you talk to him, he will give Link a Secret Seashell.}}<section end=Shell37 /> | '''Secret Seashell #37''' - After acquiring the Magnifying Lens, return to [[Animal Village]] and enter the house at the northeast corner. The [[Zora]] is now visible and if you talk to him, he will give Link a Secret Seashell.}}<section end=Shell37 /> | ||
<section begin=Shell38 />{{Gallery/Box|file=Seashell-42.jpg|caption='''Location''': [[Ukuku Prairie]] | <section begin=Shell38 />{{Gallery/Box|file=Seashell-42.jpg|caption='''Location''': [[Ukuku Prairie]] | ||
| Line 239: | Line 239: | ||
'''Required Item''': [[Shovel]], 100 [[Rupee]]s, [[Hookshot]] (Recommended) | '''Required Item''': [[Shovel]], 100 [[Rupee]]s, [[Hookshot]] (Recommended) | ||
'''Secret Seashell #39''' - Near the center of the Rapids Ride there is a small island with what appears to have nothing on it. Use the | '''Secret Seashell #39''' - Near the center of the Rapids Ride there is a small island with what appears to have nothing on it. Use the [[Hookshot]] to grapple onto the vines right next to it and climb up. Use the Shovel to dig up the top-right corner to find a Secret Seashell.}}<section end=Shell39 /> | ||
<section begin=Shell40 />{{Gallery/Box|file=Seashell-44.jpg|caption='''Location''': [[Rapids Ride]] | <section begin=Shell40 />{{Gallery/Box|file=Seashell-44.jpg|caption='''Location''': [[Rapids Ride]] | ||
| Line 257: | Line 257: | ||
'''Required Item''': Complete [[Face Shrine]] | '''Required Item''': Complete [[Face Shrine]] | ||
'''Secret Seashell #42''' - After completing Face Shrine, some new fish will occasionally appear. One of which is a Cheep-Cheep. Catch a cheep-cheep and you will be awarded with a Secret Seashell.}}<section end=Shell42 /> | '''Secret Seashell #42''' - After completing Face Shrine, some new fish will occasionally appear. One of which is a [[Cheep-Cheep]]. Catch a cheep-cheep and you will be awarded with a Secret Seashell.}}<section end=Shell42 /> | ||
<section begin=Shell43 />{{Gallery/Box|file=Seashell-52.jpg|caption='''Location''': [[Mabe Village]] | <section begin=Shell43 />{{Gallery/Box|file=Seashell-52.jpg|caption='''Location''': [[Mabe Village]] | ||
| Line 263: | Line 263: | ||
'''Required Item''': Complete [[Face Shrine]] | '''Required Item''': Complete [[Face Shrine]] | ||
'''Secret Seashell #43''' - Also after completing Face Shrine, a Blooper will appear at the Fishing Pond. While it’s movement looks awkward, the mechanics are the same as a regular fish. When it is pulling away, let it go and don’t try to reel him in. Then once its settled down, slowly reel him in. After catching a Blooper, you will get a heavyweight lure, as well as another Secret Seashell.}}<section end=Shell43 /> | '''Secret Seashell #43''' - Also after completing Face Shrine, a [[Blooper]] will appear at the Fishing Pond. While it’s movement looks awkward, the mechanics are the same as a regular fish. When it is pulling away, let it go and don’t try to reel him in. Then once its settled down, slowly reel him in. After catching a Blooper, you will get a heavyweight lure, as well as another Secret Seashell.}}<section end=Shell43 /> | ||
<section begin=Shell44 />{{Gallery/Box|file=Seashell-48.jpg|caption='''Location''': [[Tal Tal Heights]] | <section begin=Shell44 />{{Gallery/Box|file=Seashell-48.jpg|caption='''Location''': [[Tal Tal Heights]] | ||
| Line 275: | Line 275: | ||
'''Required Item''': [[Bomb]]s, [[Power Bracelet]] and [[Flippers]] | '''Required Item''': [[Bomb]]s, [[Power Bracelet]] and [[Flippers]] | ||
'''Secret Seashell #45''' - Just under the bridge to the west of the to the [[Hen House]] in the [[Tal Tal Heights]], you'll notice a hole where Link can toss a | '''Secret Seashell #45''' - Just under the bridge to the west of the to the [[Hen House]] in the [[Tal Tal Heights]], you'll notice a hole where Link can toss a [[Bomb]] (the same kind as Seashell #17). When you throw a bomb in the hole, a Secret Seashell will pop out of it.}}<section end=Shell45 /> | ||
<section begin=Shell46 />{{Gallery/Box|file=Seashell-37.jpg|caption='''Location''': [[Tal Tal Heights]] | <section begin=Shell46 />{{Gallery/Box|file=Seashell-37.jpg|caption='''Location''': [[Tal Tal Heights]] | ||
| Line 285: | Line 285: | ||
<section begin=Shell47 />{{Gallery/Box|file=Seashell-47.jpg|caption='''Location''': [[Tal Tal Mountain Range]] | <section begin=Shell47 />{{Gallery/Box|file=Seashell-47.jpg|caption='''Location''': [[Tal Tal Mountain Range]] | ||
'''Required Item''': [[Flippers]] | '''Required Item''': [[Flippers]], [[Bomb]] | ||
'''Secret Seashell #47''' - Inside the cave that leads towards Eagle's Tower, you can use a bomb to blowup the north wall. Climb up steps here and then head down a screen. Avoid the treasure chests for now and push the blocks out of the way. Exit the cave and open the chest to get a Secret Seashell.}}<section end=Shell47 /> | '''Secret Seashell #47''' - Inside the cave that leads towards [[Eagle's Tower]], you can use a [[bomb]] to blowup the north wall. Climb up steps here and then head down a screen. Avoid the treasure chests for now and push the blocks out of the way. Exit the cave and open the chest to get a Secret Seashell.}}<section end=Shell47 /> | ||
<section begin=Shell48 />{{Gallery/Box|file=Seashell-39.jpg|caption='''Location''': [[Eagle's Tower]] | <section begin=Shell48 />{{Gallery/Box|file=Seashell-39.jpg|caption='''Location''': [[Eagle's Tower]] | ||
| Line 293: | Line 293: | ||
'''Required Item''': Access to [[Eagle's Tower]] | '''Required Item''': Access to [[Eagle's Tower]] | ||
'''Secret Seashell #48''' - This Secret Seashell is hidden in a treasure chest, located in the north-west corner of the 1st floor of the [[Eagle's Tower]] dungeon. When Link reaches the room with a Red Hinox, purposely fall down a hole on the left side of the room to land on the higher ledge. From here walk up to reach the treasure chest.}}<section end=Shell48 /> | '''Secret Seashell #48''' - This Secret Seashell is hidden in a treasure chest, located in the north-west corner of the 1st floor of the [[Eagle's Tower]] dungeon. When Link reaches the room with a Red [[Hinox]], purposely fall down a hole on the left side of the room to land on the higher ledge. From here walk up to reach the treasure chest.}}<section end=Shell48 /> | ||
<section begin=Shell49 />{{Gallery/Box|file=Seashell-49.jpg|caption='''Location''': Western [[Tal Tal Mountains]] | <section begin=Shell49 />{{Gallery/Box|file=Seashell-49.jpg|caption='''Location''': Western [[Tal Tal Mountains]] | ||
Revision as of 21:08, September 27, 2019
Below is a listing of all 50 Secret Seashells found in the Link's Awakening for the Nintendo Switch
For the original version on the Game Boy and the DX remake on the Game Boy Color, view that particular Seashell Guide.
UNDER CONSTRUCTION

Location: Mabe Village
Required Item: Sword
Secret Seashell #01 - At the east side of Mabe Village, just north of the Trendy Game, there is a small 6×6 patch of small bushes. Slash them down and you'll find a Secret Seashell hidden underneath one of them.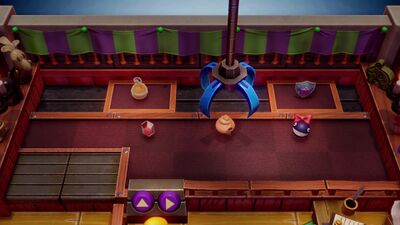
Location: Mabe Village
Required Item: Sword
Secret Seashell #02 - After initially playing the Trendy Game and acquiring the Yoshi Doll and Piece of Heart, return and a Secret Seashell will now be an award. Grab it with the crane to snag a Secret Seashell.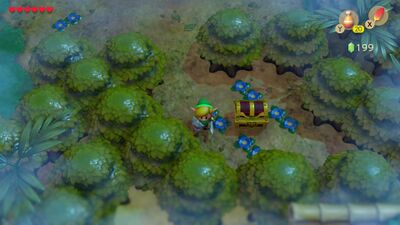
Location: Mysterious Forest
Required Item: Power Bracelet
Secret Seashell #03 - Found within the Mysterious Forest. There is treasure chest located near the west part of the forest that is behind a boulder. Lift up the boulder with the Power Bracelet and open the chest to get a Secret Seashell.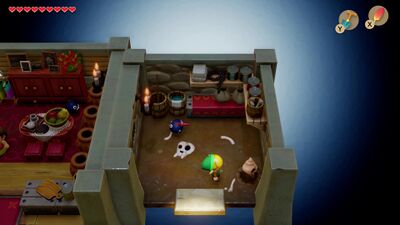
Location: Mabe Village
Required Item: Shovel
Secret Seashell #04 - Enter the small doghouse on the right side of Madam MeowMeow’s house that holds the small chain chomp. Use the shovel to dig up the bottom-right of the screen to find a Secret Seashell.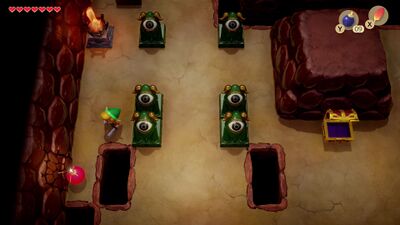
Location: Tail Cave
Required Item: Bombs
Secret Seashell #05 - Found within one of the rooms in Tail Cave. From the dungeon entrance, head up a screen, left a screen, and up a screen. Place a bomb against the crack in the west wall and open the treasure chest in this hidden room to get a Secret Seashell.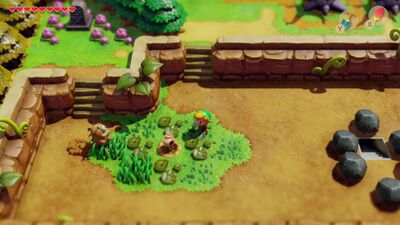
Location: Koholint Prairie
Required Item: Shovel
Secret Seashell #06 - Make your way back to the Witch's Hut located just east of the Mysterious Forest and north of the Ukuku Prairie. From here head left a screen, lift the stone, and then head down. Beware of the zombies that come from underground in this area. There is a lone bush in the center of the screen. Cut it down and then use the shovel to collect a Secret Seashell.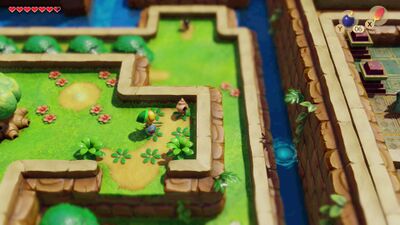
Location: Seashell Mansion
Required Item: Sword
Secret Seashell #07 - Just outside of the Seashell Mansion, there are some bushes just to the east. Slash away at the bushes to find a Secret Seashell.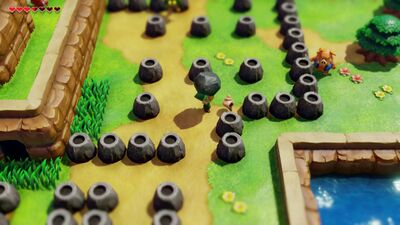
Location: Ukuku Prairie
Required Item: Power Bracelet
Secret Seashell #08 - From the Seashell Mansion, head to the southwest and you'll find an area with a a number of Pig Moblins. There is a lone stone in this area that can be lifted to discover a Secret Seashell.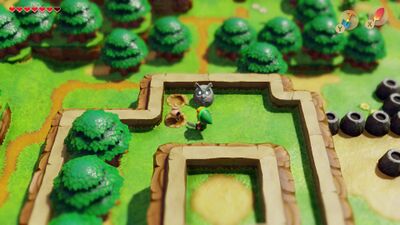
Location: Ukuku Prairie
Secret Seashell #09 - From the Seashell Mansion, head to the southwest and enter the cave in this direction. Inside make your way to the left and toss a bomb against the cracked wall on the left side of the room. Navigate through the rest of the cave to make your way outside. Just to the north is an owl statue and if you dig just southwest of the statue, a Secret Seashell will pop up.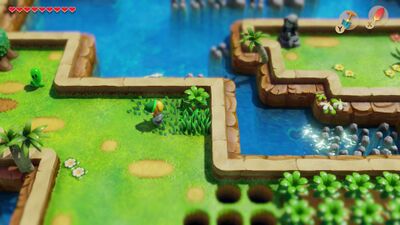
Location: Martha's Bay
Required Item: None
Secret Seashell #10 - Located at Martha's Bay, at the south-central portion of Koholint Island. Just east of the Telephone Booth, there is a bush right up in the corner. Slash at the bush to find the seashell.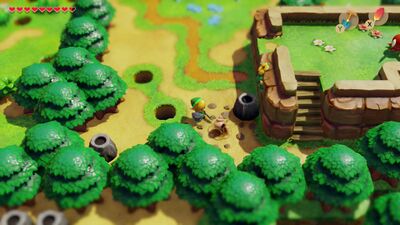
Location: Ukuku Prairie
Secret Seashell #11 - Located just southwest of Kanalet Castle and directly east from the east exit of Mabe Village. There is a large skull on the ground that Link can blowup with a bomb. Within the rubble, there is a soft soil spot right in the middle. Dig it up with the shovel to get a Secret Seashell.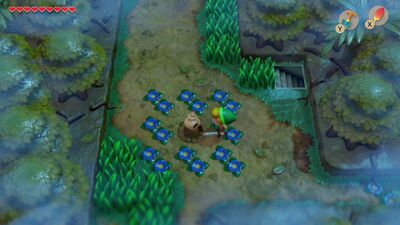
Location: Mysterious Forest
Required Item: Shovel
Secret Seashell #12 - Right in the center of the Mysterious Forest, there is an area that has 8 small blue flowers. Dig up the soil spot right in the center to find a Secret Seashell.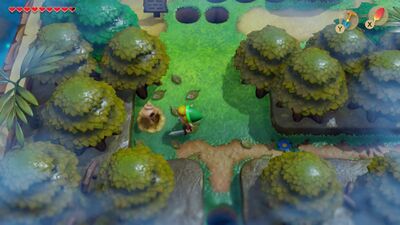
Location: Mysterious Forest
Required Item: Shovel
Secret Seashell #13 - At the far northwest corner of the Mysterious Forest, use the shovel to dig up the soil along the west wall, near the trees to find a Secret Seashell.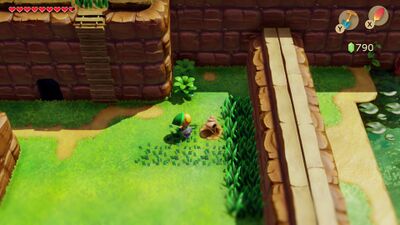
Location: Goponga Swamp
Required Item: Shovel
Secret Seashell #14 - West of the Goponogo Swamp there is a Telephone Booth. Just north of the booth there is some tall grass and a lone bush. Slash the bush and then dig it up to find a Secret Seashell that is hidden underground.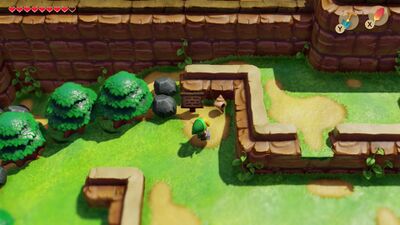
Location: Goponga Swamp
Required Item: Power Bracelet
Secret Seashell #15 - Just east of the entrance to Bottle Grotto, there is a sign and a series of rocks. Lift the rock up that is on the right side to find a Secret Seashell.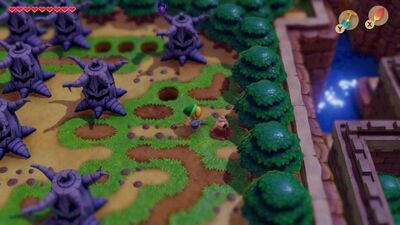
Location: Tabahl Wasteland
Required Item: Shovel
Secret Seashell #16 - At the northeast part of the Tabahl Wasteland, just south of Dampé's Shack, Link can use the Shovel to dig up the soil along the eastern edge. A Secret Seashell is hidden underground here.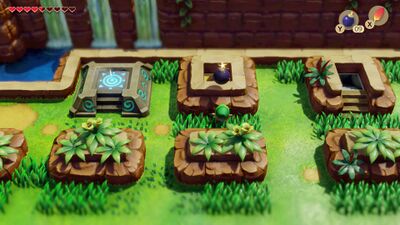
Location: Tal Tal Heights
Required Items: Power Bracelet, Bombs
Secret Seashell #17 - Located within the Tal Tal Heights region, directly east of Dampé's Shack. Right next to the warp portal, there is a hole where Link can toss a bomb. The explosion will cause a Secret Seashell to jump out.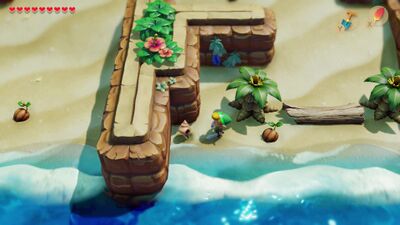
Location: Toronbo Shores
Required Item: Shovel
Secret Seashell #18 - On the Toronbo Shores, travel to the southeast edge of the beach and you'll find a small log. Walk around the tree and dig up the sand at the far west edge against the wall to find a Secret Seashell.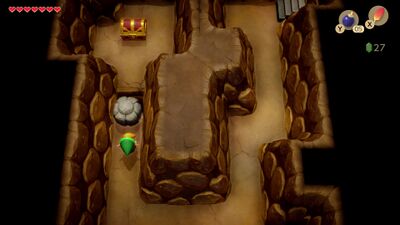
Location: Richard's Villa
Required Item: Golden Leaves, Roc's Feather
Secret Seashell #19 - After acquiring the Golden Leaves from Kanalet Castle, return to Richard's Villa and head down the staircase. Take the path on the left and push the block. Jump over the gap to reach the treasure chest that contains a Secret Seashell.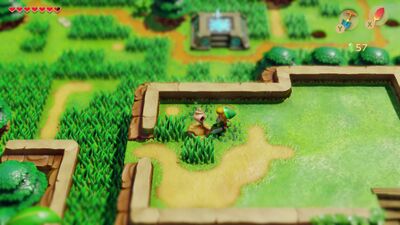
Location: Ukuku Prairie
Required Item: Shovel
Secret Seashell #20 - Just north of the entrance to Key Cavern, there are four small patches of grass. Use your shovel and dig up the spot right in the middle to find a Secret Seashell.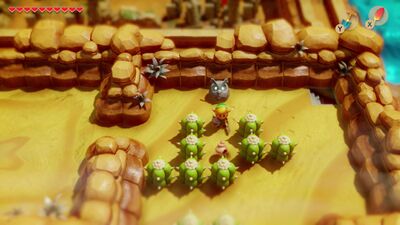
Location: Yarna Desert
Required Item: Ocarina, Ballad of the Wind Fish
Secret Seashell #21 - At the northeast portion of the Yarna Desert, Link will find an Owl Statue. Use the shovel and dig up the sand that is just south of the owl statue right up against the cactus to uncover a Secret Seashell.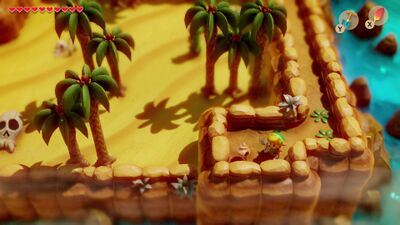
Location: Yarna Desert
Required Item: Ocarina, Ballad of the Wind Fish
Secret Seashell #22 - At the far southeast corner of the Yarna Desert there are two rocks. Lift the bottom one to find a Secret Seashell.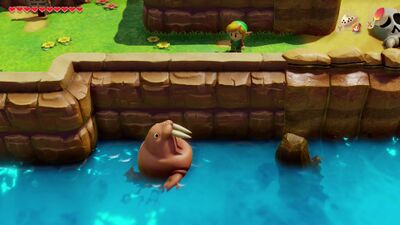
Location: Yarna Desert
Required Item: Ocarina, Ballad of the Wind Fish
Secret Seashell #23 - Return to where the Walrus was located and once again play the Ballad of the Wind Fish. The Walrus will reappear in the water and will spit out a Secret Seashell for Link.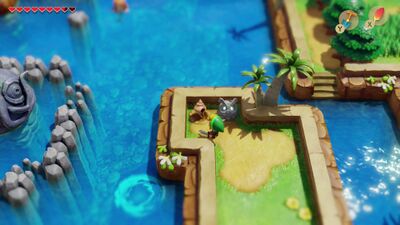
Location: Martha's Bay
Required Item: Flippers, Shovel
Secret Seashell #24 - Just east of Catfish's Maw, there is an Owl statue on the small island. Use the shovel to dig up the soil just west of the statue to find a Secret Seashell.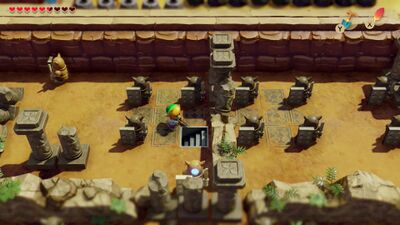
Location: Ancient Ruins
Required Item: Flippers, Bow (Recommended)
Secret Seashell #25 - Found in the Ancient Ruins on the route to the South Face Shrine, near the north-central portion of the ruins there are four Armos statues next to each other. Tap the one at the bottom-right to reveal a staircase that leads to a hidden room containing a Secret Seashell.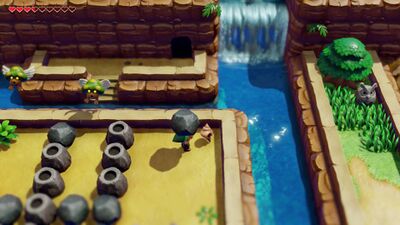
Location: East Koholint Island
Required Item: Flippers
Secret Seashell #26 - At the east end of the Koholint Island, just north of the Ancient Ruins, there are a series of boulders that Link can pick up. The lonely one at the northeast corner covers a Secret Seashell.
Location: Dampé's Shack
Required Item: Complete Key Cavern
Secret Seashell #27 - Complete four of Dampé's challenges in the Chamber Dungeon to be rewarded with a Secret Seashell.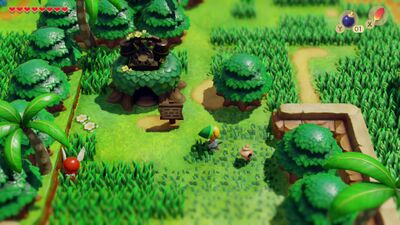
Location: Ukuku Prairie
Required Item: Pegasus Boots
Secret Seashell #28 - Just east of Mabe Village, there is a telephone booth. Dash into the tree just to the right of it to get a Secret Seashell.
Location: Tail Cave
Required Item: Pegasus Boots
Secret Seashell #29 - Just west of the entrance to Tail Cave, there is a lone tree that is right in the middle of the area. Dash into it with the Pegasus Boots to get a Secret Seashell.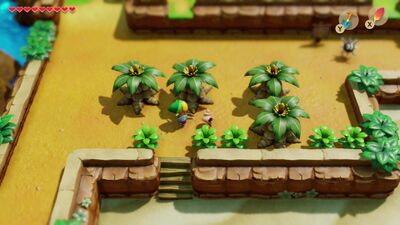
Location: Toronbo Shores
Required Item: Pegasus Boots
Secret Seashell #30 - At the southwest corner of the island there are four Palm Trees near the Toronbo Shores. Three of them are on one row and one is just below. Dash into the lower one with the Pegasus Boots to get a Secret Seashell to pop out.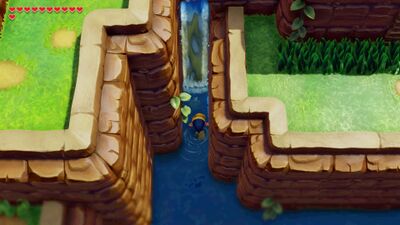
Location: Kanalet Castle
Required Item: Flippers
Secret Seashell #31 - Found in the moat that surrounds Kanalet Castle. In the stream of water just northwest of Castle, there is a waterfall that brings water from Tal Tal Heights to the Kanalet Castle moat. Dive underwater right up against the waterfall to get a Secret Seashell.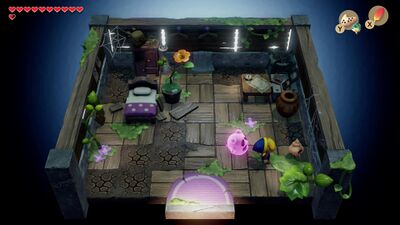
Location: Martha's Bay
Required Item: Complete Angler's Tunnel
Secret Seashell #32 - After completing Angler's Tunnel, a Ghost will appear and will follow Link around. Take him to his house at the far west end of Martha's Bay, right on the border with the Toronbo Shores. After he explores his house, lift up the pots at the bottom-right of the house, one of which holds a Secret Seashell.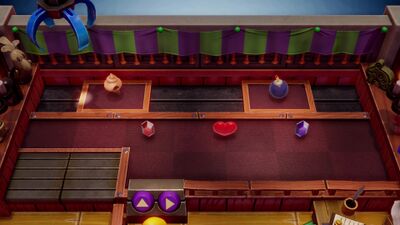
Location: Trendy Game
Required Item: Complete Angler's Tunnel
Secret Seashell #33 - After completing Angler's Tunnel, another Secret Seashell becomes available as a reward over at the Trendy Game.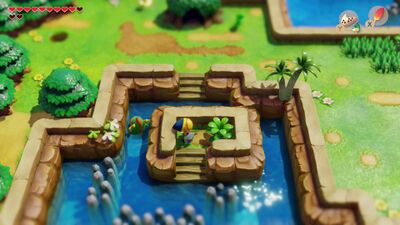
Location: Martha's Bay
Required Item: Flippers
Secret Seashell #34 - There is a tiny island at the south end of Martha's Bay. Once Link has the flippers, he can swim over and slash at the bush to find a Secret Seashell.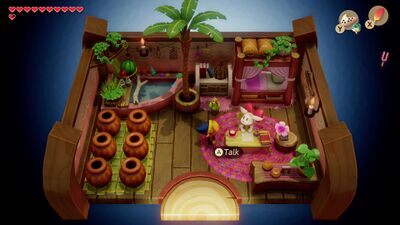
Location: Animal Village
Required Item: Acquire Broom
Secret Seashell #35 - During the Trading Sequence, Link will need to deliver the Letter to Mr. Write to acquire the Broom. After doing so, he can return to Christine at Animal Village and speak to her to get a Secret Seashell.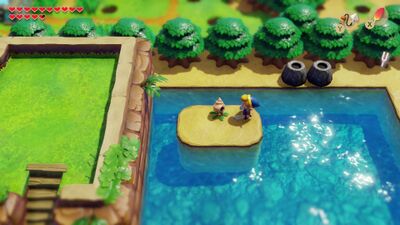
Location: Ukuku Prairie
Required Item: Flippers
Secret Seashell #36 - Just northeast of Key Cavern, there is a small island. Swim over and slash the bush to find a Secret Seashell.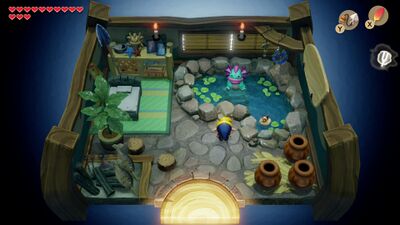
Location: Animal Village
Required Item: Magnifying Lens
Secret Seashell #37 - After acquiring the Magnifying Lens, return to Animal Village and enter the house at the northeast corner. The Zora is now visible and if you talk to him, he will give Link a Secret Seashell.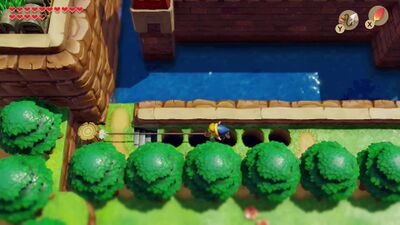
Location: Ukuku Prairie
Required Item: Hookshot
Secret Seashell #38 - Just outside of Kanalet Castle, there are a series of holes just west of the front gate. Use the Hookshot to grapple over the holes and head down the staircase. Open the treasure chest to find a Secret Seashell.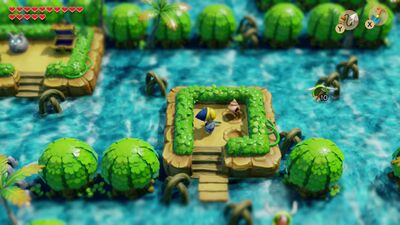
Location: Rapids Ride
Required Item: Shovel, 100 Rupees, Hookshot (Recommended)
Secret Seashell #39 - Near the center of the Rapids Ride there is a small island with what appears to have nothing on it. Use the Hookshot to grapple onto the vines right next to it and climb up. Use the Shovel to dig up the top-right corner to find a Secret Seashell.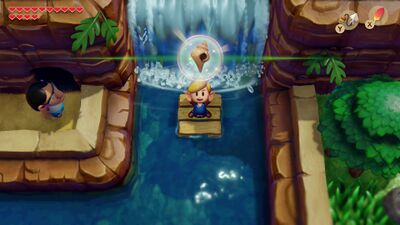
Location: Rapids Ride
Secret Seashell #40 - Play the Rapids Race and finish the race in under 35-seconds to earn a Secret Seashell.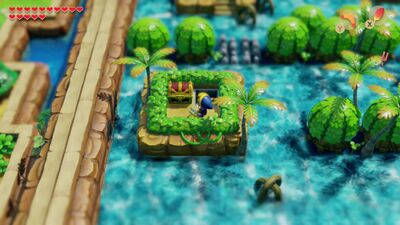
Location: Face Shrine
Required Item: Lv2 Power Bracelet
Secret Seashell #41 - While venturing through Face Shrine, take the exit at the far northwest corner of the dungeon. This will take you outside, appearing on an island within the Rapids Ride. Open the treasure chest to get a Secret Seashell.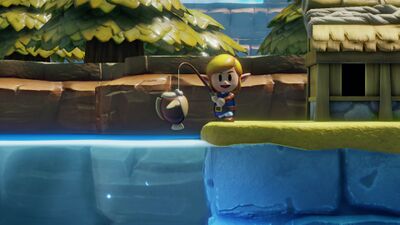
Location: Mabe Village
Required Item: Complete Face Shrine
Secret Seashell #42 - After completing Face Shrine, some new fish will occasionally appear. One of which is a Cheep-Cheep. Catch a cheep-cheep and you will be awarded with a Secret Seashell.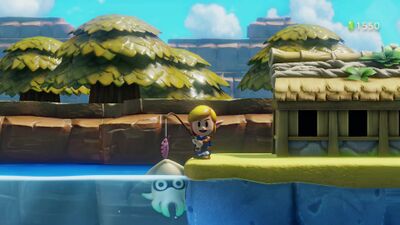
Location: Mabe Village
Required Item: Complete Face Shrine
Secret Seashell #43 - Also after completing Face Shrine, a Blooper will appear at the Fishing Pond. While it’s movement looks awkward, the mechanics are the same as a regular fish. When it is pulling away, let it go and don’t try to reel him in. Then once its settled down, slowly reel him in. After catching a Blooper, you will get a heavyweight lure, as well as another Secret Seashell.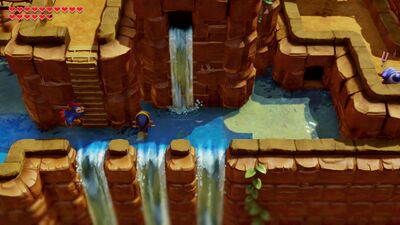
Location: Tal Tal Heights
Required Item: Flippers
Secret Seashell #44 - Once you are back outside on the Tal Tal Mountain Range, travel eastward until you reach the deep water and the large ladder. Just to the right near the waterfall, dive down below to find a Secret Seashell.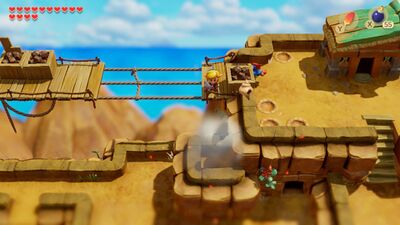
Location: Tal Tal Heights
Required Item: Bombs, Power Bracelet and Flippers
Secret Seashell #45 - Just under the bridge to the west of the to the Hen House in the Tal Tal Heights, you'll notice a hole where Link can toss a Bomb (the same kind as Seashell #17). When you throw a bomb in the hole, a Secret Seashell will pop out of it.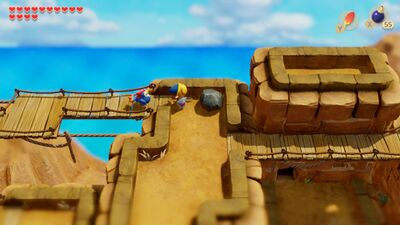
Location: Tal Tal Heights
Required Item: Flippers, Roc's Feather or Flying Rooster
Secret Seashell #46 - Cross the bridge to the east from the Hen House in Tal Tal Heights. You'll notice a formation of 3 rocks blocking your way. Underneath the right most rock hides a Secret Seashell.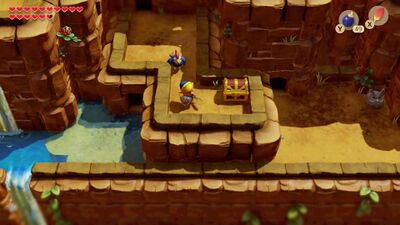
Location: Tal Tal Mountain Range
Secret Seashell #47 - Inside the cave that leads towards Eagle's Tower, you can use a bomb to blowup the north wall. Climb up steps here and then head down a screen. Avoid the treasure chests for now and push the blocks out of the way. Exit the cave and open the chest to get a Secret Seashell.
Location: Eagle's Tower
Required Item: Access to Eagle's Tower
Secret Seashell #48 - This Secret Seashell is hidden in a treasure chest, located in the north-west corner of the 1st floor of the Eagle's Tower dungeon. When Link reaches the room with a Red Hinox, purposely fall down a hole on the left side of the room to land on the higher ledge. From here walk up to reach the treasure chest.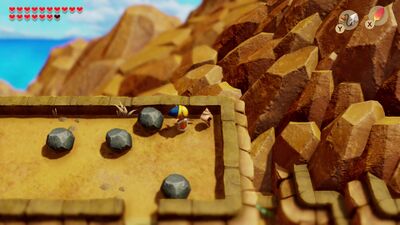
Location: Western Tal Tal Mountains
Required Item: Hookshot
Secret Seashell #49 - After traveling west from the Hen House on the top of the Tal Tal Mountain Range, Link will travel through a cave and will come out just to the west of the Egg that is on top of Mt. Tamaranch. There are a series of rocks that Link can pickup here and the one at the northeast corner hides a Secret Seashell.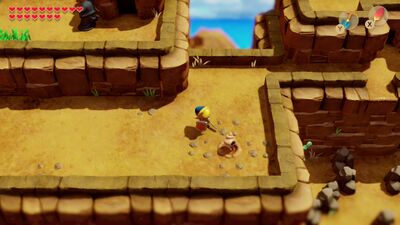
Location: Western Tal Tal Mountains
Required Item: Mirror Shield
Secret Seashell #50 - Just east of the entrance to Turtle Rock, Link will find some small rocks that surround a soil spot in the sand. Use the shovel to dig up a Secret Seashell found here.


