Level 1: The Eagle: Difference between revisions
(→Items) |
m (Text replacement - "{{References}}↵↵{{Listbox|" to "{{References}} {{clear}} {{Listbox|") |
||
| (14 intermediate revisions by 6 users not shown) | |||
| Line 1: | Line 1: | ||
{{Infobox|dungeon | {{Infobox|dungeon | ||
| image | | image = [[File:Level-1-the-eagle.png]] | ||
| caption | | caption = | ||
| game | | game = ''[[The Legend of Zelda]]'' | ||
| boss | | location = North-east island in the lake | ||
| enemies | | boss = [[Aquamentus (The Legend of Zelda)|Aquamentus]] | ||
| item | | miniboss = | ||
| reward | | enemies = [[Blade Trap]]<br/>[[Gel]]<br/>[[Goriya]]<br/>[[Keese]]<br/>[[Stalfos]]<br/>[[Wallmaster]] | ||
| walkthrough = [ | | inhab = [[Old Man (The Legend of Zelda)|Old Man]] | ||
| item = [[Bow]]<br/>[[Boomerang]] | |||
| prereq = | |||
| reward = [[Triforce Shard|Triforce Fragment]]<br/>[[Heart Container]] | |||
| related = [[Level 1 (Second Quest)]]<br/>[[Level 1 (BS The Legend of Zelda MAP 1)]]<br/>[[Level 1 (BS The Legend of Zelda MAP 2)]] | |||
| walkthrough = [https://www.zeldadungeon.net/the-legend-of-zelda-walkthrough/level-1-the-eagle/ Text Walkthrough]<br/>[https://www.youtube.com/watch?v=U4wptz77hKg Video Walkthrough] | |||
}} | }} | ||
{{ZD|[https://www.zeldadungeon.net/the-legend-of-zelda-walkthrough/level-1-the-eagle/ '''Legend of Zelda''' Walkthrough<br/>Chapter 2: The Eagle]}} | |||
'''Level 1: The Eagle''' is the first [[dungeon]] in ''[[The Legend of Zelda]]''. It is found by going one to the right, four up, and then one left from the [[Starting Screen]], which takes Link to the entrance. This dungeon holds the first of the eight [[Triforce Shard|Triforce fragments]], and Link must travel through the dungeon all the way to the end, where he meets up with the [[Boss]] of the dungeon, [[Aquamentus (The Legend of Zelda)|Aquamentus]]. After defeating Aquamentus, Link can collect the guarded Triforce fragment. | |||
'''Level 1: The Eagle''' is the first [[dungeon]] in ''[[The Legend of Zelda]]''. It is found by going one to the right, four up, and then one left from the [[Starting Screen]], which takes Link to the entrance. This dungeon holds the first of the eight [[Triforce Shard]] | |||
==Items== | ==Items== | ||
There are two different items that Link can obtain in this dungeon. The first is the [[Bow]], which can be found in a side-scrolling section of the dungeon. This side-scrolling area can be accessed from a staircase in the room that's at the | There are two different items that Link can obtain in this dungeon. The first is the [[Bow]], which can be found in a side-scrolling section of the dungeon. This side-scrolling area can be accessed from a staircase in the room that's at the northernmost point in the dungeon. It cannot be used, however, until Link has bought the [[Arrow]]s from any of the [[Item Shop|shops]] around [[Hyrule]]. The price for these Arrows is 80 [[Rupee]]s. After Link has purchased the Arrows, every time he shoots one, he loses one Rupee. | ||
The second item Link can obtain in this dungeon is the [[Boomerang]], which is one of the most useful items in the game. It can be used to stun larger enemies and kill smaller ones. Unfortunately, this type of Boomerang only travels half the screen. However, later on Link receives an upgrade; the [[Magical Boomerang]], which travels the full length of the screen. The Boomerang is found, from the entrance, two rooms up, one room left, one room up, and finally two rooms right. Here, Link encounters three [[Goriya|Red Goriyas]]. After defeating all three Goriyas, the Boomerang appears in the upper portion of the room. | The second item Link can obtain in this dungeon is the [[Boomerang]], which is one of the most useful items in the game. It can be used to stun larger enemies and kill smaller ones. Unfortunately, this type of Boomerang only travels half the screen. However, later on Link receives an upgrade; the [[Magical Boomerang]], which travels the full length of the screen. The Boomerang is found, from the entrance, two rooms up, one room left, one room up, and finally two rooms right. Here, Link encounters three [[Goriya|Red Goriyas]]. After defeating all three Goriyas, the Boomerang appears in the upper portion of the room. | ||
==Enemies== | ==Enemies== | ||
<gallery widths=80 heights=80 caption="Enemies in Level 1: The Eagle" perrow=6> | |||
File:Blade-Trap-LoZ-Sprite.png|link=Blade Trap|[[Blade Trap]] | |||
File:Gel-LoZ-Sprite.png|link=Gel|[[Gel]] | |||
File:Goriya-Red-LoZ-Sprite.png|link=Goriya|[[Goriya]] | |||
File:Keese-LoZ-Sprite.png|link=Keese|[[Keese]] | |||
File:Stalfos-LoZ-Sprite.png|link=Stalfos|[[Stalfos]] | |||
File:Wallmaster-LoZ-Sprite.png|link=Wallmaster|[[Wallmaster]] | |||
</gallery> | |||
==Aquamentus== | ==Aquamentus== | ||
{{Main|Aquamentus (The Legend of Zelda)|}} | {{Main|Aquamentus (The Legend of Zelda)|}} | ||
[[File:Aquamentus-LoZ-Sprite.png|100px|right]] | [[File:Aquamentus-LoZ-Sprite.png|100px|right]] | ||
The boss of The Eagle is known as Aquamentus, who is a green dragon that shoots fireballs at [[Link]]. This battle takes place right before the room where the Triforce | The boss of The Eagle is known as Aquamentus, who is a green dragon that shoots fireballs at [[Link (The Legend of Zelda)|Link]]. This battle takes place right before the room where the Triforce fragment is located, and Aquamentus is standing right in front of the door. With the [[Sword (The Legend of Zelda)|original Sword]], it takes a total of six hits to kill Aquamentus. If Link gets hit by one of the fireballs shot from Aquamentus, he loses half a heart, same if he comes in contact with Aquamentus. After defeating it, Link collects a [[Heart Container]] and enters the next room, where he can collect the first Triforce fragment. | ||
==Old Man Location== | ==Old Man Location== | ||
The [[Old Man]] can be found in this dungeon, in the room farthest to the left. Inside, he says, ''"EASTMOST PENNINSULA IS THE SECRET"''.{{Ref|LoZ|60|[[Old Man]]}} It is not known exactly what he means by this, but | The [[Old Man]] can be found in this dungeon, in the room farthest to the left. Inside, he says, ''"EASTMOST PENNINSULA IS THE SECRET"''.{{Ref|LoZ|60|[[Old Man]]}} It is not known exactly what he means by this, but it may have to do with either the location of the Triforce fragment in this dungeon, which is found in the room that is farthest to the right (east), or it may have to do with the location of a hidden [[Secret Moblin]] with a gift of 100 Rupees, which is found in the [[Overworld]] in the northeast corner of the map. | ||
==Dungeon Map & Compass== | ==Dungeon Map & Compass== | ||
| Line 43: | Line 45: | ||
===Compass=== | ===Compass=== | ||
The Compass is used to show Link the location of the Triforce | The Compass is used to show Link the location of the Triforce fragment, which is represented by a flashing circle on Link's map. It is found, from the entrance, up two rooms and right one room. Inside this room, there are multiple [[Keese]] that are seemingly protecting it. Link can choose to be brave and battle these enemies in combat or to be a coward and get the Compass and run. Either one results in Link obtaining the Compass. | ||
===Dungeon Map=== | ===Dungeon Map=== | ||
The Dungeon Map is used to show Link the layout of the dungeon on his sub-screen. It is particularly useful if Link is looking for the [[Bow]], as it is located in a room that is not on Link's way to the Triforce | The Dungeon Map is used to show Link the layout of the dungeon on his sub-screen. It is particularly useful if Link is looking for the [[Bow]], as it is located in a room that is not on Link's way to the Triforce fragment. The Dungeon Map is found, from the entrance, two rooms up, one room left, one room up, and finally one room right. Inside, Link finds a lot of [[Gel]]s patrolling the area. The Dungeon Map can be seen on the floor in the middle of the room. | ||
==Keys & Locked Doors== | ==Keys & Locked Doors== | ||
Inside The Eagle, there are a total of six [[Small Key]]s that are scattered throughout the dungeon. These keys can be found by defeating all the enemies in a specific room, or by killing a specific [[Stalfos]] which is holding onto a key. Using these keys, Link can unlock each and every one of the six Locked Doors that are also found in the dungeon. It is a perfect combination, six Small Keys and six Locked Doors. | Inside The Eagle, there are a total of six [[Small Key]]s that are scattered throughout the dungeon. These keys can be found by defeating all the enemies in a specific room, or by killing a specific [[Stalfos]] which is holding onto a key. Using these keys, Link can unlock each and every one of the six Locked Doors that are also found in the dungeon. It is a perfect combination, six Small Keys and six Locked Doors. | ||
There is a glitch in this dungeon, where if Link enters and then immediately exits The Eagle without unlocking the door in the first room, it will unlock automatically, saving him a key. Because of this, Link only has to use three keys to get the Bow and the Triforce fragment in this dungeon if he uses bombs to create shortcuts through specific walls. | |||
==Gallery== | ==Gallery== | ||
<gallery> | <gallery> | ||
File:Compass-Eagle-LoZ.png| | File:Level-1 entrance room - TLOZ NES.png|Entry room | ||
File:Map-Eagle-LoZ.png| | File:Compass-Eagle-LoZ.png|Room with the Compass | ||
File:Aquamentus-Eagle-LoZ.png| | File:Map-Eagle-LoZ.png|Room with the Dungeon Map | ||
File:Aquamentus-Eagle-LoZ.png|Room with Aquamentus | |||
File:LoZ_Eagle.jpg|Artwork of The Eagle | |||
</gallery> | </gallery> | ||
{{References}} | {{References}} | ||
{{ | {{clear}} | ||
{{Listbox|The Legend of Zelda|Dungeons}} | |||
{{ | {{Listbox|The Legend of Zelda|Locations}} | ||
{{Cat|The Legend of Zelda Dungeons}} | {{Cat|The Legend of Zelda Dungeons}} | ||
{{Cat|The Legend of Zelda Locations}} | {{Cat|The Legend of Zelda Locations}} | ||
Latest revision as of 21:58, June 20, 2023

Games | ||
Location | North-east island in the lake | |
Boss | ||
Enemies | ||
Inhabitants | ||
Items | ||
Rewards | ||
Related | ||
| Guides | ||
|---|---|---|
Walkthrough | ||
In-depth guide:
Legend of Zelda Walkthrough Chapter 2: The Eagle |
Level 1: The Eagle is the first dungeon in The Legend of Zelda. It is found by going one to the right, four up, and then one left from the Starting Screen, which takes Link to the entrance. This dungeon holds the first of the eight Triforce fragments, and Link must travel through the dungeon all the way to the end, where he meets up with the Boss of the dungeon, Aquamentus. After defeating Aquamentus, Link can collect the guarded Triforce fragment.
Items
There are two different items that Link can obtain in this dungeon. The first is the Bow, which can be found in a side-scrolling section of the dungeon. This side-scrolling area can be accessed from a staircase in the room that's at the northernmost point in the dungeon. It cannot be used, however, until Link has bought the Arrows from any of the shops around Hyrule. The price for these Arrows is 80 Rupees. After Link has purchased the Arrows, every time he shoots one, he loses one Rupee.
The second item Link can obtain in this dungeon is the Boomerang, which is one of the most useful items in the game. It can be used to stun larger enemies and kill smaller ones. Unfortunately, this type of Boomerang only travels half the screen. However, later on Link receives an upgrade; the Magical Boomerang, which travels the full length of the screen. The Boomerang is found, from the entrance, two rooms up, one room left, one room up, and finally two rooms right. Here, Link encounters three Red Goriyas. After defeating all three Goriyas, the Boomerang appears in the upper portion of the room.
Enemies
- Enemies in Level 1: The Eagle
Aquamentus
- Main article: Aquamentus (The Legend of Zelda)
The boss of The Eagle is known as Aquamentus, who is a green dragon that shoots fireballs at Link. This battle takes place right before the room where the Triforce fragment is located, and Aquamentus is standing right in front of the door. With the original Sword, it takes a total of six hits to kill Aquamentus. If Link gets hit by one of the fireballs shot from Aquamentus, he loses half a heart, same if he comes in contact with Aquamentus. After defeating it, Link collects a Heart Container and enters the next room, where he can collect the first Triforce fragment.
Old Man Location
The Old Man can be found in this dungeon, in the room farthest to the left. Inside, he says, "EASTMOST PENNINSULA IS THE SECRET".[1] It is not known exactly what he means by this, but it may have to do with either the location of the Triforce fragment in this dungeon, which is found in the room that is farthest to the right (east), or it may have to do with the location of a hidden Secret Moblin with a gift of 100 Rupees, which is found in the Overworld in the northeast corner of the map.
Dungeon Map & Compass
This dungeon features the first ever edition of the Dungeon Map and the Compass.
Compass
The Compass is used to show Link the location of the Triforce fragment, which is represented by a flashing circle on Link's map. It is found, from the entrance, up two rooms and right one room. Inside this room, there are multiple Keese that are seemingly protecting it. Link can choose to be brave and battle these enemies in combat or to be a coward and get the Compass and run. Either one results in Link obtaining the Compass.
Dungeon Map
The Dungeon Map is used to show Link the layout of the dungeon on his sub-screen. It is particularly useful if Link is looking for the Bow, as it is located in a room that is not on Link's way to the Triforce fragment. The Dungeon Map is found, from the entrance, two rooms up, one room left, one room up, and finally one room right. Inside, Link finds a lot of Gels patrolling the area. The Dungeon Map can be seen on the floor in the middle of the room.
Keys & Locked Doors
Inside The Eagle, there are a total of six Small Keys that are scattered throughout the dungeon. These keys can be found by defeating all the enemies in a specific room, or by killing a specific Stalfos which is holding onto a key. Using these keys, Link can unlock each and every one of the six Locked Doors that are also found in the dungeon. It is a perfect combination, six Small Keys and six Locked Doors.
There is a glitch in this dungeon, where if Link enters and then immediately exits The Eagle without unlocking the door in the first room, it will unlock automatically, saving him a key. Because of this, Link only has to use three keys to get the Bow and the Triforce fragment in this dungeon if he uses bombs to create shortcuts through specific walls.
Gallery
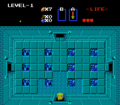
Entry room
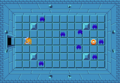
Room with the Compass
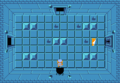
Room with the Dungeon Map
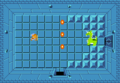
Room with Aquamentus

Artwork of The Eagle


References
- ↑ "EASTMOST PENNINSULA IS THE SECRET" — Old Man, The Legend of Zelda.