Each Step Like Thunder: Difference between revisions
No edit summary |
|||
| Line 7: | Line 7: | ||
| weaponavailable = | | weaponavailable = | ||
| game = ''[[Hyrule Warriors: Age of Calamity]]'' | | game = ''[[Hyrule Warriors: Age of Calamity]]'' | ||
| stage = | | stage = [[Fort Hateno]] | ||
| previous = [[Relentless as a Waterfall]] | | previous = [[Relentless as a Waterfall]] | ||
| next = [[The Great Plateau (Scenario)|The Great Plateau]] | | next = [[The Great Plateau (Scenario)|The Great Plateau]] | ||
| simultaneous = | | simultaneous = | ||
| warriors = X (story)<br/> | | warriors = X and [[Divine Beast]] [[Vah Naboris]] (story)<br/>Any three unlocked (''except'' [[Urbosa]] and [[Riju]]) and Divine Beast Vah Naboris (replay) | ||
| recommended level = Lv. | | recommended level = Lv. 47 | ||
| conditions = | | conditions = | ||
| battlefield materials = | | battlefield materials = [[Hearty Truffle]]<br/>[[Tireless Frog]]<br/>[[Cold Darner]]<br/>[[Electric Safflina]]<br/>[[Silent Shroom]] | ||
| boss = | | boss = | ||
| miniboss = | | miniboss = | ||
| Line 32: | Line 32: | ||
| gallery = | | gallery = | ||
}} | }} | ||
{{quote|.|In-game description}} | {{quote|Faced with a relentless army of Guardians, Urbosa and Riju head out to try and distract the enemy. Zelda and the others use this distraction to try and retake Fort Hateno.|In-game description}} | ||
'''Each Step Like Thunder''' is the second and final [[Age of Calamity Scenarios|scenario]] of ''[[Hyrule Warriors: Age of Calamity|Age of Calamity]]'' Chapter 6. | '''Each Step Like Thunder''' is the second and final [[Age of Calamity Scenarios|scenario]] of ''[[Hyrule Warriors: Age of Calamity|Age of Calamity]]'' Chapter 6. | ||
| Line 43: | Line 43: | ||
==Cutscenes== | ==Cutscenes== | ||
===Each Step Like Thunder | === Each Step Like Thunder (Part 1) === | ||
{{quote|.|In-game Gallery description}} | {{quote|Working together, they successfully recaptured the citadel. Shortly thereafter, they found Robbie, who had barely escaped from the laboratory after the Yiga Clan infiltrated its walls.|In-game Gallery description}} | ||
=== Vah Naboris's Pilots === | |||
{{quote|As Zelda and the others travel to support Fort Hateno, Urbosa and Riju attempt to distract the Guardians that are surging forth from Hyrule Castle. The pair leap aboard Vah Naboris and throw themselves into a pitched battle.|In-game Gallery description}} | |||
=== Champions United === | |||
{{quote|While the diversion was successful, a massive number of monsters emerge as night falls. Urbosa and Riju prepare themselves for the worst but are saved from that fate as the Champions from the other regions arrive to aid them.|In-game Gallery description}} | |||
=== Each Step Like Thunder (Part 2) === | |||
{{quote|Urbosa and Riju took control of Vah Naboris, working to stem the never-ending flow of Guardians.|In-game Gallery description}} | |||
=== At Last, an Awakening === | |||
{{quote|Astor, who had orchestrated the attack on Fort Hateno, sets Blight Ganon's phantoms on the party as revenge for their intervention. As Link struggles to hold them off, Zelda refuses to flee again, and her strong desire to save Link finally awakens the power she had long been seeking.|In-game Gallery description}} | |||
=== Solidarity === | |||
{{quote|Zelda speaks to the soldiers gathered at Fort Hateno, projecting a renewed confidence that reflects her role as a member of Hyrule's royal family. With spirits bolstered, Zelda takes the time to speak with one soldier in particular. The mans turns out to be an unexpected guest...|In-game Gallery description}} | |||
==Treasure Chests== | ==Treasure Chests== | ||
Revision as of 21:35, January 13, 2021
| Spoiler Alert! This article describes a subject that is sensitive to plot development. |
| This article is a stub. You can help the Zelda Dungeon Wiki by expanding it. |
Number | Chapter 6-2 | |
Games | ||
Stage | ||
Previous | ||
Next | ||
Battlefield-Specific Materials | ||
Warriors | X and Divine Beast Vah Naboris (story) | |
Recommended Level | Lv. 47 | |
"Faced with a relentless army of Guardians, Urbosa and Riju head out to try and distract the enemy. Zelda and the others use this distraction to try and retake Fort Hateno."
Each Step Like Thunder is the second and final scenario of Age of Calamity Chapter 6.
- Victory Condition:
- Defeat Condition:
Objectives
Cutscenes
Each Step Like Thunder (Part 1)
"Working together, they successfully recaptured the citadel. Shortly thereafter, they found Robbie, who had barely escaped from the laboratory after the Yiga Clan infiltrated its walls."
Vah Naboris's Pilots
"As Zelda and the others travel to support Fort Hateno, Urbosa and Riju attempt to distract the Guardians that are surging forth from Hyrule Castle. The pair leap aboard Vah Naboris and throw themselves into a pitched battle."
Champions United
"While the diversion was successful, a massive number of monsters emerge as night falls. Urbosa and Riju prepare themselves for the worst but are saved from that fate as the Champions from the other regions arrive to aid them."
Each Step Like Thunder (Part 2)
"Urbosa and Riju took control of Vah Naboris, working to stem the never-ending flow of Guardians."
At Last, an Awakening
"Astor, who had orchestrated the attack on Fort Hateno, sets Blight Ganon's phantoms on the party as revenge for their intervention. As Link struggles to hold them off, Zelda refuses to flee again, and her strong desire to save Link finally awakens the power she had long been seeking."
Solidarity
"Zelda speaks to the soldiers gathered at Fort Hateno, projecting a renewed confidence that reflects her role as a member of Hyrule's royal family. With spirits bolstered, Zelda takes the time to speak with one soldier in particular. The mans turns out to be an unexpected guest..."
Treasure Chests
- See also: Age of Calamity Treasure Chests
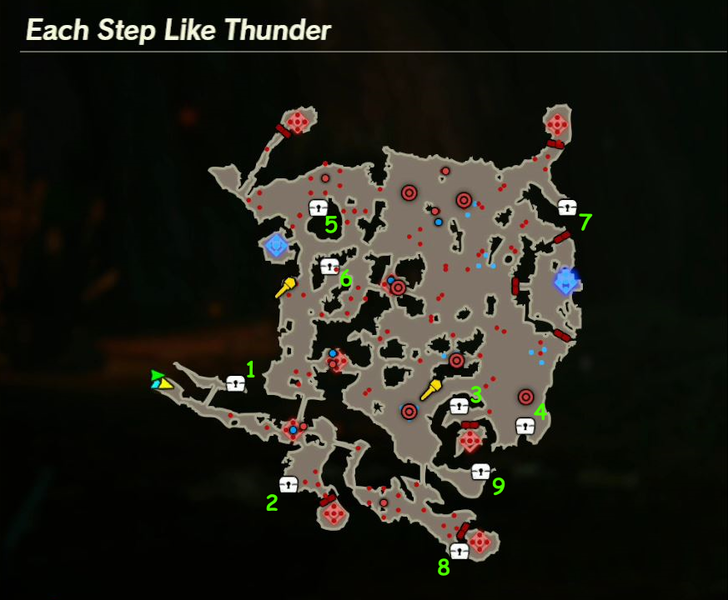
There are 9 treasure chests found in Each Step Like Thunder.

- Giant Ancient Core x2 - Across the bridge by the start.
- Big Hearty Truffle x10 - West of the southwest outpost.
- 300 Rupees - Behind a tree just outside the outpost that's toward the southeast of the main field.
- Falcon Bow - Behind a tree near the Electric Guardian toward the southeast of the main field.
- Rock Roast Flambé - Along the northwest face of the rock formation toward the northwest of the map.
- Ancient Battle Axe++ - Within the ruins west of the outpost with the third Hylian Captain in need of aid.
- Ruby x5 - At the end of the path splitting off the path to the northeast outpost.
- Boulder Breaker - Just outside the southeast outpost.
- Lightscale Trident - On the north side of the east end of the river.
Koroks
- See also: Age of Calamity Koroks
- Across the bridge by the start.
- Examine the yellow flower at the end of the path splitting off the path to the northeast outpost.
- Examine the yellow flower outside the outpost that's toward the southeast of the main field.
- Examine the stump inside the allied outpost on the western edge of the map.