Cave of No Return: Difference between revisions
No edit summary |
No edit summary |
||
| (9 intermediate revisions by 4 users not shown) | |||
| Line 1: | Line 1: | ||
{{ | {{Infobox|scenario | ||
| | | image = [[File:Cave-of-No-Return-Entrance.png|300px]] | ||
|image = [[File: | | caption = | ||
|game = ''[[The Legend of Zelda: Four Swords Adventures|Four Swords Adventures]]'' | | number = 1-2 | ||
| | | game = ''[[The Legend of Zelda: Four Swords Adventures|Four Swords Adventures]]'' | ||
|enemies = [[Rat]]<br>[[ | | location = [[Whereabouts of the Wind]] | ||
| | | previous = [[Lake Hylia (Four Swords Adventures)|Lake Hylia]] | ||
|walkthrough = [ | | next = [[Hyrule Castle (Stage)|Hyrule Castle]] | ||
}} | | boss = [[Shadow Link]] | ||
| enemies = [[Rat]]<br/>[[Bubble]]<br/>[[Ropa]]<br/>[[Torch]]<br/>[[Keese]] | |||
|item = [[Lamp]]<br/>[[Blue Bracelet]]<br/>[[Bow]]<br/>[[Heart Container]]<br/>[[Force Fairy]] | |||
| walkthrough = [https://www.zeldadungeon.net/four-swords-adventures-walkthrough-01.php#C1_3 Text Walkthrough] | |||
}} | |||
The '''Cave of No Return''' is the second stage of [[Whereabouts of the Wind]], the first level of ''[[The Legend of Zelda: Four Swords Adventures|Four Swords Adventures]]''. It takes place almost entirely within the barely lit cave, where the Lamp is the primary item used. The cave is lengthy and features many deterrents, including trap holes in the floor, enemies that cannot be defeated, and a potentially frustrating maze near the end of the level. The solution to this maze is Right, Left and Right again. If the path is not taken correctly, Link will have to start over again from the beginning of the maze. | The '''Cave of No Return''' is the second stage of [[Whereabouts of the Wind]], the first level of ''[[The Legend of Zelda: Four Swords Adventures|Four Swords Adventures]]''. It takes place almost entirely within the barely lit cave, where the [[Lamp]] is the primary item used. The cave is lengthy and features many deterrents, including trap holes in the floor, enemies that cannot be defeated, and a potentially frustrating maze near the end of the level. The solution to this maze is Right, Left and Right again. If the path is not taken correctly, [[Link (Four Swords Adventures)|Link]] will have to start over again from the beginning of the maze. | ||
Life is for the most part absent in the cave, except for a few enemies and a Mage at the start of the maze that will laugh at your chances of making it through. Ghosts can also be found in the maze, giving helpful tips before an obstacle. Like all second stages in ''Four Swords Adventures'', [[Shadow Link]] is the boss of the stage. | Life is for the most part absent in the cave, except for a few enemies and a Mage at the start of the maze that will laugh at your chances of making it through.{{Ref|FSA|475|Mage}} Ghosts can also be found in the maze, giving helpful tips before an obstacle. Like all second stages in ''Four Swords Adventures'', [[Shadow Link]] is the boss of the stage. | ||
==''Four Swords Adventures''== | |||
===Items=== | |||
====Inventory==== | |||
The [[Lamp]] and the [[Bow]] can be found within this stage. The lamp is used to see the way and light torches. The Bow also lights torches from a distance by shooting [[arrow]]s through fire. | |||
====Heart Containers==== | |||
The first [[Heart Container]] can be found within the room surrounded by [[Torch]]es shooting fireballs and numerous pots. By breaking the pots in the upper middle, the Links can find a button that reveals a chest with a Heart Container. | |||
Another Heart Container can be found after the maze. Once the Links make it through, if they pull the lever on the left side they will reveal a chest with another Heart Container. | |||
====Blue Bracelet==== | |||
Next to the Bow, the Links can find a treasure chest containing a [[Blue Bracelet]]. | |||
====Force Fairy==== | |||
An additional [[Force Fairy]] can be found within the room surrounded by Torches shooting fireballs. The pots in the bottom center will reveal a Force Fairy within them. | |||
===Enemies=== | |||
{{Gallery|size=60|pad=5|title=}} | |||
{{Gallery/Box|file=FSA-Bubble.png|link=Bubble|caption=[[Bubble]]}} | |||
{{Gallery/Box|file=FSA-Keese.png|link=Keese|caption=[[Keese]]}} | |||
{{Gallery/Box|file=FSA-Rat.png|link=Rat|caption=[[Rat]]}} | |||
{{Gallery/Box|file=Ropa-FSA.png|link=Ropa|caption=[[Ropa]]}} | |||
{{Gallery/Box|file=Dark-Link-FSA.png|link=Shadow Link|caption=[[Shadow Link]]}} | |||
{{Gallery/Box|file=FSA-Torch.png|link=Torch|caption=[[Torch]]}} | |||
{{Gallery/Bottom}} | |||
Rats are a common enemy within the cave. However, the Links also encounter Ropa and Keese in certain rooms. Anti-Fairies roam the lower areas of the cave. There are also torches that shoot fireballs. | |||
The stage ends with a fight against Shadow Link. | |||
==Gallery== | |||
<gallery> | |||
File:Cave-of-No-Return-Map.png|A map of the Cave of No Return | |||
</gallery> | |||
{{Cat|Four Swords Adventures | {{References}} | ||
{{clear}} | |||
{{Listbox|Four Swords Adventures Stages}} | |||
{{Cat|Four Swords Adventures Stages}} | |||
Latest revision as of 03:28, November 25, 2023

Number | 1-2 | |
Games | ||
Location | ||
Previous | ||
Next | ||
Boss | ||
Enemies | ||
Items | ||
| Guides | ||
|---|---|---|
Walkthrough | ||
The Cave of No Return is the second stage of Whereabouts of the Wind, the first level of Four Swords Adventures. It takes place almost entirely within the barely lit cave, where the Lamp is the primary item used. The cave is lengthy and features many deterrents, including trap holes in the floor, enemies that cannot be defeated, and a potentially frustrating maze near the end of the level. The solution to this maze is Right, Left and Right again. If the path is not taken correctly, Link will have to start over again from the beginning of the maze.
Life is for the most part absent in the cave, except for a few enemies and a Mage at the start of the maze that will laugh at your chances of making it through.[1] Ghosts can also be found in the maze, giving helpful tips before an obstacle. Like all second stages in Four Swords Adventures, Shadow Link is the boss of the stage.
Four Swords Adventures
Items
Inventory
The Lamp and the Bow can be found within this stage. The lamp is used to see the way and light torches. The Bow also lights torches from a distance by shooting arrows through fire.
Heart Containers
The first Heart Container can be found within the room surrounded by Torches shooting fireballs and numerous pots. By breaking the pots in the upper middle, the Links can find a button that reveals a chest with a Heart Container.
Another Heart Container can be found after the maze. Once the Links make it through, if they pull the lever on the left side they will reveal a chest with another Heart Container.
Blue Bracelet
Next to the Bow, the Links can find a treasure chest containing a Blue Bracelet.
Force Fairy
An additional Force Fairy can be found within the room surrounded by Torches shooting fireballs. The pots in the bottom center will reveal a Force Fairy within them.
Enemies


Rats are a common enemy within the cave. However, the Links also encounter Ropa and Keese in certain rooms. Anti-Fairies roam the lower areas of the cave. There are also torches that shoot fireballs.
The stage ends with a fight against Shadow Link.
Gallery
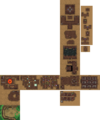
A map of the Cave of No Return

References
- ↑ "Ho ho ho... So, back again, are you? I've a feeling I'll be seeing a lot of you... Hee hee hee..." — Mage, Four Swords Adventures.