Gnarled Root Dungeon: Difference between revisions
VanitasXII (talk | contribs) (Created page with "{{Dungeon |name = Gnarled Root Dungeon |image = File:GnarledRoot.PNG |game = ''Oracle of Seasons'' |item = Bombs <br> [[Seed...") |
No edit summary |
||
| (31 intermediate revisions by 9 users not shown) | |||
| Line 1: | Line 1: | ||
{{ | {{Infobox|dungeon | ||
| | | image = [[File:Gnarled-Root-Dungeon-Entrance.png]] | ||
|image = [[File: | | caption = Entrance to the Gnarled Root Dungeon | ||
|game = ''[[The Legend of Zelda: Oracle of Seasons|Oracle of Seasons]]'' | | game = ''[[The Legend of Zelda: Oracle of Seasons|Oracle of Seasons]]'' | ||
|item = [[ | | location = [[North Horon]] | ||
|miniboss = [[ | | item = [[Bomb]]s<br/>[[Ember Seed]]s<br/>[[Seed Satchel]] | ||
|boss = [[Aquamentus]] | | miniboss = [[Brother Goriyas]] | ||
|reward = [[Heart Container]] <br> [[Fertile Soil]] | | boss = [[Aquamentus (Oracle of Seasons)|Aquamentus]] | ||
|walkthrough = [ | | enemies = [[Blade Trap|Blue Blade Trap]]<br/>[[Stalfos|Blue Stalfos]]<br/>[[Chaser]]<br/>[[Floormaster]]<br/>[[Gel]]<br/>[[Blade Trap|Green Blade Trap]]<br/>[[Keese]]<br/>[[Blade Trap|Orange Blade Trap]]<br/>[[Moblin|Red Moblin]]<br/>[[Zol|Red Zol]] | ||
| reward = [[Heart Container]]<br/>[[Fertile Soil]] | |||
| walkthrough = [https://www.zeldadungeon.net/oracle-of-seasons-walkthrough/gnarled-root-dungeon/ Text Walkthrough] | |||
}} | }} | ||
{{ZD|[https://www.zeldadungeon.net/oracle-of-seasons-walkthrough/gnarled-root-dungeon/ ''Oracle of Seasons'' Walkthrough<br/>Chapter 1: Gnarled Root Dungeon]}} | |||
The '''Gnarled Root Dungeon''' is the first [[dungeon]] featured in ''[[The Legend of Zelda: Oracle of Seasons|Oracle of Seasons]]''. The dungeon is located on a small island within [[North Horon]], a region of [[Holodrum]] that's directly north of [[Horon Village]]. | |||
== | ==Finding the Entrance== | ||
In order to gain entrance to the Gnarled Root Dungeon, Link will first need to acquire the [[Gnarled Key]] from the [[Maku Tree (Oracle of Seasons)|Maku Tree]] in [[Horon Village]]. Before Link can visit the Maku Tree, he will need to prove his courage by acquiring the [[Wooden Sword]] from the [[Hero's Cave]] along the [[Western Coast]]. | |||
After meeting with the Maku Tree, he will give you the Gnarled Key.{{Ref|OoS|584|[[Maku Tree (Oracle of Seasons)|Maku Tree]]}} He instructs Link to head north to the giant root near the lake. Along Link's way, he can speak with [[Impa]], who points Link in the direction of the Gnarled Root Dungeon, by telling him it is straight ahead.{{Ref|OoS|761|[[Impa]]}} | |||
The entrance is on a small island at the west portion of North Horon. Once Link arrives, he must use the Gnarled Key on the keyhole, causing the dungeon to appear from the ground. | |||
==Dungeon Overview== | |||
[[File:Gnarled-Root-Dungeon-Map.png|thumb|left|300px|Map of the Gnarled Root Dungeon]]The Gnarled Root Dungeon is a very straight forward and simplistic dungeon. Most of the enemies that Link encounters are very basic, capable of being defeated with just a few sword slashes. Near the entrance of the dungeon, Link will find an [[Old Man]] that gives advice on how to solve puzzles within the dungeon.{{Ref|OoS|1117|[[Old Man]]}} This also hints to what the dungeon item is, the [[Seed Satchel]] along with some [[Ember Seed]]s. | |||
Since the Gnarled Root Dungeon is the first dungeon in the game, many of the puzzles are very simplistic and sometimes are as simple as just pushing one block. Throughout the dungeon, Link will find a pair of [[Small Key]]s that open up small locked doors. There are also a number of [[Treasure Chest]]s found throughout the dungeon. In addition to finding the standard [[Dungeon Map]] and the [[Compass]], Link will also find [[Bomb]]s, a [[Gasha Seed]], and a [[Magical Ring]]. The Bombs that Link finds are used within the dungeon to blowup a cracked wall, leading to the north portion of the dungeon. The Magical Ring found here can be appraised at [[Vasu Jewelers]] to become the [[Discovery Ring]]. | |||
Link will use a [[Mine Cart]] to ride along a set of tracks throughout the north portion of the dungeon. There is a lever near the Mine Cart that can be used to switch the tracks, allowing Link to reach new areas of the dungeon. | |||
Near the west end of the dungeon, Link will find a [[Block Puzzle]]. After properly moving blocks in a maze fashion, Link can reach the Treasure Chest containing the Gasha Seed. | |||
The dungeon item comes in the form of a Seed Satchel that is filled with some Ember Seeds. Link acquires the Ember Seeds after defeating the dungeon mini-boss, the [[Brother Goriyas]]. Link will use these Ember seeds to light [[Torch]]es, allowing him to reveal certain secrets and open new passageways within the dungeon. | |||
===Brother Goriyas=== | |||
{{Main|Brother Goriyas}} | |||
This pair of Goriyas serve as protectors of the dungeon item and will not let Link pass.{{Ref|OoS|876|[[Brother Goriyas]]}} The [[Brother Goriyas]] will toss a boomerang back and forth, trying to hit Link in the process. Link can easily avoid the attack and can deliver a sword of sword slashes to defeat these enemies. | |||
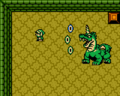
===Aquamentus=== | |||
{{Main|Aquamentus (Oracle of Seasons)|Aquamentus}} | |||
[[Aquamentus (Oracle of Seasons)|Aquamentus]] is a dragon that will shoot Fireballs out towards Link. Additionally, Aquamentus may lower its head and charge towards Link with its horn. Simple slashes with the [[Wooden Sword]] can be used to defeat Aquamentus. Link will get a [[Heart Container]], as well as the first [[Essences of Nature|Essence of Nature]], the [[Fertile Soil]]. | |||
==Similarities to The Eagle== | |||
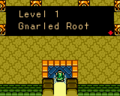
The Gnarled Root Dungeon bears a strong resemblance to the first dungeon in ''[[The Legend of Zelda]]'', [[Level 1: The Eagle|The Eagle]]. Both dungeons are located on a small island near the center of the [[Overworld]] and are accessed by a bridge to the east. The entrance to the Gnarled Root Dungeon is within a tree, much like the original Legend of Zelda. | |||
The actual dungeon room layout is completely identical to the Eagle. This includes the location leading to the dungeon item at the top portion of the dungeon. In ''The Legend of Zelda'', a group of [[Goriya]]s could be defeated to acquire the [[Boomerang]]. Similarly, the mini-boss in the Gnarled Root Dungeon are a pair of Goriyas. Much like the Eagle, there is an Old Man in the Gnarled Root Dungeon that gives Link advice. The room leading up to the battle with Aquamentus contains a group of [[Floormaster]]s. Furthermore, the location of the actual boss and Essence of Nature are identical to where Link fought [[Aquamentus (The Legend of Zelda)|Aquamentus]] and where he acquired the [[Triforce Shard]]. | |||
==Enemies== | |||
<gallery> | |||
File:Blade-Trap-Blue-Oracle-Sprite.png|[[Blade Trap|Blue Blade Trap]] | |||
File:Blade-Trap-Green-Oracle-Sprite.png|[[Blade Trap|Green Blade Trap]] | |||
File:Blade-Trap-Orange-Oracle-Sprite.png|[[Blade Trap|Orange Blade Trap]] | |||
File:Stalfos-Blue-Oracle-Sprite.png|[[Stalfos|Blue Stalfos]] | |||
File:Chaser.png|[[Chaser]] | |||
File:Floormaster.png|[[Floormaster]] | |||
File:Gel-Oracle-Sprite.png|[[Gel]] | |||
File:Keese-Oracle-Sprite.png|[[Keese]] | |||
File:Moblin-Oracle-Sprite.png|[[Moblin|Red Moblin]] | |||
File:Zol-Red-Oracle-Sprite.png|[[Zol|Red Zol]] | |||
</gallery> | |||
==Gallery== | |||
<gallery> | |||
File:Gnarled-Root-Hidden.png|Gnarled Root Dungeon before using the [[Gnarled Key]] | |||
File:Gnarled-Root-Dungeon-Old-Man.png|[[Old Man]] in the Gnarled Root Dungeon | |||
File:Gnarled-Root-Dungeon-Inside.png | |||
File:Brother-Goriyas-Screen.png|Fighting the [[Brother Goriyas]] | |||
File:Aquamentus-Oracle.png|Fighting [[Aquamentus (Oracle of Seasons)|Aquamentus]] | |||
</gallery> | |||
==Trivia== | |||
*Both the external and internal portions of the Gnarled Root Dungeon bear a strong resemblance to [[Level 1: The Eagle]] from ''[[The Legend of Zelda]]''. | |||
{{References}} | |||
{{Listbox|Oracle of Seasons Dungeons}} | |||
{{Cat|Oracle of Seasons Dungeons}} | {{Cat|Oracle of Seasons Dungeons}} | ||
{{Cat|Oracle of Seasons Locations}} | |||
Latest revision as of 02:58, March 1, 2021

Entrance to the Gnarled Root Dungeon
Games | ||
Location | ||
Boss | ||
Mini-bosses | ||
Enemies | ||
Items | ||
Rewards | ||
| Guides | ||
|---|---|---|
Walkthrough | ||
In-depth guide:
Oracle of Seasons Walkthrough Chapter 1: Gnarled Root Dungeon |
The Gnarled Root Dungeon is the first dungeon featured in Oracle of Seasons. The dungeon is located on a small island within North Horon, a region of Holodrum that's directly north of Horon Village.
Finding the Entrance
In order to gain entrance to the Gnarled Root Dungeon, Link will first need to acquire the Gnarled Key from the Maku Tree in Horon Village. Before Link can visit the Maku Tree, he will need to prove his courage by acquiring the Wooden Sword from the Hero's Cave along the Western Coast.
After meeting with the Maku Tree, he will give you the Gnarled Key.[1] He instructs Link to head north to the giant root near the lake. Along Link's way, he can speak with Impa, who points Link in the direction of the Gnarled Root Dungeon, by telling him it is straight ahead.[2]
The entrance is on a small island at the west portion of North Horon. Once Link arrives, he must use the Gnarled Key on the keyhole, causing the dungeon to appear from the ground.
Dungeon Overview

The Gnarled Root Dungeon is a very straight forward and simplistic dungeon. Most of the enemies that Link encounters are very basic, capable of being defeated with just a few sword slashes. Near the entrance of the dungeon, Link will find an Old Man that gives advice on how to solve puzzles within the dungeon.[3] This also hints to what the dungeon item is, the Seed Satchel along with some Ember Seeds.
Since the Gnarled Root Dungeon is the first dungeon in the game, many of the puzzles are very simplistic and sometimes are as simple as just pushing one block. Throughout the dungeon, Link will find a pair of Small Keys that open up small locked doors. There are also a number of Treasure Chests found throughout the dungeon. In addition to finding the standard Dungeon Map and the Compass, Link will also find Bombs, a Gasha Seed, and a Magical Ring. The Bombs that Link finds are used within the dungeon to blowup a cracked wall, leading to the north portion of the dungeon. The Magical Ring found here can be appraised at Vasu Jewelers to become the Discovery Ring.
Link will use a Mine Cart to ride along a set of tracks throughout the north portion of the dungeon. There is a lever near the Mine Cart that can be used to switch the tracks, allowing Link to reach new areas of the dungeon.
Near the west end of the dungeon, Link will find a Block Puzzle. After properly moving blocks in a maze fashion, Link can reach the Treasure Chest containing the Gasha Seed.
The dungeon item comes in the form of a Seed Satchel that is filled with some Ember Seeds. Link acquires the Ember Seeds after defeating the dungeon mini-boss, the Brother Goriyas. Link will use these Ember seeds to light Torches, allowing him to reveal certain secrets and open new passageways within the dungeon.
Brother Goriyas
- Main article: Brother Goriyas
This pair of Goriyas serve as protectors of the dungeon item and will not let Link pass.[4] The Brother Goriyas will toss a boomerang back and forth, trying to hit Link in the process. Link can easily avoid the attack and can deliver a sword of sword slashes to defeat these enemies.
Aquamentus
- Main article: Aquamentus
Aquamentus is a dragon that will shoot Fireballs out towards Link. Additionally, Aquamentus may lower its head and charge towards Link with its horn. Simple slashes with the Wooden Sword can be used to defeat Aquamentus. Link will get a Heart Container, as well as the first Essence of Nature, the Fertile Soil.
Similarities to The Eagle
The Gnarled Root Dungeon bears a strong resemblance to the first dungeon in The Legend of Zelda, The Eagle. Both dungeons are located on a small island near the center of the Overworld and are accessed by a bridge to the east. The entrance to the Gnarled Root Dungeon is within a tree, much like the original Legend of Zelda.
The actual dungeon room layout is completely identical to the Eagle. This includes the location leading to the dungeon item at the top portion of the dungeon. In The Legend of Zelda, a group of Goriyas could be defeated to acquire the Boomerang. Similarly, the mini-boss in the Gnarled Root Dungeon are a pair of Goriyas. Much like the Eagle, there is an Old Man in the Gnarled Root Dungeon that gives Link advice. The room leading up to the battle with Aquamentus contains a group of Floormasters. Furthermore, the location of the actual boss and Essence of Nature are identical to where Link fought Aquamentus and where he acquired the Triforce Shard.
Enemies


Gallery
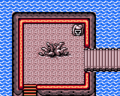
Gnarled Root Dungeon before using the Gnarled Key
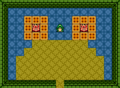
Old Man in the Gnarled Root Dungeon
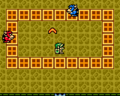
Fighting the Brother Goriyas
Fighting Aquamentus


Trivia
- Both the external and internal portions of the Gnarled Root Dungeon bear a strong resemblance to Level 1: The Eagle from The Legend of Zelda.
References
- ↑ "Then I give you this key. Go to the giant root near the lake up north! The first essence should be there, but I'd expect some resistance. Be careful! I'll just--ahhm, rest until--ohh, no energy...ZZZ" — Maku Tree, Oracle of Seasons.
- ↑ "A gnarled root? Go straight from here. I am sure I saw one there." — Impa, Oracle of Seasons.
- ↑ "Return light to unlit torches!" — Old Man, Oracle of Seasons.
- ↑ "Growrrr! You cannot pass!" — Brother Goriyas, Oracle of Seasons.