Ganon's Tower (A Link to the Past): Difference between revisions
mNo edit summary |
No edit summary |
||
| Line 1: | Line 1: | ||
{{Spoiler}} | |||
{{Infobox|dungeon | {{Infobox|dungeon | ||
|name = Ganon's Tower | | name = Ganon's Tower | ||
|image = [[File:S-ganons-tower.jpg|225px]] | | image = [[File:S-ganons-tower.jpg|225px]] | ||
|game = ''[[The Legend of Zelda: A Link to the Past|A Link to the Past]]'' | | caption = Official Illustration | ||
|item = [[Red Mail]] | | game = ''[[The Legend of Zelda: A Link to the Past|A Link to the Past]]'' | ||
|boss = [[Agahnim]] | | item = [[Red Mail]] | ||
|miniboss = [[Armos Knight]]s<br>[[Lanmola]]s<br>[[Moldorm (A Link to the Past)|Moldorm]] | | boss = [[Agahnim]] | ||
|enemies = | | miniboss = [[Armos Knight]]s<br>[[Lanmola]]s<br>[[Moldorm (A Link to the Past)|Moldorm]] | ||
[[Anti-Fairy]] | | enemies = [[Anti-Fairy]] | ||
[[Beamos]] | [[Beamos]] | ||
[[Biri]] | [[Biri]] | ||
| Line 40: | Line 41: | ||
[[Winder]] | [[Winder]] | ||
[[Wizzrobe]] | [[Wizzrobe]] | ||
|reward = | | reward = Completion of Game | ||
|walkthrough = [http://www.zeldadungeon.net/Zelda03Walkthrough09.php Text Walkthrough] | | walkthrough = [http://www.zeldadungeon.net/Zelda03Walkthrough09.php Text Walkthrough] | ||
}} | }} | ||
'''Ganon's Tower''' is | '''Ganon's Tower''' is the final [[dungeon]] of ''[[The Legend of Zelda: A Link to the Past|A Link to the Past]]'', located at the top of [[Death Mountain]] in the [[Dark World]], mirroring the [[Tower of Hera (A Link to the Past)|Tower of Hera]] from the [[Light World]]. The Tower is guarded by a strong magic spell, which is only breakable by the [[Seven Maidens]]. Therefore, [[Link]] needs to save all Seven Maidens from their respective [[Crystal]]s in order to enter the dungeon. It's an incredibly complex dungeon, which pits Link up against four returning [[Boss|bosses]] from the Light World's dungeons. | ||
==Lore== | ==Lore== | ||
| Line 64: | Line 65: | ||
==Dungeon Map== | ==Dungeon Map== | ||
Ganon's Tower is easily the most complex dungeon of the game. Below is a gallery showing off its many floors. | |||
{{Gallery|size=80|pad=5|}} | {{Gallery|size=80|pad=5|}} | ||
| Line 99: | Line 100: | ||
File:Purple-Wizzrobe-3.png|[[Wizzrobe]] (Cursed) | File:Purple-Wizzrobe-3.png|[[Wizzrobe]] (Cursed) | ||
</gallery> | </gallery> | ||
==Item== | |||
===Red Mail=== | |||
This is the final mail Link receives, and it reduces damage by 75% over the [[Green Mail]]. Though the [[Red Mail]] is not required to complete the game, it helps considerably with the rest of Ganon's Tower and the fight with [[Ganon]] himself. | |||
{{Gallery|size=80|pad=5|}} | |||
{{Gallery/Box|file=RedMail.png|caption=Artwork}} | |||
{{Gallery/Box|file=Lttp_zd_325.png|caption=Obtained!}} | |||
{{Gallery/Box|file=Red-Mail.png|caption=Icon Sprite}} | |||
{{Gallery/Bottom}} | |||
==Mini-Bosses== | ==Mini-Bosses== | ||
===Armos Knights=== | ===Armos Knights=== | ||
[[Armos Knight]]s are one of the easiest bosses in the game. Pull out the [[bow]] and, once they start moving, shoot arrows at them. Three | [[Armos Knight]]s are one of the easiest bosses in the game. Pull out the [[bow]] and, once they start moving, shoot arrows at them. Three [[Arrow]]s or a single [[Silver Arrow]] for each Knight does the job. The corners are a safe haven for Link, as the Knights generally do not move to that location. This battle differs from the previous encounter with the Armos Knights in that the entire battle takes place on an icy floor, increasing the difficulty. | ||
When there is only one Knight left, | When there is only one Knight left, it turns red and starts to jump around, trying to land on Link. When it's about to land, move out of the way and hit it with the sword. The Knight can also be hit with Arrows while it is jumping. | ||
{{Gallery|size=80|pad=5}} | {{Gallery|size=80|pad=5}} | ||
{{Gallery/Box|file=ArmosKnight.png|link=Armos Knight|caption=[[Armos Knight]]}} | {{Gallery/Box|file=ArmosKnight.png|link=Armos Knight|caption=[[Armos Knight]]}} | ||
{{Gallery/Box|file=Lttp_zd_323.png|link=Armos Knight|caption=Screen of the Fight}} | {{Gallery/Box|file=Lttp_zd_323.png|link=Armos Knight|caption=Screen of the Fight}} | ||
{{Gallery/Bottom}} | {{Gallery/Bottom}} | ||
===Lanmolas=== | ===Lanmolas=== | ||
| Line 119: | Line 130: | ||
{{Gallery/Box|file=Lanmola-ALTTP-Sprite.png|link=Lanmola|caption=[[Lanmola]]}} | {{Gallery/Box|file=Lanmola-ALTTP-Sprite.png|link=Lanmola|caption=[[Lanmola]]}} | ||
{{Gallery/Box|file=Lttp_zd_333.png|link=Lanmola|caption=Screen of the Fight}} | {{Gallery/Box|file=Lttp_zd_333.png|link=Lanmola|caption=Screen of the Fight}} | ||
{{Gallery/Bottom}} | {{Gallery/Bottom}} | ||
===Moldorm=== | ===Moldorm=== | ||
| Line 127: | Line 138: | ||
{{Gallery/Box|file=Moldorm-ALTTP-Sprite.png|link=Moldorm|caption=[[Moldorm]]}} | {{Gallery/Box|file=Moldorm-ALTTP-Sprite.png|link=Moldorm|caption=[[Moldorm]]}} | ||
{{Gallery/Box|file=Lttp_zd_337.png|link=Moldorm|caption=Screen of the Fight}} | {{Gallery/Box|file=Lttp_zd_337.png|link=Moldorm|caption=Screen of the Fight}} | ||
{{Gallery/Bottom}} | {{Gallery/Bottom}} | ||
==Boss== | ==Boss== | ||
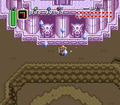
===Agahnim=== | ===Agahnim=== | ||
This time [[Agahnim]] is a little more difficult because he has made two duplicates of himself. It is easy to | This time [[Agahnim]] is a little more difficult because he has made two duplicates of himself. It is easy to tell which one is him because his shadow is darker than the other two on his real form. To defeat him, use his own magic against him. With the sword hit his spells back to the "real" wizard. Agahnim will no longer use the lightning attack he used to in [[Hyrule Castle (A Link to the Past)|Hyrule Castle]]. Six hits with his own spells should take care of him. | ||
{{Gallery|size=80|pad=5|}} | |||
{{Gallery/Box|file=Agahnim-ALTTP-Sprite.png|caption= [[Agahnim]]}} | {{Gallery/Box|file=Agahnim-ALTTP-Sprite.png|caption= [[Agahnim]]}} | ||
{{Gallery/Box|file=LttP_zd_Agahnim2.png|caption= Hitting Back}} | {{Gallery/Box|file=LttP_zd_Agahnim2.png|caption= Hitting Back}} | ||
{{Gallery/Box|file=Lttp_zd_338.png|caption= Splitting into Three}} | {{Gallery/Box|file=Lttp_zd_338.png|caption= Splitting into Three}} | ||
{{Gallery/Bottom}} | {{Gallery/Bottom}} | ||
== | ==Defeat Sequence== | ||
=== | {{Spoiler|section}} | ||
{{Gallery|size=80|pad=5|}} | |||
{{Gallery/Box|file=Lttp_zd_339.png|caption=Ganon's Spirit}} | |||
{{Gallery/Box|file=Lttp_zd_340.png|caption=Turns into a Bat}} | |||
{{Gallery/Box|file= | {{Gallery/Box|file=Lttp_zd_341.png|caption=Link calls the [[Duck]]}} | ||
{{Gallery/Box|file= | {{Gallery/Box|file=Lttp_zd_342.png|caption=[[Pyramid of Power]]}} | ||
{{Gallery/Box|file= | {{Gallery/Box|file=Lttp_zd_343.png|caption=Crashed Through, [[Link]] Arrives}} | ||
{{Gallery/Bottom}} | {{Gallery/Bottom}} | ||
==Gallery== | ==Gallery== | ||
< | <gallery> | ||
File:Lttp_zd_313.png|Entrance Seal Being Broken by the Maidens | |||
</gallery> | |||
{{MagicNavbox|A Link to the Past|Dungeons}} | {{MagicNavbox|A Link to the Past|Dungeons}} | ||
Revision as of 03:12, February 24, 2014
| Spoiler Alert! This article describes a subject that is sensitive to plot development. |

Official Illustration
Games | ||
Boss | ||
Mini-bosses | ||
Enemies | Anti-Fairy | |
Items | ||
Rewards | Completion of Game | |
| Guides | ||
|---|---|---|
Walkthrough | ||
Ganon's Tower is the final dungeon of A Link to the Past, located at the top of Death Mountain in the Dark World, mirroring the Tower of Hera from the Light World. The Tower is guarded by a strong magic spell, which is only breakable by the Seven Maidens. Therefore, Link needs to save all Seven Maidens from their respective Crystals in order to enter the dungeon. It's an incredibly complex dungeon, which pits Link up against four returning bosses from the Light World's dungeons.
Lore
"The creatures who guarded Ganon's Tower were a menace to explorers."
"This impressive structure is said to be where Ganon spent most of his evil reign over the Dark World. Legend says that Link broke the seal of the tower after collecting the seven crystals which Ganon had hidden in the dungeons of the Dark World. The seven maidens held captive in the Crystals magically made the seal disappear. Link was then free to explore the tower and search for Ganon. But he wouldn't find this master of evil until after he survived battles with four creatures that he had already encountered in the Light World. Link's long journey was close to completion."
"The Armos Knights were among the Light World enemies that Link encountered in the tower."
"A Long Climb to the Top: Ganon used all of his evil powers to make the tower a nightmare for heroic explorers. The traps, enemies and puzzles in this structure were among the most challenging in the land. Only a determined adventurer would make his way to the top."
"Over the Invisible Floor: A large chamber on the first floor had invisible flooring. Link could only be sure that he was about to walk on solid ground by pushing a block in front of him. He created the blocks with the Cane of Somaria. When Link was within range of the torch on the north end of the room, he used the Fire Rod to light the torch, illuminating the path."
"Link found that there was only one way to go straight up: check out the stairs labeled H."
"Invisible floors could be detected by using the flame of Dungeon Torches, Ether Magic or Somarian Blocks."
--Nintendo Power Player's Guide
Dungeon Map
Ganon's Tower is easily the most complex dungeon of the game. Below is a gallery showing off its many floors.

Location

Area Map

B1

F1

F2

F3

F4

F5

F6

F7


Enemies
These are enemies encountered in Ganon's Tower:


Item
Red Mail
This is the final mail Link receives, and it reduces damage by 75% over the Green Mail. Though the Red Mail is not required to complete the game, it helps considerably with the rest of Ganon's Tower and the fight with Ganon himself.

Artwork

Obtained!

Icon Sprite


Mini-Bosses
Armos Knights
Armos Knights are one of the easiest bosses in the game. Pull out the bow and, once they start moving, shoot arrows at them. Three Arrows or a single Silver Arrow for each Knight does the job. The corners are a safe haven for Link, as the Knights generally do not move to that location. This battle differs from the previous encounter with the Armos Knights in that the entire battle takes place on an icy floor, increasing the difficulty.
When there is only one Knight left, it turns red and starts to jump around, trying to land on Link. When it's about to land, move out of the way and hit it with the sword. The Knight can also be hit with Arrows while it is jumping.

Screen of the Fight

Lanmolas
Once you enter, you will see three Lanmolas, coming out of the ground and shooting rocks in four directions. The only vulnerable part of the Lanmola is the head. Either strike it with the sword a couple times or time when the Lanmola will come out and use an arrow to hit it in the head. Keep hitting them using these methods until two of the three are gone. It should take about six hits for each to die.
When there is only one Lanmola left, it will shoot rocks in eight directions instead of four. Just dodge the rocks and keep striking it with the sword or arrows.

Screen of the Fight
Moldorm
Moldorm's only weakness is his tail. Strike it with the sword as he passes by. Be careful not to fall off. If Link does fall off, he will return to full power upon returning. After four hits, Moldorm will start moving faster. It will take a total of six hits or a mere two hits with the Golden Sword to defeat Moldorm.

Screen of the Fight
Boss
Agahnim
This time Agahnim is a little more difficult because he has made two duplicates of himself. It is easy to tell which one is him because his shadow is darker than the other two on his real form. To defeat him, use his own magic against him. With the sword hit his spells back to the "real" wizard. Agahnim will no longer use the lightning attack he used to in Hyrule Castle. Six hits with his own spells should take care of him.

Hitting Back

Splitting into Three


Defeat Sequence
| Spoiler Alert! This section describes a subject that is sensitive to plot development. |


Gallery
Entrance Seal Being Broken by the Maidens
