Gallery:Breath of the Wild Locations: Difference between revisions
Jump to navigation
Jump to search
Want an adless experience? Log in or Create an account.
No edit summary |
(Got to stop here for now, may come back in like an hour.) |
||
| Line 11: | Line 11: | ||
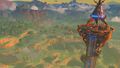
{{Gallery/Box|file=Mount-Hylia.png|link=Mount Hylia|caption=[[Mount Hylia]]}} | {{Gallery/Box|file=Mount-Hylia.png|link=Mount Hylia|caption=[[Mount Hylia]]}} | ||
{{Gallery/Box|file=River-of-the-Dead.png|link=River of the Dead|caption=[[River of the Dead]]}} | {{Gallery/Box|file=River-of-the-Dead.png|link=River of the Dead|caption=[[River of the Dead]]}} | ||
{{Gallery/Bottom}}</center> | |||
===Dueling Peaks=== | |||
<center>{{Gallery}} | |||
{{Gallery/Box|file=Great-Plateau.jpg|link=The Great Plateau|caption=[[Outpost Ruins]]}} | |||
{{Gallery/Box|file=Great-Plateau.jpg|link=The Great Plateau|caption=[[Scout's Hill]]}} | |||
{{Gallery/Box|file=Great-Plateau.jpg|link=The Great Plateau|caption=[[Proxim Bridge]]}} | |||
{{Gallery/Box|file=Great-Plateau.jpg|link=The Great Plateau|caption=[[Hylia River]]}} | |||
{{Gallery/Box|file=Great-Plateau.jpg|link=The Great Plateau|caption=[[Hills of Baumer]]}} | |||
{{Gallery/Box|file=Great-Plateau.jpg|link=The Great Plateau|caption=[[Squabble River]]}} | |||
{{Gallery/Box|file=Great-Plateau.jpg|link=The Great Plateau|caption=[[Dueling Peaks]]}} | |||
{{Gallery/Box|file=Great-Plateau.jpg|link=The Great Plateau|caption=[[Big Twin Bridge]]}} | |||
{{Gallery/Box|file=Great-Plateau.jpg|link=The Great Plateau|caption=[[Little Twin Bridge]]}} | |||
{{Gallery/Box|file=Great-Plateau.jpg|link=The Great Plateau|caption=[[Hickaly Woods]]}} | |||
{{Gallery/Box|file=Great-Plateau.jpg|link=The Great Plateau|caption=[[Mount Rozudo]]}} | |||
{{Gallery/Box|file=Great-Plateau.jpg|link=The Great Plateau|caption=[[Bubinga Forest]]}} | |||
{{Gallery/Box|file=Great-Plateau.jpg|link=The Great Plateau|caption=[[Oakle's Navel]]}} | |||
{{Gallery/Box|file=Great-Plateau.jpg|link=The Great Plateau|caption=[[Blatchery Plain]]}} | |||
{{Gallery/Box|file=Great-Plateau.jpg|link=The Great Plateau|caption=[[Ash Swamp]]}} | |||
{{Gallery/Box|file=Great-Plateau.jpg|link=The Great Plateau|caption=[[Kakariko Bridge]]}} | |||
{{Gallery/Box|file=Great-Plateau.jpg|link=The Great Plateau|caption=[[Lake Siela]]}} | |||
{{Gallery/Box|file=Great-Plateau.jpg|link=The Great Plateau|caption=[[Bonooru's Stand]]}} | |||
{{Gallery/Box|file=Great-Plateau.jpg|link=The Great Plateau|caption=[[Pillars of Levia]]}} | |||
{{Gallery/Box|file=Great-Plateau.jpg|link=The Great Plateau|caption=[[Lantern Lake]]}} | |||
{{Gallery/Box|file=Great-Plateau.jpg|link=The Great Plateau|caption=[[Great Fairy Fountain]]}} | |||
{{Gallery/Box|file=Great-Plateau.jpg|link=The Great Plateau|caption=[[Sahasra Slope]]}} | |||
{{Gallery/Box|file=Great-Plateau.jpg|link=The Great Plateau|caption=[[Nabi Lake]]}} | |||
{{Gallery/Box|file=Great-Plateau.jpg|link=The Great Plateau|caption=[[Floret Sandbar]]}} | |||
{{Gallery/Box|file=Great-Plateau.jpg|link=The Great Plateau|caption=[[Eagus Bridge]]}} | |||
{{Gallery/Box|file=Great-Plateau.jpg|link=The Great Plateau|caption=[[Batrea Lake]]}} | |||
{{Gallery/Box|file=Great-Plateau.jpg|link=The Great Plateau|caption=[[Owlan Bridge]]}} | |||
{{Gallery/Box|file=Great-Plateau.jpg|link=The Great Plateau|caption=[[Horwell Bridge]]}} | |||
{{Gallery/Box|file=Great-Plateau.jpg|link=The Great Plateau|caption=[[Mable Ridge]]}} | |||
{{Gallery/Box|file=Great-Plateau.jpg|link=The Great Plateau|caption=[[South Nabi Lake]]}} | |||
Revision as of 02:32, July 8, 2020
Guys I might have to stop creating this page at any moment, in which case could someone pls start where I left off? Thanks!