Gauntlets: Difference between revisions
Jump to navigation
Jump to search
Want an adless experience? Log in or Create an account.
mNo edit summary |
mNo edit summary |
||
| (2 intermediate revisions by the same user not shown) | |||
| Line 19: | Line 19: | ||
==Variations== | ==Variations== | ||
*'''Silver Gauntlets:''' The Level 1 variation. Link wields the [[Silver Gauntlets]] from ''[[The Legend of Zelda: Ocarina of Time|Ocarina of Time]]'', paired with the [[Ball and Chain]] from ''[[The Legend of Zelda: Twilight Princess|Twilight Princess]]''. | *'''Silver Gauntlets:''' The Level 1 variation. Link wields the [[Silver Gauntlets]] from ''[[The Legend of Zelda: Ocarina of Time|Ocarina of Time]]'', paired with the [[Ball and Chain]] from ''[[The Legend of Zelda: Twilight Princess|Twilight Princess]]''. | ||
*'''Golden Gauntlets:''' The Level 2 variation. Link wields the [[Golden Gauntlets]] from ''Ocarina of Time'', paired with a golden ball and chain | *'''Golden Gauntlets:''' The Level 2 variation. Link wields the [[Golden Gauntlets]] from ''Ocarina of Time'', paired with a larger, golden ball and chain. | ||
*''''Power Gloves:''' The Level 3 variation. | *''''Power Gloves:''' The Level 3 variation. Link wields a pair of [[Power Glove|Power Gloves]] from ''[[The Legend of Zelda: A Link to the Past|A Link to the Past]]'', paired with a [[Chain Chomp]] wrecking ball. | ||
*'''8-Bit Power Bracelets:''' The Level ★ variation. Link wears a pair of [[Power Bracelet|Power Bracelets]] from ''[[The Legend of Zelda]]'', rendered in 3D and attached to black gloves; they are paired with the [[Raft]] from the same game, attached to a green rope and also rendered in 3D. | *'''8-Bit Power Bracelets:''' The Level ★ variation. Link wears a pair of [[Power Bracelet|Power Bracelets]] from ''[[The Legend of Zelda]]'', rendered in 3D and attached to black gloves; they are paired with the [[Raft]] from the same game, attached to a green rope and also rendered in 3D. | ||
*'''Power Gloves +:''' The Level 4 variation. Their appearance is identical to the Power Gloves. | *'''Power Gloves +:''' The Level 4 variation. Their appearance is identical to the Power Gloves. | ||
| Line 50: | Line 50: | ||
|'''Wii U:''' [[Adventure Map]], B-14{{Tt|2nd from bottom, 14th from left}}<br/>'''3DS/Switch:''' [[Master Quest Map]], A-11 | |'''Wii U:''' [[Adventure Map]], B-14{{Tt|2nd from bottom, 14th from left}}<br/>'''3DS/Switch:''' [[Master Quest Map]], A-11 | ||
|- | |- | ||
|[[File:8-Bit_Power_Bracelet.png|140px]]<br/> | |[[File:8-Bit_Power_Bracelet.png|140px]]<br/>8-Bit Power Bracelet | ||
|★ | |★ | ||
|{{Lightning}} Lightning | |{{Lightning}} Lightning | ||
| Line 75: | Line 75: | ||
|- | |- | ||
| style="text-align:center"|Base String{{Tt|YYYYY/BBBBB}} | | style="text-align:center"|Base String{{Tt|YYYYY/BBBBB}} | ||
|Link performs a | |Link performs a string of five attacks; He swings the ball right, swings it left, spins it around him, thrusts it forward, and flips before smashing it into the ground a short distance away. | ||
|- | |- | ||
| style="text-align:center"|C1{{Tt|X/Y}} | | style="text-align:center"|C1{{Tt|X/Y}} | ||
|Link | |Link makes a grab in front of him. If he grabs a [[Jar]], [[Bomb Flower]], or enemy unit, Link will pick them up, and can either slam them down with {{HW Button|weak}} or throw them with {{HW Button|strong}}. Contents of Jars are automatically dropped, while enemies are automatically thrown. | ||
|- | |- | ||
| style="text-align:center"|C2{{Tt|YX+XX/BY+YY}} | | style="text-align:center"|C2{{Tt|YX+XX/BY+YY}} | ||
|Link | |Link digs his hand into the ground, creating a small shockwave; This can be extended, causing Link to pull out a boulder and throw it into the air, then burrow into the ground and leap up with an uppercut. During the second extension, Link is invulnerable while underground. | ||
|- | |- | ||
| style="text-align:center"|C3{{Tt|YYX+XX/BBY+YY}} | | style="text-align:center"|C3{{Tt|YYX+XX/BBY+YY}} | ||
|Link pounds his | |Link pounds his fists together, creating an electric surge around him; This can be extended, causing Link to punch the ground and send out three paralyzing electric pulses in an arc, then dash forward with an electric slap. | ||
|- | |- | ||
| style="text-align:center"|C4{{Tt|YYYX+XX/BBBY+YY}} | | style="text-align:center"|C4{{Tt|YYYX+XX/BBBY+YY}} | ||
|Link | |Link tears a tall stone pillar out from the ground and slams it down in front of him before shattering the pillar with a thrust of the ball; This can be extended, causing Link to instead grab the pillar and spin it around him (throwing it if the second follow-up isn’t performed), then throw the pillar into the air and slam it into the ground. | ||
|- | |- | ||
| style="text-align:center"|C5{{Tt|YYYYX/BBBBY}} | | style="text-align:center"|C5{{Tt|YYYYX/BBBBY}} | ||
|Link | |Link charges the gauntlets with electricity, grabs a chunk from the ground in front of him, and vaults away, tearing it out in a blast of energy. | ||
|- | |- | ||
| style="text-align:center"|Special Attack | | style="text-align:center"|Special Attack | ||
|Link smashes | |Link smashes the ball into the ground, then jumps, spins 360°, and tears it out, creating an enormous shockwave around him. | ||
|- | |- | ||
| style="text-align:center"|Focus Spirit Finisher | | style="text-align:center"|Focus Spirit Finisher | ||
Latest revision as of 20:31, April 20, 2024
| This article describes a subject that is or may be outside the core Zelda canon. |
| This article is a stub. You can help the Zelda Dungeon Wiki by expanding it. |
TODO: Languages, evaluate moveset and add gameplay tips, add Weak Point Smash info
Care to do so?
Gauntlets

Games | ||
Used by | ||
Element |
| |
Related | ||
"A power-gauntlet-and-flail-combo set, perfect for devastating attacks. Pressing the Strong Attack button allows you to pick up and throw enemies."
— In-game description
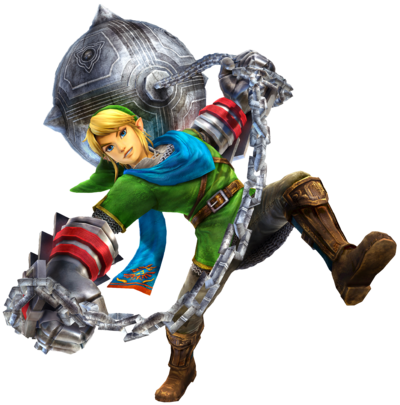
Gauntlets are a weapon class used by Link in Hyrule Warriors. While wielding it, Link fights using a pair of strength-enhancing gauntlets, enabling him to swing a hefty wrecking ball and tear the earth itself apart.
Variations
- Silver Gauntlets: The Level 1 variation. Link wields the Silver Gauntlets from Ocarina of Time, paired with the Ball and Chain from Twilight Princess.
- Golden Gauntlets: The Level 2 variation. Link wields the Golden Gauntlets from Ocarina of Time, paired with a larger, golden ball and chain.
- 'Power Gloves: The Level 3 variation. Link wields a pair of Power Gloves from A Link to the Past, paired with a Chain Chomp wrecking ball.
- 8-Bit Power Bracelets: The Level ★ variation. Link wears a pair of Power Bracelets from The Legend of Zelda, rendered in 3D and attached to black gloves; they are paired with the Raft from the same game, attached to a green rope and also rendered in 3D.
- Power Gloves +: The Level 4 variation. Their appearance is identical to the Power Gloves.
- Burning Gloves: The Level 4+ variation. Their appearance is identical to the Power Gloves, but the gauntlets are completely red, with a red Chain Chomp wrecking ball.
| Weapon | Level | Elements | Strength | Location |
|---|---|---|---|---|
 Silver Gauntlets |
1 | 80 (+8 per ★) |
Adventure Map, G-14 | |
 Golden Gauntlets |
2 | 150 (+15 per ★) |
Wii U: Adventure Map, C-12? 3DS/Switch: Great Sea Map, B-3 | |
 Power Gloves |
3 | 280 (+28 per ★) |
Wii U: Adventure Map, B-14? 3DS/Switch: Master Quest Map, A-11 | |
 8-Bit Power Bracelet |
★ | 280 (+28 per ★) |
Wii U: Twilight Map, C-3? 3DS/Switch: Cosmetic appearance for Power Gloves + and Burning Gloves when 8-Bit Weapons is turned on. | |
Power Gloves + |
4 | 500 (+50 per ★) |
Twilight Map, G-5 | |
| Burning Gloves | 4+ | 500 (+50 per ★) |
Koholint Island Map, A-14 |
Moveset
| Attack | Explanation |
|---|---|
| Base String? | Link performs a string of five attacks; He swings the ball right, swings it left, spins it around him, thrusts it forward, and flips before smashing it into the ground a short distance away. |
| C1? | Link makes a grab in front of him. If he grabs a Jar, Bomb Flower, or enemy unit, Link will pick them up, and can either slam them down with |
| C2? | Link digs his hand into the ground, creating a small shockwave; This can be extended, causing Link to pull out a boulder and throw it into the air, then burrow into the ground and leap up with an uppercut. During the second extension, Link is invulnerable while underground. |
| C3? | Link pounds his fists together, creating an electric surge around him; This can be extended, causing Link to punch the ground and send out three paralyzing electric pulses in an arc, then dash forward with an electric slap. |
| C4? | Link tears a tall stone pillar out from the ground and slams it down in front of him before shattering the pillar with a thrust of the ball; This can be extended, causing Link to instead grab the pillar and spin it around him (throwing it if the second follow-up isn’t performed), then throw the pillar into the air and slam it into the ground. |
| C5? | Link charges the gauntlets with electricity, grabs a chunk from the ground in front of him, and vaults away, tearing it out in a blast of energy. |
| Special Attack | Link smashes the ball into the ground, then jumps, spins 360°, and tears it out, creating an enormous shockwave around him. |
| Focus Spirit Finisher | Manual: Link swings his ball up into the air, then as it falls, he punches the ball, thrusting it forward with devastating power. Automatic: Link jumps and slams his palm to the ground, releasing his remaining magic in an electric explosion around him. |
| Weak Point Smash | Enemy Captain/Warrior: TBA Giant Boss: TBA |