Samasa Plain: Difference between revisions
mNo edit summary |
mNo edit summary |
||
| (16 intermediate revisions by 5 users not shown) | |||
| Line 1: | Line 1: | ||
{{Infobox|location | {{Infobox|location | ||
| image = [[File:Samasa-Plain.png]] | | image = [[File:Samasa-Plain.png|400px]] | ||
| game = ''[[The Legend of Zelda: Breath of the Wild|Breath of the Wild]]'' | | caption = | ||
| inhab | | game = ''[[The Legend of Zelda: Breath of the Wild|Breath of the Wild]]''<br/>''[[The Legend of Zelda: Tears of the Kingdom|Tears of the Kingdom]]'' | ||
| pointsint = | | enemies = | ||
| item | | inhab = | ||
| pointsint = [[Rucco Maag Shrine]] | |||
| location = [[Lanayru Great Spring]], [[Lanayru (Breath of the Wild)|Lanayru]] | |||
| item = | |||
| natseason = | | natseason = | ||
| related = [[ | | related = [[Lanayru Bay]]<br/>[[Rutala River]]<br/>[[Samasa Desert]]<br/>[[Trotter's Downfall]] | ||
}} | }} | ||
'''Samasa Plain''' is a location from ''[[The Legend of Zelda: Breath of the Wild|Breath of the Wild]]''. | '''Samasa Plain''' is a location from ''[[The Legend of Zelda: Breath of the Wild|Breath of the Wild]]'' and ''[[The Legend of Zelda: Tears of the Kingdom|Tears of the Kingdom]]''. | ||
== | ==''Breath of the Wild''== | ||
The Samasa Plain is a narrow land area between the [[Lanayru Bay]] and the [[Rutala River]] found within the [[Lanayru]] | The Samasa Plain is a narrow land area between the [[Lanayru Bay]] and the [[Rutala River]] found within the [[Lanayru (Breath of the Wild)|Lanayru]] province of the game. As it is in the land area covered by the [[Lanayru Tower]], it will never stop raining until Link has completed the [[Vah Ruta]] dungeon. | ||
At the northwest part of the plain, right along the shore, there are a trio of [[Blue Lizalfos]]. They are cooking some [[Roasted Bass]] on some [[Boko Spear]]s, and there is also a treasure chest at the camp that contains some [[Ice Arrow]]s. There is also a [[Raft]] here, allowing Link to sail along the Rutala River. However, the area across the river has very steep cliffs that would be impossible to climb | At the northwest part of the plain, right along the shore, there are a trio of [[Blue Lizalfos]]. They are cooking some [[Roasted Bass]] on some [[Boko Spear]]s, and there is also a treasure chest at the camp that contains some [[Ice Arrow]]s. There is also a [[Raft]] here, allowing Link to sail along the Rutala River. However, the area across the river has very steep cliffs that would be impossible to climb without substantial stamina or [[Revali's Gale]]. | ||
At the south end of the Samasa Plain, right along the Lanayru Bay, there is a small camp with a [[Traveler's Sword]] and [[Traveler's Shield]]. There is some wood here where Link can quickly start a [[Campfire]]. Just north of this area in the south-central part of Samasa Plain, there is a treasure chest on top of a hill and it is stuck in the ground. Link can pull it out with [[Magnesis]] and open it to get a [[Rupee|Silver Rupee]]. | At the south end of the Samasa Plain, right along the Lanayru Bay, there is a small camp with a [[Traveler's Sword]] and [[Traveler's Shield]]. There is some wood here where Link can quickly start a [[Campfire]]. Just north of this area in the south-central part of Samasa Plain, there is a treasure chest on top of a hill and it is stuck in the ground. Link can pull it out with [[Magnesis]] and open it to get a [[Rupee|Silver Rupee]]. | ||
| Line 21: | Line 24: | ||
{{main|Rucco Maag Shrine}} | {{main|Rucco Maag Shrine}} | ||
The [[Rucco Maag Shrine]] is found at the north end of the plain. There are some ruins just south of the shrine, as well as a series of pillars. There are four Blue Lizalfos that patrol the area and | The [[Rucco Maag Shrine]] is found at the north end of the plain. There are some ruins just south of the shrine, as well as a series of pillars. There are four Blue Lizalfos that patrol the area and protect the shrine. Additionally, there are spikes on the floor and Link will need to carefully navigate the maze to reach the shrine. Alternatively Link can just use Revali's Gale or leap down from the much higher elevations in the adjacent areas. | ||
==Nomenclature== | ===Nomenclature=== | ||
Samasa Plain is named after the [[Samasa Desert]], a location from ''[[The Legend of Zelda: Oracle of Seasons|Oracle of Seasons]]''. | Samasa Plain is named after the [[Samasa Desert]], a location from ''[[The Legend of Zelda: Oracle of Seasons|Oracle of Seasons]]''. | ||
== | ===Animals=== | ||
<gallery mode=nolines> | |||
File:Hearty_Blueshell_Snail.png|[[Hearty Blueshell Snail]] | |||
File:Cold-darner.png|[[Cold Darner]] | |||
File:Hightail-lizard.png|[[Hightail Lizard]] | |||
File:Restless-cricket.png|[[Restless Cricket]] | |||
File:Hot-footed-frog.png|[[Hot-Footed Frog]] | |||
File:Blue-winged-heron.jpg|[[Blue-Winged Heron]] | |||
File:Wood-pigeon.jpg|[[Wood Pigeon]] | |||
</gallery> | |||
==Items== | ===Items=== | ||
<gallery mode=nolines> | |||
File:Acorn-BOTW.png|[[Acorn]] | |||
File:Apple-botw.png|[[Apple]] | |||
File:Hyrule_Herb.png|[[Hyrule Herb]] | |||
File:Travelers-shield.png|[[Traveler's Shield]] | |||
File:Hyrule-Compendium-Travelers-Sword.png|[[Traveler's Sword]] | |||
</gallery> | |||
==Enemies== | ===Enemies=== | ||
<gallery mode=nolines> | |||
File:Blue-Lizalfos.png|[[Blue Lizalfos]] | |||
File:Keese-botw.jpg|[[Keese]] | |||
File:Stalizalfos.jpg|[[Stalizalfos]] | |||
</gallery> | |||
==Nearby Korok Seeds== | ===Nearby Korok Seeds=== | ||
<section begin=Seed483summary />[[File:Korok483.png|200px|thumb|left|Clear the leaves, pick up the rock beneath.]]<section end=Seed483summary />Hit the leaves with a bladed weapon or burn them, and pick up the rock under them.{{Korok Seed|Seed483}}{{Clear|left}} | <section begin=Seed483summary />[[File:Korok483.png|200px|thumb|left|Clear the leaves, pick up the rock beneath.]]<section end=Seed483summary />Hit the leaves with a bladed weapon or burn them, and pick up the rock under them.{{Korok Seed|Seed483}}{{Clear|left}} | ||
<section begin=Seed484summary />[[File:Korok484.png|200px|thumb|left|Complete the rock circle using the rock at the other end of the beach.]]<section end=Seed484summary />Carry the rock from the other end of the beach all the way around to complete the rock circle.{{Korok Seed|Seed484}}{{Clear|left}} | <section begin=Seed484summary />[[File:Korok484.png|200px|thumb|left|Complete the rock circle using the rock at the other end of the beach.]]<section end=Seed484summary />Carry the rock from the other end of the beach all the way around to complete the rock circle.{{Korok Seed|Seed484}}{{Clear|left}} | ||
{{Cat|Breath of the Wild Locations}} | ==''Tears of the Kingdom''== | ||
The Samasa Plain is the narrow land area that separates the [[Lanayru Bay]] with the [[Rutala River]]. | |||
At the far west end of the bay, [[Addison]] can be found holding up a [[Hudson Sign]]. Use the nearby [[Board]] to hold up the sign by placing it diagonally, leaning to the edge of the sign. As a thanks, Addison will reward Link with a [[Red Rupee]], some [[Energizing Mushroom Rice Balls]], and a [[Sleepover Ticket]]. | |||
At the north end of the plain, there is an enemy base with some [[Moblin]] and [[Blue Bokoblin]]. On the top floor of the base there are two chests, one containing five [[Bomb Flower]]s, and the other a [[Spiked-Iron-Ball Hammer]]. | |||
===Korok Seeds=== | |||
*At the far east end of the area, in the water of the Lanayru Bay, there are a few rocks. Collect the flowers in order to get the [[Korok Seed]]. | |||
*At the east end of the region, along the beach, there is a Korok trying to reunite with his friend. Either use the nearby [[Log]]s and [[Sail]] to create a raft, or carry him around the bay to reunite the Koroks and get two Korok Seeds. | |||
*At the far west end of the Lanayru Bay, there are a pair of statues with offering plates, with one of them having a [[Roasted Porgy]]. If you don't have one already, catch either a [[Mighty Porgy]] or an [[Armored Porgy]], which are both found in the Lanayru Bay. Light the campfire using a fire based weapon or fire fruit and drop one of the porgys. Let it roast until it turns into a Roasted Porgy. Use Ultrahand to place it on the offering plate to get the Korok Seed. | |||
*Next to some ruins near the center of the plain, there is a lone tree. Climb up and lift the rock to get the Korok Seed. | |||
===Animals=== | |||
<gallery mode=nolines> | |||
File:Grassland_Fox_-_TotK_Compendium.png|[[Grassland Fox]] | |||
</gallery> | |||
===Enemies=== | |||
<gallery mode=nolines> | |||
File:Blue_Bokoblin_-_TotK_Compendium.png|[[Blue Bokoblin]] | |||
File:Electric_Chuchu_-_TotK_Compendium.png|[[Electric Chuchu]] | |||
File:Electric_Keese_-_TotK_Compendium.png|[[Electric Keese]] | |||
File:Moblin_-_TotK_Compendium.png|[[Moblin]] | |||
File:Stalkoblin_-_TotK_Compendium.png|[[Stalkoblin]] | |||
</gallery> | |||
===Bugs and Materials=== | |||
<gallery mode=nolines> | |||
File:Apple_-_TotK_icon.png|[[Apple]] | |||
File:Cold_Darner_-_TotK_icon.png|[[Cold Darner]] | |||
File:Golden_Apple_-_TotK_icon.png|[[Golden Apple]] | |||
File:Korok_Frond_-_TotK_icon.png|[[Korok Frond]] | |||
File:Hightail_Lizard_-_TotK_icon.png|[[Hightail Lizard]] | |||
File:Hylian_Pine_Cone_-_TotK_icon.png|[[Hylian Pine Cone]] | |||
File:Hylian_Shroom_-_TotK_icon.png|[[Hylian Shroom]] | |||
File:Hyrule_Herb_-_TotK_icon.png|[[Hyrule Herb]] | |||
File:Restless_Cricket_-_TotK_icon.png|[[Restless Cricket]] | |||
File:Silent_Shroom_-_TotK_icon.png|[[Silent Shroom]] | |||
File:Splash_Fruit_-_TotK_icon.png|[[Splash Fruit]] | |||
File:Stamella_Shroom_-_TotK_icon.png|[[Stamella Shroom]] | |||
</gallery> | |||
==Gallery== | |||
<gallery widths="400px" heights="220px"> | |||
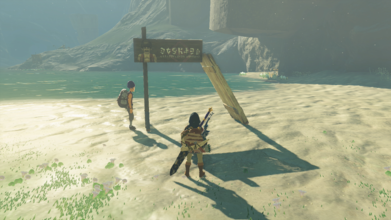
File:Samasa-Plain-Hudson-Sign.png|[[Addison]] and a [[Hudson Sign]] | |||
</gallery> | |||
{{Cat|Breath of the Wild Lanayru Locations}} | |||
{{cat|Tears of the Kingdom Lanayru Locations}} | |||
Latest revision as of 19:33, April 25, 2024

Games | ||
Location | ||
Points of | ||
Related | ||
Samasa Plain is a location from Breath of the Wild and Tears of the Kingdom.
Breath of the Wild
The Samasa Plain is a narrow land area between the Lanayru Bay and the Rutala River found within the Lanayru province of the game. As it is in the land area covered by the Lanayru Tower, it will never stop raining until Link has completed the Vah Ruta dungeon.
At the northwest part of the plain, right along the shore, there are a trio of Blue Lizalfos. They are cooking some Roasted Bass on some Boko Spears, and there is also a treasure chest at the camp that contains some Ice Arrows. There is also a Raft here, allowing Link to sail along the Rutala River. However, the area across the river has very steep cliffs that would be impossible to climb without substantial stamina or Revali's Gale.
At the south end of the Samasa Plain, right along the Lanayru Bay, there is a small camp with a Traveler's Sword and Traveler's Shield. There is some wood here where Link can quickly start a Campfire. Just north of this area in the south-central part of Samasa Plain, there is a treasure chest on top of a hill and it is stuck in the ground. Link can pull it out with Magnesis and open it to get a Silver Rupee.
Rucco Maag Shrine
- Main article: Rucco Maag Shrine
The Rucco Maag Shrine is found at the north end of the plain. There are some ruins just south of the shrine, as well as a series of pillars. There are four Blue Lizalfos that patrol the area and protect the shrine. Additionally, there are spikes on the floor and Link will need to carefully navigate the maze to reach the shrine. Alternatively Link can just use Revali's Gale or leap down from the much higher elevations in the adjacent areas.
Nomenclature
Samasa Plain is named after the Samasa Desert, a location from Oracle of Seasons.
Animals


Items


Enemies


Nearby Korok Seeds

Hit the leaves with a bladed weapon or burn them, and pick up the rock under them.

Carry the rock from the other end of the beach all the way around to complete the rock circle.
Tears of the Kingdom
The Samasa Plain is the narrow land area that separates the Lanayru Bay with the Rutala River.
At the far west end of the bay, Addison can be found holding up a Hudson Sign. Use the nearby Board to hold up the sign by placing it diagonally, leaning to the edge of the sign. As a thanks, Addison will reward Link with a Red Rupee, some Energizing Mushroom Rice Balls, and a Sleepover Ticket.
At the north end of the plain, there is an enemy base with some Moblin and Blue Bokoblin. On the top floor of the base there are two chests, one containing five Bomb Flowers, and the other a Spiked-Iron-Ball Hammer.
Korok Seeds
- At the far east end of the area, in the water of the Lanayru Bay, there are a few rocks. Collect the flowers in order to get the Korok Seed.
- At the east end of the region, along the beach, there is a Korok trying to reunite with his friend. Either use the nearby Logs and Sail to create a raft, or carry him around the bay to reunite the Koroks and get two Korok Seeds.
- At the far west end of the Lanayru Bay, there are a pair of statues with offering plates, with one of them having a Roasted Porgy. If you don't have one already, catch either a Mighty Porgy or an Armored Porgy, which are both found in the Lanayru Bay. Light the campfire using a fire based weapon or fire fruit and drop one of the porgys. Let it roast until it turns into a Roasted Porgy. Use Ultrahand to place it on the offering plate to get the Korok Seed.
- Next to some ruins near the center of the plain, there is a lone tree. Climb up and lift the rock to get the Korok Seed.
Animals

Enemies


Bugs and Materials
Gallery
Addison and a Hudson Sign
