Goron Temple: Difference between revisions
No edit summary |
mNo edit summary |
||
| (8 intermediate revisions by 3 users not shown) | |||
| Line 11: | Line 11: | ||
{{ZD|[https://www.zeldadungeon.net/phantom-hourglass-walkthrough/goron-temple/ '''Phantom Hourglass''' Walkthrough: Goron Temple]}} | {{ZD|[https://www.zeldadungeon.net/phantom-hourglass-walkthrough/goron-temple/ '''Phantom Hourglass''' Walkthrough: Goron Temple]}} | ||
The '''Goron Temple''' is the fifth [[Dungeon]] in ''[[The Legend of Zelda: Phantom Hourglass|Phantom Hourglass]]''. It is located on [[Goron Island]] in the Southeast Quadrant of the [[World of the Ocean King]] | The '''Goron Temple''' is the fifth [[Dungeon]] in ''[[The Legend of Zelda: Phantom Hourglass|Phantom Hourglass]]''. It is located on [[Goron Island]] in the [[Southeast Quadrant]] of the [[World of the Ocean King]]. | ||
== | ==Gaining Entrance== | ||
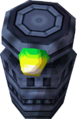
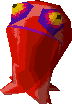
After [[Link (The Wind Waker)#Phantom Hourglass|Link]] acquires the [[Southeastern Sea Chart]], he has multiple options, as he can venture to the Goron Temple or the [[Temple of Ice]]. Alternatively, Link can also acquire the [[Northeastern Sea Chart]] and head towards [[Mutoh's Temple]]. When Link tries to dock at Goron Island, he'll encounter a [[Massive Eye]], an Overworld enemy that he must launch cannons at its eyes in order to defeat and gain access to the island. | |||
While on Goron Island, Link is required to run around and speak with all the [[Goron]]s that he encounters. After doing so, he can speak with [[Biggoron]] and he can take the [[Goron Quiz]]. Successfully answering all 6 questions will result in Link gaining access to the north portion of the island. Biggoron's son, [[Gongoron]], will run up ahead and after navigating the maze, Link will join him in the Goron Temple. | |||
==Dungeon Overview== | |||
Early on in the temple, Link will encounter [[Armos]] and will need to use their massive bodies to push them onto floor switches, allowing Link to solve puzzles. The dungeon utilizes much of Link's inventory up until this point, with puzzles that require Link to use the [[Bomb]]s, [[Bow]], and [[Shovel]]. When Link arrives at the Basement, he will reunite with Gongoron, but they are separated by a barrier of sand. During this portion of the dungeon, Link and Gongoron will work together, where the player can alternate control of both characters. While playing as Gongoron, attacks are limited to simply jumping at enemies. Gongoron can roll around, picking up speed and being able to jump across gaps. | |||
Working together with Gongorn, Link will acquire the dungeon item, the [[Bombchu]]s. The second half of the dungeon heavily revolves around usage of the Bombchus, with Link needing to trace strategic pathways to launch Bombchus at enemies and floor switches. Often these are used alongside a [[Crystal Switch]], where Link will need to raise and lower colored blocks in order to guide a Bombchu across a pathway. Bombchus can be sent throw small holes where Link otherwise would not be able to crawl through. | |||
==Dongorongo, Armored Lizard== | ===Dongorongo, Armored Lizard=== | ||
{{Main|Dongorongo}} | {{Main|Dongorongo}} | ||
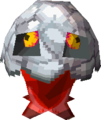
[[File: Dongorongo.png|left]] | [[File: Dongorongo.png|left]] | ||
The boss features the same unique mechanic permeating most of the Goron Temple, switching between [[Link]] and [[Gongoron]]. | The boss features the same unique mechanic permeating most of the Goron Temple, switching between [[Link (The Wind Waker)#Phantom Hourglass|Link]] and [[Gongoron]]. Gongoron will need to avoid its charge and fire breath attacks. Gongoron can attack Dongorongo from its side, knocking it to the ground. Then controlling as Link, send a Bombchu across the sand to land in the mouth of Dongorongo. During this phase, Link must also be wary of the enemy [[Eye Slug]]s that will attack. As Gongoron attack the boss's side and then quickly switch control to Link. Trace a path for your Bombchu on the DS touchscreen towards the beast's mouth. Repeat the process three times. | ||
After | After the initial phase, it appears as if Dongorongo is defeated and Gongoron will depart the boss chamber. However, after crossing the bridge, Dongorongo will be revived for the final phase of the battle. Link will need to launch bombs into Dongorongo when the beast is inhaling. Doing so will stun the boss, allowing Link to deliver some sword slashes. | ||
Link will be awarded with a [[Heart Container]] and 2 more minutes of [[Sand of Hours]]. Link will also acquire the pure metal [[Crimsonine]]. | |||
==Enemies== | |||
{{Gallery}} | |||
== | {{Gallery/Box|file=PH-Armos.png|link=Armos|caption=[[Armos]]}} | ||
{{Gallery/Box|file=PH-Beamos.png|link=Beamos|caption=[[Beamos]]}} | |||
{{Gallery/Box|file=PH-Blue-ChuChu.png|link=Blue_ChuChu|caption=[[Blue ChuChu]]}} | |||
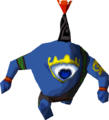
{{Gallery/Box|file=PH-Hinox.png|link=Eye_Brute|caption=[[Eye Brute]]}} | |||
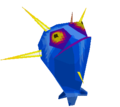
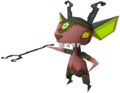
{{Gallery/Box|file=Eye-Slug.png|link=Eye_Slug|caption=[[Eye Slug]]}} | |||
{{Gallery/Box|file=Fire-Bubble.png|link=Fire_Bubble|caption=[[Fire Bubble]]}} | |||
{{Gallery/Box|file=Flying-Pot.png|link=Flying_Jar|caption=[[Flying Jar]]}} | |||
{{Gallery/Box|file=PH-Gel.png|link=Gel|caption=[[Gel]]}} | |||
{{Gallery/Box|file=PH-Like-Like.png|link=Like_Like|caption=[[Like Like]]}} | |||
{{Gallery/Box|file=PH-Miniblin.png|link=Miniblin|caption=[[Miniblin]]}} | |||
{{Gallery/Box|file=PH-Red-ChuChu.png|link=Red_ChuChu|caption=[[Red ChuChu]]}} | |||
{{Gallery/Box|file=Rock-ChuChu.png|link=Rock_ChuChu|caption=[[Rock ChuChu]]}} | |||
{{Gallery/Bottom}} | |||
==Maps== | |||
<gallery> | |||
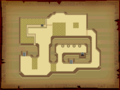
File:Goron-Temple-1F-1.png|1st Floor (Entrance) | |||
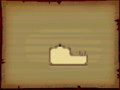
File:Goron-Temple-1F-2.png|1st Floor (Northwest Chamber) | |||
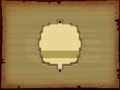
File:Goron-Temple-B1.png|Basement Floor 1 | |||
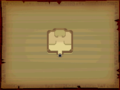
File:Goron-Temple-B2.png|Basement Floor 2 | |||
File:Goron-Temple-B3.png|Basement Floor 3 | |||
File:Goron-Temple-B4.png|Basement Floor 4 | |||
File:Goron-Temple-Boss-Room.png|Boss Room with [[Dongorongo]] | |||
File:Goron-Temple-Crimsonine.png|Floor with [[Crimsoninine]] | |||
</gallery> | |||
{{clear}} | |||
{{Listbox|Phantom Hourglass Dungeons}} | |||
{{Cat|Phantom Hourglass Dungeons}} | {{Cat|Phantom Hourglass Dungeons}} | ||
Revision as of 14:17, November 28, 2022

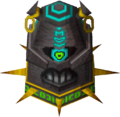
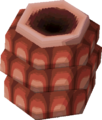
Entrance of the Dungeon
Games | ||
Boss | ||
Items | ||
Rewards | Heart Container | |
| Guides | ||
|---|---|---|
Walkthrough | ||
In-depth guide:
Phantom Hourglass Walkthrough: Goron Temple |
The Goron Temple is the fifth Dungeon in Phantom Hourglass. It is located on Goron Island in the Southeast Quadrant of the World of the Ocean King.
Gaining Entrance
After Link acquires the Southeastern Sea Chart, he has multiple options, as he can venture to the Goron Temple or the Temple of Ice. Alternatively, Link can also acquire the Northeastern Sea Chart and head towards Mutoh's Temple. When Link tries to dock at Goron Island, he'll encounter a Massive Eye, an Overworld enemy that he must launch cannons at its eyes in order to defeat and gain access to the island.
While on Goron Island, Link is required to run around and speak with all the Gorons that he encounters. After doing so, he can speak with Biggoron and he can take the Goron Quiz. Successfully answering all 6 questions will result in Link gaining access to the north portion of the island. Biggoron's son, Gongoron, will run up ahead and after navigating the maze, Link will join him in the Goron Temple.
Dungeon Overview
Early on in the temple, Link will encounter Armos and will need to use their massive bodies to push them onto floor switches, allowing Link to solve puzzles. The dungeon utilizes much of Link's inventory up until this point, with puzzles that require Link to use the Bombs, Bow, and Shovel. When Link arrives at the Basement, he will reunite with Gongoron, but they are separated by a barrier of sand. During this portion of the dungeon, Link and Gongoron will work together, where the player can alternate control of both characters. While playing as Gongoron, attacks are limited to simply jumping at enemies. Gongoron can roll around, picking up speed and being able to jump across gaps.
Working together with Gongorn, Link will acquire the dungeon item, the Bombchus. The second half of the dungeon heavily revolves around usage of the Bombchus, with Link needing to trace strategic pathways to launch Bombchus at enemies and floor switches. Often these are used alongside a Crystal Switch, where Link will need to raise and lower colored blocks in order to guide a Bombchu across a pathway. Bombchus can be sent throw small holes where Link otherwise would not be able to crawl through.
Dongorongo, Armored Lizard
- Main article: Dongorongo

The boss features the same unique mechanic permeating most of the Goron Temple, switching between Link and Gongoron. Gongoron will need to avoid its charge and fire breath attacks. Gongoron can attack Dongorongo from its side, knocking it to the ground. Then controlling as Link, send a Bombchu across the sand to land in the mouth of Dongorongo. During this phase, Link must also be wary of the enemy Eye Slugs that will attack. As Gongoron attack the boss's side and then quickly switch control to Link. Trace a path for your Bombchu on the DS touchscreen towards the beast's mouth. Repeat the process three times.
After the initial phase, it appears as if Dongorongo is defeated and Gongoron will depart the boss chamber. However, after crossing the bridge, Dongorongo will be revived for the final phase of the battle. Link will need to launch bombs into Dongorongo when the beast is inhaling. Doing so will stun the boss, allowing Link to deliver some sword slashes.
Link will be awarded with a Heart Container and 2 more minutes of Sand of Hours. Link will also acquire the pure metal Crimsonine.
Enemies


Maps
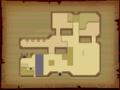
1st Floor (Entrance)
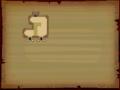
1st Floor (Northwest Chamber)
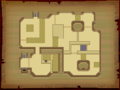
Basement Floor 1
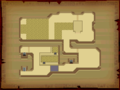
Basement Floor 2
Basement Floor 3
Basement Floor 4
Boss Room with Dongorongo
Floor with Crimsoninine


