Meadela's Mantle: Difference between revisions
mNo edit summary |
mNo edit summary |
||
| Line 2: | Line 2: | ||
| image = [[File:Meadelas-Mantle.jpg|400px]] | | image = [[File:Meadelas-Mantle.jpg|400px]] | ||
| caption = | | caption = | ||
| game = ''[[The Legend of Zelda: Breath of the Wild|Breath of the Wild]]'' | | game = ''[[The Legend of Zelda: Breath of the Wild|Breath of the Wild]]''<br/>''[[The Legend of Zelda: Tears of the Kingdom|Tears of the Kingdom]]'' | ||
| enemies = | | enemies = | ||
| inhab = | | inhab = | ||
| Line 12: | Line 12: | ||
}} | }} | ||
'''Meadela's Mantle''' is a location in ''[[The Legend of Zelda: Breath of the Wild|Breath of the Wild]]''. | '''Meadela's Mantle''' is a location in ''[[The Legend of Zelda: Breath of the Wild|Breath of the Wild]]'' and ''[[The Legend of Zelda: Tears of the Kingdom|Tears of the Kingdom]]''. | ||
==''Breath of the Wild''== | ==''Breath of the Wild''== | ||
| Line 40: | Line 40: | ||
===Animals=== | ===Animals=== | ||
<gallery mode=nolines> | |||
File:Cold-footed-wolf.jpg|[[Cold-Footed Wolf]] | |||
File:Great-horned-rhinoceros.jpg|[[Great-Horned Rhinoceros]] | |||
File:Honeyvore-bear.jpg|[[Honeyvore Bear]] | |||
File:Snowcoat-fox.jpg|[[Snowcoat Fox]] | |||
File:Tabantha-moose.jpg|[[Tabantha Moose]] | |||
File:White-pigeon.jpg|[[White Pigeon]] | |||
</gallery> | |||
===Enemies=== | ===Enemies=== | ||
<gallery mode=nolines> | |||
File:Blue-Bokoblin-Model.png|[[Blue Bokoblin]] | |||
File:Black-Bokoblin-Model.png|[[Black Bokoblin]] | |||
File:Black-Moblin.png|[[Black Moblin]] | |||
File:Ice-keese.jpg|[[Ice Keese]] | |||
File:Ice-wizzrobe.jpg|[[Ice Wizzrobe]] | |||
File:Ice-Breath-Lizalfos.png|[[Ice-Breath Lizalfos]] | |||
File:Stalmoblin.jpg|[[Stalmoblin]] | |||
</gallery> | |||
===Materials=== | ===Materials=== | ||
<gallery mode=nolines> | |||
File:Chillshroom.png|[[Chillshroom]] | |||
File:Cold-darner.png|[[Cold Darner]] | |||
File:Cool_Safflina.png|[[Cool Safflina]] | |||
File:Restless-cricket.png|[[Restless Cricket]] | |||
File:Rushroom.png|[[Rushroom]] | |||
File:Wildberry.png|[[Wildberry]] | |||
File:Winterwing-butterfly.png|[[Winterwing Butterfly]] | |||
</gallery> | |||
===Nearby Korok Seeds=== | ===Nearby Korok Seeds=== | ||
| Line 84: | Line 84: | ||
<section begin=Seed803summary />[[File:Korok803.png|200px|thumb|left|Catch the fairy lights.]]<section end=Seed803summary />Catch the fairy lights.{{Korok Seed|Seed803}}{{Clear|left}} | <section begin=Seed803summary />[[File:Korok803.png|200px|thumb|left|Catch the fairy lights.]]<section end=Seed803summary />Catch the fairy lights.{{Korok Seed|Seed803}}{{Clear|left}} | ||
{{Cat|Breath of the Wild Locations}} | {{Cat|Breath of the Wild Gerudo Locations}} | ||
{{cat|Tears of the Kingdom Gerudo Locations}} | |||
Revision as of 17:02, June 22, 2023

Meadela's Mantle is a location in Breath of the Wild and Tears of the Kingdom.
Breath of the Wild
The Meadela's Mantle is located near the center of the Gerudo Highlands, just south of the Gerudo Summit. Like much of the region, the area is bitterly cold, requiring Link to wear armor with Cold Resistance in order to survive. Each day between the hours of 6am and 6pm, the area has unlimited sunshine, where as after 6pm, it will revert to cloudy or snowy conditions.
There are some Blue Bokoblin and Black Bokoblin archers that can be found in the area riding massive Honeyvore Bears. There are also some Cold-Footed Wolves, Tabantha Moose, and some Great-Horned Rhinoceroses that can be found roaming the area.
At the south end of the mantle, there is a small hill and, on top of it, there are some sparkling leaves moving around. Catch the leaves to find a Korok Seed.
Treasure Chests
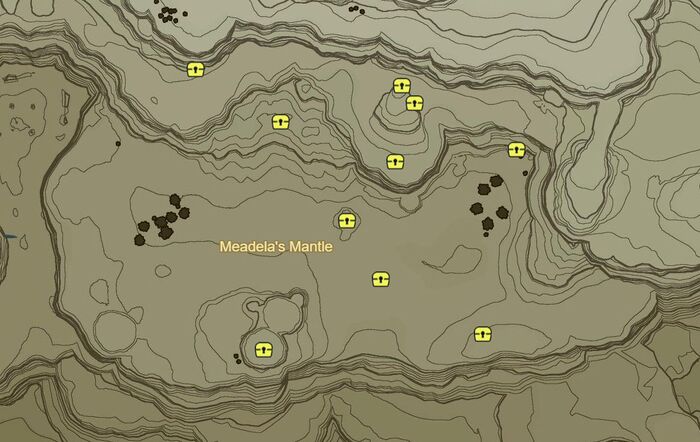
Map of the region with just Treasure Chests highlighted.

There are a bunch of treasure chests found throughout the Meadela's Mantle with a variety of goodies. Below is a listing of all treasure chests, roughly in geographic order from west to east.
- Golden Bow - On top of the small plateau, at the south end of the mantle.
- Topaz - On the higher elevation to the north, melt the ice block that is against the cliff to find a chest.
- Purple Rupee - Buried in the snow on the slope at the north part of the area.
- Ice Arrows ×5 - Melt the ice block on top of the hill to the north, near the Ice Wizzrobe.
- Sapphire - Melt the ice block just east of the tall hill with the Ice Wizzrobe.
- Ruby - Buried in the snow, just south of the tall hill to the north.
- Silver Rupee - Buried in the snow on a small plateau in the center of the mantle.
- Amber - In the snow at the east side of the Mantle, near some Honeyvore Bears.
- Golden Bow - In the snow at the southeast end of the mantle.
- Arrows ×5 - On the ledge at the northeast end of the mantle.
Animals


Enemies


Materials


Nearby Korok Seeds

The seed platform for this race starts west-southwest of this position, halfway up the cliff. Race to the ring for the seed.

All Yiga offerings want Mighty Bananas. You can pick them back up after getting the seed.

All Yiga offerings want Mighty Bananas. You can pick them back up after getting the seed.

Solve the block puzzle using the block to the west.

Catch the fairy lights.