Secret Passage: Difference between revisions
m (Text replacement - "<br>" to "<br/>") |
No edit summary |
||
| (6 intermediate revisions by 4 users not shown) | |||
| Line 1: | Line 1: | ||
{{Infobox|dungeon | {{Infobox|dungeon | ||
| image | | image = [[File:Link-Zelda-Sewers-SNES.png|300px]] | ||
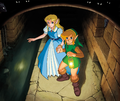
| caption | | caption = Artwork from ''[[The Legend of Zelda: A Link to the Past|A Link to the Past]]'' | ||
| game | | game = ''[[The Legend of Zelda: A Link to the Past|A Link to the Past]]'' ([[The Legend of Zelda: A Link to the Past (GBA)|GBA]])<br/>''[[The Legend of Zelda: A Link Between Worlds|A Link Between Worlds]]'' | ||
| item | | location = | ||
| walkthrough = '''A Link to the Past'''<br/>[ | | quest = | ||
'''A Link Between Worlds'''<br/>[ | | boss = | ||
| miniboss = | |||
| enemies = | |||
| inhab = | |||
| item = '''''A Link Between Worlds'''''<br/>[[Lamp]] | |||
| reward = | |||
| walkthrough = '''''A Link to the Past'''''<br/>[https://www.zeldadungeon.net/a-link-to-the-past-walkthrough/zeldas-rescue/ Text Walkthrough]<br/>'''''A Link Between Worlds'''''<br/>[https://www.zeldadungeon.net/a-link-between-worlds-walkthrough/eastern-palace/ Text Walkthrough] | |||
| related = | |||
}} | }} | ||
The '''Secret Passage''' is an underground passageway | The '''Secret Passage''' is an underground passageway in ''[[The Legend of Zelda: A Link to the Past|A Link to the Past]]'' and ''[[The Legend of Zelda: A Link Between Worlds|A Link Between Worlds]]''. | ||
== | ==''A Link to the Past''== | ||
After Link defeats the [[Ball and Chain Soldier]] and rescues [[Zelda|Princess Zelda]], the two head to the [[Throne Room]]. Link and Zelda together can push the [[Ornamental Shelf]] behind the throne out of the way, revealing the entrance to the Secret Passage. The two will travel through a series of rooms that are unlit, but Link can use his [[Lamp]] to light up a series of torches. | |||
After Link defeats the [[Ball and Chain | |||
Link will eventually reach a set of sewers where he will encounter a number of [[Rat]]s, [[Rope]]s, and [[Keese]]. Once Link and Zelda reach the lit area, they will find a pair of strange walls on the west side of the screen. This secret room cannot be accessed as Link does not have any [[Bomb]]s during the initial run through the Secret Passage. Link can return to the Secret Passage late in the game by falling down a secret grave within the [[Hyrulian Cemetery]]. | Link will eventually reach a set of sewers where he will encounter a number of [[Rat]]s, [[Rope]]s, and [[Keese]]. Once Link and Zelda reach the lit area, they will find a pair of strange walls on the west side of the screen. This secret room cannot be accessed as Link does not have any [[Bomb]]s during the initial run through the Secret Passage. Link can return to the Secret Passage late in the game by falling down a secret grave within the [[Hyrulian Cemetery]]. | ||
| Line 18: | Line 24: | ||
At the end of the Secret Passage, Link will pull a lever on the right side of the room, opening the door that leads to the Sanctuary. It is here that Link and Zelda will meet up with the [[Loyal Sage]]. Link can open the [[Treasure Chest]] found within the Sanctuary to collect a [[Heart Container]]. | At the end of the Secret Passage, Link will pull a lever on the right side of the room, opening the door that leads to the Sanctuary. It is here that Link and Zelda will meet up with the [[Loyal Sage]]. Link can open the [[Treasure Chest]] found within the Sanctuary to collect a [[Heart Container]]. | ||
== | ==''A Link Between Worlds''== | ||
{{Stub|section}} | |||
==Enemies Encountered== | ==Enemies Encountered== | ||
| Line 29: | Line 36: | ||
==Gallery== | ==Gallery== | ||
<gallery> | <gallery> | ||
File: | File:Link-Zelda-Sewers-GBA.png|Remake of the official artwork, commissioned for the [[The Legend of Zelda: A Link to the Past (GBA)|''A Link to the Past'' GBA port]] | ||
File:Secret-Passage-Comic.png|Secret Passage from the [[The Legend of Zelda: A Link to the Past (Comic)|A Link to the Past | File:Secret-Passage-Comic.png|Secret Passage from the [[The Legend of Zelda: A Link to the Past (Comic)|''A Link to the Past'' comic]] | ||
File:Secret-Passage-Room.png|Room within the Secret Passage | File:Secret-Passage-Room.png|Room within the Secret Passage | ||
</gallery> | </gallery> | ||
{{ | {{Listbox|A Link to the Past|Dungeons}} | ||
{{Cat|A Link to the Past Dungeons}} | {{Cat|A Link to the Past Dungeons}} | ||
{{Cat|A Link to the Past Locations}} | {{Cat|A Link to the Past Locations}} | ||
{{Cat|A Link Between Worlds Locations}} | {{Cat|A Link Between Worlds Locations}} | ||
Latest revision as of 00:22, April 15, 2023

Games | ||
Items | A Link Between Worlds | |
| Guides | ||
|---|---|---|
Walkthrough | A Link to the Past | |
The Secret Passage is an underground passageway in A Link to the Past and A Link Between Worlds.
A Link to the Past
After Link defeats the Ball and Chain Soldier and rescues Princess Zelda, the two head to the Throne Room. Link and Zelda together can push the Ornamental Shelf behind the throne out of the way, revealing the entrance to the Secret Passage. The two will travel through a series of rooms that are unlit, but Link can use his Lamp to light up a series of torches.
Link will eventually reach a set of sewers where he will encounter a number of Rats, Ropes, and Keese. Once Link and Zelda reach the lit area, they will find a pair of strange walls on the west side of the screen. This secret room cannot be accessed as Link does not have any Bombs during the initial run through the Secret Passage. Link can return to the Secret Passage late in the game by falling down a secret grave within the Hyrulian Cemetery.
At the end of the Secret Passage, Link will pull a lever on the right side of the room, opening the door that leads to the Sanctuary. It is here that Link and Zelda will meet up with the Loyal Sage. Link can open the Treasure Chest found within the Sanctuary to collect a Heart Container.
A Link Between Worlds
| This section is a stub. You can help the Zelda Dungeon Wiki by expanding it. |
Enemies Encountered
Gallery
Remake of the official artwork, commissioned for the A Link to the Past GBA port
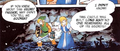
Secret Passage from the A Link to the Past comic
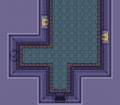
Room within the Secret Passage


